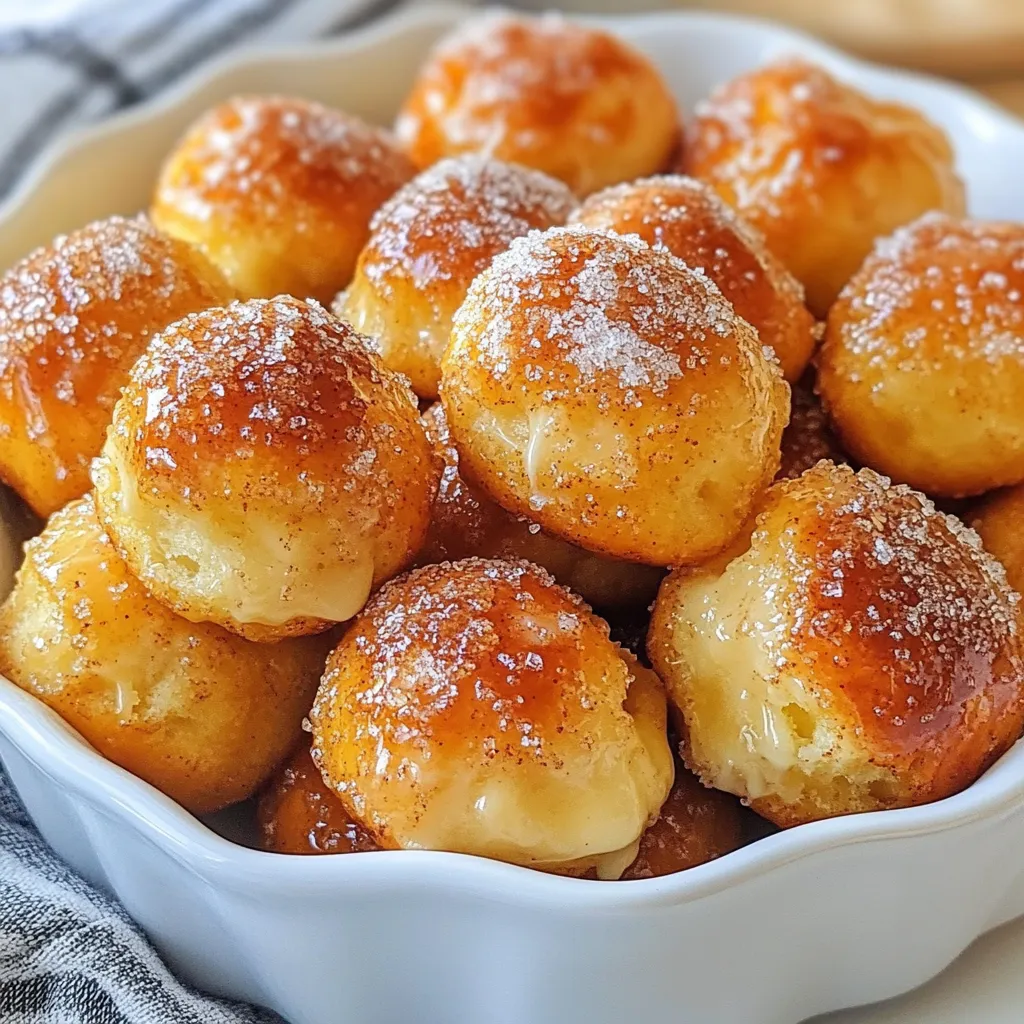
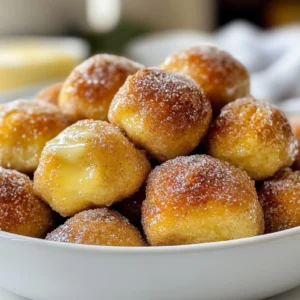
Cinnamon Sugar Pretzel Bites Tasty Snack Delight
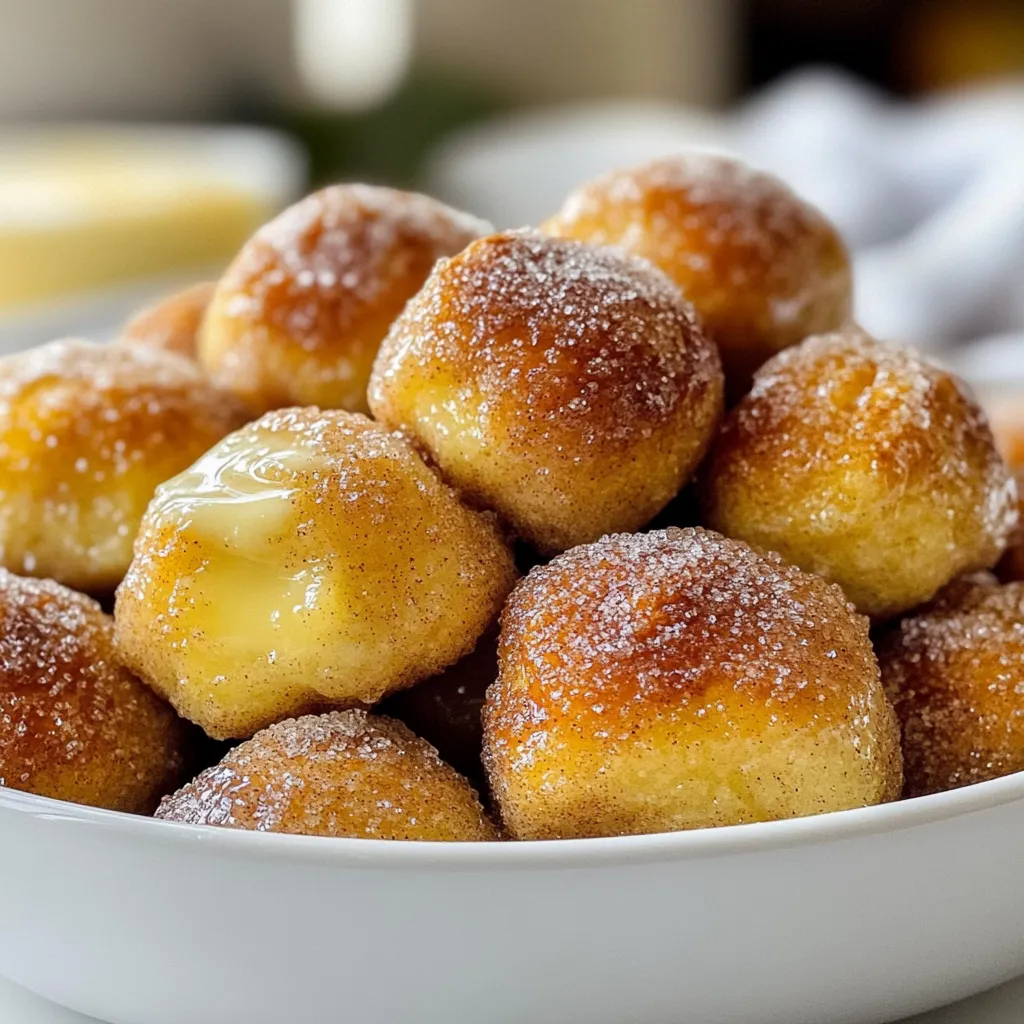

Craving a snack that’s warm, sweet, and oh-so-satisfying? You’re in for a treat with my Cinnamon Sugar Pretzel Bites! These fluffy bites are easy to make and perfect for sharing, or even for a cozy night in. With just a few simple ingredients and steps, you’ll have a delicious snack ready in no time. Let’s dive into the fun of making these tasty treasures!
Why I Love This Recipe
- Deliciously Sweet and Savory: The perfect balance of cinnamon and sugar creates a delightful flavor profile that makes these pretzel bites irresistible.
- Fun to Make: Shaping and boiling the pretzel bites is an enjoyable process, making it a great activity for family or friends to do together.
- Perfect for Any Occasion: These pretzel bites are versatile and can be served at parties, game nights, or just as a tasty snack at home.
- Customizable Dipping Options: You can enhance the experience with various dipping sauces like cream cheese frosting, caramel, or chocolate for added fun!
Ingredients
Necessary Ingredients
- 1 ½ cups warm water (110°F to 115°F)
- 2 tablespoons granulated sugar
- 2 teaspoons active dry yeast
- 4 cups all-purpose flour
- 1 teaspoon salt
- ½ cup baking soda
- 1 large egg, beaten (for egg wash)
- ½ cup unsalted butter, melted
- ½ cup granulated sugar (for coating)
- 2 teaspoons ground cinnamon
To make delicious cinnamon sugar pretzel bites, you need a few key ingredients. First, you need warm water. This helps activate the yeast. You also need granulated sugar. This adds sweetness to the dough and helps the yeast grow.
Next, you will use active dry yeast. This is the magic that makes the dough rise. All-purpose flour is essential for the dough’s structure. Make sure to use salt as it enhances flavor.
Baking soda is important too. It gives pretzels that classic flavor and color. You will need a large egg for the egg wash. This gives the pretzel bites a shiny finish. Unsalted butter adds richness to the bites and makes them even tastier.
Lastly, mix together cinnamon and sugar for coating. This is what makes these pretzel bites sweet and irresistible. With these ingredients, you are ready to create a fun and tasty snack!

Step-by-Step Instructions
Preparing the Dough
1. First, grab a large bowl. Mix warm water, sugar, and yeast together. Let this sit for about 5 minutes. You want it to get frothy. This shows the yeast is active.
2. Next, add flour and salt to the yeast mix. Stir until a dough forms.
3. Now, knead the dough on a floured surface. Do this for about 5 to 7 minutes. You want a smooth and elastic dough.
Rising the Dough
1. Place the dough in a greased bowl. This keeps it from sticking.
2. Cover the bowl with a clean kitchen towel. Let it rise in a warm place. This should take about 1 hour. You’ll know it’s ready when it has doubled in size.
Shaping the Pretzel Bites
1. While the dough is rising, prep for boiling. In a large pot, bring 10 cups of water to a boil. Carefully add the baking soda. It will bubble up, so be cautious.
2. Once the dough has risen, punch it down. Divide it into 8 equal pieces. Roll each piece into a long rope, about 10 inches long. Cut them into 1-inch pieces for pretzel bites.
3. Drop the pretzel bites into the boiling soda water in batches. Let them boil for about 30 seconds. Use a slotted spoon to remove them and place them on parchment-lined baking sheets.
Baking Instructions
1. Preheat your oven to 425°F (220°C). Line two baking sheets with parchment paper.
2. Brush the pretzel bites with the beaten egg. This gives them a lovely golden color when baked.
3. In a small bowl, mix sugar and cinnamon. Sprinkle this mixture generously over the pretzel bites.
4. Bake in the oven for 12 to 15 minutes. They should turn golden brown.
5. Once done, take them out. Brush the tops with melted butter while they are still warm. Sprinkle with extra cinnamon sugar if you like.
Tips & Tricks
Perfecting the Dough
To know when the dough has risen, look for a puffed-up shape. It should double in size and feel light. If it stays flat, give it more time.
For kneading, use a floured surface. Push the dough with your palms and fold it over. Repeat this for 5-7 minutes. The dough should feel smooth and elastic when ready. This will help make your pretzel bites soft and chewy.
Achieving a Golden Brown Color
Using an egg wash gives the pretzel bites that shiny look. After boiling, brush the beaten egg on top. This step is key for that golden brown color.
For texture, try baking on a stone instead of a pan. A stone keeps heat well. This can help your bites get crispy on the outside while staying soft inside.
Serving Suggestions
For dipping, cream cheese frosting pairs really well. You can also try caramel or chocolate sauce. These sauces add a fun twist to your snack.
To present, serve the warm pretzel bites in a basket. Line it with a napkin for a nice touch. This makes your snack look inviting and tasty.
Pro Tips
- Perfect Temperature: Ensure your water is at the right temperature (110°F to 115°F) to activate the yeast effectively.
- Kneading Technique: Knead the dough until it’s smooth and elastic; this helps develop the gluten for a better texture.
- Boiling Solution: When adding baking soda to boiling water, do it slowly to prevent overflow and ensure even cooking.
- Extra Cinnamon Sugar: Don’t be shy with the cinnamon sugar topping; add more after brushing with butter for an extra sweet finish.
Variations
Flavor Variations
You can get creative with your cinnamon sugar pretzel bites. Try adding seasonal spices like nutmeg or pumpkin spice for fall. For a holiday twist, mix in some ginger or cloves. You can also change the coating. Instead of just cinnamon sugar, try using cocoa powder or crushed nuts. A sprinkle of sea salt can also add a nice contrast to the sweetness.
Dietary Adjustments
If you need a gluten-free option, use gluten-free all-purpose flour. Many brands offer blends that work great in dough. To make these bites healthier, reduce the sugar in the coating. You can even try using a sugar substitute. This way, you still enjoy the flavor without all the extra calories.
Mini vs. Regular Sizes
Making mini pretzel bites is fun and cute! Just cut the dough into smaller pieces. When baking, do reduce the time to about 8-10 minutes. Keep an eye on them to avoid burning. For serving, mini bites are perfect for parties. You can arrange them on a platter with various dips. Regular-sized bites make a great snack for movie nights or family gatherings.
Storage Info
How to Store Pretzel Bites
To keep your pretzel bites fresh, use an airtight container. This keeps moisture out and helps them last longer. You can also wrap them in plastic wrap before placing them in the container. If you prefer, store them in a zip-top bag.
You can leave pretzel bites at room temperature for up to two days. If you want to keep them longer, store them in the fridge. Just remember, cold air can dry them out, so wrap them well.
Freezing Instructions
To freeze your pretzel bites, let them cool completely first. Then, place them in a single layer on a baking sheet. Freeze them for about an hour. After they are frozen, transfer them to a zip-top bag. Remove as much air as possible before sealing.
When you’re ready to eat them, take out the desired amount. You can reheat them directly from the freezer. Preheat your oven to 350°F (175°C). Bake them for about 10-12 minutes. They will come out warm and tasty. Enjoy!
FAQs
Can I use active dry yeast instead of instant yeast?
Yes, you can use active dry yeast in place of instant yeast. The process is very similar. Just remember, you need to activate active dry yeast first. Mix it with warm water and sugar. Let it sit for about 5 minutes until it gets frothy. Then, mix it into your dough. This step is key for the best rise in your pretzel bites.
How do I know when the pretzel bites are done baking?
You will know the pretzel bites are done when they turn golden brown. They should have a nice, shiny look from the egg wash. The total baking time is around 12 to 15 minutes. Keep an eye on them during the last few minutes to get that perfect color.
Can I make the dough ahead of time?
Yes, you can make the dough ahead of time! After kneading, cover it and place it in the fridge. It can last for up to 24 hours. When you are ready to bake, let it sit at room temperature for about 30 minutes. This helps the dough rise better.
What can I serve with cinnamon sugar pretzel bites?
Cinnamon sugar pretzel bites taste great on their own, but you can add dips for fun! Consider serving with cream cheese frosting or chocolate sauce. Caramel sauce also pairs well for a sweet treat. You can even add some fresh fruit to your snack spread for color and flavor!
You now have a complete guide to making tasty pretzel bites. From the right ingredients to step-by-step instructions, you can whip up a batch at home. Remember to knead well and let your dough rise for that perfect texture. Experiment with flavors and storage tips to enhance your pretzel experience. Enjoy these bites fresh or share them with friends and family. Get creative with dips and serve them at your next gathering. Now, it’s time to enjoy your delicious homemade pretzel bite
Cinnamon Sugar Pretzel Bites
Ingredients
- 1.5 cups warm water (110°F to 115°F)
- 2 tablespoons granulated sugar
- 2 teaspoons active dry yeast
- 4 cups all-purpose flour
- 1 teaspoon salt
- 0.5 cups baking soda
- 1 large egg, beaten (for egg wash)
- 0.5 cups unsalted butter, melted
- 0.5 cups granulated sugar (for coating)
- 2 teaspoons ground cinnamon
Instructions
- In a large mixing bowl, combine the warm water, sugar, and yeast. Let it sit for about 5 minutes until it becomes frothy.
- Gradually add the flour and salt to the yeast mixture, stirring until a dough forms. Knead the dough on a floured surface for about 5-7 minutes until smooth and elastic.
- Place the dough in a greased bowl, cover with a clean kitchen towel, and let it rise in a warm place for about 1 hour or until it has doubled in size.
- Preheat your oven to 425°F (220°C) and line two baking sheets with parchment paper.
- In a large pot, bring 10 cups of water to a boil and carefully add the baking soda (it will bubble up).
- Punch down the risen dough and divide it into 8 equal pieces. Roll each piece into a long rope (about 10 inches long) and cut them into 1-inch pieces for pretzel bites.
- Drop the pretzel bites into the boiling baking soda water in batches for about 30 seconds, then remove them with a slotted spoon and place them on the parchment-lined baking sheets.
- Brush the pretzel bites with the beaten egg to give them a nice golden brown color when baked.
- In a small bowl, mix together the sugar and cinnamon. Sprinkle the mixture generously over the pretzel bites.
- Bake in the preheated oven for 12-15 minutes or until golden brown.
- Remove from the oven and brush the tops with melted butter while still warm, then sprinkle with extra cinnamon sugar as desired.
![- 2 cups heavy whipping cream - 1 cup powdered sugar - 1 teaspoon vanilla extract - 1 cup strong brewed coffee, cooled - 1 tablespoon cocoa powder - 1 package (14.3 oz) Oreo cookies - 1/2 cup crushed espresso beans (optional, for garnish) - Shaved chocolate or chocolate curls (for garnish) Choosing the right coffee Select a coffee you enjoy drinking. A bold, rich coffee enhances the flavor of the cake. I recommend a dark roast for a deep, satisfying taste. Alternative sweeteners or creams You can use coconut cream or almond milk for a lighter version. If you want less sugar, consider using honey or maple syrup. Adjust the amount based on your taste. Substitutions for Oreo cookies If you can’t find Oreos, use chocolate wafer cookies. They provide a similar texture and flavor. You can also try gluten-free cookies if needed. For the full recipe, see the details above. First, gather your ingredients. You will need heavy cream, powdered sugar, and Oreo cookies. Brew strong coffee and let it cool. These steps set the stage for a great icebox cake. The chilling time is key. It helps the flavors blend and firm up the cake. I recommend letting it chill for at least four hours. Overnight is even better! Now, let’s layer the cake. Start by dipping each Oreo in the coffee mixture. Don’t soak them too long. You want them soft but not soggy. Place a layer of dipped Oreos in your baking dish. Next, spread a layer of whipped cream over the cookies. Make sure to smooth it out evenly. Repeat this process. Alternate between Oreos and whipped cream until you finish with cream on top. Once you complete layering, it’s time for the final touches. I love to sprinkle crushed espresso beans and chocolate curls on top for a fancy look. For serving, slice the cake into squares. Chilled plates add a nice touch. You can also add a dollop of whipped cream on the side. A sprinkle of cocoa powder gives an extra flair. Enjoy your Mocha Oreo Icebox Cake! For the full recipe, check out the details above. - Over-whipping cream: When you whip the cream, stop as soon as stiff peaks form. Over-whipping can turn your cream into butter. - Dipping Oreos too long: Dip each Oreo quickly. If you soak them too long, they will fall apart and get mushy. - How long to chill: Chill the cake for at least four hours. Overnight is best for rich flavors. - Timing for flavor melding: Allow the cake to sit in the fridge. This helps the coffee and cream flavors blend perfectly. - Best mixing tools: Use an electric mixer to whip the cream. It makes the process quick and easy. - Recommended baking dish: A 9x13 inch baking dish works great. It holds all the layers and fits in most fridges. For a detailed look at the ingredients and steps, check out the Full Recipe. {{image_2}} You can change the coffee type to fit your taste. Try espresso for a strong kick. Or, use flavored coffee like hazelnut or vanilla to add a unique twist. You can also mix in spices like cinnamon or a splash of coffee liqueur for more depth. Adding flavors to whipped cream can enhance the cake even more. Mix in a touch of almond extract or a bit of melted chocolate. You could also fold in some cocoa powder for a richer taste. Each flavor adds its own charm to this treat. For a gluten-free version, swap out regular Oreos for gluten-free cookies. Many brands offer delicious options that taste just as good. You can also use gluten-free chocolate wafers as an alternative. If you want a lower-calorie cake, use reduced-fat cream or a sugar substitute. Greek yogurt can also replace some of the cream for a lighter feel. Adjust the sweetness to your liking while keeping the taste intact. You can make holiday-themed twists by adding peppermint extract in December. Top the cake with crushed candy canes for a festive look. In the summer, use fresh fruits like strawberries or raspberries. Layer them between the Oreos for a bright, fruity taste. Each season brings a new chance to play with flavors. For the [Full Recipe], check out the detailed instructions and ingredients. To keep your Mocha Oreo Icebox Cake fresh, cover it tightly. Use plastic wrap or aluminum foil. This prevents air from getting in and keeps the flavors intact. I recommend a glass or plastic container with a lid. This way, it stays safe and tastes great. Yes, you can freeze the cake! This is a great option if you want to save some for later. Wrap the cake tightly in plastic wrap and then in foil. This helps prevent freezer burn. To defrost, move the cake to the fridge. Let it sit overnight. This keeps it moist and tasty. Your icebox cake will last about 3 to 5 days in the fridge. Look for signs of spoilage, like off smells or mold. If the cake looks dry or the cookies are too soft, it’s time to toss it. Enjoy your delicious treat while it’s fresh! For the [Full Recipe](#), check back to make this amazing dessert! An icebox cake is a no-bake dessert that layers cookies and whipped cream. It is simple to make and perfect for warm days. The history of icebox cakes dates back to the 1920s. People used iceboxes to chill desserts before modern fridges were common. This cake allows flavors to meld as it chills, creating a rich taste. Yes, you can use other cookies! Try chocolate chip cookies for a twist. Graham crackers also work well and give a nice crunch. Vanilla wafers add a sweet touch too. Feel free to experiment with different flavors and textures to find your favorite. You will know the cake is ready when the whipped cream is set and holds its shape. It should feel firm to the touch. After chilling for at least four hours, the cookies will soften, but they should not fall apart. The layers should look smooth and cohesive. Absolutely! This cake is perfect for making in advance. You can prepare it a day before you plan to serve. Just cover it well with plastic wrap before chilling. This way, the flavors deepen and the cake tastes even better. In this blog post, we explored the key ingredients for a delicious icebox cake. We covered tips on choosing the right coffee and alternatives for Oreos. You learned step-by-step instructions for preparation, layering, and adding final touches. We also shared common mistakes and timing for best results. Now, with these details in mind, you can create your own perfect icebox cake. Don't be afraid to experiment with flavors and variations. Enjoy the process and delight in sharing your creation!](https://dailydishlab.com/wp-content/uploads/2025/07/0dda9964-7972-494e-946c-2eb6009d36dd-768x768.webp)