Savory Sweet and Sour Chicken Meatballs Recipe
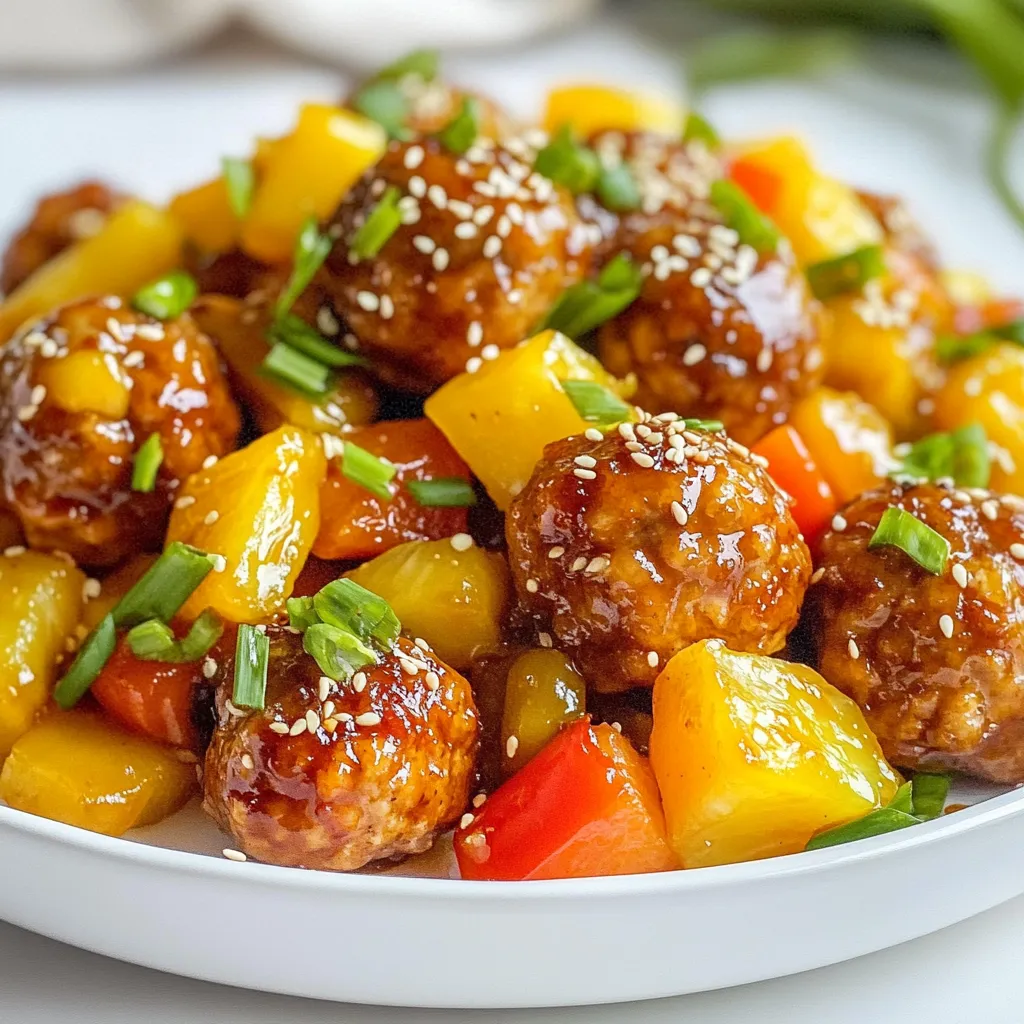

Are you ready to enjoy a tasty twist on a classic dish? My Savory Sweet and Sour Chicken Meatballs recipe is an easy and fun way to please everyone at the dinner table. With juicy meatballs coated in a tangy sauce, you’ll find a perfect balance of flavors. Plus, I’ll share tips, variations, and storage tricks to make meal prep a breeze. Let’s dive into this delicious recipe!
Why I Love This Recipe
- Flavorful Combination: The mix of sweet pineapple and tangy sauce creates a delightful balance that pleases the palate.
- Easy to Prepare: With simple ingredients and straightforward steps, this recipe is perfect for busy weeknights.
- Healthy Option: Ground chicken keeps the meatballs lean, while the use of sugar-free ketchup reduces calories without sacrificing taste.
- Versatile Dish: These meatballs can be served as an appetizer, main dish, or even in a wrap, making them a great addition to any meal.
Ingredients
List of Ingredients for Sweet and Sour Chicken Meatballs
To make sweet and sour chicken meatballs, gather these ingredients:
- 1 lb ground chicken
- 1/4 cup breadcrumbs
- 1/4 cup grated Parmesan cheese
- 2 green onions, chopped
- 1 clove garlic, minced
- 1 tablespoon fresh ginger, grated
- 1 egg, lightly beaten
- Salt and pepper to taste
- 1 cup pineapple chunks (fresh or canned)
- 1 bell pepper, diced (red or yellow)
- 1/2 cup sugar-free ketchup
- 1/3 cup apple cider vinegar
- 2 tablespoons soy sauce (or tamari for gluten-free)
- 1 tablespoon cornstarch mixed with 2 tablespoons water (for thickening)
- Sesame seeds for garnish
Optional Ingredients for Customization
You can add or swap these ingredients to make the dish your own:
- Chopped cilantro for freshness
- Sliced jalapeños for heat
- Different bell pepper colors for visual appeal
- Honey or maple syrup for added sweetness
Nutritional Facts Overview
This dish offers a balanced mix of protein and veggies. Each serving has around:
- Calories: 320
- Protein: 25g
- Carbohydrates: 30g
- Fat: 10g
- Fiber: 2g
These numbers can vary based on any optional ingredients you choose. Sweet and sour chicken meatballs are a tasty way to enjoy a meal that feels indulgent but remains nutritious.

Step-by-Step Instructions
Preparation Steps for Meatballs
To start, gather your ingredients. You need:
- 1 lb ground chicken
- 1/4 cup breadcrumbs
- 1/4 cup grated Parmesan cheese
- 2 green onions, chopped
- 1 clove garlic, minced
- 1 tablespoon fresh ginger, grated
- 1 egg, lightly beaten
- Salt and pepper to taste
In a large bowl, mix the ground chicken, breadcrumbs, Parmesan, green onions, minced garlic, and ginger. Add the beaten egg, salt, and pepper. Use your hands to blend everything. Make sure it’s well mixed.
Next, form the mixture into small meatballs, about one inch in size. Place them on a lined baking sheet. Make sure they have space between them.
Baking the Chicken Meatballs
Preheat your oven to 400°F (200°C). Once the oven is ready, put the meatballs in. Bake for about 20 minutes. You want them to be cooked through and lightly golden on the outside. Keep an eye on them to avoid burning.
Making the Sweet and Sour Sauce
While the meatballs bake, let’s make the sauce. Gather these ingredients:
- 1/2 cup sugar-free ketchup
- 1/3 cup apple cider vinegar
- 2 tablespoons soy sauce
- 1 cup pineapple chunks
In a medium saucepan, mix the ketchup, apple cider vinegar, soy sauce, and pineapple chunks. Heat this over medium. Stir it until it simmers gently.
Add in diced bell pepper, which you can pick in red or yellow. Let this cook for about 5 minutes. You want the peppers to soften a bit.
Then, mix 1 tablespoon of cornstarch with 2 tablespoons of water. Add this to the sauce while stirring. This will thicken the sauce nicely. After it thickens, turn off the heat.
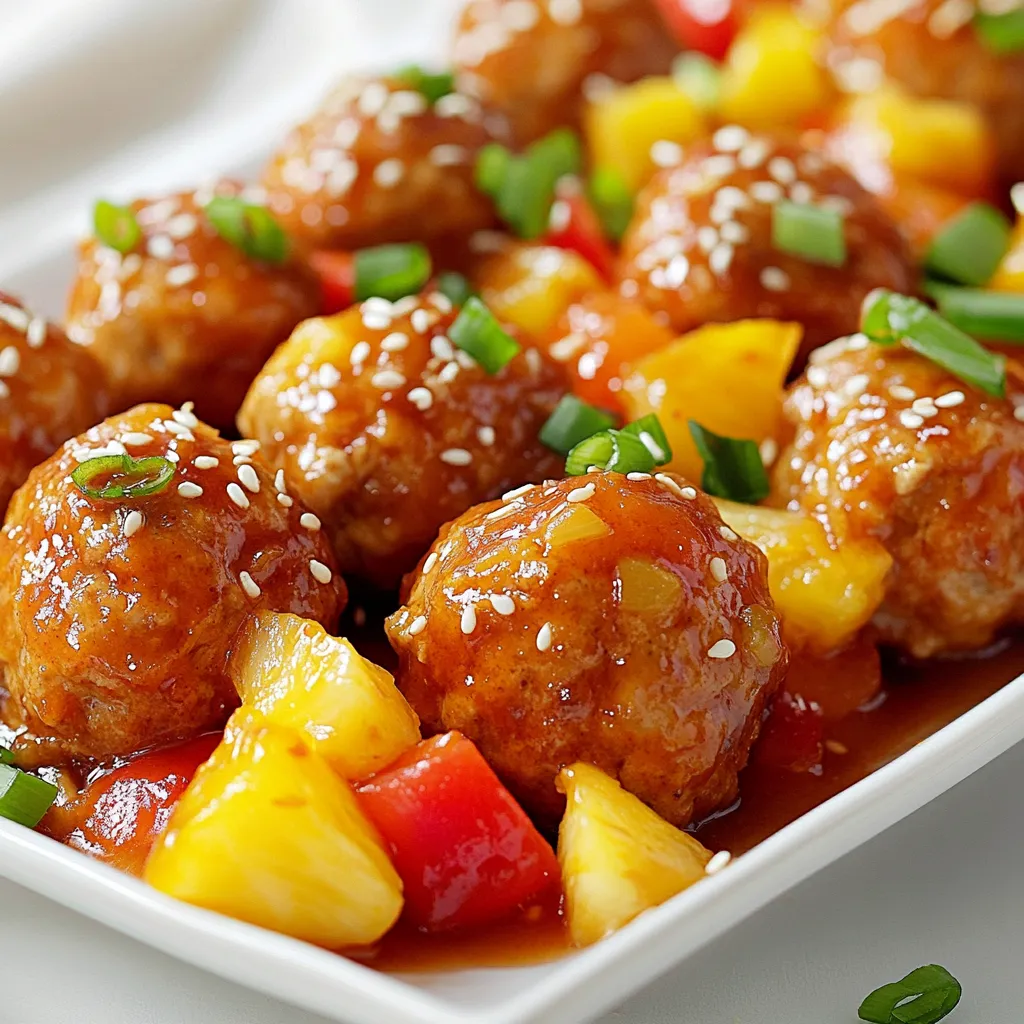
Once the meatballs are done, add them to your sauce. Gently toss to coat each meatball well. You can serve them warm and sprinkle sesame seeds and extra green onions on top for a nice touch.
Tips & Tricks
Common Mistakes to Avoid
When making sweet and sour chicken meatballs, avoid these common mistakes:
- Overmixing the meatball mixture: Mix just enough to combine. Overmixing can make them tough.
- Skipping the egg: The egg helps bind the meatballs. Without it, they may fall apart.
- Not seasoning well: Use salt and pepper generously. Proper seasoning brings out the flavors.
Tips for Perfectly Cooked Meatballs
To ensure your meatballs turn out great, follow these tips:
- Uniform size: Make meatballs about one inch wide. This helps them cook evenly.
- Use parchment paper: Line your baking sheet with parchment. It prevents sticking and makes cleanup easy.
- Check for doneness: Use a meat thermometer. The internal temperature should reach 165°F (74°C).
How to Enhance Flavor Profiles
To make your sweet and sour chicken meatballs even tastier, consider these flavor tips:
- Add herbs: Fresh herbs like cilantro or basil can add freshness. Sprinkle them on before serving.
- Spice it up: Add crushed red pepper for heat. Adjust the amount based on your taste.
- Experiment with sauces: Try teriyaki or barbecue sauce for a different twist. Each sauce brings unique flavors.
With these tips and tricks, you’re set to make delicious sweet and sour chicken meatballs!
Pro Tips
- Use Fresh Ingredients: Fresh ground chicken and seasonal vegetables will enhance the flavor of your meatballs and sauce, making the dish more vibrant.
- Adjust Sauce Sweetness: If you prefer a sweeter sauce, you can add a bit more sugar-free ketchup or a touch of honey for extra sweetness while keeping it healthy.
- Perfect Meatball Size: Aim for uniform meatball sizes (about 1 inch in diameter) to ensure even cooking and consistent texture throughout.
- Garnish for Flair: Don’t skip the sesame seeds and extra green onions for garnish; they add a beautiful finish and extra flavor to your dish.
Variations
Low-Carb or Keto-Friendly Adjustments
You can easily make sweet and sour chicken meatballs low-carb. Start by using crushed pork rinds instead of breadcrumbs. This swaps carbs for protein and fat. You can also use almond flour as another option. For the sauce, choose a sugar-free ketchup to cut down on sugar. This way, you enjoy the same great taste without the extra carbs.
Vegetarian or Vegan Alternatives
To create a vegetarian version, replace the ground chicken with a mix of mushrooms and lentils. This gives you a hearty texture. Use flaxseed meal mixed with water as an egg substitute. For a vegan option, swap out the cheese for nutritional yeast. This adds a cheesy flavor without animal products. You can still enjoy that sweet and sour taste with these plant-based options.
Different Sauces or Flavor Profiles
You can change the sauce to fit your taste. Try adding sriracha for a spicy kick. If you love garlic, increase the minced garlic in the sauce. You can also try teriyaki sauce for a different flavor. Each variation keeps the core of sweet and sour but adds a twist. Get creative and explore what flavors you enjoy the most!
Storage Info
Best Practices for Storing Leftovers
Storing your sweet and sour chicken meatballs is easy. First, let them cool to room temperature. Then, place them in an airtight container. Make sure to separate the meatballs from the sauce. This will keep both fresh longer. You can store them in the fridge for up to three days. If you want to keep them longer, freezing is a great option.
Reheating Instructions
Reheating is simple. You can use the microwave or the stovetop. If you use the microwave, place the meatballs on a plate. Cover them with a damp paper towel. Heat for about one to two minutes. Check if they are warm enough. On the stovetop, add the meatballs and sauce to a pan. Heat on low until they are warm. Stir often to avoid burning.
Freezing Sweet and Sour Chicken Meatballs
To freeze your sweet and sour chicken meatballs, first, let them cool completely. Arrange the meatballs in a single layer on a baking sheet. Freeze them for about one hour. This helps them keep their shape. After that, transfer them to a freezer-safe bag. Make sure to remove excess air. Label the bag with the date. You can freeze them for up to three months. When you’re ready to eat, thaw them in the fridge overnight before reheating.
FAQs
Can I make Sweet and Sour Chicken Meatballs in advance?
Yes, you can make Sweet and Sour Chicken Meatballs ahead of time. Prepare the meatballs and sauce separately. Store them in airtight containers in the fridge. They will stay fresh for about three days. You can also freeze them. Just make sure to cool them first. When you’re ready, thaw them overnight in the fridge. Then, heat them up in a pot or microwave.
What can I serve with Sweet and Sour Chicken Meatballs?
Sweet and Sour Chicken Meatballs pair well with many sides. Here are some great options:
- Steamed rice for a classic touch.
- Cauliflower rice for a low-carb option.
- Stir-fried veggies for added color and nutrition.
- Noodles to soak up the sauce and add texture.
Feel free to get creative with your sides!
How do I know when the meatballs are cooked through?
To check if meatballs are done, use a meat thermometer. The inside should reach 165°F (74°C). If you don’t have a thermometer, cut one open. The center should be no longer pink. The meatballs should also be firm to the touch. If they meet these criteria, they are ready to enjoy!
We explored the key ingredients and steps to make sweet and sour chicken meatballs. You learned about customization options, cooking tips, and storage best practices. Remember, avoiding common mistakes can lead to perfect meatballs every time. You can get creative with variations like vegan options or keto-friendly swaps. With these insights, you can enjoy a delicious meal that suits your taste. Happy cookin

Sweet and Sour Chicken Meatballs
Ingredients
- 1 lb ground chicken
- 0.25 cup breadcrumbs
- 0.25 cup grated Parmesan cheese
- 2 pieces green onions, chopped
- 1 clove garlic, minced
- 1 tablespoon fresh ginger, grated
- 1 piece egg, lightly beaten
- to taste salt and pepper
- 1 cup pineapple chunks (fresh or canned)
- 1 piece bell pepper, diced (red or yellow)
- 0.5 cup sugar-free ketchup
- 0.33 cup apple cider vinegar
- 2 tablespoons soy sauce (or tamari for gluten-free)
- 1 tablespoon cornstarch mixed with 2 tablespoons water (for thickening)
- for garnish sesame seeds
Instructions
- Preheat your oven to 400°F (200°C). Line a baking sheet with parchment paper.
- In a large mixing bowl, combine ground chicken, breadcrumbs, Parmesan cheese, chopped green onions, minced garlic, grated ginger, beaten egg, salt, and pepper. Mix until everything is well incorporated.
- Form the mixture into small meatballs, about 1 inch in diameter, and place them on the prepared baking sheet.
- Bake the meatballs for about 20 minutes or until cooked through and slightly golden.
- While the meatballs are baking, prepare the sweet and sour sauce. In a medium saucepan, combine the ketchup, apple cider vinegar, soy sauce, and sugar-free pineapple juice (if using canned pineapple). Stir until mixed.
- Bring the sauce to a gentle simmer over medium heat, then add in the diced bell pepper and pineapple chunks. Let it cook for about 5 minutes until the peppers start to soften.
- Add the cornstarch mixture to the sauce, stirring continuously until it thickens. Remove from heat.
- Once the meatballs are done baking, add them to the sauce and gently toss to coat.
- Serve the sweet and sour chicken meatballs warm, garnished with sesame seeds and any remaining green onions.
![- 1 medium head of cauliflower, cut into florets - 2 tablespoons olive oil - 1 teaspoon smoked paprika - 1 teaspoon ground cumin - 1 teaspoon garlic powder - Salt and pepper to taste - 8 small corn tortillas - 1 cup red cabbage, thinly sliced - 1 avocado, sliced - 1/4 cup fresh cilantro, chopped - Lime wedges, for serving When making roasted cauliflower tacos, the key is to choose fresh, high-quality ingredients. Start with a firm head of cauliflower. Look for florets that are tight and free of brown spots. This ensures your cauliflower is fresh and flavorful. Next, olive oil plays a crucial role. It helps the cauliflower roast evenly and adds richness. You can use other oils, but olive oil enhances the taste best. Seasonings are where the magic happens. Smoked paprika gives a lovely depth. Ground cumin adds warmth, while garlic powder boosts flavor. Don't forget to season with salt and pepper. These basic seasonings are essential for bringing out the natural flavors of the cauliflower. Tortillas are the base of your tacos. Small corn tortillas add a nice texture. They are soft and hold the fillings well. Fresh toppings like red cabbage and avocado add crunch and creaminess. Finally, lime wedges are a must. They add a burst of zest that brightens up the whole dish. This recipe brings together all these ingredients to create a vibrant, delicious meal. For the full recipe, refer to the earlier section. First, you need to preheat your oven to 425°F (220°C). This heat makes the cauliflower crispy and tasty. Next, take a large bowl and toss the cauliflower florets with olive oil. Add smoked paprika, ground cumin, garlic powder, salt, and pepper. Mix it well until every piece gets coated. This step is key for flavor. Now, arrange the seasoned cauliflower on a baking sheet. Make sure the florets are in a single layer. This helps them roast evenly. Place the baking sheet in the preheated oven. Roast the cauliflower for about 25 to 30 minutes. You want them golden brown and tender. Remember to toss them halfway through. This helps them cook evenly. While the cauliflower roasts, take a dry skillet and warm the corn tortillas over medium heat. Heat each side for about 30 seconds. They should be soft and slightly charred. Now it’s time to build your tacos! Start with a corn tortilla and layer on a generous amount of roasted cauliflower. Then, add sliced red cabbage and avocado. Sprinkle fresh cilantro on top for that bright flavor. Don’t forget to serve your tacos with lime wedges. Squeeze some lime over the tacos for an extra zing. Enjoy every bite of your delicious roasted cauliflower tacos! You can find the [Full Recipe] for more details. Roasting cauliflower brings out its natural sweetness. I love it more than grilling. Roasting gives you a crispy outside and a tender inside. To achieve this, use high heat. Preheat your oven to 425°F (220°C). Spread the cauliflower in a single layer. This helps it roast evenly. Spices make a big difference. Try smoked paprika for a deep flavor. Ground cumin adds warmth, while garlic powder gives a nice touch. You can also add chili powder for heat. For balance, serve your tacos with fresh toppings. Red cabbage adds crunch, while avocado brings creaminess. Pair your tacos with simple sides. I recommend black beans or a fresh salad. These sides add fiber and nutrients. For toppings, you can get creative! Try pickled onions for tang, or a drizzle of spicy sauce for extra kick. Don't forget lime wedges for zest! They brighten every bite. {{image_2}} You can easily adjust this recipe to fit your needs. For a gluten-free option, use corn tortillas. They add a nice crunch and pair well with the roasted cauliflower. If you want a vegan meal, this recipe is already vegan! It uses no meat or dairy. You can also try low-carb options by using lettuce wraps instead of tortillas. This keeps the meal light and fresh. Feel free to swap out cauliflower for other veggies. Broccoli or Brussels sprouts work well too. Each veggie brings a unique taste. You can use sweet potatoes for a sweet twist. When it comes to tortillas, consider using whole wheat or spinach wraps. They add different flavors and colors to your tacos. Try giving your tacos an international flair! For an Asian twist, add soy sauce and sesame oil to the cauliflower before roasting. Top with pickled veggies and sriracha. For Mediterranean flavors, use herbs like oregano and serve with tzatziki sauce. You can also add seasonal produce. In summer, fresh corn and tomatoes shine. In fall, roasted squash adds warmth. These variations keep your tacos exciting and new. Check out the Full Recipe for more details! To keep your tacos fresh, store them in a sealed container. Place them in the fridge right away. They will stay good for about three days. If you want to keep the tacos crispy, store the cauliflower and tortillas separately. Wrap the tortillas in foil or plastic wrap to avoid drying out. When you want to eat the leftovers, reheat them gently. You can use a skillet on low heat. Just warm the cauliflower for a few minutes. This helps it stay tasty and not soggy. For an easy option, pop them in the microwave for about 30 seconds. If you have leftover cauliflower, add it to salads or grain bowls for extra flavor. You can freeze roasted cauliflower too! Just let it cool down before you pack it. Place it in a freezer bag and squeeze out the air. It can last up to three months in the freezer. For tortillas, stack them and wrap tightly before freezing. When you’re ready to use them, thaw the cauliflower in the fridge overnight. Warm the tortillas in a skillet before serving. For more details, check the Full Recipe. Yes, you can make these tacos ahead of time. They are great for breakfast, lunch, or quick meals. If you want to prepare in advance, roast the cauliflower and store it in the fridge. Warm it up when you are ready to eat. You can also prepare the toppings ahead. Just slice the avocado and cabbage, then keep them in separate containers. This way, you can enjoy fresh tacos anytime! Toppings can make your tacos shine. Here are some great ideas: - Sliced red cabbage adds crunch. - Avocado gives a creamy texture. - Fresh cilantro brings bright flavor. - Lime wedges add a zesty kick. - You can also use salsa or hot sauce for spice. Mix and match to find your favorites! You can use frozen cauliflower, but it needs some tips. Thaw the cauliflower first and drain any water. This keeps your tacos from getting soggy. You may need to roast them a bit longer to get them crispy. Check them halfway to see if they need more time. Frozen cauliflower can still taste great in your tacos! This blog post covers the delicious journey of making roasted cauliflower tacos. We explored the key ingredients, detailed step-by-step instructions, and shared tips for enhancing flavor. You learned how to store leftovers and adapt recipes to meet different dietary needs. Remember, you can enjoy these tacos in many creative ways. Try new toppings or flavors to keep things fresh. Delicious meals should always spark joy and inspire you to cook more. Dive into this tasty recipe and enjoy every bite!](https://dailydishlab.com/wp-content/uploads/2025/06/61582cbb-5ce3-472b-acca-9a15eb330d0c-768x768.webp)