
Balsamic Caprese Pasta Salad Fresh and Flavorful Dish
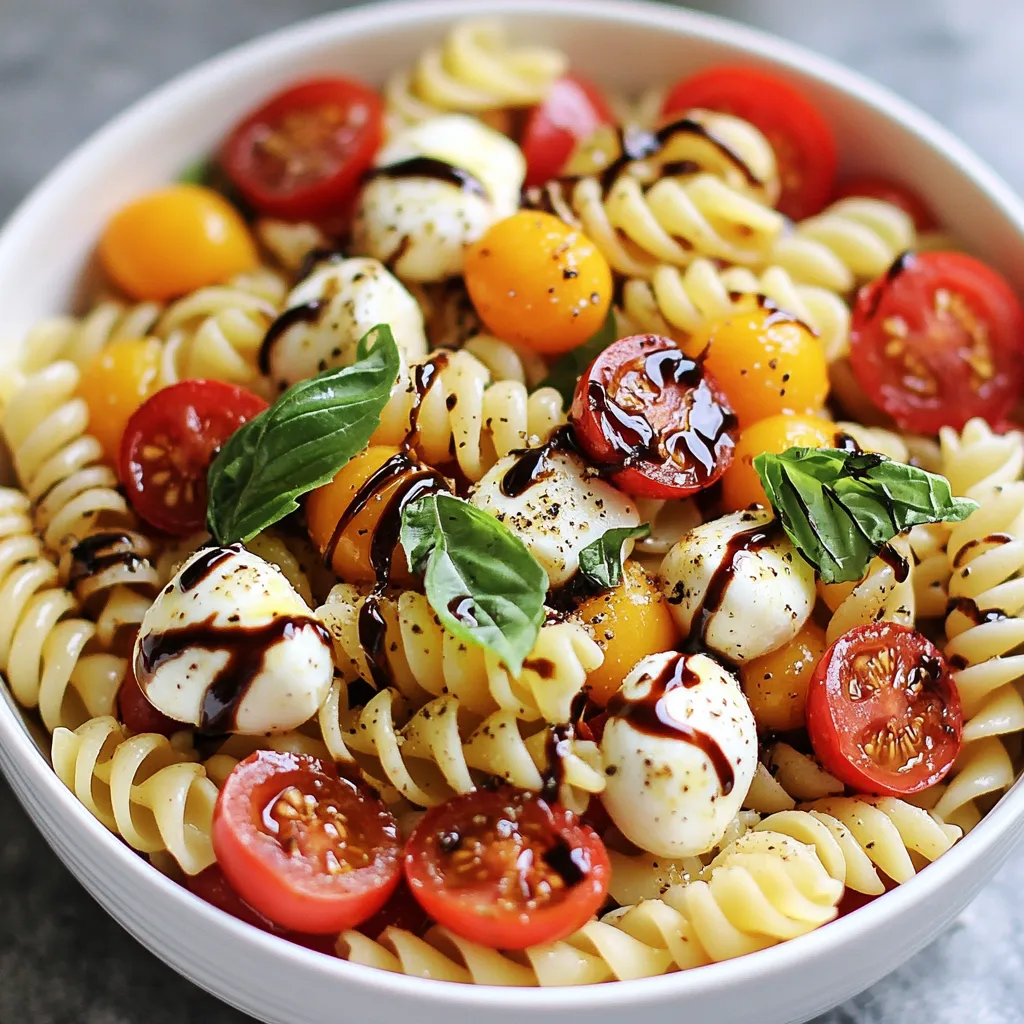
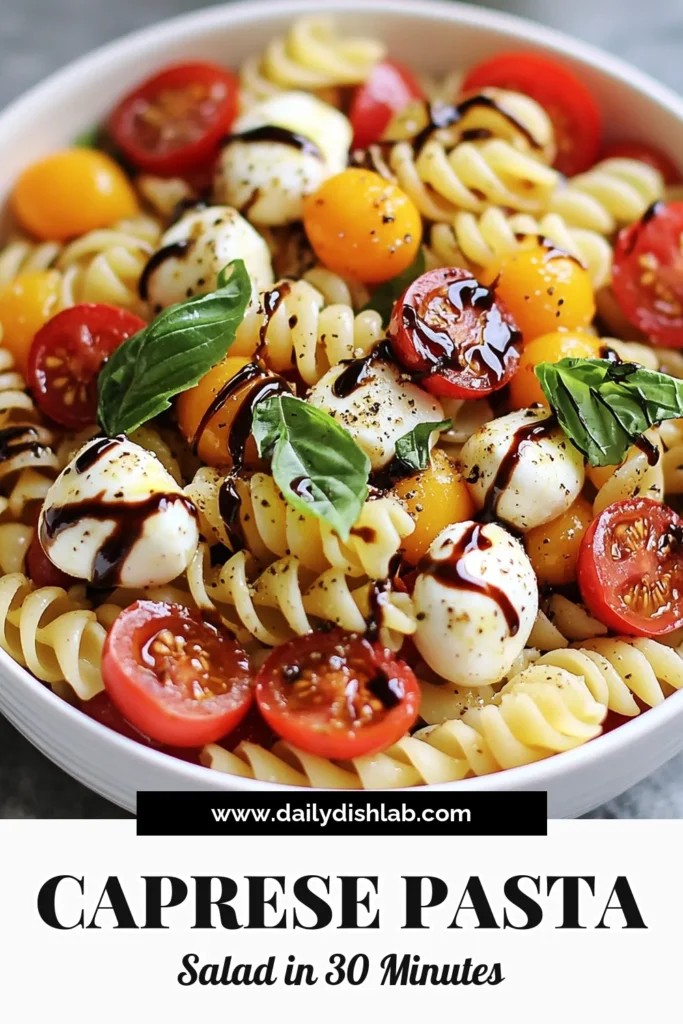
If you’re craving a fresh and tasty dish, you’ll love this Balsamic Caprese Pasta Salad! It’s a simple mix of ripe tomatoes, creamy mozzarella, and fragrant basil, all brought together with a tangy balsamic dressing. This recipe fits perfectly for any meal, and it’s great for gatherings or just a light lunch. Let’s dive into the details so you can whip up this delicious salad in no time!
Why I Love This Recipe
- Fresh Ingredients: This salad highlights the vibrant flavors of fresh tomatoes, mozzarella, and basil, making each bite a delightful experience.
- Quick and Easy: With only 15 minutes of prep time, this recipe is perfect for busy weeknights or last-minute gatherings.
- Flavorful Dressing: The combination of balsamic glaze and olive oil adds a rich depth of flavor that elevates the dish.
- Versatile Serving: This pasta salad can be enjoyed chilled or at room temperature, making it a great option for picnics or potlucks.
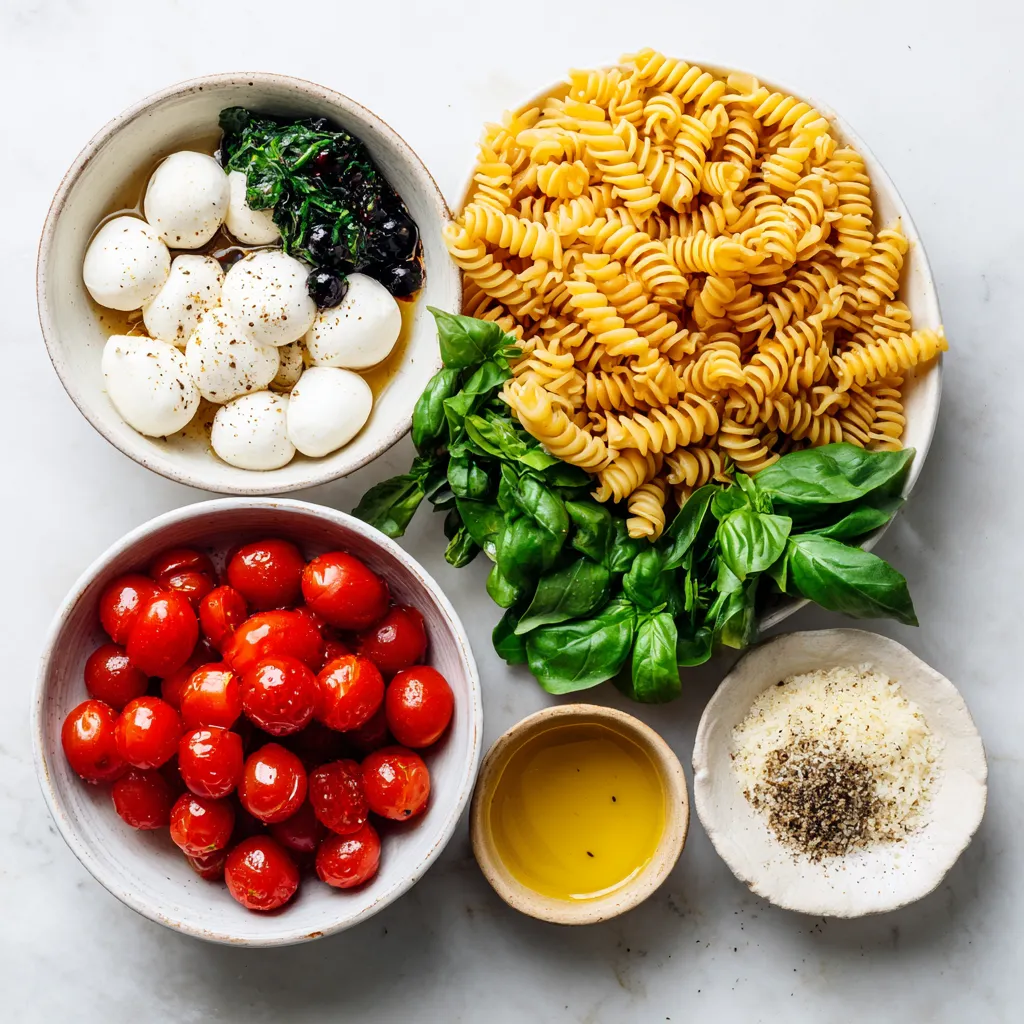
Ingredients
List of Ingredients
To make Balsamic Caprese Pasta Salad, you will need:
- 2 cups uncooked fusilli pasta
- 1 ½ cups cherry tomatoes, halved
- 1 cup fresh mozzarella pearls
- 1 cup fresh basil leaves, roughly torn
- 3 tablespoons balsamic glaze
- 2 tablespoons extra virgin olive oil
- 1 teaspoon garlic powder
- Salt and pepper to taste
- Optional: Freshly cracked black pepper for garnish
Ingredient Substitutions
You can easily swap some ingredients to fit your taste. Use any pasta shape you like. Penne or rotini works well. If you can’t find mozzarella pearls, try cubed mozzarella. For a twist, use arugula instead of basil. You can change the balsamic glaze with a flavored vinegar. A red wine or apple cider vinegar adds a nice kick.
Importance of Fresh Ingredients
Using fresh ingredients makes this pasta salad shine. Fresh tomatoes burst with flavor. They add sweetness and color. Mozzarella pearls provide creaminess that balances the tangy balsamic. Fresh basil gives a great aroma and taste. Overall, fresh ingredients make every bite enjoyable. They also bring health benefits. Fresh veggies and herbs are full of nutrients. They help you feel good while you eat.
Step-by-Step Instructions
Cooking the Pasta
First, boil water in a large pot. Add a pinch of salt to the water. Once it boils, add 2 cups of uncooked fusilli pasta. Cook the pasta until it is al dente, about 8 to 10 minutes. Test a piece to see if it is firm yet tender. When done, drain the pasta in a colander. Rinse it under cold water to stop the cooking. This helps keep the pasta from getting mushy.
Preparing the Dressing
In a small bowl, you will make the dressing. Combine 3 tablespoons of balsamic glaze and 2 tablespoons of extra virgin olive oil. Add 1 teaspoon of garlic powder, salt, and pepper to taste. Whisk the mixture well. You want it smooth and creamy. This dressing adds flavor and ties all the ingredients together.
Combining Ingredients
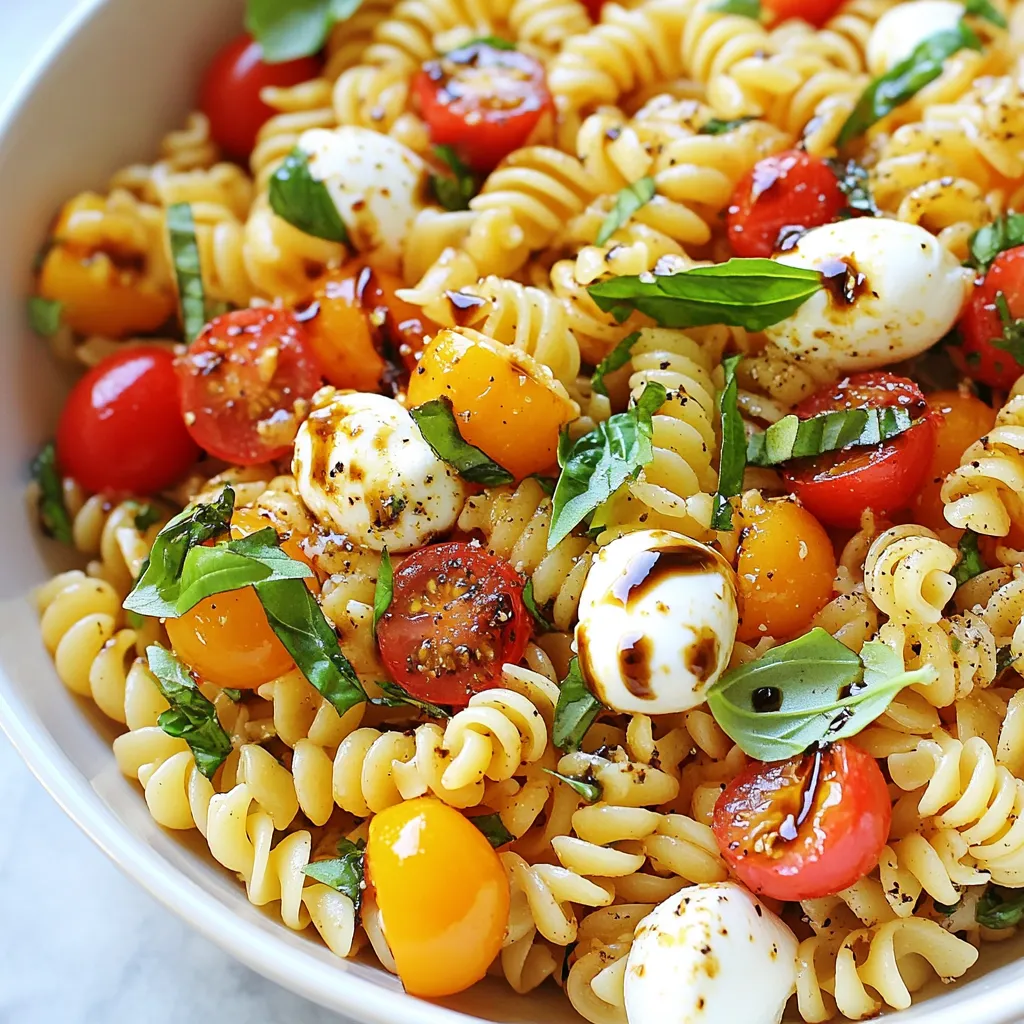
In a large mixing bowl, combine the cooked pasta, 1 ½ cups of halved cherry tomatoes, and 1 cup of fresh mozzarella pearls. Toss in 1 cup of roughly torn basil leaves. Pour the dressing over this mix. Gently toss everything together until it is well coated. This salad needs to sit for at least 15 minutes. This resting time allows the flavors to blend perfectly. Serve it chilled or at room temperature. You can add freshly cracked black pepper for an extra touch!
Tips & Tricks
Expert Tips for Perfect Pasta Salad
For a great pasta salad, use good pasta. Fusilli holds sauce well. Cook it al dente for the best texture. Rinse it under cold water to stop cooking. This keeps the pasta firm.
Make sure to let the salad sit after mixing. This helps the flavors blend. A 15-minute wait is perfect.
How to Enhance Flavor Profiles
To boost flavors, use fresh herbs. Basil adds a sweet touch. You can also try adding a squeeze of lemon juice for brightness.
Adjust the balsamic glaze as you like. If you enjoy sweetness, add more. For a tangy kick, use a bit more olive oil.
Serving Suggestions
Serve the pasta salad cold or at room temperature. It’s great for picnics or barbecues.
Garnish with cracked black pepper for extra flavor. Pair it with grilled chicken for a full meal. Enjoy this fresh dish at any gathering!
Pro Tips
- Use Fresh Ingredients: For the best flavor, opt for fresh basil and ripe cherry tomatoes. Their natural sweetness will elevate the dish.
- Chill Before Serving: Allowing the pasta salad to sit for at least 15 minutes or refrigerating it for an hour enhances the melding of flavors.
- Customize Your Cheese: If you prefer, substitute mozzarella pearls with crumbled feta or burrata for a different texture and flavor profile.
- Dress It Right: Toss the salad gently with the dressing to avoid breaking the mozzarella pearls and ensure even distribution of the flavors.
Variations
Different Pasta Options
You can switch up the pasta in this dish easily. While I love fusilli for its fun shape, you can use other options too. Penne, rotini, or farfalle all work well. Each type adds its own twist to the salad. Choose whole grain or gluten-free pasta if you prefer. They will still taste great with the other ingredients.
Add-Ins for Extra Nutrition
Want to boost the nutrition of your pasta salad? Try adding some veggies. Spinach, arugula, or bell peppers add color and flavor. You could also toss in some chickpeas or cooked chicken for protein. Nuts like pine nuts or walnuts add crunch. Each of these add-ins makes the dish even more filling and healthy.
Dressing Variations
The dressing is key to this salad. The balsamic glaze gives a sweet and tangy taste. You could mix it up by adding lemon juice for a zesty kick. Or, try a dash of honey for extra sweetness. If you want a creamier option, mix in a bit of Greek yogurt. These variations keep the salad fresh and exciting every time you make it!
Storage Info
How to Store Leftovers
To store leftovers, place the pasta salad in an airtight container. Make sure to cover it tightly. This keeps the flavors fresh and prevents spills. You can store it in the fridge for up to three days. If you notice any changes in smell or texture, it’s best to toss it out.
Best Practices for Meal Prep
For meal prep, I suggest making the pasta salad in larger batches. Divide the salad into individual containers. This way, you can grab a healthy meal quickly. Just remember to add the dressing right before you eat. This keeps the salad crisp and fresh.
Reheating Instructions
If you want to reheat the pasta salad, do it gently. Place the salad in a microwave-safe bowl. Heat it for about 30 seconds, then stir. Check the temperature, and repeat if needed. I recommend enjoying the salad cold, as it tastes best that way.
FAQs
Can I make this salad ahead of time?
Yes, you can make this salad ahead of time. It tastes better after chilling. Prepare it and let it sit in the fridge for at least 30 minutes. The flavors mix well, making it even more delicious. Just add the dressing before serving to keep the pasta fresh.
What should I serve with Balsamic Caprese Pasta Salad?
This salad pairs well with many dishes. You can serve it with grilled chicken or salmon for protein. A fresh baguette or garlic bread complements the meal nicely. It also works as a side dish for barbecues or picnics. The bright flavors match well with rich foods.
Is this recipe suitable for meal prep?
Absolutely! This recipe is great for meal prep. It stores well in the fridge for up to three days. Just keep the dressing separate if you want to enjoy it fresh. You can pack portions in containers for easy lunches. This makes eating healthy simple and tasty.
In this article, we explored key ingredients for Balsamic Caprese Pasta Salad. You learned about ingredient substitutes and the value of fresh items. I shared step-by-step cooking methods and tips for a tasty result. We discussed variations for different pasta types and add-ins for nutrition. Lastly, I covered how to store leftovers and answered FAQs about meal prep.
Use these tips to make your pasta salad fun and delicious! Enjoy your cooking journe

Balsamic Caprese Pasta Salad
Ingredients
- 2 cups uncooked fusilli pasta
- 1.5 cups cherry tomatoes, halved
- 1 cup fresh mozzarella pearls
- 1 cup fresh basil leaves, roughly torn
- 3 tablespoons balsamic glaze
- 2 tablespoons extra virgin olive oil
- 1 teaspoon garlic powder
- to taste salt and pepper
- optional freshly cracked black pepper for garnish
Instructions
- Cook the fusilli pasta according to the package instructions until al dente. Drain and rinse under cold water to stop the cooking process.
- In a large mixing bowl, combine the cooked pasta, halved cherry tomatoes, mozzarella pearls, and torn basil leaves.
- In a small bowl, whisk together the balsamic glaze, olive oil, garlic powder, salt, and pepper until well-combined.
- Pour the dressing over the pasta salad and toss gently to coat all ingredients evenly.
- Taste and adjust seasoning if necessary, adding more salt, pepper, or balsamic glaze as desired.
- Let the salad sit for at least 15 minutes to allow the flavors to meld.
- Serve chilled or at room temperature, garnished with freshly cracked black pepper if desired.


![The Roasted Garlic Parmesan Brussels Sprouts recipe includes simple, fresh ingredients. Each one adds flavor and texture to the dish. This recipe serves four people and takes just 35 minutes to make. - 1 pound Brussels sprouts, trimmed and halved - 4 cloves garlic, minced - 3 tablespoons olive oil - 1 teaspoon salt - 1/2 teaspoon black pepper - 1/2 cup grated Parmesan cheese - 1 teaspoon paprika - 1 tablespoon balsamic vinegar (optional, for drizzling) These ingredients come together to create a tasty and healthy side dish. If you don't have Brussels sprouts, try using green beans or cauliflower. For garlic, you can use garlic powder, about one teaspoon. Olive oil can be swapped for avocado oil. You can use nutritional yeast instead of Parmesan for a dairy-free option. Finally, if you don't like balsamic vinegar, lemon juice adds a nice touch. These substitutions keep the dish delicious while allowing for flexibility. First, set your oven to 425°F (220°C). This high heat will help the Brussels sprouts get nice and crispy. Preheating is key. If the oven isn't hot enough, the sprouts will not roast well. Take 1 pound of Brussels sprouts. Trim the ends and cut them in half. Place them in a large bowl. Add 4 cloves of minced garlic, 3 tablespoons of olive oil, 1 teaspoon of salt, and 1/2 teaspoon of black pepper. Toss everything well. You want every sprout to have some oil and seasoning. This helps them roast evenly. Now, spread the Brussels sprouts in a single layer on a baking sheet. Make sure the cut sides face down. This helps them get crispy. Place the baking sheet in your preheated oven. Roast for 20-25 minutes. Stir them halfway through cooking. This ensures they roast evenly. When they turn golden brown, they are ready. After roasting, take them out and sprinkle 1/2 cup of grated Parmesan cheese and 1 teaspoon of paprika on top. Toss gently to make sure the cheese mixes well. If you like, drizzle a little balsamic vinegar over them for extra flavor. Serve warm for the best taste. For the full recipe, refer to the previous section. To make your Brussels sprouts crispy, start with dry sprouts. Water makes them soggy. After washing, dry them well with a towel. Cut the sprouts in half to expose more surface area. This helps them roast evenly. Use a hot oven, around 425°F (220°C), to get that nice crunch. Spread them out on the pan, cut side down. This way, they brown better. You can boost the flavor in many ways. Add spices like paprika or garlic powder. They give a nice kick. For a savory touch, mix in some onion powder or crushed red pepper. You can also add fresh herbs like thyme or rosemary. A splash of lemon juice brightens the dish. Don’t forget the balsamic vinegar for a sweet twist; it adds depth to the flavors. First, use a colorful platter to make your dish stand out. Arrange the Brussels sprouts in a circle for a neat look. Top with extra Parmesan cheese for a cheesy finish. A sprinkle of fresh parsley adds a nice green touch. Serve them warm for the best taste. For a fancy touch, drizzle a bit of balsamic vinegar on top right before serving. These simple steps make your dish look gourmet! {{image_2}} You can make Roasted Garlic Parmesan Brussels Sprouts vegan easily. Replace the Parmesan cheese with nutritional yeast. This swap gives a cheesy flavor without dairy. You can also use vegan butter instead of olive oil for a richer taste. Feel free to explore different flavors! Add lemon zest for a fresh taste. You can also mix in crushed red pepper for some heat. If you love herbs, try thyme or rosemary. These herbs add depth to the dish. A sprinkle of lemon juice brightens the sprouts after roasting. Serve these Brussels sprouts as a side dish for any meal. They pair well with roasted chicken or grilled fish. You can also add them to salads for extra crunch. For a fun appetizer, serve them with a creamy dip. Drizzle with balsamic vinegar for a touch of sweetness. Check out the Full Recipe for more ideas! After you make Roasted Garlic Parmesan Brussels Sprouts, let them cool first. Place the cooled sprouts in an airtight container. Store them in the fridge for up to three days. Keep them away from moisture to stay fresh. You can also layer parchment paper between the sprouts to keep them crisp. To reheat, preheat your oven to 350°F (175°C). Spread the sprouts on a baking sheet in a single layer. Heat them for about 10-15 minutes. This will help restore their crispiness. You can also use a microwave if you're in a hurry. Just heat for 1-2 minutes, but they may lose some crunch. If you want to save some for later, freezing is a great option. First, blanch the Brussels sprouts in boiling water for 2-3 minutes. Then, cool them in ice water. Drain and pat dry. Place them in a freezer-safe bag, removing as much air as possible. They can last up to three months in the freezer. Just remember to cook them straight from frozen for the best taste! For the full recipe and more tips, check out the [Full Recipe]. Yes, you can use frozen Brussels sprouts! They are quick and easy. However, they may be softer than fresh ones. To avoid this, thaw them first and pat them dry. This helps them crisp up better when roasted. Brussels sprouts are done when they turn golden brown and crispy on the edges. You can check them at about 20 minutes of roasting. If they are tender when pierced with a fork, they are ready. Yes, you can prepare Brussels sprouts ahead of time. Toss them with oil and spices, then cover and store them in the fridge. You can roast them when you are ready to eat. This makes meal prep easy and fun! For the complete recipe, check out the Full Recipe. In this post, we covered how to make delicious Brussels sprouts. We discussed the key ingredients, step-by-step instructions, and tips for perfect crispiness. You learned about variations to suit different diets and how to store leftovers properly. Enjoy experimenting with flavors and techniques to make this dish your own. Remember, fresh ingredients and proper cooking methods are key to tasty Brussels sprouts. Happy cooking!](https://dailydishlab.com/wp-content/uploads/2025/07/dac44eb7-4ccc-403d-88f9-42333a1aedf1-768x768.webp)
![To make easy grilled veggie skewers, you need: - 1 bell pepper (any color), cut into 1-inch pieces - 1 zucchini, sliced into thick rounds - 1 red onion, cut into wedges - 1 cup cherry tomatoes - 8 button mushrooms, cleaned and stems trimmed - 3 tablespoons olive oil - 1 tablespoon balsamic vinegar - 1 teaspoon garlic powder - 1 teaspoon dried oregano - Salt and pepper to taste - Fresh basil for garnish For the best grilling experience, consider these products: - Skewers: Look for stainless steel or bamboo skewers. - Grill: A simple charcoal or gas grill works well. You can add more colors and flavors to your skewers. Try these options: - Yellow squash for a bright touch. - Eggplant for a unique texture. - Bell peppers in different colors for variety. - Different herbs like thyme or rosemary for extra flavor. First, gather all your ingredients. You'll need a bell pepper, zucchini, red onion, cherry tomatoes, and button mushrooms. Cut the bell pepper into 1-inch pieces. Slice the zucchini into thick rounds and cut the onion into wedges. Clean the mushrooms and trim their stems. Next, get a large bowl. Pour in olive oil, balsamic vinegar, garlic powder, dried oregano, salt, and pepper. Whisk this mixture well. Add all your veggies to the bowl. Toss gently until they are evenly coated. Let them marinate for about 15-20 minutes. This step boosts the flavor a lot! Now, it's time to thread the veggies onto skewers. Alternate the vegetables for a nice look. If you're using wooden skewers, soak them in water for 30 minutes first. This prevents burning. Preheat your grill to medium-high heat. Place the skewers on the grill and cook them for 10-12 minutes. Turn them occasionally. You want the veggies to be tender and slightly charred. This gives them a great taste! To ensure even cooking, try to cut all the veggies to similar sizes. This helps them cook at the same rate. Keep an eye on them while grilling. If some are cooking faster, move those skewers to a cooler part of the grill. Once they're done, remove the skewers from the grill. Let them cool for a couple of minutes. Then, garnish with fresh basil before serving. Enjoy your Easy Grilled Veggie Skewers! For a full recipe with all details, check out the [Full Recipe]. Marinating vegetables boosts their flavor. Use a simple mix of olive oil, balsamic vinegar, garlic powder, dried oregano, salt, and pepper. This blend brings out the best in veggies. Let them soak for 15 to 20 minutes for great taste. If you have more time, let them sit longer. This adds even more flavor depth. Not all veggies work well on skewers. Select firm vegetables that hold their shape. Bell peppers, zucchini, red onion, cherry tomatoes, and button mushrooms are great choices. Choose colorful options for a beautiful plate. Freshness is key; always pick the freshest veggies for the best flavor. Avoid cutting your veggies too small; they may fall through the grill. Don't skimp on marinating time; this is crucial for flavor. If using wooden skewers, always soak them first. This prevents burning and helps them hold their shape. Finally, don't overcrowd the skewers. Leave space for even cooking and nice grill marks. For the complete recipe, check the [Full Recipe]. {{image_2}} You can change the veggies in your skewers to fit your taste. Try using eggplant, asparagus, or even sweet corn. Each brings a new flavor and texture. For a rainbow look, mix in different colors of bell peppers. You can even add small potatoes for heartiness. Just make sure they are cut small enough to cook well. Seasonings can change the whole dish. You can use lemon juice, cumin, or smoked paprika for a twist. For a spicy kick, add chili powder or cayenne. Want an Italian vibe? Try Italian herbs like thyme and rosemary. Experiment with your favorite flavors to find what you love best. To turn your skewers into a full meal, add protein. Chicken or shrimp works great. You can also use tofu or tempeh for a vegetarian option. Marinate the protein the same way you do with veggies. This way, everything shares the same tasty flavors. Grilling protein with your veggies makes for a fun and easy meal. After your meal, let the skewers cool down. Place them in an airtight container. Store them in the fridge. They will stay fresh for about 3 to 4 days. If you want to keep them longer, consider freezing. To reheat your skewers, use the oven or microwave. For the oven, preheat it to 350°F (175°C). Place the skewers on a baking sheet. Heat for about 10 minutes until warm. In the microwave, heat them for 1-2 minutes. Check to ensure they warm evenly. To freeze, place the cooled skewers in a freezer-safe bag. Remove as much air as possible before sealing. They can last for up to 3 months in the freezer. When ready to eat, thaw them in the fridge overnight. Reheat using the tips above for best results. You can grill many vegetables, but some are best. Bell peppers add color and sweetness. Zucchini brings a nice texture. Red onions have a great flavor when grilled. Cherry tomatoes burst with juice. Button mushrooms are hearty and soak up marinades well. These veggies stay firm and taste amazing when grilled. Yes, you can prep veggie skewers ahead of time. Just cut the veggies and marinate them. Store them in the fridge for up to 24 hours. This way, they soak up the flavors. When you're ready to grill, simply thread them onto skewers. This saves time and makes grilling easier. Veggie skewers usually take about 10 to 12 minutes to grill. Make sure your grill is hot. Turn the skewers every few minutes. Check for tenderness and slight charring. This ensures even cooking and great flavor. For the complete recipe and step-by-step details, check the [Full Recipe]. This gives you all the instructions you need for perfect grilled veggie skewers. You learned the key ingredients and steps for making perfect veggie skewers. We discussed how to prepare, grill, and store them. I shared tips for marinating, choosing vegetables, and avoiding common mistakes. Remember, you can customize your skewers with different flavors and proteins. Enjoy the process and experiment with new combinations. Now, gather your ingredients and get ready to create delicious skewers that everyone will love. Happy grilling!](https://dailydishlab.com/wp-content/uploads/2025/06/7d073b29-4343-47f2-9b62-ced2757717c9-768x768.webp)