Spicy Turkey Chili Flavorful Recipe for Cozy Nights
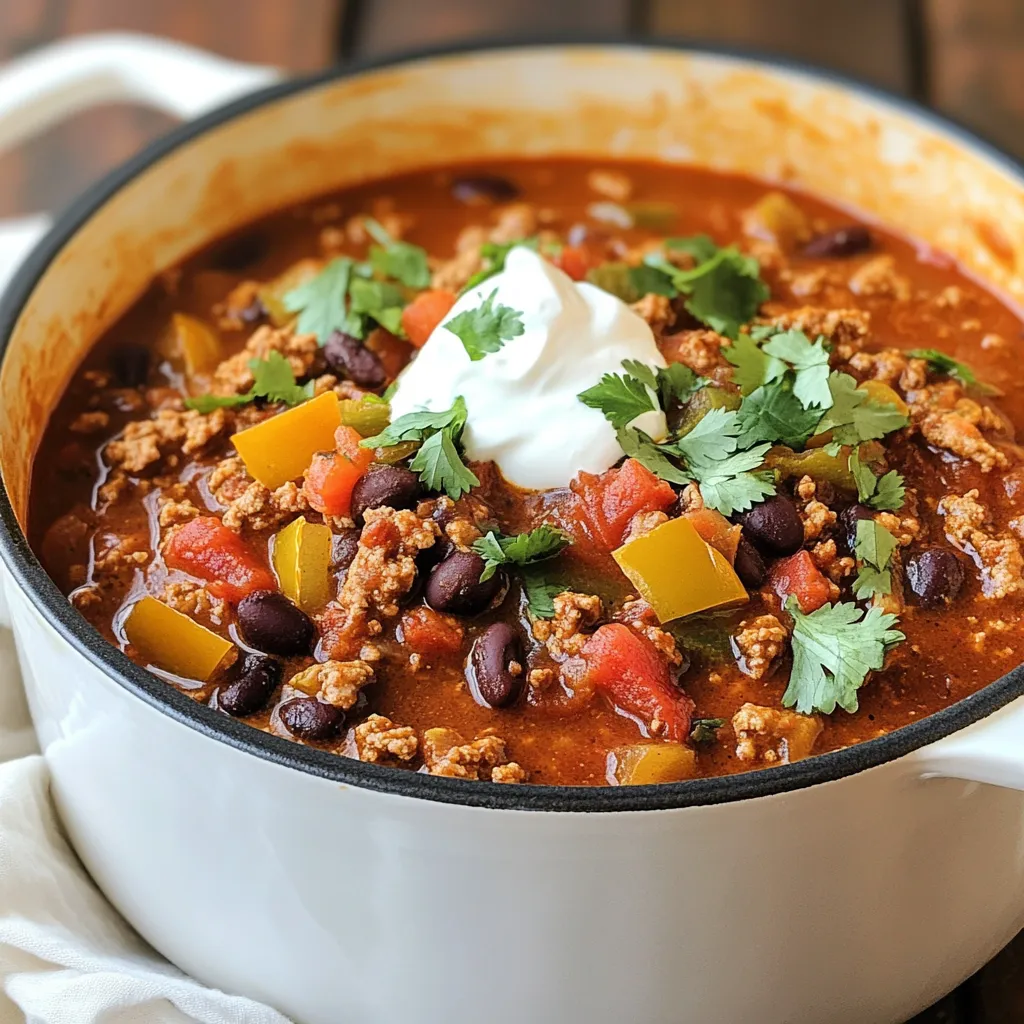

Cozy nights call for warm, delicious meals, and nothing beats a bowl of Spicy Turkey Chili! Packed with flavor and healthy ingredients, this recipe is easy to make and will soothe your soul. Whether you’re a chili pro or a new cook, I’ll guide you step-by-step to create a dish that’s perfect for chilly evenings. Dive in and learn how to whip up a hearty meal that everyone will love!
Why I Love This Recipe
- Healthy and Delicious: This spicy turkey chili is a great way to enjoy a hearty meal without the guilt, packed with lean protein and vegetables.
- Customizable Heat: Adjust the cayenne pepper to your liking, making it perfect for everyone from spice lovers to mild palates.
- One-Pot Wonder: With all ingredients cooked in one pot, cleanup is a breeze, leaving you more time to enjoy your meal.
- Perfect for Meal Prep: This chili stores well in the fridge or freezer, making it an ideal choice for meal prepping for the week ahead.
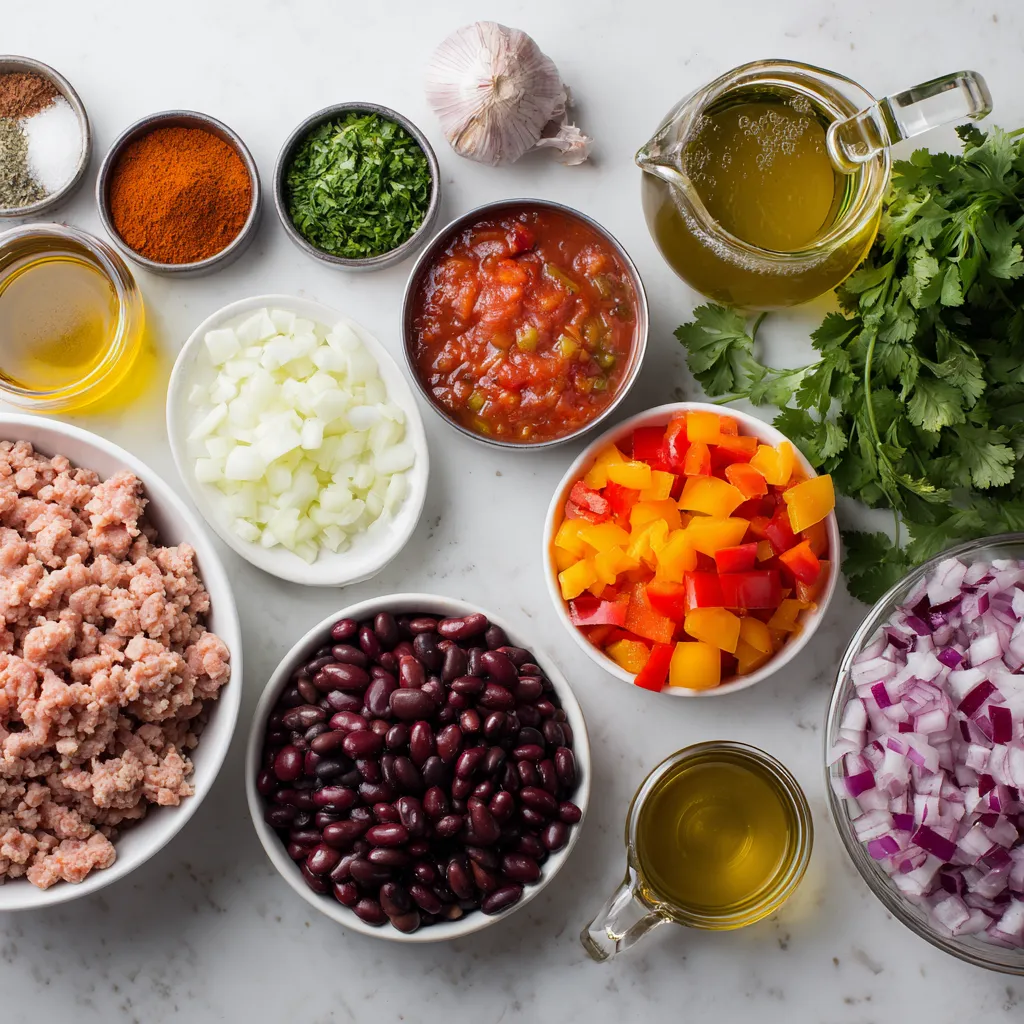
Ingredients
Main Ingredients
- 1 lb ground turkey
- 1 tablespoon olive oil
- 1 medium onion, diced
- 2 cloves garlic, minced
- 1 bell pepper, diced (red or green)
- 2 medium carrots, diced
- 1 can (14 oz) diced tomatoes (with juices)
- 1 can (15 oz) kidney beans, drained and rinsed
- 1 can (15 oz) black beans, drained and rinsed
The main ingredients bring a mix of taste and nutrition. The ground turkey is lean and full of protein. Olive oil adds healthy fats. The diced vegetables bring flavors and colors, making the chili look great.
Spices and Seasonings
- 2 tablespoons chili powder
- 1 tablespoon ground cumin
- 1 teaspoon smoked paprika
- ½ teaspoon cayenne pepper (adjust to taste)
- Salt and pepper, to taste
The spices are the heart of this chili. Chili powder gives it that classic flavor. Ground cumin adds warmth and depth. Smoked paprika brings a hint of smokiness. Cayenne pepper adds the heat, which you can change based on your taste.
Optional Garnishes
- Fresh cilantro, chopped
- Sour cream or Greek yogurt
- Shredded cheese
Garnishes add fun and flavor. Fresh cilantro makes the dish feel bright. A dollop of sour cream or Greek yogurt cools down the heat. Shredded cheese adds creaminess and richness. You can mix and match these to your liking.
Step-by-Step Instructions
Preparation Steps
First, heat the olive oil in a large pot over medium heat. Next, add the diced onion. Sauté for about 3-5 minutes. You want it to become clear. Then, add the minced garlic, diced bell pepper, and carrots. Cook for another 5 minutes. Stir occasionally to keep it from burning.
Now, add the ground turkey to the pot. Break it up with a spoon. Cook until the turkey is brown, about 5-7 minutes. Make sure the meat is cooked through and no longer pink.
Combining Ingredients
After cooking the turkey, it’s time to add flavor. Stir in the chili powder, ground cumin, smoked paprika, cayenne pepper, salt, and pepper. Cook for 1-2 minutes to toast the spices. This step brings out their full flavor.
Next, pour in the can of diced tomatoes with their juices. Stir everything well. Then, add the chicken or vegetable broth. This will keep your chili moist and tasty.
Now, mix in the kidney beans and black beans. Drain and rinse them first. Stir thoroughly to combine all the ingredients.
Simmering the Chili
Bring the mixture to a boil. Then, reduce the heat to low. Let it simmer for 30-40 minutes. Stir it occasionally. This lets the flavors mix and the chili thicken.
After simmering, taste the chili. Adjust the seasoning if needed. You can add more cayenne for heat or salt for flavor. Serve the chili hot, garnished with fresh cilantro. Enjoy the cozy warmth of your spicy turkey chili!
Tips & Tricks
Adjusting Spice Levels
To control the heat, you can modify the cayenne pepper. Start with less than half a teaspoon. Taste the chili and add more if you need it spicier. You can also add sliced jalapeños for extra heat. This gives your chili a fresh, zesty kick.
Cooking Techniques
If you can’t find ground turkey, you can use ground chicken or beef. Both will work well in this recipe. Another option is to use a pressure cooker. This method cooks the chili faster while keeping it moist and flavorful.
Serving Suggestions
Pair your chili with cornbread or rice for a filling meal. You can also serve it with tortilla chips for crunch. For toppings, fresh cilantro adds brightness. A dollop of sour cream or Greek yogurt cools the heat. Shredded cheese brings richness to each bite.
Pro Tips
- Spice Control: Adjust the amount of cayenne pepper based on your heat preference. Start with less and add more as needed.
- Flavor Boost: For an extra depth of flavor, consider adding a splash of Worcestershire sauce or a teaspoon of brown sugar while simmering.
- Make Ahead: This chili tastes even better the next day! Make it in advance and let the flavors meld overnight in the fridge.
- Vegetable Variations: Feel free to swap in other veggies like zucchini or corn for added nutrition and texture.

Variations
Vegetarian Version
You can make a tasty vegetarian chili by swapping turkey for plant-based protein. Try using lentils or crumbled tofu. These options provide texture and protein. For beans, you can use chickpeas or pinto beans instead of kidney and black beans. Add more veggies like zucchini or corn for extra flavor.
Dietary Adjustments
If you want a low-carb chili, you can skip the beans. Use cauliflower instead for a hearty base. For gluten-free chili, check your spices and broth. Most chili powders and broths are gluten-free, but always read labels.
Flavor Enhancements
To boost the flavors, add spices like oregano or coriander. A splash of hot sauce can bring a nice kick. You can also mix in seasonal vegetables, like bell peppers in summer or squash in fall. These additions keep your chili fresh and interesting.
Storage Info
Refrigeration
To store leftover chili, let it cool first. Place it in an airtight container. This keeps the chili fresh. Store it in the fridge for up to four days.
Best practices for cooling include spreading the chili in a shallow dish. This speeds up cooling time. You can also stir it occasionally to help release heat.
Freezing
For long-term storage, freezing is great. After cooling, pour the chili into freezer-safe bags. Squeeze out excess air before sealing. This prevents freezer burn.
When you want to eat it, thaw the chili in the fridge overnight. You can also use the microwave for quicker thawing. Reheat in a pot over low heat until hot. Stir occasionally to warm it evenly.
Shelf Life
Chili lasts in the fridge for about four days. After that, it can spoil.
Signs of spoilage include off smells, mold, or changes in color. If you see any of these, it’s best to throw the chili away. Always trust your senses when it comes to food safety.
FAQs
What can I use instead of ground turkey?
You can swap ground turkey for several options. Here are some ideas:
- Ground chicken
- Lean beef
- Pork
- Plant-based meat substitutes, like lentils or tofu
- Chopped mushrooms for a hearty texture
These alternatives can give your chili a new twist. Each option brings its own flavor.
How do I make my chili thicker?
To thicken your chili, try these tips:
- Simmer it longer to reduce liquid.
- Add a tablespoon of cornstarch mixed with water.
- Stir in mashed beans or pureed beans for more texture.
- Use less broth when cooking if you want it thicker from the start.
Each method helps create a rich, hearty chili.
Can I prepare chili in advance?
Yes, preparing chili in advance is a great idea. Here are some benefits:
- Flavors deepen and improve over time.
- It saves time on busy days.
- Chili freezes well for future meals.
Make a big batch, store it, and enjoy cozy nights anytime!
This blog post explored making a flavorful chili. We covered key ingredients, like ground turkey and spices, plus preparation steps. I shared tips for adjusting heat and storage advice to keep it fresh. Remember, chili is flexible; you can make vegetarian versions or try different seasonings. Whether you prefer it mild or spicy, you can create your perfect bowl. Enjoy the warmth and comfort of chili anytim

Spicy Turkey Chili
Ingredients
- 1 lb ground turkey
- 1 tablespoon olive oil
- 1 medium onion, diced
- 2 cloves garlic, minced
- 1 bell pepper (red or green), diced
- 2 medium carrots, diced
- 1 can (14 oz) diced tomatoes (with juices)
- 1 can (15 oz) kidney beans, drained and rinsed
- 1 can (15 oz) black beans, drained and rinsed
- 2 tablespoons chili powder
- 1 tablespoon ground cumin
- 1 teaspoon smoked paprika
- 0.5 teaspoon cayenne pepper (adjust to taste)
- to taste Salt and pepper
- 1 cup chicken or vegetable broth
- to taste Fresh cilantro, chopped (for garnish)
- to taste Sour cream or Greek yogurt (optional, for serving)
- to taste Shredded cheese (optional, for serving)
Instructions
- Heat the olive oil in a large pot over medium heat. Add the diced onion and sauté for about 3-5 minutes until it becomes translucent.
- Incorporate the minced garlic, diced bell pepper, and carrots. Cook for another 5 minutes, stirring occasionally.
- Add the ground turkey to the pot, breaking it up with a spoon. Cook until the turkey is browned and cooked through, approximately 5-7 minutes.
- Stir in the chili powder, cumin, smoked paprika, cayenne pepper, salt, and pepper. Cook for 1-2 minutes to toast the spices.
- Pour in the diced tomatoes (with their juices) and the broth. Stir well to combine all the ingredients.
- Add the kidney beans and black beans, mixing thoroughly.
- Bring the mixture to a boil, then reduce the heat to low and let it simmer for 30-40 minutes, stirring occasionally. The chili should thicken and the flavors will meld together beautifully.
- Taste and adjust seasoning if necessary, adding more cayenne for heat or salt to enhance flavors.
- Serve the chili hot, garnished with fresh cilantro. Add a dollop of sour cream or Greek yogurt on top, and sprinkle with shredded cheese if desired.
. Marinating chicken is key to great taste. It allows the flavors to blend well. I suggest marinating for at least 15 minutes. For deeper flavor, let it sit for 2 hours in the fridge. Fresh ingredients also make a big difference. Choose bright, crisp asparagus and quality truffle honey. This will elevate the dish. To make sure your chicken is cooked through, check its internal temperature. Aim for 165°F (75°C) to ensure safety. For the asparagus, cook it until tender but still crisp. This keeps the bright color and fresh taste. Do not overload the baking sheet. Give each piece enough space to roast evenly. Garnishing can make your dish stand out. A sprinkle of fresh parsley adds color and freshness. You can also drizzle some pan juices over the chicken. This enhances flavor and looks beautiful. Serve the chicken and asparagus on a large platter. This makes for an inviting presentation. For more ideas, check the full recipe and explore your creativity! {{image_4}} You can easily swap proteins in this dish. Try using shrimp or tofu for a fun twist. Each option brings a new texture and flavor. For veggies, consider seasonal choices like broccoli or bell peppers. They add color and nutrients to your plate. You can mix and match to keep things fresh and exciting. Want to change the taste? Consider adding herbs like thyme or rosemary. They enhance the dish with earthy notes. You can also adjust the sweetness. Add more truffle honey for a sweeter flavor or use less for a more savory bite. A splash of balsamic vinegar can add a nice acidity, balancing the sweetness. Not in the mood for baking? Try grilling the chicken for a smoky flavor. Just preheat your grill and cook until the chicken is done. You can also use an Instant Pot for quick cooking. Simply add the chicken and marinade, set it to high pressure, and cook for about 10 minutes. This method is fast and keeps the chicken juicy. Explore these variations to make Truffle Honey Chicken with Asparagus your own. For the full recipe, check out the details earlier in the article. To keep your Truffle Honey Chicken with Asparagus fresh, use these steps: - Refrigeration: Store leftovers in an airtight container. This keeps the chicken and asparagus moist. Place it in the fridge within two hours of cooking. - Freezing: If you want to freeze it, wrap the chicken and asparagus tightly in plastic wrap. Then, place them in a freezer-safe bag. This way, you can enjoy them later. To enjoy your meal again, follow these reheating tips: - Best methods: Use an oven or microwave to reheat. For the oven, preheat to 350°F (175°C) and heat for about 10-15 minutes. In the microwave, use medium power and heat in short bursts. - Ensuring quality: Make sure the chicken reaches 165°F (75°C) when reheating. This keeps it safe and tasty. Wondering how long your dish lasts? Here’s what you need to know: - How long will it last in the fridge?: It can stay fresh in the fridge for up to 3 days. - Signs of spoilage: Check for changes in color, smell, or texture. If anything seems off, don’t eat it. Always trust your senses! For the full recipe, check out the [Full Recipe] section above. You can enjoy this dish with several tasty sides. Here are some great options: - Rice: A fluffy white or brown rice pairs well with the chicken. - Potatoes: Mashed or roasted potatoes add heartiness. - Salad: A fresh green salad brings a nice crunch. - Bread: Crusty bread is perfect for soaking up the juices. These sides will balance the dish and enhance your meal. If you find the dish too sweet, you can adjust a few ingredients. Here’s how: - Use Less Truffle Honey: Cut the honey to one tablespoon. - Add More Lemon Juice: This will brighten the dish and balance sweetness. - Increase Dijon Mustard: A little extra mustard will add tanginess. Feel free to taste as you go. This way, you can find the perfect balance for your palate. Yes, you can prep this dish in advance. Here’s how to do it: - Marinate the Chicken: You can marinate it up to two hours ahead. - Prepare Asparagus: You can trim and season asparagus ahead of time. - Store in Fridge: Cover and keep the chicken and asparagus in the fridge. When you are ready to cook, just follow the baking steps. It makes dinner easier! Truffle honey gives a unique flavor, but you can substitute it. Here are some ideas: - Regular Honey: Use regular honey for sweetness without the truffle flavor. - Maple Syrup: This adds a different but pleasant sweetness. - Balsamic Glaze: It gives a sweet and tangy profile. Each substitute will change the dish, but it can still be delicious. In this blog post, I shared a delicious recipe for Truffle Honey Chicken with Asparagus. We covered the key ingredients, step-by-step instructions, and useful tips to enhance flavor. I provided options for ingredient swaps and variations for a personal touch. Lastly, I discussed storage and reheating tips to keep your meal fresh. This dish offers great taste and flexibility. Now, you can enjoy this meal any night of the week!](https://dailydishlab.com/wp-content/uploads/2025/06/fb120668-62a7-469e-8438-ab137e53e136-768x768.webp)

![- Ground beef - Breadcrumbs - Parmesan cheese - Egg - Garlic The main ingredients create the base of your sweet and sour meatballs. Ground beef gives the meatballs their hearty flavor. Breadcrumbs add texture, while Parmesan cheese gives a rich taste. An egg binds everything together, making the meatballs easy to shape. Garlic adds a lovely aroma and enhances the flavor. - Sugar - Apple cider vinegar - Ketchup - Soy sauce - Pineapple chunks The sweet and sour sauce brings the dish to life. Sugar balances the tangy apple cider vinegar. Ketchup adds a nice tomato base, while soy sauce gives a savory depth. Pineapple chunks add a burst of sweetness and texture, making the sauce even more enjoyable. - Cornstarch (for thickening) - Water (for thickening) - Bell peppers You can make your sauce thicker by using cornstarch and water. This gives the sauce a nice consistency that clings to the meatballs. Adding bell peppers not only adds color but also gives extra crunch and flavor. For the full recipe, check out the details above! First, take a large bowl and combine the following ingredients: - 500g ground beef - 1/2 cup breadcrumbs - 1/4 cup grated Parmesan cheese - 1 egg - 2 cloves garlic, minced - 1 teaspoon onion powder - 1 teaspoon dried oregano - Salt and pepper to taste Mix these ingredients gently until they come together. You don’t want to overmix. Next, form the mixture into small meatballs, about 1 inch in size. This size helps them cook evenly. Place your meatballs on a baking sheet lined with parchment paper. Now, preheat your oven to 200°C (400°F). This step ensures that your meatballs cook properly. Once the oven is hot, put your baking sheet with the meatballs inside. Bake them for 20 to 25 minutes. They should turn a nice brown color and be cooked through. While the meatballs bake, let’s make the sweet and sour sauce. In a saucepan, combine: - 1/2 cup sugar - 1/2 cup apple cider vinegar - 1/4 cup ketchup - 1 teaspoon soy sauce Stir these ingredients on medium heat until the sugar dissolves. Then, add in: - 1 cup pineapple chunks - 1/2 cup diced red bell pepper - 1/2 cup diced green bell pepper Bring the mixture to a gentle simmer. If you want a thicker sauce, mix 1 tablespoon cornstarch with 2 tablespoons water to make a slurry. Stir this into the sauce and cook for an extra 2 to 3 minutes. Once the meatballs are done, you can coat them in the sweet and sour sauce or serve the sauce on the side. Enjoy your meal with rice or noodles for a fun and tasty dinner! For the complete recipe, check the [Full Recipe]. - Ideal meatball size: Aim for meatballs about 1 inch wide. This size cooks evenly and is easy to eat. If you make them too big, they may not cook through. If too small, they may dry out. - Ensuring moisture retention: To keep meatballs moist, do not overmix the meat mixture. Mix just until combined. Adding breadcrumbs helps absorb moisture, making them juicy. You can also use milk to soak the breadcrumbs for extra softness. - Balance of sweet and sour flavors: The key to great sauce is balance. Aim for equal parts sugar and vinegar. This gives you that classic sweet and sour taste. Use fresh pineapple for a bright flavor. You can adjust sugar for sweetness and vinegar for tanginess based on your taste. - Tips for thickening: If you want a thicker sauce, mix cornstarch with a bit of water to form a slurry. Stir this into the sauce while it simmers. It will thicken quickly, giving you a rich and glossy finish. - Ideal side dishes: Serve sweet and sour meatballs over rice or noodles. They soak up the sauce well. Steamed vegetables, like broccoli or carrots, make a great side too. You can also try serving with a fresh salad for crunch. - Garnishing options: Add chopped green onions or sesame seeds on top. This adds color and a nice crunch. You can also sprinkle fresh herbs like cilantro for a fresh twist. Garnishes make your dish look bright and inviting. For the complete recipe, check the Full Recipe section. {{image_2}} You can swap ground beef for ground turkey or chicken. These lean meats provide a lighter taste. Ground turkey may require a bit more seasoning since it has less flavor. Chicken works well too and stays juicy when cooked right. For a vegetarian option, consider using lentils or chickpeas. These add protein while being tasty and fun. You can mash them up and mix in the same ingredients as the meatballs. Want to spice things up? Add red pepper flakes or cayenne to the sauce. This gives a nice kick that balances the sweetness. You can also swap the sugar for honey or maple syrup for a twist. If you want a healthier option, reduce the sugar and use a sugar substitute. For a tangier sauce, add more vinegar or some fresh lime juice. Add vegetables to your meatballs for extra flavor and nutrition. Chopped spinach or grated carrots blend well into the mix. You can also serve the meatballs over different carbs. Rice is classic, but try noodles or even quinoa for a fresh take. These choices bring variety and make each meal feel special. After you enjoy the sweet and sour meatballs, store any leftovers in the fridge. Place them in an airtight container. This keeps them fresh and tasty. Meatballs can last about three to four days in the fridge. For longer storage, freeze the meatballs and sauce together. Use freezer-safe containers or bags. This way, they can last up to three months. Just remember to label them with the date. When it's time to eat leftovers, you can reheat them in two main ways. The oven is best for even heat. Preheat the oven to 180°C (350°F). Place the meatballs in a baking dish, cover with foil, and heat for about 15-20 minutes. The microwave works too, but it can make them a bit soggy. If using the microwave, heat for 1-2 minutes at a time. Check often to avoid overcooking. Keep the flavors and textures intact by not overheating them. Cooked meatballs can stay safe in the fridge for about three to four days. If frozen, they can last for up to three months. Sweet and sour sauce lasts longer. It can stay fresh in the fridge for about one week. If you freeze the sauce, it can last for up to six months. Always check for any off smells or changes before using them. These tips will help keep your sweet and sour meatballs tasty for longer! You can use gluten-free breadcrumbs. They work just like regular ones. You can also use ground oats or crushed rice crackers. If you want to skip the breadcrumbs, try ground nuts. They add a nice flavor, too. Yes, you can use ground turkey or chicken instead of beef. Both options give a lighter taste. If you want a vegetarian dish, try using lentils or chickpeas. These options are healthy and delicious. These meatballs pair well with rice or noodles. You can also serve them with steamed veggies. A fresh salad adds a nice crunch. Feel free to get creative with your sides. To add more heat, you can include red pepper flakes or hot sauce. Just a little goes a long way. You can also add minced jalapeños for a fresh kick. Adjust the spice level to match your taste. Sweet and sour meatballs are a fun, tasty dish. We covered key ingredients, from meat to sauce. I shared steps for making perfect meatballs and sauce. Remember to balance flavors for the best taste. Feel free to try different meats and sauces to suit your taste. With this guide, your sweet and sour meatballs will impress everyone. Enjoy cooking and sharing this meal with loved ones.](https://dailydishlab.com/wp-content/uploads/2025/07/6a38a525-ac29-43e7-bdf8-6ebffeec64fd-768x768.webp)