

If you’re craving a tasty snack that’s both crispy and healthy, baked zucchini fries are your answer! These delightful fries transform ordinary zucchini into a flavor-packed treat. With the right ingredients and simple steps, you can enjoy guilt-free munching. I’ll guide you through the baking process, share tips for achieving maximum crispiness, and offer flavorful variations. Let’s get started on making this delicious snack that will satisfy your taste buds!
Why I Love This Recipe
- Healthy Snack Alternative: These baked zucchini fries are a nutritious option compared to traditional fries, making them perfect for guilt-free snacking.
- Easy to Make: With minimal ingredients and simple steps, this recipe is perfect for busy weeknights or last-minute gatherings.
- Customizable Flavor: You can easily adjust the seasoning or add your favorite spices to make these fries uniquely yours.
- Kid-Friendly: These crispy fries are a fun way to get kids to eat their vegetables, making them a hit at family meals.
Ingredients
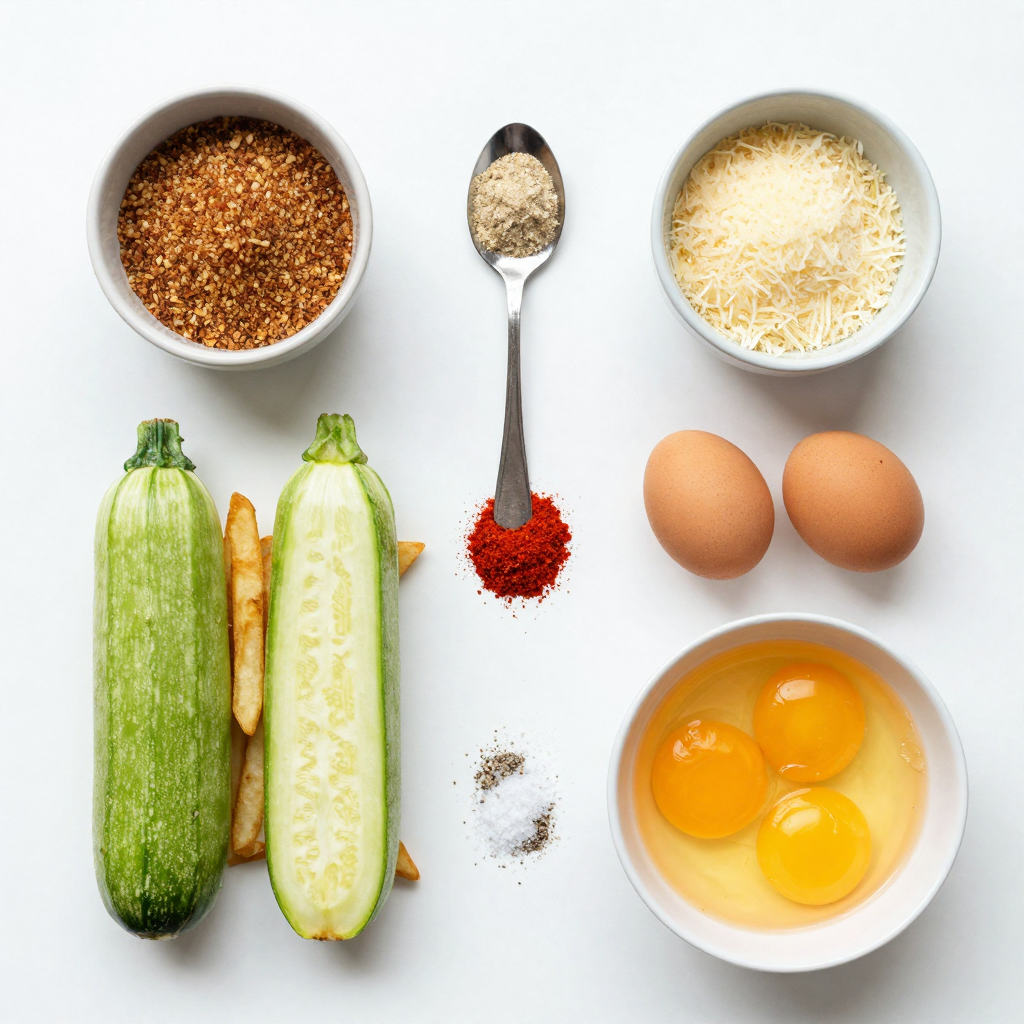
List of Ingredients
– 2 medium zucchinis, cut into fries
– 1 cup breadcrumbs (preferably whole wheat or panko for extra crunch)
– 1/2 cup grated Parmesan cheese
– 1 teaspoon garlic powder
– 1 teaspoon paprika
– 1/2 teaspoon salt
– 1/2 teaspoon black pepper
– 2 large eggs, beaten
– Cooking spray or olive oil for drizzling
When choosing zucchinis, look for medium-sized ones that feel firm. Avoid any that are soft or have blemishes. Fresh zucchinis taste better and give the best results.
For breadcrumbs, I suggest using either whole wheat or panko. Whole wheat adds a nutty flavor, while panko gives extra crunch. Both options work well, but I lean toward panko for that delightful crisp.
Using fresh ingredients is key. Fresh herbs, spices, and cheese enhance the taste of your baked zucchini fries. They make your snack not just tasty but also healthy. Always choose high-quality ingredients for the best results.Enjoy your cooking!
Step-by-Step Instructions
Prepping the Oven and Baking Sheet
Start by preheating your oven to 425°F (220°C). This high heat helps achieve that crispy texture we love. While the oven heats, line a baking sheet with parchment paper. This step makes cleanup easy and prevents sticking. Make sure the parchment paper is flat against the pan. Any wrinkles can cause uneven cooking.
Coating the Zucchini Fries
Next, let’s coat those zucchini fries. First, beat your eggs in a shallow bowl. This will help the breadcrumbs stick. Now, prepare the breadcrumb mixture. In another bowl, mix the breadcrumbs, grated Parmesan, garlic powder, paprika, salt, and pepper. The mix should be evenly combined.
For coating, take each zucchini fry and dip it into the eggs. Let the extra drip off for a cleaner look. Then, roll it in the breadcrumb mix. Press gently to ensure the crumbs stick well. This step is key for a crispy bite.
Baking Process
Now, it’s time to bake. Place the coated zucchini fries on the baking sheet. Make sure they are in a single layer and not touching. This spacing helps them crisp up. Lightly spray or drizzle with olive oil for an extra crispy finish.
Bake the fries for 20 to 25 minutes. Flip them halfway through to ensure even cooking. You know they are done when they turn golden brown and crisp. Let them cool for a few minutes before serving. Enjoy your crispy and flavorful baked zucchini fries!
Pro Tips
- Use Fresh Zucchini: For the best flavor and texture, choose firm, fresh zucchinis. Look for ones that are shiny and have no blemishes.
- Experiment with Seasonings: Feel free to customize the breadcrumb mixture with your favorite spices, such as Italian herbs or cayenne pepper for a kick.
- Ensure Even Cooking: Make sure the zucchini fries are evenly spaced on the baking sheet to promote even cooking and crispiness.
- Storage Tips: Store any leftovers in an airtight container in the fridge for up to 3 days. Reheat in the oven to restore their crispiness.
Tips & Tricks
Achieving Maximum Crispiness
To get your zucchini fries extra crispy, focus on the coating. I recommend using panko breadcrumbs. They add more crunch than regular breadcrumbs. Mix them with grated Parmesan, garlic powder, paprika, salt, and pepper for a tasty coating.
Even spacing on the baking sheet is key. Place the zucchini fries in a single layer. Make sure they don’t touch each other. This allows hot air to circulate around each fry, making them crispier.
Seasoning Suggestions
You can customize the spice levels to fit your taste. If you like heat, add cayenne pepper or chili powder. For a milder flavor, stick to garlic and herbs.
Fresh herbs can enhance the flavor. Try adding chopped parsley or basil to the breadcrumb mix. This adds a fresh taste that pairs well with zucchini.
Alternative Cooking Methods
If you want to try air frying, it’s a great option. Air fryers cook food quickly and make it crispy. Set the temperature to 400°F (200°C) and cook for about 15 minutes, shaking the basket halfway through.
Grilling zucchini fries is another fun method. Brush them with olive oil and grill them over medium heat. This gives them a smoky flavor while still keeping them crispy.
Variations
Cheese Alternatives
You can switch up the cheese for your baked zucchini fries. For a vegan option, use nutritional yeast. It adds a cheesy flavor without dairy. You can also use vegan cheese shreds. They melt well and give a nice texture.
If you prefer traditional cheese, try mozzarella or cheddar. Both add a creamy taste. Parmesan is great for a salty kick. Mixing different cheeses can create even more flavor.
Different Coating Ideas
Want a gluten-free option? Use almond flour or crushed rice cereal instead of breadcrumbs. These options still give that crunchy texture.
For more crunch, add nuts or seeds to your coating mix. Chopped almonds or sunflower seeds work well. They boost nutrition and flavor. You can even try crushed cornflakes for a unique twist.
Flavor Infusions
Experiment with spices to give your fries a new taste. Try adding cayenne pepper for heat or Italian herbs for a fresh flavor. You can mix garlic powder with onion powder for depth.
Incorporating other vegetables can add variety, too. Try mixing in carrot or sweet potato sticks. They can add color and taste. Just keep the size similar so they cook evenly.
Storage Info
Storing Leftovers
To keep your zucchini fries fresh, use airtight containers. Glass containers work great. You can also use plastic ones that seal well. Store them in the fridge. They stay good for about 3 days.
Reheating Techniques
When reheating, use the oven for the best results. Preheat it to 350°F (175°C). Place the fries on a baking sheet. Heat for about 10 minutes. This keeps them crispy. The microwave works too, but it may make them soft. If you use the microwave, heat for 1-2 minutes on a plate.
Freezing Options
You can freeze your leftover fries for later. Lay them flat on a baking sheet and freeze until solid. Then, move them to a freezer bag. They stay good for about 2 months.
When you’re ready to eat them, thaw overnight in the fridge. Reheat in the oven for a crispy finish. Always avoid refreezing once they are thawed.
FAQs
How do I make baked zucchini fries crispy?
To make baked zucchini fries crispy, you need to focus on a few key steps. First, choose the right breadcrumbs. Whole wheat or panko breadcrumbs add great crunch. Dip the fries in beaten eggs to help the coating stick. Make sure to press the breadcrumbs onto the zucchini well.
Common mistakes include overcrowding the baking sheet. Ensure the fries are in a single layer. This allows hot air to circulate and crisp them up. Also, lightly spray the fries with cooking spray or drizzle with olive oil before baking. This step enhances the crispiness.
Can I use frozen zucchini for this recipe?
Using frozen zucchini is not ideal for baked zucchini fries. Frozen zucchini contains more water, which affects texture. When you bake it, the fries may turn out soggy instead of crispy. Fresh zucchini gives you the best flavor and crunch.
If you only have frozen zucchini, thaw it first. Pat it dry with paper towels to remove excess moisture. This may improve the final result, but fresh is always better for this recipe.
What dips pair well with zucchini fries?
Zucchini fries taste great with many dips. Here are some popular options:
– Marinara sauce
– Ranch dressing
– Garlic aioli
– Spicy ketchup
– Yogurt dip
You can also make your own dips to match your taste. Mixing Greek yogurt with herbs makes a refreshing dip, while a spicy aioli adds a kick. Try different combinations to find your favorite!
In this post, I shared how to make delicious zucchini fries. We covered selecting the best ingredients, baking techniques, and tips for a perfect crunch. Fresh ingredients matter for great taste. Remember to space your fries evenly for crispiness. Experiment with flavors and cooking methods for variety. Finally, store your leftovers correctly to keep them tasty. Enjoy making these versatile fries, and don’t hesitate to try new combinations!


