Skip to content
About
Contact
Cookie Policy
Copyright Policy
Disclaimer
Search
Home
Dinner
Appetizer
Desserts
Drinks
About
Contact
Privacy Policy
Toggle Menu
Home
/
Appetizer
- Page 13
Appetizer
Zucchini and Chickpea Fritters Simple and Delicious
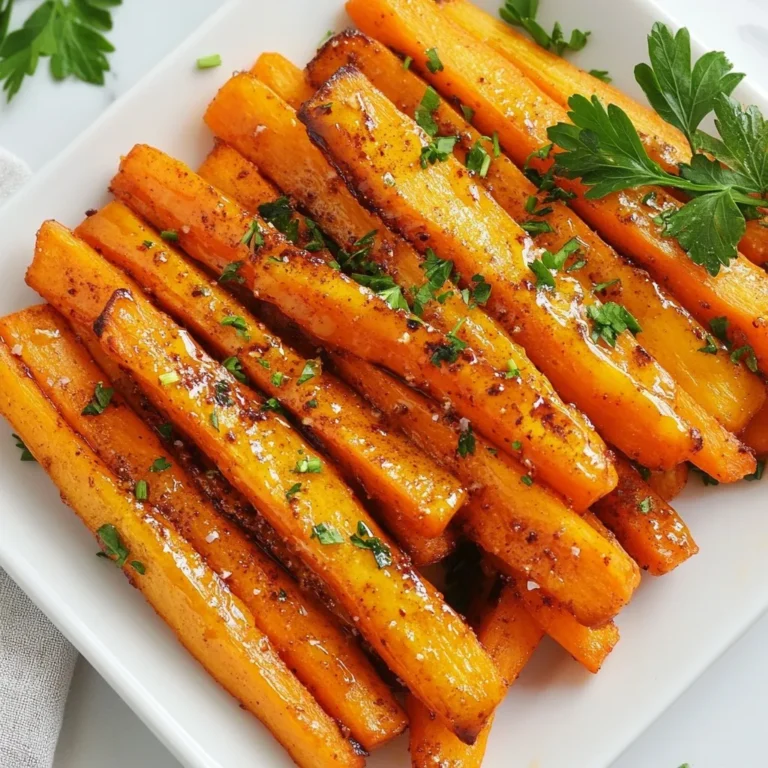
Honey Glazed Carrot Fries Flavorful and Simple Snack
Spinach Tomato Egg Muffins Divine and Easy Breakfast
Crispy Baked Sweet Potato Chips Easy and Healthy Snack
Mango Avocado Salsa Flavorful and Easy Recipe
Spicy Roasted Sweet Potatoes Simple and Tasty Dish
Smashed Potatoes with Garlic Butter Rich Flavor Dish
Loaded Chicken Nachos Irresistible Flavor Explosion
Garlic Parmesan Roasted Broccoli Tasty and Quick Side
Honey BBQ Cauliflower Wings Crispy and Delicious Snack
Page navigation
Previous Page
Previous
1
…
11
12
13
14
15
…
26
Next Page
Next
Home
Dinner
Appetizer
Desserts
Drinks
About
Contact
Privacy Policy
Toggle Menu Close
Search for:
Search

![Here’s what you need to make Zucchini and Chickpea Fritters: - 2 medium zucchinis, grated - 1 cup canned chickpeas, rinsed and drained - 1/2 cup all-purpose flour (or chickpea flour for a gluten-free option) - 2 tbsp fresh parsley, chopped - 1 tsp cumin powder - 1/2 tsp paprika - 1/4 tsp black pepper - 2 eggs, beaten - 3 green onions, finely chopped - 3 cloves garlic, minced - Salt to taste - Olive oil for frying Let’s dive into each ingredient and why they matter. Zucchinis are the star of this dish. They add moisture and a fresh taste. Grating them helps release excess water. This keeps your fritters from being soggy. Canned chickpeas give a hearty base. They add protein and fiber, making the dish filling. Rinse them well to remove extra sodium. Flour binds everything together. If you prefer gluten-free, use chickpea flour. It adds a nutty flavor and works well. Fresh parsley brightens up the fritters. It adds color and a fresh taste. The cumin and paprika spices give warmth and depth. They make each bite more exciting. Black pepper adds a hint of spice. Garlic enhances the flavor, making the fritters aromatic. Eggs hold the mixture together. They help create a nice texture. Adjust salt to your taste. Finally, you’ll need olive oil for frying. It gives a lovely golden color and crispiness. With these ingredients, you can create delicious fritters that are simple and satisfying. If you want more details, check out the Full Recipe. - Grate the zucchinis and squeeze out excess moisture. - Mash the chickpeas until mostly smooth. To prepare, first, you need to grate the zucchinis. Use a box grater for this task. After grating, take a clean kitchen towel and put the zucchinis inside. Squeeze them tightly to remove extra water. This step is key to avoid soggy fritters. Next, take a bowl and mash the chickpeas. You want them mostly smooth, but leave some chunks for texture. A fork or potato masher works well for this. - Combine all ingredients in the mixing bowl. - Heat oil in a skillet and shape fritters in the pan. - Fry until golden brown on both sides. Now, mix all the ingredients in the bowl. Add the grated zucchini, mashed chickpeas, beaten eggs, and the rest of the ingredients. Stir until everything is well combined. If the mixture feels too wet, add a little more flour. Next, heat a non-stick skillet over medium heat with a drizzle of olive oil. Use a spoon to drop small portions of the batter into the skillet. Flatten them slightly with the back of the spoon. Cook for about three to four minutes on each side. You want them golden brown and crispy. - Total preparation time: 15 minutes. - Total cooking time: 15 minutes. - Servings: 4 fritters per batch. In total, you’ll spend about 30 minutes making these fritters. Each batch makes four fritters, perfect for sharing or enjoying all by yourself! For the full recipe, check [Full Recipe]. To make the best fritters, start with the zucchini. Squeeze out maximum moisture from the grated zucchini. This step helps prevent soggy fritters. Use a clean towel to get every drop. Next, adjust the flour as needed. If your batter feels too wet, add more flour. You want the batter to hold together well. Cooking temperature is key. Maintain medium heat when frying. This ensures even cooking and helps avoid burning. Too high heat can brown the outside but leave the inside raw. So, be patient and let them cook slowly. Serve the fritters warm for the best taste. A dollop of yogurt or tzatziki on top adds creaminess. Garnish with fresh parsley and lemon wedges for color. This not only makes the dish look nice but also adds a bright flavor. For the full recipe, check out the recipe section. {{image_2}} If you want a gluten-free twist, use chickpea flour instead of all-purpose flour. Chickpea flour adds a nutty taste and holds everything together well. This swap makes the fritters crisp and light. Plus, it keeps the flavor rich and satisfying. You can boost nutrition and taste by adding other veggies. Grated carrots, chopped bell peppers, or fresh spinach work great. Each option adds color and flavor. They also make the fritters even healthier. Don’t be afraid to mix and match veggies based on what you have at home! Want to make your fritters more exciting? Try different spices like chili powder or curry powder. A little heat can really enhance the flavor. You can also add herbs like dill or thyme for a fresh twist. Experimenting with spices allows you to make these fritters your own. Store leftovers in an airtight container for up to 3 days. This keeps them fresh. When you’re ready to eat, just grab them from the fridge. You can freeze uncooked fritters for quick meals later. Place them on a baking sheet to freeze. Once frozen, transfer them to a freezer bag. Cooked fritters also freeze well, making it easy to reheat them when you're hungry. For the best taste, reheat in a skillet or oven. This will keep them crispy. Avoid microwaving, as it may make them soggy. Just a few minutes in a hot skillet can bring back that delightful crunch. Enjoy them warm with your favorite dips! Yes, prepare the batter and store in the fridge for up to 24 hours before cooking. This makes meal prep simple. You can whip up the batter while you cook other meals. When you are ready, just fry them up. They will taste fresh and delicious, even after a short time in the fridge. Replace eggs with a flaxseed or chia seed egg substitute. To do this, mix one tablespoon of ground flaxseeds or chia seeds with three tablespoons of water. Let it sit for about five minutes until it gets thick. This works great as a binder in your fritters. You won’t even taste the difference! These fritters pair well with salads, dips, or as part of a meze platter. You can serve them with yogurt or tzatziki for a cool dip. A fresh salad adds a nice crunch and balances the meal. You can also add some lemon wedges for extra zest. Explore different dips and sides to find your favorite combo! This blog post shared a simple recipe for Zucchini and Chickpea Fritters. We covered the ingredients, tools, and step-by-step instructions. You learned tips for perfect fritters and ways to make them gluten-free or veggie-packed. Storing tips help keep them fresh. In the end, these fritters offer a tasty, healthy option for meals or snacks. Enjoy your cooking adventure!](https://dailydishlab.com/wp-content/uploads/2025/07/99a74c3e-dfef-499f-9eba-f5de88290435-768x768.webp)
![- 6 large eggs - 1 cup fresh spinach, chopped - 1 medium tomato, diced - 1/2 cup feta cheese, crumbled - 1/4 cup milk (dairy or non-dairy) - 1/4 cup onion, finely chopped - 1 clove garlic, minced - 1 teaspoon dried oregano - Salt and pepper to taste - Olive oil spray or muffin liners Each muffin has about 90 calories. You get around 6 grams of protein, 5 grams of fat, and 6 grams of carbs. They are rich in vitamins A and C from spinach and tomatoes. Feta cheese adds calcium to your diet, while eggs provide essential protein. This makes them a great choice for a healthy breakfast. To get the best flavors, choose fresh spinach with bright green leaves. Look for tomatoes that are firm and slightly soft to the touch. Ripe tomatoes have the best taste. For feta cheese, pick a brand that uses quality milk and has a strong flavor. This will enhance your muffins and make them truly delicious. First, you need to preheat your oven to 375°F (190°C). This step warms the oven for even cooking. Next, prepare your muffin tin. You can spray it with olive oil or use muffin liners. Both options work well and help prevent sticking. In a large mixing bowl, crack six large eggs. Whisk them until they blend well. Then, add 1/4 cup of milk, salt, and pepper. Whisk again until smooth. Next, stir in 1 cup of chopped spinach, 1 medium diced tomato, 1/2 cup of crumbled feta cheese, 1/4 cup of finely chopped onion, 1 clove of minced garlic, and 1 teaspoon of dried oregano. Mix everything well until you see no dry spots. This creates a tasty and colorful egg mixture. Now, it’s time to fill the muffin tin. Pour the egg mixture evenly into each muffin cup. Fill them about 3/4 full to allow for rising. Place the muffin tin in the preheated oven. Bake for 18-20 minutes. The muffins should puff up and look golden. To check if they are done, insert a toothpick into the center. If it comes out clean, your muffins are ready. After baking, let them cool for a few minutes before removing them from the tin. Enjoy your delicious Spinach Tomato Egg Muffins! For the complete recipe, check the [Full Recipe]. When making spinach tomato egg muffins, some common mistakes can ruin the dish. First, avoid overfilling the muffin cups. Fill each cup only 3/4 full. This gives the muffins room to puff up. If you fill them too much, they may spill over. Next, do not underbake them. Check the muffins at 18 minutes. They should be puffed and firm in the center. If a toothpick comes out wet, bake a few more minutes. To achieve a fluffy muffin, whisk the eggs well. This adds air and lightens the mixture. Using fresh eggs also helps. If you want a denser muffin, you can add more cheese or spinach. However, too much can make them heavy. The right balance is key. A mix of fluffy and creamy textures makes these muffins divine. Serve your muffins warm with fresh fruit or a light salad. They pair well with a dollop of yogurt or a splash of hot sauce for extra flavor. For a complete meal, add whole grain toast or avocado slices on the side. You can also sprinkle fresh herbs on top for a vibrant touch. Explore different sides to find your perfect match for these delicious muffins. For the full recipe, check out the detailed instructions above and enjoy your cooking! {{image_2}} You can change the greens in this recipe easily. Try kale, swiss chard, or arugula. Each green gives a unique taste and texture. You can also swap the feta cheese. Try goat cheese, cheddar, or even mozzarella for different flavors. If you want protein, add cooked sausage or bacon bits. You can make these muffins your own! If you need a gluten-free option, use gluten-free milk. You can skip the cheese for a dairy-free version. For a vegan twist, replace the eggs with a mix of silken tofu and nutritional yeast. This keeps the muffins tasty and healthy. Always check that your substitutions fit your diet. Adding spices can make a big difference. Try a pinch of cayenne for heat or smoked paprika for a smoky taste. Fresh herbs like basil or parsley can brighten the flavor. You can also add a splash of hot sauce for some kick. Experiment with these ideas to create your perfect muffin! For the complete recipe, check out the [Full Recipe]. To keep your spinach tomato egg muffins fresh, store them in an airtight container. Place a paper towel inside to absorb moisture. This will help prevent sogginess. You can keep them in the fridge for up to four days. Just reheat in the microwave or oven before serving. If you want to make muffins ahead, freezing is a great option. Wait until they cool completely. Wrap each muffin tightly in plastic wrap. Then, place them in a freezer-safe bag. They can last for up to three months. When ready to eat, thaw them in the fridge overnight. Reheat in the microwave or oven for a warm meal. When stored properly, these muffins last four days in the refrigerator and three months in the freezer. Always check for signs of spoilage before eating. If they look or smell off, it’s best to toss them. Keeping track of your muffin stash helps ensure you enjoy them at their best. To make spinach tomato egg muffins, start by preheating your oven to 375°F (190°C). Prepare a muffin tin with olive oil spray or muffin liners. Next, crack six large eggs in a bowl and whisk them until smooth. Add 1/4 cup of milk, salt, and pepper to taste, and mix well. Now, stir in 1 cup of chopped fresh spinach, 1 medium diced tomato, 1/2 cup crumbled feta cheese, 1/4 cup finely chopped onion, 1 minced clove of garlic, and 1 teaspoon dried oregano. Pour this mixture into the muffin tin, filling each cup about 3/4 full. Bake for 18-20 minutes until puffed. Enjoy your muffins warm or at room temperature! Yes, you can use frozen spinach! Frozen spinach is often just as good as fresh. It is picked and frozen at peak freshness. Just make sure to thaw it first and squeeze out excess water. This will keep your muffins from getting soggy. Use about 1 cup of thawed spinach to replace the fresh spinach in the recipe. These muffins pair well with many sides. You can serve them with a fresh salad for a light meal. They also go great with fruit, like sliced oranges or berries. For drinks, consider pairing them with coffee or fresh juice. These options enhance the meal and make it even more enjoyable! This blog post explained how to make delicious spinach tomato egg muffins. We covered the key ingredients, nutritional facts, and fresh ingredient tips. I shared step-by-step instructions for preparation, baking, and tips to perfect texture. You learned variations, storage methods, and common FAQs. These muffins are easy to customize and perfect for any meal. Enjoy them fresh, or store them for later. You can make them fit your diet easily. Now, get cooking and savor these nutritious muffins!](https://dailydishlab.com/wp-content/uploads/2025/07/f8cd24d9-0783-4450-a45e-f2b92159c1aa-768x768.webp)


![For spicy roasted sweet potatoes, you need simple and fresh ingredients. Here’s what you’ll need: - 3 medium sweet potatoes, peeled and cut into 1-inch cubes - 2 tablespoons olive oil - Spices: smoked paprika, cayenne pepper, garlic powder, onion powder - Additional seasonings: salt and black pepper - Sweetener options: honey or maple syrup - Garnish: fresh cilantro, chopped These ingredients come together to create a dish that is both tasty and easy to make. Sweet potatoes provide a natural sweetness, while the spices add a punch of flavor. Using honey or maple syrup gives the dish a delightful glaze. You can adjust the heat by changing the amount of cayenne pepper. Fresh cilantro brings a bright finish to your plate. If you want to see the full recipe, check out the section below. - Step 1: Preheat the oven and prepare baking sheet Start by preheating your oven to 425°F (220°C). This high heat helps the sweet potatoes become crispy. While the oven heats, line a baking sheet with parchment paper. This makes for easy cleanup later. - Step 2: Mix sweet potatoes with seasoning and oil In a large bowl, gather your cubed sweet potatoes. Pour in 2 tablespoons of olive oil. Add 1 teaspoon each of smoked paprika, cayenne pepper, garlic powder, and onion powder. Season with salt and black pepper to taste. Toss everything well until the sweet potatoes are fully coated in the mix. - Step 3: Spread sweet potatoes and roast in the oven Next, spread your seasoned sweet potatoes on the lined baking sheet. Make sure they are in a single layer. This spacing allows them to roast evenly. Place the baking sheet in the preheated oven and roast for 25 to 30 minutes. Stir the sweet potatoes halfway through to ensure all sides get crispy. - Step 4: Drizzle with honey/maple syrup and garnish Once the sweet potatoes are tender and crispy, take them out of the oven. Drizzle 2 tablespoons of honey or maple syrup over them. Toss again to coat. Finally, transfer the sweet potatoes to a serving dish and sprinkle with fresh cilantro for a tasty finish. For the complete recipe, check out the [Full Recipe]. To make the best spicy roasted sweet potatoes, pick firm and smooth sweet potatoes. Look for ones with no soft spots or blemishes. Choose medium-sized sweet potatoes for even cooking. When peeling, use a sharp peeler to remove the skin easily. Cut the sweet potatoes into 1-inch cubes. This size helps them cook at the same rate. Crispiness comes from roasting sweet potatoes at a high temperature. Preheat your oven to 425°F (220°C). Spread the sweet potatoes on the baking sheet in a single layer. Avoid crowding them. This gives them room to brown and crisp up. Stir halfway through cooking to ensure even roasting. You want them tender inside and crispy outside. For an extra kick, try adding cumin or chili powder. Fresh herbs also add flavor. Consider topping your sweet potatoes with avocado or a squeeze of lime. These toppings bring freshness to the dish. For a sweet finish, drizzle on honey or maple syrup after roasting. This contrast makes the flavors pop. You can find the full recipe in the earlier section. {{image_2}} For a vegan option, use maple syrup instead of honey. This sweetener adds depth and keeps the dish plant-based. It blends well with the spices and enhances the natural sweetness of the sweet potatoes. If you need gluten-free modifications, rest assured that this recipe is already gluten-free. All the spices and oils used are safe. Feel free to add your favorite gluten-free ingredients for extra flavor! To kick up the heat, try different hot spices. You can use chipotle powder or even a pinch of red pepper flakes. This gives a smoky flavor and makes the dish even more exciting. For a sweet and savory twist, add caramelized onions. Cook the onions slowly until they are golden brown. Toss them with the sweet potatoes before serving. This adds a lovely depth to the dish. Pair these spicy roasted sweet potatoes with proteins like grilled chicken or fish. They also taste great with a fresh salad. The sweetness balances the savory flavors of the proteins. For a creative presentation, serve the sweet potatoes in a colorful bowl. Add fresh cilantro on top for a nice touch. You could also add a wedge of lime on the side for a zesty kick. This makes the dish look more inviting and adds extra flavor. For the full recipe, check out the link above! To keep your spicy roasted sweet potatoes fresh, store them in an airtight container. This helps lock in moisture and flavor. You can use glass or plastic containers with tight lids. Avoid using bags, as they may not keep them as fresh. Make sure to let the sweet potatoes cool down before sealing them up. This prevents condensation, which can make them soggy. When reheating, the oven is my favorite method. Preheat it to 375°F (190°C). Spread the sweet potatoes on a baking sheet. Heat for about 10-15 minutes until warm. This helps them stay crispy. If you're in a hurry, you can use the microwave. Place sweet potatoes in a microwave-safe dish. Heat in short bursts of 30 seconds, stirring in between. This helps heat them evenly without making them mushy. For the best taste, go for the oven when you can! How long do spicy roasted sweet potatoes last in the fridge? Spicy roasted sweet potatoes can last 3 to 5 days in the fridge. Store them in an airtight container. This helps keep them fresh and tasty. Can I prepare the sweet potatoes in advance? Yes, you can prep the sweet potatoes ahead of time. Cut and season them, then store in the fridge for up to 24 hours. Just roast them when you're ready to eat. What can I serve with spicy roasted sweet potatoes? These sweet potatoes pair well with many dishes. Try serving them with grilled chicken, fish, or a fresh salad. You can add them to tacos for a fun twist too. How do I prevent the sweet potatoes from burning? To avoid burning, make sure to cut the sweet potatoes evenly. Spread them out on the baking sheet. Stir them halfway through cooking for even roasting. Can I substitute other vegetables for sweet potatoes? Yes, you can use other veggies like carrots or butternut squash. Just adjust the cooking time based on the vegetable you choose. Each will add its own tasty twist! You learned how to make tasty roasted sweet potatoes. We covered ingredients, step-by-step cooking, and tips. Remember to choose quality sweet potatoes for the best flavor. Use spices you enjoy to make it your own. Don't forget about storage and reheating so your leftovers stay great. With these ideas, you'll impress at any meal. Enjoy your cooking adventure!](https://dailydishlab.com/wp-content/uploads/2025/07/c2c85d03-5716-4218-8e65-d8fbee897dfc-768x768.webp)
![- 2 pounds baby potatoes - 4 tablespoons unsalted butter, melted - 4 cloves garlic, minced - 1 tablespoon fresh parsley, chopped - 1 teaspoon sea salt - ½ teaspoon black pepper - ¼ teaspoon smoked paprika (optional) - Lemon zest (from 1 lemon) - Large pot - Baking sheet - Parchment paper - Measuring cup - Fork or potato masher Gather these ingredients to make your smashed potatoes shine. The baby potatoes are key; they cook evenly and have a great texture. The garlic brings a rich taste, while the butter adds a smooth finish. Fresh parsley not only brightens the dish but also adds color. You’ll also need some basic tools. The large pot helps cook the potatoes, and the baking sheet is perfect for roasting. Parchment paper prevents sticking, making cleanup easy. A measuring cup ensures you get the butter just right. Lastly, a fork or masher helps you smash the potatoes to the perfect flatness without breaking them apart. For a full experience, check the [Full Recipe] for step-by-step guidance. - Preheat your oven to 450°F (230°C). - Fill a large pot with water and add a pinch of salt. - Bring the pot to a boil over high heat. - Add 2 pounds of baby potatoes to the pot. - Cook the potatoes until fork-tender, about 15-20 minutes. - Drain the potatoes and let them cool for about 5 minutes. - Line a baking sheet with parchment paper. - Place the cooled potatoes on the sheet. - Use the bottom of a measuring cup or a fork to smash each potato gently. - In a small bowl, mix 4 tablespoons of melted butter with 4 minced garlic cloves. - Add 1 teaspoon of sea salt and ½ teaspoon of black pepper. - If you want, add ¼ teaspoon of smoked paprika. - Brush or drizzle this garlic butter over each smashed potato. - Bake the potatoes in the preheated oven for 20-25 minutes. - Keep an eye on them until they are golden and crispy on the edges. - Remove from the oven and sprinkle with fresh parsley and lemon zest before serving. - You can find the Full Recipe for more details. To get the best crispy texture, adjust your baking time. Bake the smashed potatoes for 20-25 minutes. If you want them crispier, leave them in for a few more minutes. Just keep an eye on them! The size of the potatoes also plays a big role. Use baby potatoes for even cooking. Smaller potatoes smash well and bake faster. For more flavor, try adding different spices. Smoked paprika adds a nice smoky taste. You can also sprinkle in some onion powder or chili flakes for heat. When it comes to garlic, fresh garlic gives the best taste. I recommend using whole cloves and mincing them yourself. This ensures the garlic flavor is strong and fresh. Presentation is key! Serve your smashed potatoes on a big white platter. Drizzle any leftover garlic butter over the top. Garnish with fresh parsley for a pop of color. Fresh herbs like chives or thyme also look great and add flavor. This makes your dish not only tasty but also beautiful to serve. {{image_2}} You can switch up your potato choice for smashed potatoes. While baby potatoes work great, try red or yellow potatoes for a different taste. These potatoes add creaminess and a slight sweetness. If you want to swap butter, olive oil is a fantastic choice. It brings a rich flavor and is a bit healthier. You can also use coconut oil for a unique twist. Adding cheese can elevate your smashed potatoes. Grated Parmesan adds a salty, nutty taste. For a creamier option, use cheddar cheese. Just sprinkle it on top before the final bake. You can also play with spices. Try adding rosemary or thyme for an earthy flavor. Smoked paprika adds warmth and a hint of smokiness. Experiment with different spices to find your favorite combo. Want to make this dish vegan? Simply replace butter with a plant-based butter. Use a neutral oil, like canola, for the garlic mixture. If you need low-sodium options, cut back on salt. Use fresh herbs instead to boost flavor. Lemon juice can also add brightness without extra salt. For more details, check out the Full Recipe. To keep your smashed potatoes fresh, store them in the fridge. Place leftovers in an airtight container. This helps prevent moisture loss. Use a glass or plastic container with a tight lid. They will stay good for about 3 to 5 days. If you want to keep them longer, consider freezing instead. When it's time to enjoy your leftovers, you have several options. The best way to reheat smashed potatoes is in the oven. Preheat your oven to 350°F (175°C). Place the potatoes on a baking sheet and cover them with foil. This keeps them moist. Bake for about 15 minutes. If you want a crispy finish, remove the foil for the last 5 minutes. To avoid soggy potatoes, do not microwave them. Microwaving can make the texture mushy. For longer storage, freezing is a great option. Cool the smashed potatoes completely before freezing. Place them in a freezer-safe bag or container. Make sure to squeeze out any extra air. They can last up to 2 months in the freezer. When you’re ready to eat them, thaw in the fridge overnight. Reheat them in the oven for the best texture. Avoid thawing in the microwave to keep them from getting soggy. To make your smashed potatoes extra crispy, I suggest two key steps. First, ensure your oven is hot, around 450°F (230°C). This helps achieve that golden crunch. Second, after smashing the potatoes, brush them well with garlic butter. This adds flavor and helps crisp up the edges. Yes, you can prepare the garlic butter ahead of time. Simply melt the butter and mix in minced garlic and other ingredients. Store it in the fridge for up to a week. This way, your cooking process becomes quicker when you’re ready to make the potatoes. Smashed potatoes pair well with many dishes. They go great with roasted chicken, grilled steak, or even a fresh salad. You can also serve them with a dip or sauce for added flavor. Feel free to get creative! Absolutely! While parsley is a classic choice, you can use other herbs too. Fresh chives, thyme, or rosemary work wonderfully. This gives your smashed potatoes a unique twist and flavor profile. Smashed potatoes can last in the fridge for about 3 to 5 days. Store them in an airtight container to keep them fresh. When ready to eat, just reheat them in the oven for the best texture. - [Explore the complete Garlic Butter Smashed Potatoes recipe here.](#) This post covered how to make Garlic Butter Smashed Potatoes. We discussed ingredients, steps, tips, and variations. You learned how to prepare, smash, and bake potatoes for a crispy treat. I shared ways to enhance flavor and provided storage advice. With this recipe, you can impress anyone at your next meal. Enjoy experimenting and making it your own!](https://dailydishlab.com/wp-content/uploads/2025/07/1cd4206a-28a3-462f-8de7-03118f6b2243-768x768.webp)