Skip to content
About
Contact
Cookie Policy
Copyright Policy
Disclaimer
Search
Home
Dinner
Appetizer
Desserts
Drinks
About
Contact
Privacy Policy
Toggle Menu
Home
/
Appetizer
- Page 17
Appetizer
Spicy Mango Quinoa Salad Fresh and Easy Recipe
Caramelized Onion Hummus Tasty and Simple Dip
Roasted Garlic Herb Mushrooms Flavorful and Simple Dish
Garlic Parmesan Roasted Cauliflower Savory Delight
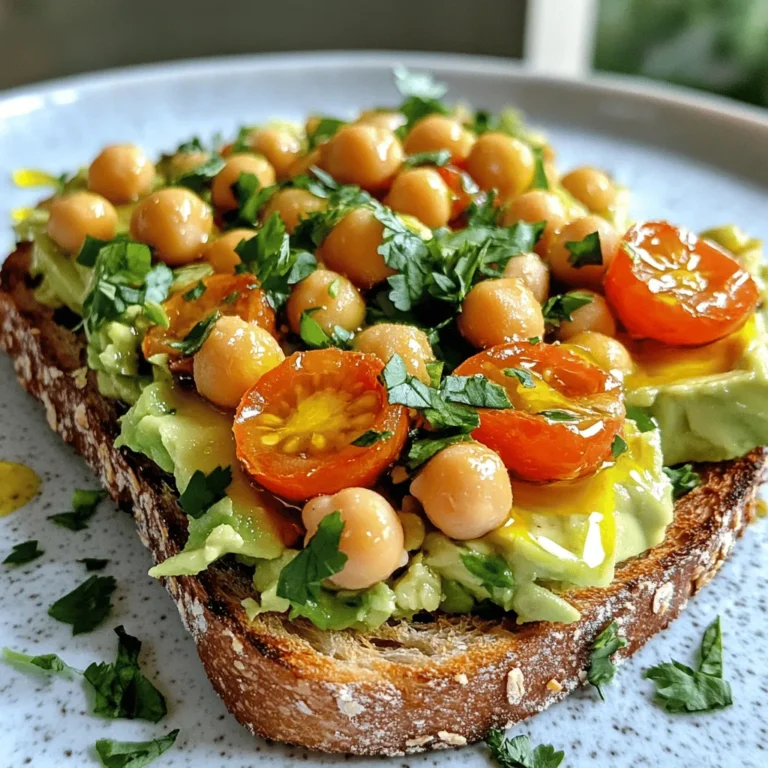
Smashed Chickpea Avocado Toast Quick and Healthy Meal
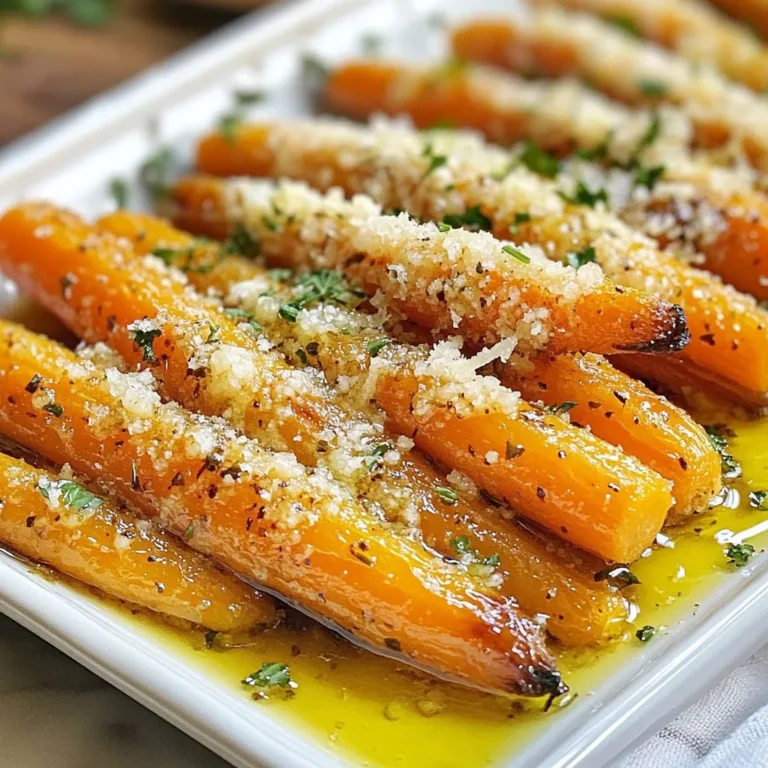
Garlic Parmesan Roasted Carrots Flavorful Side Dish
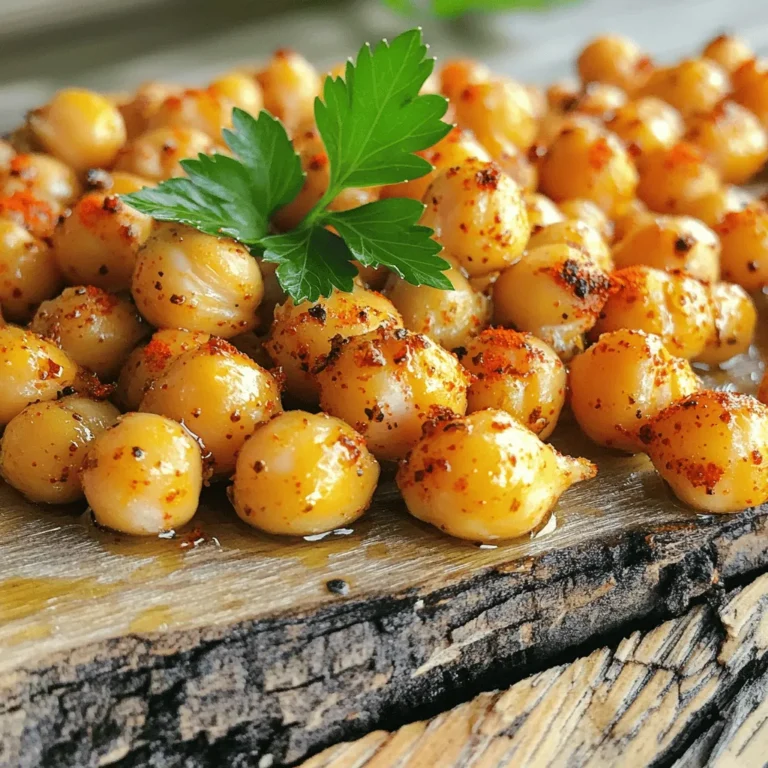
Spicy Roasted Chickpeas Crispy and Flavorful Snack
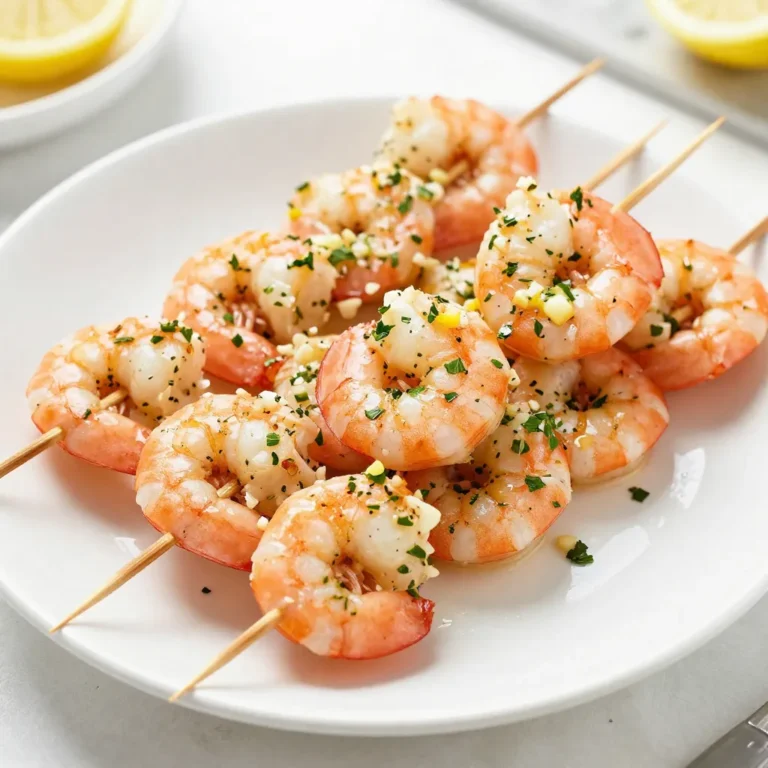
Garlic Herb Butter Shrimp Skewers Flavorful Delight
Easy Chicken Caesar Wraps Quick and Tasty Meal
Simple Grilled Veggie Skewers Flavorful Summer Dish
Page navigation
Previous Page
Previous
1
…
15
16
17
18
19
…
26
Next Page
Next
Home
Dinner
Appetizer
Desserts
Drinks
About
Contact
Privacy Policy
Toggle Menu Close
Search for:
Search

![To make delicious caramelized onion hummus, you'll need some simple ingredients. Here’s what to gather: - 2 medium onions, thinly sliced - 2 tablespoons olive oil - 1 can (15 oz) chickpeas, drained and rinsed - 2 tablespoons tahini - 2 tablespoons lemon juice - 1 garlic clove, minced - 1/2 teaspoon cumin - Salt and pepper to taste - Water, as needed - Fresh herbs (parsley or thyme) for garnish These ingredients come together to create a rich and flavorful dip. The caramelized onions add sweetness, while the chickpeas give it a creamy texture. Tahini and lemon juice bring a nice balance of nutty and tangy flavors. You can easily find these items at your local grocery store. Remember, using fresh herbs for garnish makes your dish look pretty and tastes great too. For the full recipe, follow the steps carefully to achieve the best results! - Heat olive oil in a skillet over medium heat. - Add the thinly sliced onions and stir. - Cook the onions for about 20-25 minutes. - Stir occasionally until the onions are golden brown. Caramelizing onions takes patience, but the sweet, rich flavor is worth it. You want them to turn soft and brown, not burn. The longer you cook them, the sweeter they get. Once they are done, remove them from heat and let them cool a bit. - In a food processor, combine chickpeas, tahini, and seasonings. - Add lemon juice, minced garlic, and half of the caramelized onions. Blend these ingredients until smooth. Chickpeas give a creamy base, while tahini adds a nutty flavor. The garlic brings a nice kick. Don't forget to save some caramelized onions for later. They will add a tasty finish to your dip! - If the mixture is too thick, add water. - Start with one tablespoon at a time until you reach the right consistency. - Taste the hummus and season with salt and pepper. Blend again to mix the seasonings well. The texture should be creamy and spreadable. If you want to impress, drizzle olive oil on top and sprinkle some smoked paprika. This dips well with pita chips or fresh veggies. For the full recipe, check out the complete guide. To make the best caramelized onions, follow these tips. First, use a heavy skillet. This helps heat spread evenly. Second, slice your onions thin. Thin slices cook better and faster. Cook on medium heat, not high. Stir often to keep them from burning. This process takes about 20-25 minutes. You want them golden, not dark brown. The right timing brings out their sweet flavor. Want to spice up your hummus? Try adding cumin or smoked paprika. These spices add depth. If you like heat, add a pinch of cayenne. You can also switch up the garnishes. Fresh herbs like parsley or thyme brighten the dish. A drizzle of balsamic glaze adds a nice touch too. Experimenting with flavors keeps things exciting. When serving hummus, think about pairings. Pita chips, fresh veggies, or warm pita bread work great. For a fun twist, serve with crunchy crackers. Presentation matters too! Use a wide bowl for the hummus. Create a swirl in the top, then drizzle with olive oil. Lastly, sprinkle some smoked paprika for a pop of color. These small touches make your dish shine. For the full recipe, check the Caramelized Onion Hummus section. {{image_2}} You can make your caramelized onion hummus even better. Try adding roasted peppers for a spicy kick. They give a nice warmth and depth. You can also toss in fresh herbs like basil or cilantro. This adds a fresh taste and brightens the flavor. If you want a twist, use white beans instead of chickpeas. They create a smooth texture and mild taste. For nut butter lovers, swap tahini with almond or cashew butter. This change adds a unique flavor profile and keeps it creamy. You can get creative with how you serve hummus. Use it as a spread on sandwiches for a tasty lunch. It also works great as a dip for parties or game nights. Pair it with fresh veggies or pita chips for a fun snack. For the full recipe, check out the details above! To keep your caramelized onion hummus fresh, use an airtight container. Glass jars work best since they do not absorb odors. You can also use plastic containers with tight lids. Make sure to seal the container well. Place a layer of plastic wrap between the hummus and the lid for extra freshness. Store your hummus in the fridge right after making it. This helps keep it safe and tasty. If you want to enjoy it later, avoid leaving it out at room temperature for more than two hours. How long does it keep in the fridge? Homemade hummus lasts about five to seven days in the fridge. Always check for signs of spoilage, like an off smell or mold. If you see any, throw it away. Freezing hummus for extended storage is also easy. Portion it out in small containers for quick access. Hummus can last up to three months in the freezer. Just remember to thaw it in the fridge overnight before you eat it again. This way, you can enjoy your delicious hummus anytime you want. For the full recipe, check here: [Full Recipe]. Caramelized onion hummus is a creamy dip made with chickpeas and sweet, soft onions. The onions add a rich flavor, while the chickpeas give a smooth and hearty base. This hummus is perfect for dipping or spreading. Its texture is creamy and thick, making it great for pairing with chips or veggies. The sweetness of the caramelized onions balances the nutty taste of tahini and the zest of lemon. Yes, you can use store-bought caramelized onions for this recipe. They save time and still taste great. However, making them at home gives you more control over the flavor. Homemade onions can be cooked to your liking. They also add freshness to the dish. If you choose store-bought, check the label for added ingredients. You want to keep it simple and healthy. Hummus is packed with good nutrients. Chickpeas provide protein and fiber, which help keep you full. Tahini, made from sesame seeds, adds healthy fats and calcium. Garlic can boost your immune system. Lemon juice gives a dose of vitamin C. Overall, hummus is a healthy snack that supports a balanced diet. It’s a great way to enjoy veggies and whole grains while keeping your meals tasty. In this blog post, we explored how to make a delicious caramelized onion hummus. We covered each ingredient, from onions to tahini, and provided step-by-step instructions for caramelizing and blending. I shared tips for perfecting flavor and offered variations to try. Storing your hummus properly keeps it fresh longer. Finally, I answered common questions to enhance your hummus knowledge. Enjoy making this tasty dip! It's easy and brings joy to your meals.](https://dailydishlab.com/wp-content/uploads/2025/06/31a0e749-19bc-456b-b0d4-468054f59b86-768x768.webp)
![For Garlic Parmesan Roasted Cauliflower, you need fresh ingredients to get the best flavor. Here’s what you will need: - 1 large head of cauliflower, cut into florets - 4 tablespoons olive oil - 4 cloves garlic, minced - 1 teaspoon smoked paprika - 1 teaspoon onion powder - 1 teaspoon salt - ½ teaspoon black pepper - ½ cup grated Parmesan cheese - 2 tablespoons fresh parsley, chopped (for garnish) - Lemon wedges (for serving) Using fresh ingredients matters. Fresh garlic brings a strong aroma. Fresh parsley adds a pop of color. Each ingredient works together to make this dish shine. If you have dietary restrictions, consider these substitutes: - Use nutritional yeast instead of Parmesan for a vegan option. - Swap olive oil for avocado oil if you prefer. - Try cauliflower rice if you want a lower-carb option. These swaps can keep the dish tasty while meeting your needs. For the full recipe, check the details above. 1. Preheat your oven to 425°F (220°C). This high heat helps the cauliflower roast well. 2. Line a baking sheet with parchment paper. This keeps the cauliflower from sticking. 3. In a large bowl, mix the olive oil, minced garlic, smoked paprika, onion powder, salt, and black pepper. Stir until combined. 4. Add the cauliflower florets to the bowl. Toss them well to coat with the oil and spice mix. Each floret should be covered for the best flavor. 1. Spread the coated cauliflower evenly on the prepared baking sheet. Make sure they are not crowded. 2. Roast the cauliflower for about 25 minutes. Stir halfway through to ensure even cooking. 3. Check for doneness by poking a floret with a fork. It should be tender and golden brown. 1. After roasting, take the cauliflower out of the oven. Quickly sprinkle the grated Parmesan cheese over the top. 2. Return the baking sheet to the oven for 5 more minutes. This melts the cheese and makes it crispy. 3. Once done, remove it from the oven. Garnish with fresh parsley and serve with lemon wedges. The lemon adds a fresh zing that brightens the dish. For the full recipe, including ingredient details, check the [Full Recipe]. To achieve crispy cauliflower, you need enough space on the baking sheet. Avoid crowding the florets. This allows hot air to circulate and crisp them up. I also recommend a touch of oil for that golden finish. Stick to the roasting time of 25 minutes, and stir halfway through to roast evenly. If you want to roast other veggies at the same time, keep their cooking times in mind. Carrots and bell peppers work well alongside cauliflower. Just cut them smaller than the cauliflower so they cook at the same pace. For seasoning adjustments, feel free to play around with the spices. A pinch of cayenne adds heat. Try fresh herbs like thyme for a fragrant twist. You can also swap the Parmesan for nutritional yeast for a vegan option. For storing leftovers, place them in an airtight container. Let them cool first. Store in the fridge for up to three days. When reheating, use the oven if you want to keep the crunch. Heat at 350°F for 10 minutes, or until warm. If you want to freeze the roasted cauliflower, allow it to cool completely. Use a freezer-safe bag, and squeeze out the air before sealing. It should last up to three months. When ready to eat, thaw in the fridge and reheat in the oven for best results. For the full recipe, refer to the earlier section. Enjoy your garlic Parmesan roasted cauliflower! {{image_2}} You can change the taste of your Garlic Parmesan Roasted Cauliflower in fun ways. Try adding spices like cayenne for heat or cumin for a warm flavor. Herbs like thyme or rosemary can also add freshness and aroma. If you want a twist, think about using cheese alternatives. Nutritional yeast gives a cheesy flavor without dairy. You can also use feta or goat cheese for a tangy bite. This dish works great with many meals. Serve it alongside grilled chicken, fish, or even quinoa for a filling meal. You can create a cauliflower salad by mixing in cherry tomatoes, cucumbers, or olives. This adds color and crunch! Pair your roasted cauliflower with dips like ranch or hummus for a tasty appetizer. The creamy dips make a great contrast to the roasted flavors. For more ways to enjoy this dish, check out the Full Recipe. What are the best cooking methods for cauliflower? The best cooking methods for cauliflower include roasting, steaming, and sautéing. Roasting brings out the natural sweetness and adds a nice crunch. For a softer texture, steaming works well. Sautéing gives you a quick cook while keeping the flavor bright. Each method highlights the taste of cauliflower in its own way. Can I use frozen cauliflower for this recipe? Yes, you can use frozen cauliflower for this recipe. Just make sure to thaw it first. Pat the cauliflower dry with a towel to remove excess moisture. This step helps the cauliflower crisp up nicely during roasting. How do I know when the cauliflower is done roasting? You’ll know the cauliflower is done when it is golden brown and tender. A fork should easily pierce through the florets. Keep an eye on it in the last few minutes to avoid burning. The cheese should be melted and slightly crispy at the end. Overview of calories and main nutrients A serving of Garlic Parmesan Roasted Cauliflower has about 150 calories. It contains fiber, vitamins C and K, and calcium. The olive oil adds healthy fats, while Parmesan cheese adds protein. Discussion on health benefits of cauliflower and Parmesan Cauliflower is low in calories and high in nutrients. It supports digestion and helps with weight management. Parmesan cheese adds flavor and calcium for strong bones. Together, this dish offers a tasty way to enjoy these benefits. Suggested serving sizes for a balanced meal For a balanced meal, serve about one cup of roasted cauliflower. Pair it with lean protein, like chicken or fish, and a whole grain, like brown rice or quinoa. This creates a complete meal with good nutrients. To make garlic Parmesan roasted cauliflower, you will need: - 1 large head of cauliflower, cut into florets - 4 tablespoons olive oil - 4 cloves garlic, minced - 1 teaspoon smoked paprika - 1 teaspoon onion powder - 1 teaspoon salt - ½ teaspoon black pepper - ½ cup grated Parmesan cheese - 2 tablespoons fresh parsley, chopped (for garnish) - Lemon wedges (for serving) Start by preheating the oven to 425°F (220°C). Line a baking sheet with parchment paper. In a large bowl, mix the olive oil, minced garlic, smoked paprika, onion powder, salt, and black pepper. Add the cauliflower florets and toss them until they are well coated. Spread the coated florets on the baking sheet. Roast them for 25 minutes, stirring halfway through. They should be tender and golden brown when done. Sprinkle the grated Parmesan cheese on top and return it to the oven for another 5 minutes. This will melt the cheese and make it slightly crispy. Garnish with fresh parsley and serve with lemon wedges on the side. This recipe serves 4 people and takes about 35 minutes in total, including 10 minutes of prep time. For more tips on garlic Parmesan roasted cauliflower, check out related recipes or cooking guides that inspire your kitchen adventures! In this post, we explored how to make garlic Parmesan roasted cauliflower. We discussed ingredients, preparation steps, and roasting tips for the perfect dish. Fresh ingredients are key for great flavor. We also offered advice on storing leftovers and suggested delicious variations. The journey of this recipe can enhance any meal. Try these tips and make it your own! Enjoy every bite of your tasty creation.](https://dailydishlab.com/wp-content/uploads/2025/06/fe37a522-1e60-44eb-9a11-11c72f683603-768x768.webp)