Skip to content
About
Contact
Cookie Policy
Copyright Policy
Disclaimer
Search
Home
Dinner
Appetizer
Desserts
Drinks
About
Contact
Privacy Policy
Toggle Menu
Home
/
Desserts
- Page 24
Desserts
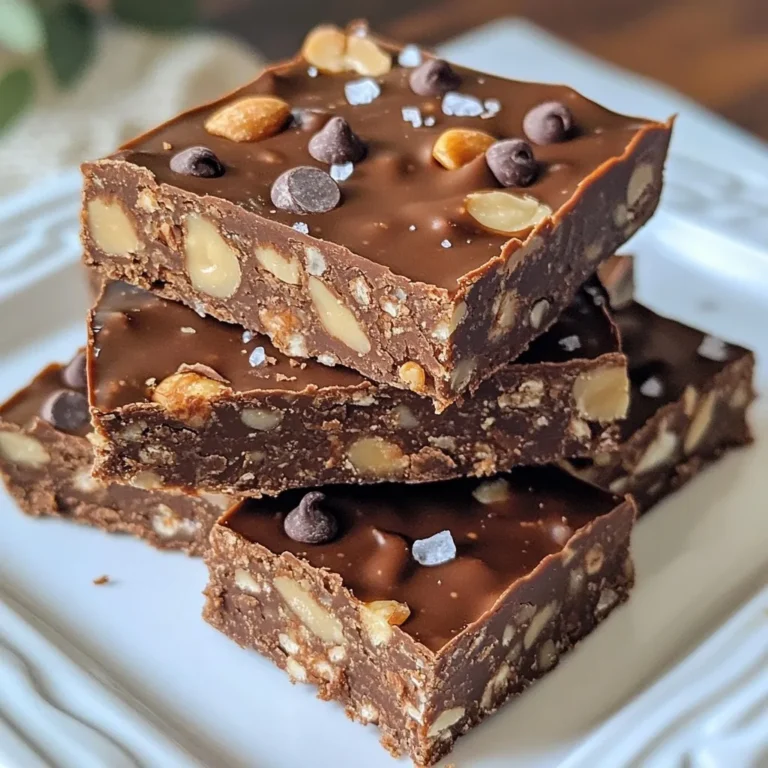
Chocolate Peanut Butter Energy Bars Easy Fuel Boost
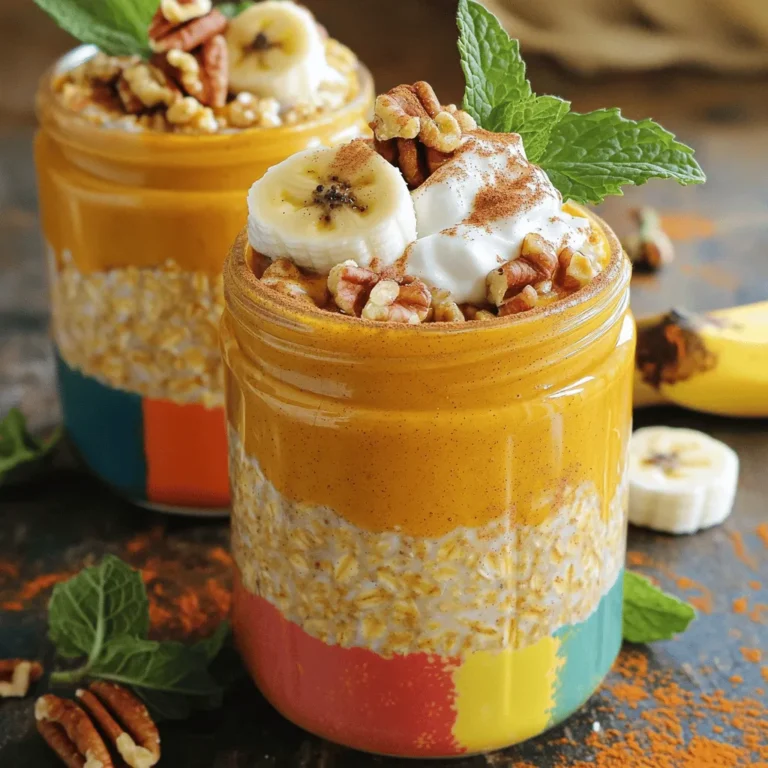
Pumpkin Spice Overnight Oats Simple and Tasty Recipe
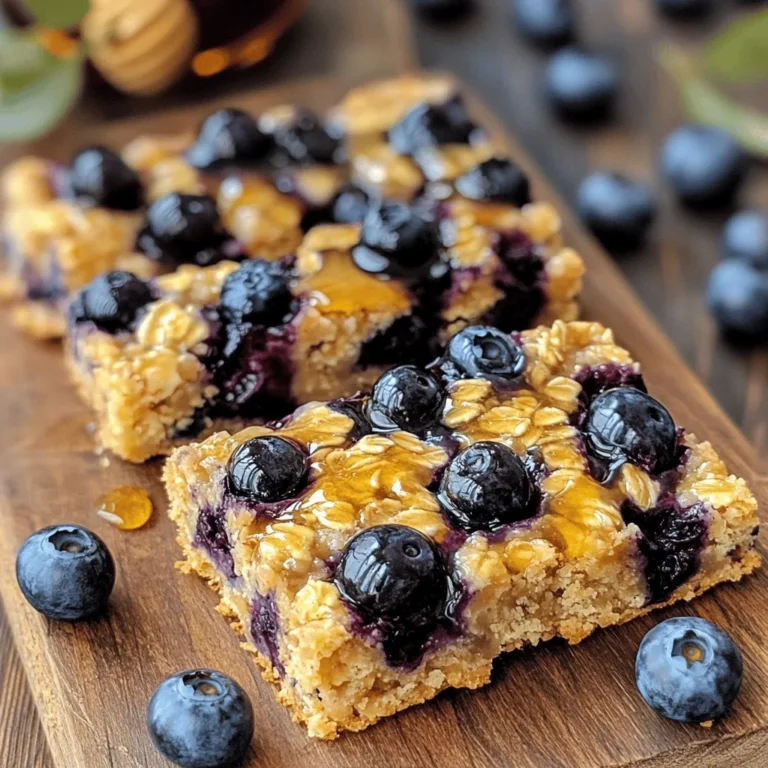
Blueberry Oatmeal Breakfast Bars Easy and Tasty Recipe
No-Bake Cookie Dough Bars Simple and Tasty Treat
Easy Cinnamon Apple Chips Simple and Tasty Snack
Raspberry White Chocolate Scones Flavorful and Easy Treat
Classic Blueberry Muffins Simple and Tasty Recipe
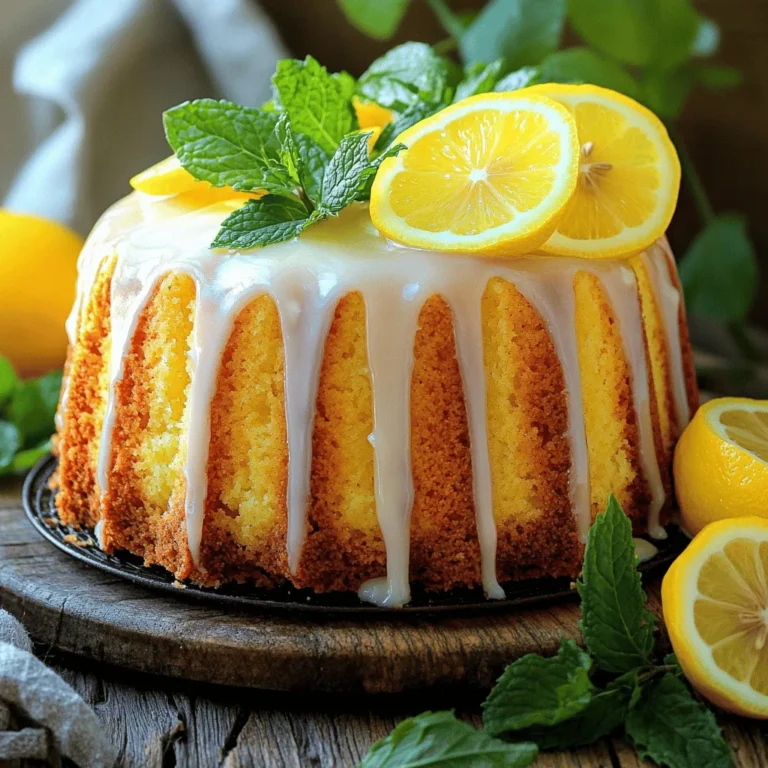
Lemon Drizzle Pound Cake Moist and Flavorful Delight
Peach Upside Down Cake Irresistible Dessert Recipe
Peach Pecan Energy Bites Quick and Healthy Snack
Page navigation
Previous Page
Previous
1
…
22
23
24
25
26
…
40
Next Page
Next
Home
Dinner
Appetizer
Desserts
Drinks
About
Contact
Privacy Policy
Toggle Menu Close
Search for:
Search

![To make these delicious scones, gather the following ingredients: - 2 cups all-purpose flour - 1/3 cup granulated sugar - 1 tablespoon baking powder - 1/4 teaspoon salt - 1/2 cup unsalted butter, chilled and cubed - 1/2 cup heavy cream - 1 large egg - 1 teaspoon vanilla extract - 1 cup fresh raspberries - 1/2 cup white chocolate chips You can customize your scones with some fun add-ins. Here are a few ideas: - 1/2 cup chopped nuts, like pecans or walnuts - 1/2 teaspoon cinnamon for a warm spice note - Zest from 1 lemon or orange for a citrus twist - A handful of dark chocolate chips for a richer flavor Using fresh, high-quality ingredients makes a big difference. For the best results, choose: - Flour: Go for a good brand of all-purpose flour. This helps with texture. - Butter: Use unsalted butter. It gives you control over the salt in your recipe. - Raspberries: Fresh raspberries are key. Look for plump, firm berries. - Chocolate: Choose high-quality white chocolate chips. They melt well and taste great. These choices enhance the flavor and texture of your scones. For an easy guide, check out the Full Recipe for more details. 1. Preheat your oven to 400°F (200°C). Line a baking sheet with parchment paper. 2. In a large bowl, whisk together the flour, sugar, baking powder, and salt. 3. Add the chilled butter to the dry mix. Use your fingers or a pastry cutter to blend until the mix looks like coarse crumbs. 4. In another bowl, whisk the cream, egg, and vanilla together. 5. Pour the cream mix into the flour mix. Stir gently until just combined. Do not overmix! 6. Fold in the fresh raspberries and white chocolate chips. Make sure they are evenly spread. 7. Turn the dough onto a floured surface. Knead gently a few times until it comes together. 8. Pat the dough into a circle about 1 inch thick. Cut it into 8 wedges with a sharp knife or pizza cutter. 9. Place the wedges on the baking sheet, leaving space between each. 10. Bake for 15-20 minutes until golden brown on top. 11. Remove from the oven. Let them cool slightly on a wire rack before serving. - Step 1: Make sure your oven is fully preheated. This helps the scones rise well. - Step 3: Keep the butter cold. This gives the scones a nice flaky texture. - Step 5: Mixing too much makes the scones tough. Mix until you see no dry flour. - Step 6: Gently fold, so you keep the raspberries whole. This adds a juicy burst of flavor. - Overmixing the dough: This results in tough scones. Mix just until combined. - Skipping the chilling: Cold ingredients help create a better texture. Don’t skip the cold butter! - Not measuring ingredients: Use exact measurements for the best results. Baking is a science. - Ignoring baking time: Check your scones at 15 minutes. They should be golden, not burnt. For the complete recipe, check out the Full Recipe section above. To make the best raspberry white chocolate scones, follow a few simple steps. First, keep your butter very cold. This helps create a fluffy texture. I suggest cubing the butter and chilling it before use. Second, mix the dry and wet ingredients gently. Overmixing makes scones tough, and we want them light and airy. Lastly, shape your dough carefully. Pat it down without pressing too hard to keep air pockets inside. Serve these scones warm for the best taste. You can dust them with powdered sugar for a sweet touch. Pair them with clotted cream for richness. If you like, add fresh raspberries on the side for extra flavor. These scones also shine at brunch or tea time, making them perfect for any gathering. Raspberry white chocolate scones go well with many drinks. A nice cup of Earl Grey tea complements their sweetness. You can also enjoy them with a light lemonade or even coffee. For spreads, try a tart raspberry jam to balance the sweetness. Each pairing enhances the flavors of the scones, making each bite delightful. For the full recipe, visit the [Full Recipe]. {{image_2}} You can play with the flavors of your scones. Instead of raspberries, try blueberries or strawberries for a fresh twist. You may also swap white chocolate for dark chocolate or milk chocolate. Each option gives a new taste. If you like nuts, add chopped almonds or pecans to the mix. These small changes can make a big difference. If you need gluten-free scones, use a gluten-free flour blend. Many blends work well in baking. Look for one that has xanthan gum. This will help the scones hold their shape. You can also use almond flour or coconut flour, but adjust the liquid in the recipe. These flours add a different flavor and texture. You can change the flavors with the seasons. In fall, add chopped apples and cinnamon for a warm taste. Winter calls for cranberry and orange zest. In spring, use lemon zest and poppy seeds for a bright, fresh flavor. Summer is perfect for peaches or cherries. Each season brings new fruits to enjoy in your scones. For the complete recipe, check the Full Recipe section. To keep your Raspberry White Chocolate Scones fresh, store them in an airtight container. This helps maintain their soft texture and delightful flavor. Place a piece of parchment paper between layers to prevent sticking. You can keep them at room temperature for up to two days. If you want to store them longer, the fridge is a good option, but it may dry them out a bit. When you're ready to enjoy your scones again, reheating is easy. Preheat your oven to 350°F (175°C). Place the scones on a baking sheet. Warm them for about 5-7 minutes. This will bring back their fresh-baked taste. You can also microwave them for about 10-15 seconds, but this might make them a bit soft. Freezing is a great way to save scones for later. Allow the scones to cool completely. Then, wrap each scone in plastic wrap. Place them in a freezer bag or container. They will stay fresh for up to three months. When you want to eat them, thaw overnight in the fridge. Then, reheat as mentioned above. This way, you can enjoy these tasty treats anytime! For the complete recipe, check out the Full Recipe. You can tell scones are done when they turn golden brown. The tops should feel firm to the touch. A toothpick inserted into the center should come out clean. If it has dough on it, bake them a bit longer. These signs help ensure your Raspberry White Chocolate Scones are baked just right! Yes, you can make the dough ahead of time! Chill the dough for up to 24 hours in the fridge. Wrap it tightly in plastic wrap. When you’re ready to bake, simply cut the dough into wedges and bake as directed. This saves time and lets you enjoy fresh scones at your convenience. If you need a substitute for white chocolate, try using dark chocolate chips or milk chocolate chips. You can also use dried fruit like cherries or apricots for a different flavor. Each option adds a unique twist to the scone. Experiment and find what you like best! For the complete recipe and specific steps, check the Full Recipe. We explored how to make perfect scones from scratch. We covered key ingredients, detailed instructions, and helpful tips. I shared common mistakes to avoid and fun variations to try. Storing and reheating tips ensure you enjoy fresh scones longer. Baking scones is easy and rewarding. With practice, your scones will impress everyone. Get creative and enjoy this tasty treat!](https://dailydishlab.com/wp-content/uploads/2025/07/7e56670c-1729-4c97-bf35-067a569313c1-768x768.webp)
![To make these classic blueberry muffins, you need a few key ingredients: - 2 cups all-purpose flour - 1 cup granulated sugar - 1 tablespoon baking powder - 1/2 teaspoon salt - 1/2 cup unsalted butter, melted and cooled - 1 cup milk (whole or almond) - 2 large eggs - 1 teaspoon vanilla extract - 1 1/2 cups fresh blueberries These ingredients work together to create a soft, fluffy, and delicious muffin. The flour gives structure, while the sugar adds sweetness. Baking powder helps them rise, leading to a light texture. Butter adds richness, and milk keeps them moist. Blueberries are the star of this dish, bursting with flavor. You can also enhance your muffins with these optional ingredients: - Zest of 1 lemon (for added flavor) - 1 tablespoon coarse sugar (for topping, optional) - Variations for milk substitutes (whole or almond) Adding lemon zest brings a bright, fresh taste. Coarse sugar on top gives a nice crunch. If you're avoiding dairy, almond milk works well. These extras can elevate your muffins, making them even more special. For the complete recipe, check out the [Full Recipe]. 1. Preheat your oven to 375°F (190°C). This step makes sure your muffins bake evenly. Line a 12-cup muffin pan with paper liners or grease it with non-stick spray. 2. In a large mixing bowl, combine the dry ingredients. Add 2 cups of all-purpose flour, 1 cup of granulated sugar, 1 tablespoon of baking powder, and 1/2 teaspoon of salt. Whisk them together until they are well mixed. 3. In another bowl, combine the wet ingredients. Whisk together 1/2 cup of melted butter, 1 cup of milk, 2 large eggs, and 1 teaspoon of vanilla extract. Make sure everything is smooth and fully mixed. 1. Now, it's time to mix the wet and dry ingredients. Pour the wet mixture into the dry mixture. Use a spatula to gently mix them together. Do not overmix; a few lumps are okay. 2. Carefully fold in the blueberries and lemon zest. Add 1 1/2 cups of fresh blueberries. If you use frozen blueberries, keep them frozen to avoid color bleeding. 3. Next, fill the muffin cups. Scoop the batter into each cup, filling them about 3/4 full. If you like a crunchy top, sprinkle 1 tablespoon of coarse sugar on top. 4. Bake your muffins for 18-22 minutes. They are ready when the tops turn golden and a toothpick comes out clean from the center. For the complete recipe, check out the Full Recipe section. To make perfect blueberry muffins, the texture matters a lot. First, avoid overmixing the batter. When you mix the wet and dry ingredients, stop as soon as you see no dry flour. Lumps are okay. Overmixing makes the muffins tough, which we don’t want! Next, cooling the muffins properly is key. After baking, let them sit in the pan for just five minutes. This keeps them moist. Then, transfer them to a wire rack. Cooling them fully helps maintain a soft texture and stops sogginess. You can make your muffins even better with a few simple additions. Consider adding chopped nuts, like walnuts or pecans, for a crunchy bite. A pinch of cinnamon or nutmeg can add warmth and depth to the flavor. You can also play with the sweetness. If you prefer a less sweet muffin, reduce the sugar by a quarter cup. For a sweeter treat, add a bit more sugar or top the muffins with a sprinkle of coarse sugar before baking. This gives a nice, sweet crunch on top. For the complete recipe, check out the [Full Recipe]. {{image_2}} You can easily switch up your classic blueberry muffins with new flavors. One fun option is lemon-blueberry muffins. Just add the zest of one lemon to your batter. This brings a bright and fresh taste to each bite. The lemon pairs well with the sweet blueberries, creating a lovely balance. Another delightful option is almond-flavored muffins with blueberries. You can achieve this by adding almond extract instead of vanilla. This gives a nutty twist that makes your muffins stand out. You can also sprinkle sliced almonds on top before baking for extra crunch. If you follow a gluten-free diet, you can still enjoy these muffins. Just replace the all-purpose flour with a gluten-free blend. Many blends work well and keep the muffins soft. You can use the same amount, making it easy to convert the recipe. For those who want vegan muffins, I have good news! You can swap the eggs for flax eggs. To make a flax egg, mix one tablespoon of ground flaxseed with three tablespoons of water. Let it sit for a few minutes to thicken. Also, use almond or soy milk instead of regular milk. This keeps your muffins moist and delicious. Try these variations to create your perfect blueberry muffin. New flavors and dietary choices make baking fun! For the full recipe, check out the Berrylicious Blueberry Muffins 🫐🧁 section above. To keep your muffins fresh, store them in an airtight container. This helps prevent them from drying out. You can keep the muffins at room temperature for up to three days. If your kitchen is warm and humid, it’s best to keep them in the fridge. However, this can change the texture. Muffins may become dense and less fluffy when chilled. To freeze muffins, first, let them cool completely. Wrap each muffin tightly in plastic wrap. Then place the wrapped muffins in a freezer-safe bag or container. This helps keep out air and prevents freezer burn. You can freeze muffins for up to three months. When you want to enjoy a muffin, take it out of the freezer. Unwrap it and reheat it in a microwave for 20 to 30 seconds. For a crisp top, you can warm it in the oven at 350°F (175°C) for about 10 minutes. This method keeps your muffins tasting fresh and delicious. Can I use frozen blueberries instead of fresh? Yes, you can use frozen blueberries! They work well in muffins. Just add them straight from the freezer. This helps keep your muffins from turning blue. How do I know when my muffins are done baking? Check your muffins at 18 minutes. Insert a toothpick into the center. If it comes out clean, your muffins are done. The tops should look golden brown too. What can I do if my muffins are too dry? If your muffins are dry, try adding more milk next time. You can also reduce baking time slightly. This keeps them moist and fluffy. How to make blueberry muffins in a mini version? To make mini muffins, use a mini muffin pan. Fill each cup about halfway. Bake at the same temperature for 10-12 minutes. Keep an eye on them as they bake. Can I substitute any ingredients for a healthier muffin? Yes, you can! Try using whole wheat flour instead of all-purpose flour. You can also use less sugar or substitute it with honey. These changes can make a healthier muffin. In this post, we covered everything about making classic blueberry muffins. You learned the key ingredients, step-by-step instructions, baking tips, and cool variations. Baking perfect muffins means mixing well but not too much. Fresh blueberries make a big difference. You can try new flavors and adaptations, like gluten-free options. Remember to store muffins properly and enjoy them warm. With these tips, you can bake tasty muffins that everyone loves. Now get in the kitchen and start baking!](https://dailydishlab.com/wp-content/uploads/2025/07/a334ec52-bf2f-4d59-8425-d9a15cac52c1-768x768.webp)