Skip to content
About
Contact
Cookie Policy
Copyright Policy
Disclaimer
Search
Home
Dinner
Appetizer
Desserts
Drinks
About
Contact
Privacy Policy
Toggle Menu
Home
/
Desserts
- Page 28
Desserts
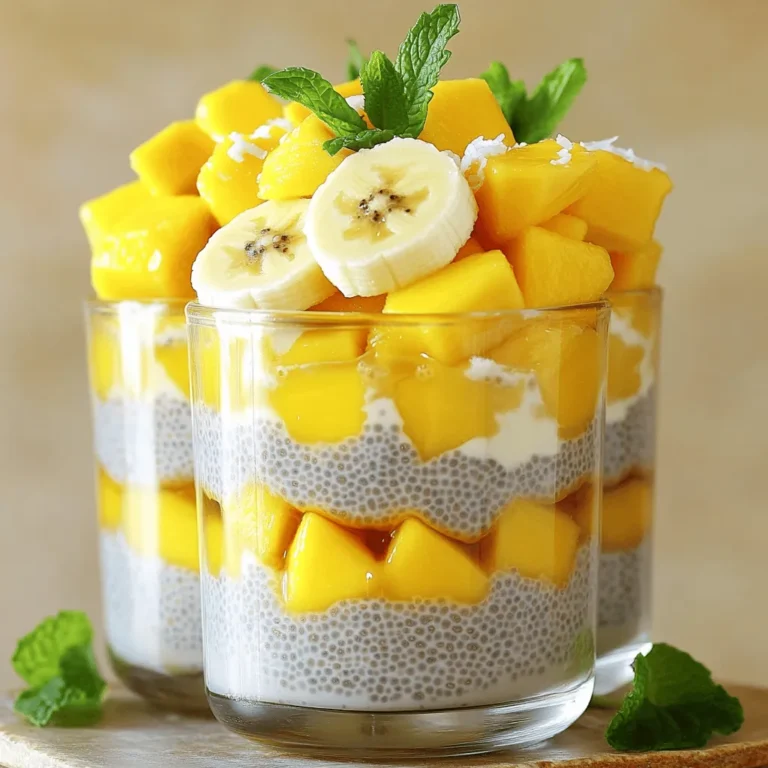
Tropical Fruit Chia Pudding Flavorful and Fresh Snack
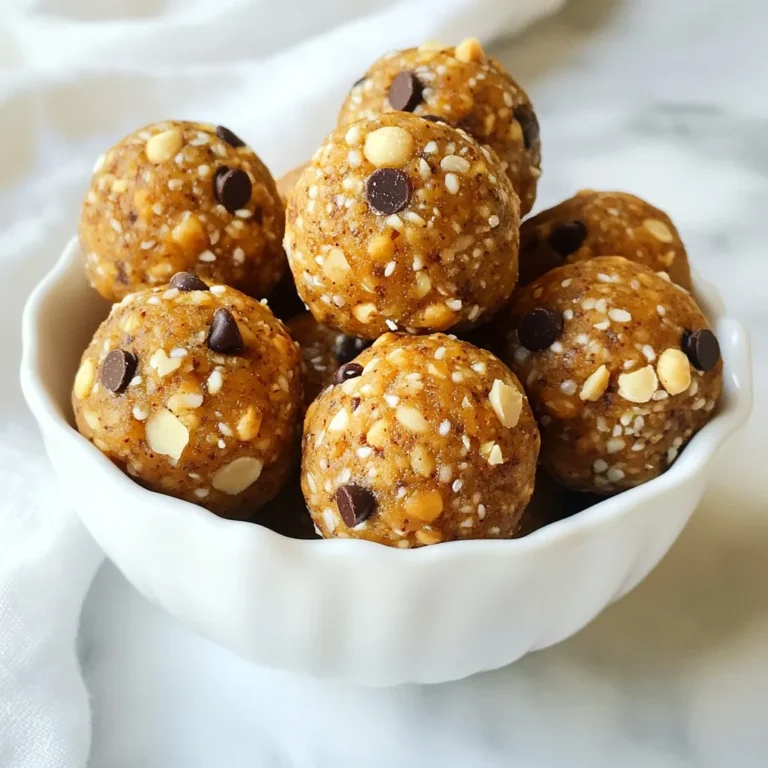
Pumpkin Spice Energy Balls Healthy Snack Delight
Cinnamon Sugar Soft Pretzels Quick and Tasty Recipe
Baked Apple Crisp Delightful and Easy Recipe Guide
Classic Apple Crisp Simple and Delicious Dessert Recipe
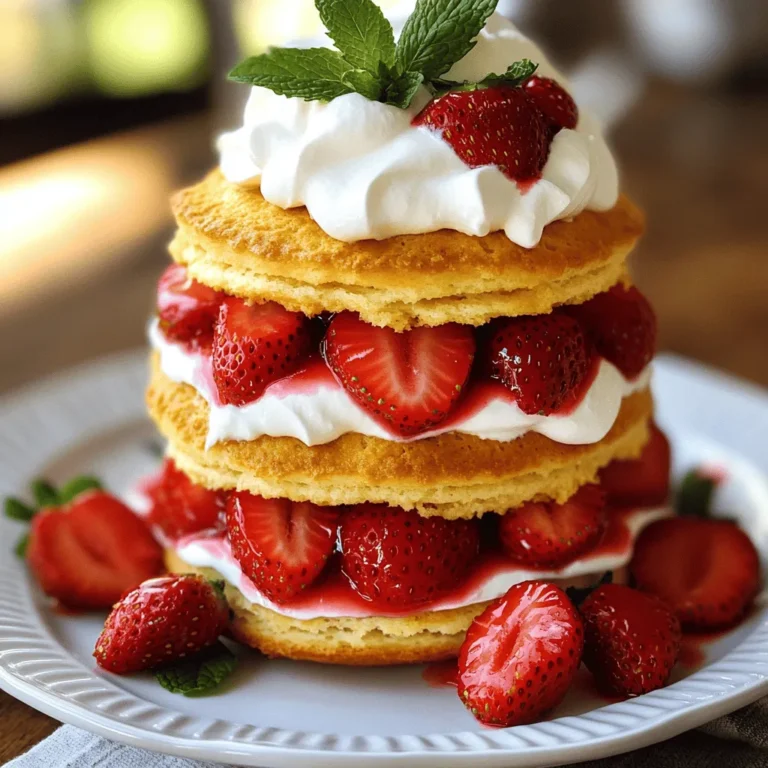
Strawberry Shortcake Delightful and Simple Recipe
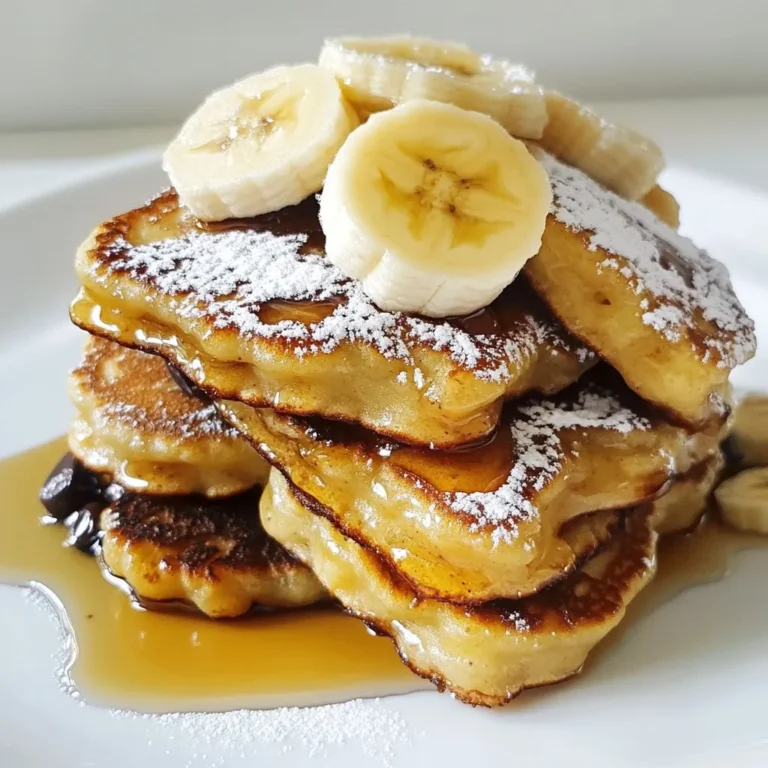
Chocolate Chip Banana Pancake Bites Tasty Breakfast Treat
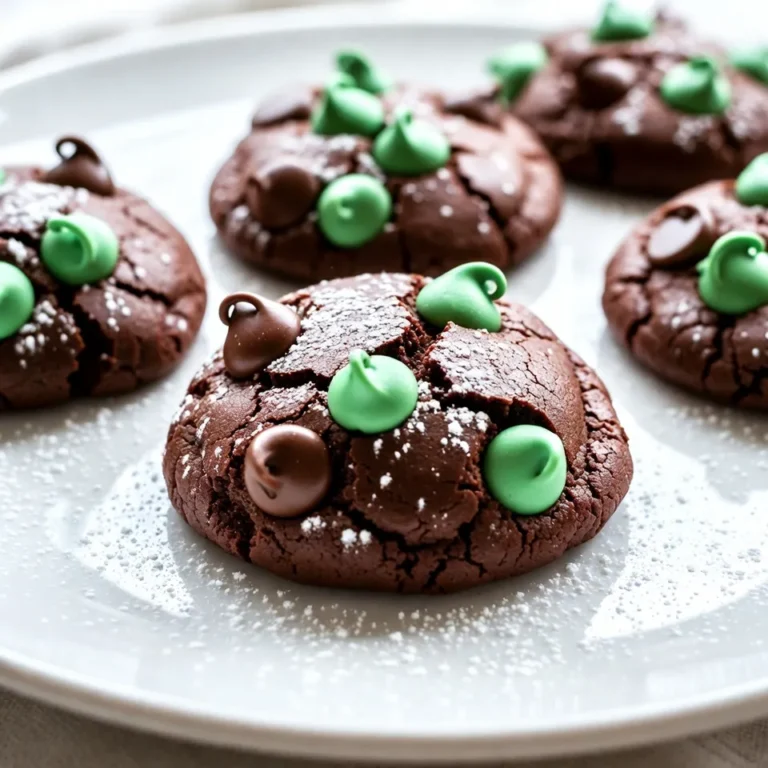
Mint Chocolate Brownie Cookies Irresistible Treats
Best Ever Blueberry Pancakes Fluffy and Delicious Treat
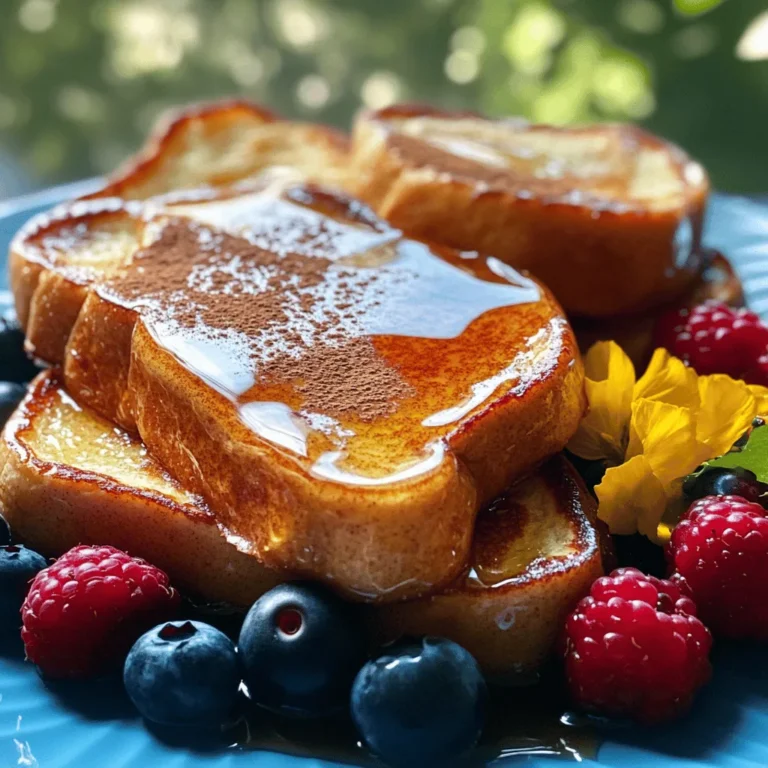
Classic French Toast Delightful and Easy Recipe
Page navigation
Previous Page
Previous
1
…
26
27
28
29
30
…
40
Next Page
Next
Home
Dinner
Appetizer
Desserts
Drinks
About
Contact
Privacy Policy
Toggle Menu Close
Search for:
Search


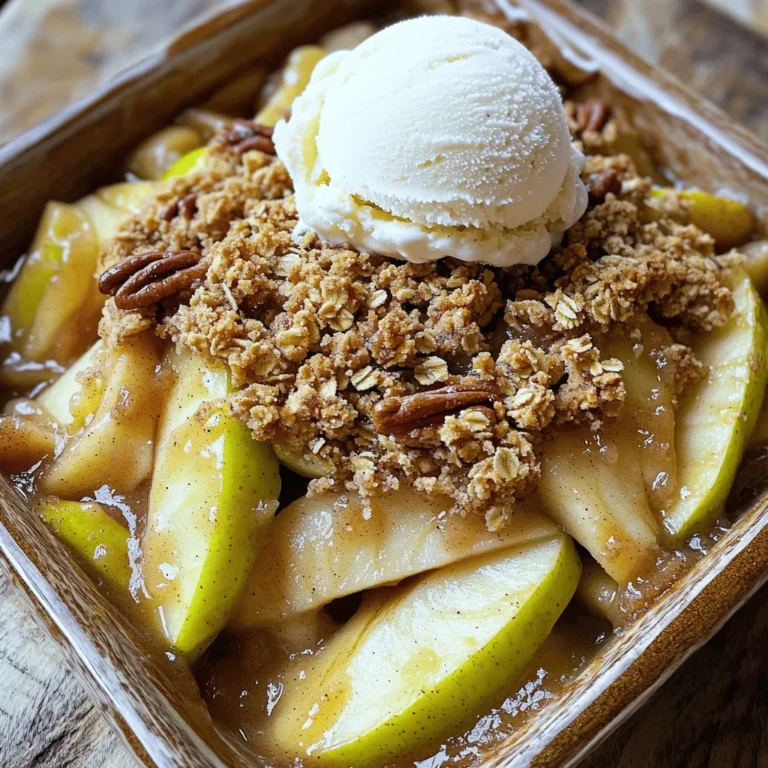
![- 6 medium apples (Granny Smith or Honeycrisp) - 1 tablespoon lemon juice - 1 teaspoon ground cinnamon - ¼ teaspoon nutmeg - ¾ cup granulated sugar - 1 cup rolled oats - ¾ cup all-purpose flour - ½ cup brown sugar, packed - ½ cup unsalted butter, melted - Pinch of salt - Raisins or dried cranberries - Chopped nuts for crunch - Vanilla extract for extra flavor Gathering your ingredients is key to making a great apple crisp. You want to use fresh apples for the best taste. I love using Granny Smith for their tartness or Honeycrisp for sweetness. The lemon juice brightens the flavor and keeps the apples from browning. Ground cinnamon and nutmeg add a warm spice that makes this dessert feel cozy. Also, don’t forget the oats! They create a crunchy topping that contrasts perfectly with the soft, warm apples. You can mix in some raisins or nuts if you want more texture. A dash of vanilla can also make it extra special. When you have everything ready, you’re set to create this simple and delicious dessert. For the full recipe, check out the [Full Recipe]. - Preheat the oven to 350°F (175°C). - In a large bowl, combine sliced apples with lemon juice, cinnamon, nutmeg, and sugar. - Toss until the apples are well coated. This adds flavor and keeps the apples fresh. - In another bowl, mix oats, flour, brown sugar, melted butter, and salt. - Stir until the mixture is crumbly. This will create a nice topping. - Layer the apple mixture in a greased 9x13 inch baking dish. - Sprinkle the oat mixture evenly on top of the apples. - Bake for 35-40 minutes. Look for a golden brown topping and bubbling apples. Enjoy this classic apple crisp, and don't forget to check the Full Recipe for all the details! To make the best apple crisp, I suggest using a mix of tart and sweet apples. Granny Smith apples add a nice tart flavor, while Honeycrisp brings sweetness. This balance makes each bite delicious. Don’t forget to add the lemon juice. It brightens the flavor and keeps the apples from browning. A little acidity goes a long way in enhancing the taste. When it comes to serving, warm apple crisp shines with a scoop of vanilla ice cream. The cold ice cream melts into the warm crisp, creating a tasty treat. You can also top it with whipped cream for a light touch. For an extra sweet kick, drizzle caramel sauce on top. This adds richness and pairs well with the apples. Try these tips for a delightful dessert experience. For the full recipe, check out the [Full Recipe]. {{image_2}} You can add fun flavors to your apple crisp. Mixing in spices like ginger or cardamom gives it a warm kick. Ginger adds a hint of spice, while cardamom brings a sweet, floral note. You can also brighten your dish by adding some citrus zest. Try using lemon or orange zest for a fresh twist. This makes each bite pop with flavor. Apple crisp does not have to be just apples. You can use other fruits too. Pears can add a lovely sweetness. Berries, like blueberries or raspberries, give a nice tartness. Peaches can add a juicy and soft texture. You could even mix different fruits together. A blend of apples, pears, and berries creates a colorful and tasty dessert. You can find the full recipe for classic apple crisp to try these ideas. Refrigerate leftovers in an airtight container. This keeps the apple crisp fresh for about 3 to 5 days. Make sure to let it cool before storing. If you plan to enjoy it later, cover it well to prevent it from drying out. You can freeze apple crisp for up to 3 months. To do this, let it cool completely. Then, wrap it tightly with plastic wrap and place it in a freezer-safe bag. When you're ready to enjoy it, remove it from the freezer and thaw it in the fridge overnight. For reheating, preheat your oven to 350°F (175°C). Place the apple crisp in an oven-safe dish. Heat it for about 20 minutes, or until warm. This method keeps the topping nice and crisp. You can also microwave individual portions for a quick treat. Just heat for 30 seconds to 1 minute. Enjoy your delicious dessert! Your apple crisp is done when the topping is golden brown. The apples should bubble around the edges. Check the center to see if the apples are tender. This usually takes 35 to 40 minutes in the oven. If you see steam rising, that means it's cooking well! Yes, you can prepare your apple crisp ahead of time! Just follow the recipe up to the baking step. Cover the dish tightly and store it in the fridge. When you're ready, bake it fresh. You can also freeze it. Just thaw it in the fridge overnight before baking. Apple crisp pairs well with many treats! A scoop of vanilla ice cream is a classic choice. Whipped cream adds a nice touch too. For a fun twist, drizzle caramel sauce on top. You can also serve it with coffee or warm tea to balance the sweetness. Enjoy! To recap, we explored the delicious world of apple crisp. We covered what ingredients you need and how to prepare them. I shared tips for the perfect bake and fun variations. You learned about storage methods and FAQs to enhance your baking. Apple crisp is versatile and easy to make. With a few simple tweaks, you can create your unique version. Enjoy baking and savoring this classic dish with your favorite add-ins. Your warm apple crisp will surely please everyone at the table.](https://dailydishlab.com/wp-content/uploads/2025/06/ccb876a4-297a-4b30-860d-1e07c3f119f5-768x768.webp)
![To make the best ever blueberry pancakes, you'll need some simple and fresh ingredients. Each one plays an important role in making these pancakes fluffy and delicious. - Overview of fresh blueberries Fresh blueberries are the star of this dish. They add natural sweetness and a lovely burst of flavor. Look for plump, firm berries without any wrinkles. Rinse them gently before using. - Essential dry ingredients You will need: - 1 cup all-purpose flour - 2 tablespoons sugar - 2 teaspoons baking powder - 1/2 teaspoon baking soda - 1/4 teaspoon salt These ingredients help create the perfect pancake base. The baking powder and baking soda give the pancakes their light, airy texture. - Important wet ingredients The wet ingredients are just as crucial: - 1 cup buttermilk (you can use milk with vinegar as a substitute) - 1 large egg - 2 tablespoons melted butter (plus some for cooking) - Zest of 1 lemon - 1 teaspoon vanilla extract These help bind the mixture and add flavor. Buttermilk makes the pancakes tender and rich. You can find the full recipe at the end of this article. Enjoy making these delightful pancakes! 1. Mixing dry ingredients: Start by sifting together the flour, sugar, baking powder, baking soda, and salt in a large bowl. This step helps to break up any lumps and ensures the ingredients blend well. 2. Combining wet ingredients: In a separate bowl, whisk the buttermilk, egg, melted butter, lemon zest, and vanilla extract. Whisk until everything is smooth and well-mixed. The lemon zest adds a fresh taste. 3. Folding in blueberries: Pour the wet mix into the dry mix. Gently fold the two together. Remember, do not overmix! A few lumps are okay. Now, fold in the fresh blueberries. Save a few for garnishing later. 1. Heating the pan: Heat a non-stick skillet or griddle over medium heat. Add a little melted butter to coat the surface. This helps the pancakes cook evenly and prevents sticking. 2. Pouring the batter: Use a 1/4 cup measure to pour the batter onto the skillet. Space them out to give each pancake room to spread as they cook. 3. Checking for doneness: Cook the pancakes until bubbles form on the surface, about 2-3 minutes. Flip them and cook for another 1-2 minutes until golden brown. This ensures a fluffy inside and a nice crust outside. 1. Plating the pancakes: Stack the pancakes neatly on a plate. A tall stack looks impressive and inviting. 2. Topping ideas: Top with additional blueberries, a drizzle of maple syrup, or a dollop of whipped cream. These toppings add flavor and make the dish more fun. 3. Presentation tips: For a beautiful finish, sprinkle some lemon zest on top. It adds color and a lovely aroma. Enjoy your best ever blueberry pancakes! Check the [Full Recipe] for more details. When you pick blueberries, fresh is best. Fresh blueberries are plump and juicy. They burst with flavor in each bite. Frozen blueberries can work too, but they may be mushy. If you want the best taste, choose fresh. To find ripe blueberries, look for a deep blue color. Avoid any that are red or green. Check for firmness; soft berries may be overripe. Smell them too, as ripe blueberries have a sweet scent. Store your blueberries in the fridge. Keep them in their original container. This helps them stay fresh for longer. If you wash them, dry them well before storing. Mixing the batter is key for fluffy pancakes. Avoid overmixing. Stir just enough to combine the wet and dry ingredients. Some lumps are okay! Overmixing makes pancakes tough, not fluffy. For fluffier pancakes, use buttermilk. The acidity helps create air bubbles. You can also add baking powder for extra lift. After mixing, let the batter rest for about 5 minutes. This allows the ingredients to hydrate. Resting makes your pancakes rise better. Choose a non-stick skillet or griddle for cooking. These surfaces help prevent sticking. Make sure to heat it over medium heat. Too hot can burn your pancakes, while too low can make them soggy. Use a little melted butter on the pan to coat it. This adds flavor and helps with browning. Watch for common pitfalls. Don’t flip too soon; wait for bubbles to form. If you flip too early, your pancakes may be raw inside. Flip only once for the best texture. {{image_2}} To make your blueberry pancakes even better, try adding some spices. A pinch of cinnamon or nutmeg can warm up the flavor. You can also add lemon or orange zest for a bright, fresh taste. Using different extracts like almond or coconut can add a unique twist too. These small changes can change your pancake game completely. For those who need to avoid gluten, you can use gluten-free flour options. These flours work well and keep the pancakes fluffy. If you want to make your pancakes vegan, use substitutes like flax eggs and plant-based milk. You can also reduce sugar by using mashed bananas or applesauce. These swaps keep your pancakes tasty while meeting dietary needs. Pancakes are fun to serve in many ways. Stack them high with a colorful fruit compote on top. You can add nuts or even chocolate chips for extra flavor. If you want something different, try savory pancake variations. Adding cheese or herbs can turn your sweet pancakes into a hearty meal. Enjoy exploring all these tasty options! To keep your pancakes fresh, store them properly. Place leftover pancakes in an airtight container. If you plan to eat them soon, refrigerate them. - Refrigeration: Leftover pancakes last up to 3 days in the fridge. Make sure they are cool before sealing the container. This helps prevent sogginess. - Freezing Guidelines: For longer storage, freeze pancakes. Stack them with parchment paper in between each one. Use a freezer-safe bag or container. They can last up to 2 months in the freezer. When you’re ready to enjoy your pancakes again, reheating is simple. Here are the best methods: - Best Methods for Reheating: Use a microwave or a skillet. For the microwave, heat on medium power for 20-30 seconds. If using a skillet, warm them on low heat for a few minutes until hot. - Tips for Maintaining Texture: To keep pancakes fluffy, cover them with a damp paper towel in the microwave. This helps steam them. If using a skillet, add a little butter before reheating. Knowing how long your pancakes last ensures you enjoy them at their best. - Shelf Life in the Fridge: Pancakes keep well for up to 3 days in the fridge. After that, they may dry out or lose flavor. - Shelf Life in the Freezer: In the freezer, pancakes last up to 2 months. For best taste, eat them within the first month. To make blueberry pancakes from scratch, follow these steps: 1. Mix Dry Ingredients: Start by sifting together 1 cup of all-purpose flour, 2 tablespoons of sugar, 2 teaspoons of baking powder, 1/2 teaspoon of baking soda, and 1/4 teaspoon of salt in a large bowl. 2. Combine Wet Ingredients: In another bowl, whisk together 1 cup of buttermilk, 1 large egg, 2 tablespoons of melted butter, the zest of 1 lemon, and 1 teaspoon of vanilla extract until smooth. 3. Combine Mixtures: Pour the wet ingredients into the dry mixture. Gently fold until just mixed. A few lumps are fine, so don't overdo it. 4. Add Blueberries: Carefully fold in 1 cup of fresh blueberries. Save some for the top later. 5. Heat the Pan: Heat a non-stick skillet over medium heat. Add a bit of melted butter to coat it. 6. Cook Pancakes: Pour 1/4 cup of batter for each pancake. Cook until bubbles form, then flip and cook until golden. 7. Serve: Stack the pancakes, add more blueberries, and drizzle with maple syrup or honey. Yes, you can use frozen blueberries. Here are some tips: - Do not thaw the blueberries before using them. This helps keep them intact during cooking. - Add them directly to the batter. This way, they will stay cold and firm. - You might need to cook the pancakes a little longer to ensure they are done. Pancakes stick for a few reasons: - The pan may not be hot enough. Make sure your skillet is at medium heat. - You might not be using enough butter. Add more butter to the pan before cooking. - Using a non-stick pan is key. If your pan isn’t non-stick, consider switching. Here are some tasty ideas to serve with pancakes: - Maple syrup is a classic choice. - Fresh fruit like sliced bananas or strawberries adds color. - A dollop of whipped cream makes it extra special. - You can also try yogurt for a creamy texture. Yes, you can adapt this recipe for gluten-free pancakes. Use gluten-free flour blends that substitute for all-purpose flour. - Look for blends that include xanthan gum for better texture. - You can also use almond flour or coconut flour with some adjustments to liquid. To keep your pancakes light and fluffy, follow these tips: - Avoid overmixing the batter; mix until just combined. - Let the batter rest for a few minutes. This helps with texture. - Ensure you use fresh baking powder for the best rise. This blog post covered everything you need for perfect blueberry pancakes. We explored key ingredients, step-by-step instructions, and tips for the best texture. You learned how to enhance flavors and adapt the recipe for dietary needs. We also discussed storing and reheating leftover pancakes. With these insights, you can create fluffy, delicious pancakes that everyone will love. Enjoy making them again and again!](https://dailydishlab.com/wp-content/uploads/2025/06/88cf7048-30d4-446e-9952-44c38fb788a9-768x768.webp)