Skip to content
About
Contact
Cookie Policy
Copyright Policy
Disclaimer
Search
Home
Dinner
Appetizer
Desserts
Drinks
About
Contact
Privacy Policy
Toggle Menu
Home
/
Dinner
- Page 28
Dinner
Mediterranean Chickpea Power Bowl Boost Your Energy
Lemon Herb Quinoa Salad Fresh and Flavorful Delight
Baja Fish Taco Bowls Flavorful and Easy Dinner Recipe
Baja Fish Taco Bowls Flavorful and Fresh Delight
Lemon Herb Quinoa Salad Fresh and Flavorful Recipe
Honey Garlic Chicken Thighs Easy and Flavorful Recipe
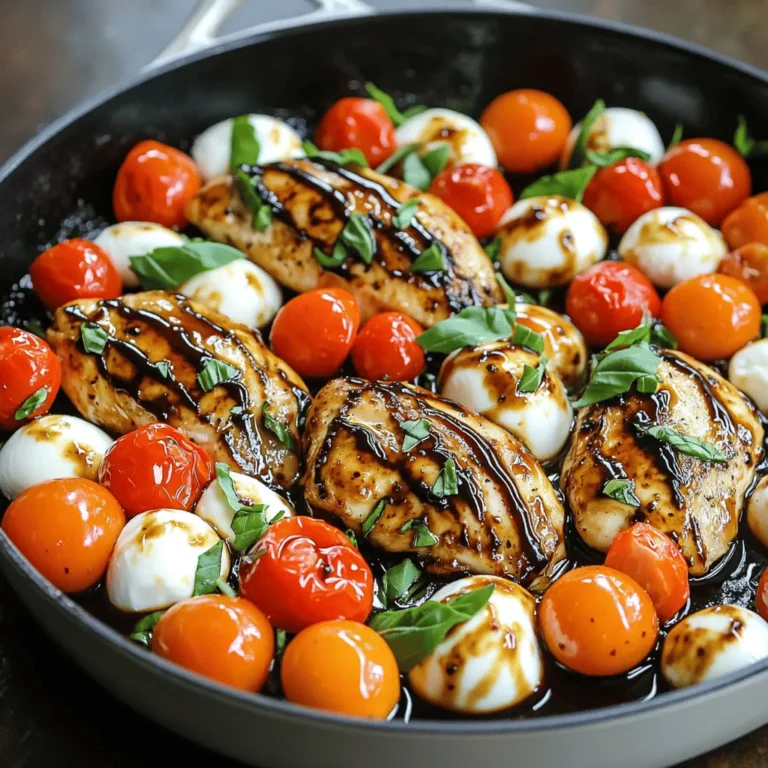
Balsamic Glazed Caprese Chicken Flavorful Dinner Recipe
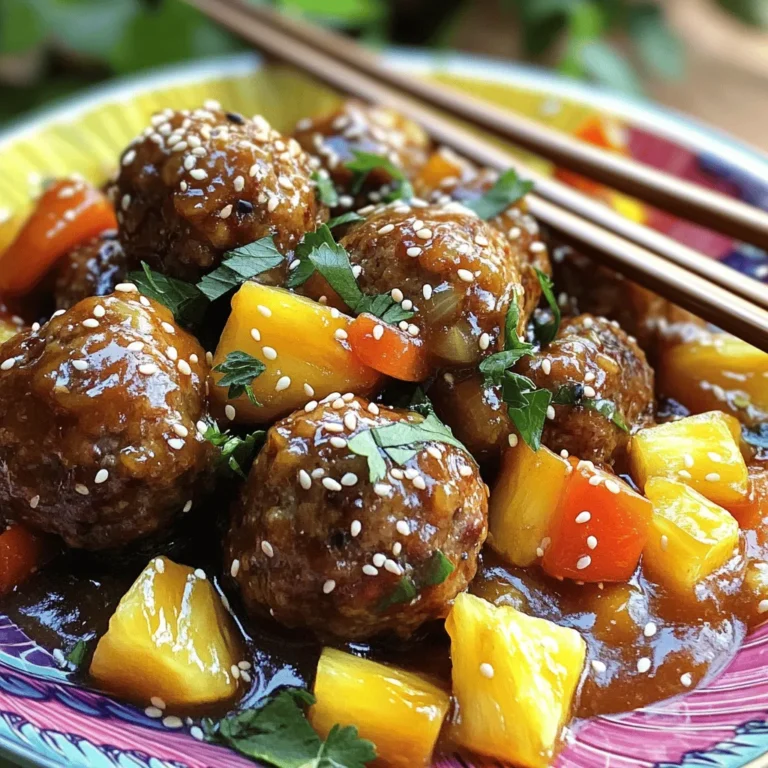
Sweet and Sour Meatballs Tasty Recipe for Everyone
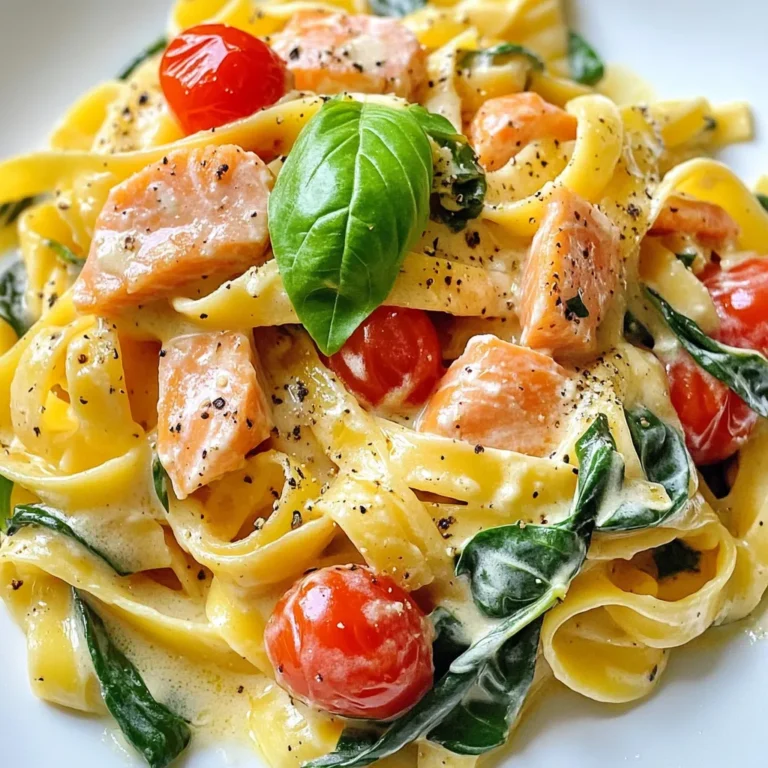
Creamy Tuscan Salmon Pasta Simple and Flavorful Meal
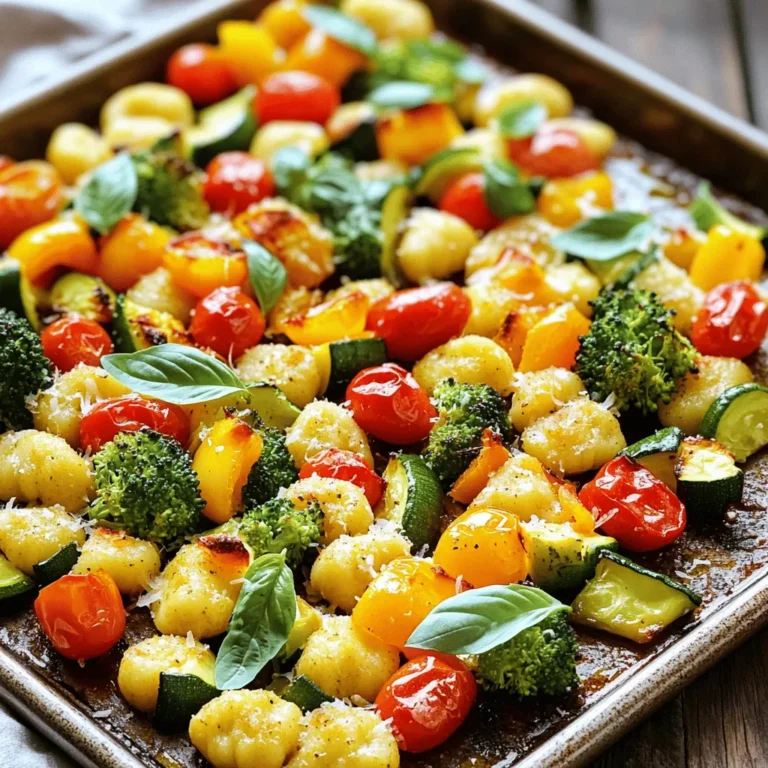
Easy Sheet Pan Gnocchi Primavera Flavorful and Quick
Page navigation
Previous Page
Previous
1
…
26
27
28
29
30
…
64
Next Page
Next
Home
Dinner
Appetizer
Desserts
Drinks
About
Contact
Privacy Policy
Toggle Menu Close
Search for:
Search

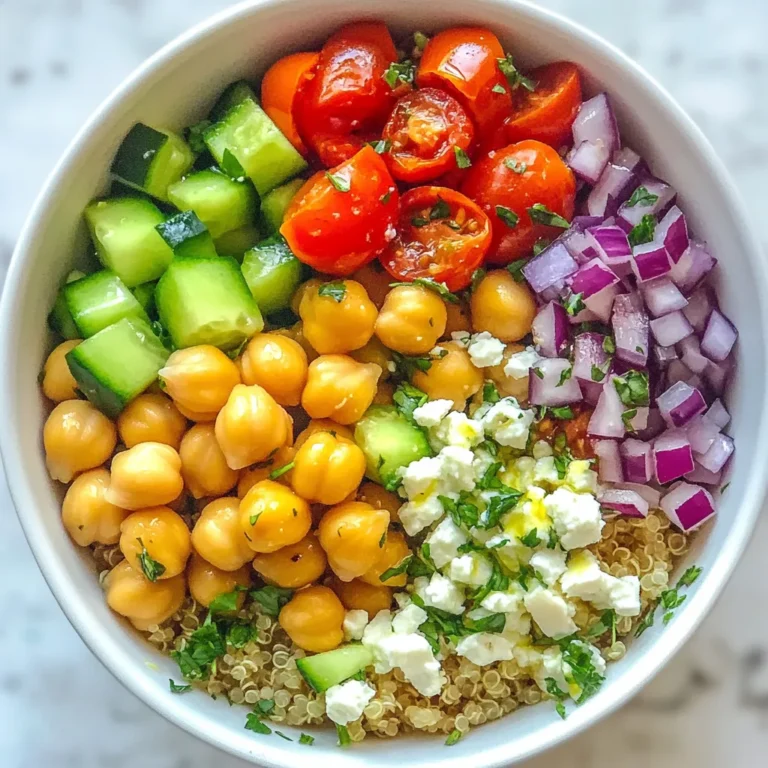

![To make a delicious Lemon Herb Quinoa Salad, you need a few key items: - 1 cup quinoa, rinsed - 2 cups vegetable broth or water - 1 large cucumber, diced - 1 cup cherry tomatoes, halved - 1 bell pepper (any color), diced - 1/4 red onion, finely chopped - 1/4 cup fresh parsley, chopped - 1/4 cup fresh mint, chopped - Juice of 2 lemons - 3 tablespoons olive oil - Salt and pepper to taste - 1/2 teaspoon garlic powder (optional) These ingredients create a fresh and vibrant taste. Quinoa adds protein, while vegetables give color and crunch. You can boost your salad with some optional ingredients: - Avocado, diced - Feta cheese, crumbled - Chickpeas, rinsed and drained - Nuts or seeds, like almonds or sunflower seeds These additions bring extra flavors and textures. They make the salad more filling and fun to eat. To prepare your Lemon Herb Quinoa Salad, you will need: - A medium saucepan for cooking quinoa - A large mixing bowl for the salad - A whisk for mixing the dressing - A cutting board and knife for chopping veggies Having the right tools makes cooking easier. This way, you can focus on making a tasty dish. For the full recipe, refer to the section provided above. To cook quinoa, start with rinsing 1 cup of quinoa under cold water. This step removes any bitter taste. In a medium saucepan, combine the rinsed quinoa with 2 cups of vegetable broth or water. Bring this mixture to a boil over high heat. Once it boils, lower the heat to a simmer. Cover the pot and let it cook for about 15 minutes. You’ll know it’s done when the liquid is absorbed, and the quinoa is fluffy. After cooking, let it sit covered for 5 more minutes. Then, fluff it with a fork and set it aside to cool. While the quinoa cools, you can prepare the fresh vegetables. Take a large cucumber and dice it. Halve 1 cup of cherry tomatoes. Dice 1 bell pepper, any color you like. Finely chop 1/4 of a red onion. These veggies add color and crunch to the salad. Place them all in a large mixing bowl. Their freshness really makes this salad special. Now it’s time to bring everything together. Add the cooled quinoa to your bowl of vegetables. In a small bowl, whisk the juice of 2 lemons with 3 tablespoons of olive oil. If you like, add 1/2 teaspoon of garlic powder for more flavor. Season with salt and pepper to taste. Pour this dressing over the quinoa and veggies. Toss gently to combine. Finally, fold in 1/4 cup each of chopped parsley and mint. These herbs add a bright, fresh taste. Taste your salad and adjust the seasoning if needed. You can find the full recipe for this Lemon Herb Quinoa Salad in the article. To make quinoa fluffy, rinse it well before cooking. This removes extra starch. Use two cups of liquid for every cup of quinoa. Bring it to a boil, then lower the heat to simmer. Cover it and let it cook for about 15 minutes. After cooking, let it sit covered for five more minutes. Finally, fluff it with a fork. This method gives you light and airy quinoa for your salad. You can change the dressing to add more flavor. Try adding a teaspoon of Dijon mustard for a tangy kick. You could also use balsamic vinegar instead of lemon juice for a sweeter taste. For a spicy touch, add a pinch of red pepper flakes. Mix and match these ideas to find your favorite! I love serving this salad chilled or at room temperature. It looks great in a big bowl or individual cups. You can add lemon slices on top for a bright look. If you're hosting, pair it with grilled chicken or fish. It’s also perfect as a side dish at picnics. For a quick lunch, pack it in a jar for easy transport. This salad is fresh and full of flavor, making it a hit at any meal! For the full recipe, check the recipe section above. {{image_2}} You can easily boost the protein in your Lemon Herb Quinoa Salad. Adding chicken, chickpeas, or tofu makes it heartier. Grilled chicken works well; just slice it and toss it in. For a vegetarian option, try chickpeas. They add nice texture and flavor. Simply rinse and drain canned chickpeas, then mix them in. Tofu is another great option. Use firm tofu, cube it, and pan-fry until golden. This adds a delicious crunch. This salad is perfect for any season! In summer, add fresh corn or diced avocado. Both bring a creamy texture and sweetness. You can even include fruits like diced mango or strawberries for a fun twist. In winter, think about adding roasted vegetables. Try sweet potatoes, Brussels sprouts, or beets. They give warmth and depth to your salad. Adjust your herbs too. In winter, use sage or thyme for a cozy flavor. Dietary needs can change, and this salad is flexible. If you're gluten-free, quinoa is a great choice! However, if quinoa doesn't suit you, try brown rice or millet. For a lighter option, you could use cauliflower rice. If you're avoiding oil, substitute with avocado or Tahini for creaminess. Need a nut-free option? Just leave out the nuts or seeds if you add them. You can still enjoy a fresh, tasty salad! For the full recipe, check out the detailed instructions and enjoy this healthy dish! To keep your Lemon Herb Quinoa Salad fresh, place it in an airtight container. Make sure to seal it tightly. Store it in the fridge. It will stay good for up to five days. The flavors will blend more as it sits. This makes it taste even better! You can freeze quinoa salad, but it may change texture. To freeze, scoop the salad into freezer-safe bags. Remove as much air as possible. Label the bags with the date. When you're ready to eat, thaw it in the fridge overnight. Enjoy it within three months for the best taste. For the best taste, serve your quinoa salad chilled or at room temperature. If it was in the fridge, take it out and let it sit for a bit. This will help the flavors pop! You can also add a splash of lemon juice before serving to brighten it up. Lemon Herb Quinoa Salad is packed with nutrients. Quinoa offers protein, fiber, and essential amino acids. Each serving has about: - 220 calories - 8 grams of protein - 4 grams of fat - 38 grams of carbs - 5 grams of fiber The fresh veggies boost vitamins and minerals, making it a healthy choice. Yes, you can prepare Lemon Herb Quinoa Salad ahead. It stays fresh in the fridge for up to three days. Just store it in an airtight container. The flavors deepen as it sits, which is a bonus! If you lack parsley or mint, try these herbs: - Cilantro - Basil - Dill - Chives Each adds a unique taste. Feel free to mix and match based on what you like best! For the full recipe and more tips, check the [Full Recipe]. In this blog post, we explored how to create a delicious lemon herb quinoa salad. We covered essential and optional ingredients that can boost flavor. I also shared tips for cooking quinoa perfectly and preparing fresh veggies. You learned different ways to enhance the dish, like adding protein or modifying for seasons. Remember to store leftovers well and reheat properly for best taste. Enjoy making this salad your own with easy swaps and additions!](https://dailydishlab.com/wp-content/uploads/2025/07/7d74a881-4284-4d62-884c-d248237a5ed2-768x768.webp)
![- 6 boneless, skinless chicken thighs - 1/4 cup honey - 1/4 cup soy sauce - 1 tablespoon rice vinegar - 4 cloves garlic, minced - 1 tablespoon fresh ginger, grated For this dish, the main star is the chicken thighs. They are juicy and tender. The honey adds sweetness, while soy sauce brings depth. Rice vinegar gives a nice tang. Garlic and ginger add a burst of flavor. - 2 green onions, thinly sliced - Sesame seeds Garnishes make the dish pop. Green onions add a fresh crunch. Sesame seeds add a nutty touch. These small details can elevate your meal. - 2 tablespoons olive oil - Salt and pepper to taste - 1 teaspoon sesame oil Seasoning is key for great taste. Olive oil helps with cooking and flavor. Salt and pepper enhance the natural flavors. Sesame oil adds a rich aroma. You can adjust these to fit your taste. For the complete recipe, check out the [Full Recipe]. To start, gather your ingredients. In a medium bowl, whisk together: - 1/4 cup honey - 1/4 cup soy sauce - 1 tablespoon rice vinegar - 4 cloves garlic, minced - 1 tablespoon fresh ginger, grated - 2 tablespoons olive oil - 1 teaspoon sesame oil Mix until smooth. This honey garlic blend will give your chicken a sweet and tangy taste. Next, place the 6 boneless, skinless chicken thighs into a large resealable plastic bag or bowl. Pour the marinade over the chicken. Make sure each piece gets coated well. Seal the bag or cover the bowl. Refrigerate the chicken for at least 30 minutes. For even better flavor, marinate for up to 4 hours. You can choose to grill or pan-sear your chicken. - Grilling: Preheat your grill to medium-high heat. - Pan-searing: Heat a large skillet over medium heat. Once ready, take the chicken out of the marinade. Let the excess marinade drip off. Season your chicken with salt and pepper. Cook the chicken thighs for about 6-7 minutes on each side. Make sure they reach an internal temperature of 165°F (75°C) and get a nice caramelized look. In the last few minutes, you can brush some reserved marinade over the chicken. Just remember, only use marinade that has not touched raw chicken. Enjoy your meal! The full recipe is easy to follow, making a delicious dish. For the best flavor, marinate your chicken thighs for at least 30 minutes. You can let them sit for up to 4 hours for a bolder taste. Use a large resealable bag or a bowl to coat the chicken fully. Make sure you flip the bag or stir the bowl occasionally. This helps the marinade reach every spot. To check if your chicken is done, use a meat thermometer. The safe internal temperature is 165°F (75°C). This ensures the chicken is juicy and safe to eat. Always wash your hands and surfaces after touching raw chicken. It’s key to avoid cross-contamination. For serving, place the chicken thighs on a big platter. Drizzle some honey or leftover marinade over them for extra shine. Serve with steamed rice or colorful stir-fried vegetables for a complete meal. Garnish with green onions and sesame seeds for a beautiful look. Enjoy your dish! {{image_2}} You can add a bright flavor to your honey garlic chicken thighs. Just include some orange or lemon zest. This little move gives your dish a fresh taste. The citrus adds a nice zing that works well with the sweet honey. Simply mix the zest into your marinade for a tasty twist! Want to kick it up a notch? Try adding chili flakes or sriracha. This gives your chicken a spicy kick that balances the sweetness of the honey. Start with a little, then taste as you go. You can adjust the heat to match your preference. It’s a fun way to switch up the flavor! If you're looking for a lighter meal, use skinless chicken thighs. This keeps your dish flavorful without the extra fat. You can also swap regular soy sauce for low-sodium soy sauce. This small change makes your honey garlic chicken healthier while still tasting great. Small tweaks can lead to big benefits! For the full recipe, check out the detailed instructions to create your flavorful dish. Store your leftover honey garlic chicken thighs in an airtight container. This keeps them fresh. Ensure they cool down before sealing. They will stay good for up to four days in the fridge. If you want to eat them later, avoid leaving them out for more than two hours. This helps prevent bacteria growth. You can freeze cooked chicken thighs too. First, let them cool completely. Then, wrap each thigh in plastic wrap. Place them in a freezer-safe bag or container. They will last up to three months in the freezer. When you're ready to eat, move them to the fridge for overnight thawing. To reheat, use the oven for best results. Preheat the oven to 350°F (175°C). Place the chicken on a baking sheet and cover with foil. Heat for about 15-20 minutes, or until warmed through. You can also use a microwave. Just place the chicken on a plate, cover it, and heat for about 1-2 minutes. Check every 30 seconds to avoid overcooking. Reheating this way keeps the chicken juicy and tasty. For more detailed steps, check the Full Recipe. To make Honey Garlic Chicken Thighs, follow these simple steps: 1. Prepare the marinade by mixing honey, soy sauce, rice vinegar, minced garlic, grated ginger, olive oil, and sesame oil in a bowl. 2. Marinate the chicken in a bag or bowl for at least 30 minutes. 3. Cook the chicken on a grill or in a pan for about 6-7 minutes per side. 4. Glaze the chicken with some reserved marinade in the last minutes of cooking. 5. Rest and serve the chicken after cooking, garnished with green onions and sesame seeds. This process creates juicy, flavorful chicken with a sticky glaze that you will love. You have many options for side dishes that pair well with Honey Garlic Chicken Thighs: - Steamed rice - Stir-fried vegetables - Quinoa salad - Garlic mashed potatoes - Roasted broccoli Each of these sides complements the sweet and savory notes of the chicken. Yes, you can use chicken breasts, but there are pros and cons: - Pros: Chicken breasts are leaner and cook faster. - Cons: They can dry out more easily than thighs if overcooked. Chicken thighs offer more flavor and tenderness, making them a great choice for this recipe. Yes, this recipe is perfect for meal prep. Here are some tips: - Cook a larger batch and store in airtight containers. - Divide into single servings for easy lunches or dinners. - Keep the chicken in the fridge for up to four days or freeze for longer storage. Meal prepping makes it easy to enjoy delicious Honey Garlic Chicken Thighs all week! For the complete cooking process, check out the [Full Recipe]. This blog post covered a simple recipe for Honey Garlic Chicken Thighs. We explored the main ingredients, the marinade process, and cooking methods. I shared tips on marinating, cooking, and presenting your dish. You also learned about variations and how to store leftovers. In closing, enjoy the rich flavor of this dish. It’s easy to make, healthy, and perfect for sharing. Experiment with the variations to keep your meals exciting. Whether you grill or pan-sear, this recipe is sure to impress. Happy cooking!](https://dailydishlab.com/wp-content/uploads/2025/07/290d04f4-f0f3-4f16-8110-9751a8193952-768x768.webp)