Skip to content
About
Contact
Cookie Policy
Copyright Policy
Disclaimer
Search
Home
Dinner
Appetizer
Desserts
Drinks
About
Contact
Privacy Policy
Toggle Menu
Home
/
Dinner
- Page 36
Dinner
Garlic Herb Roasted Rainbow Carrots Simple Dish
Sweet Potato Chickpea Curry Bold and Flavorful Dish
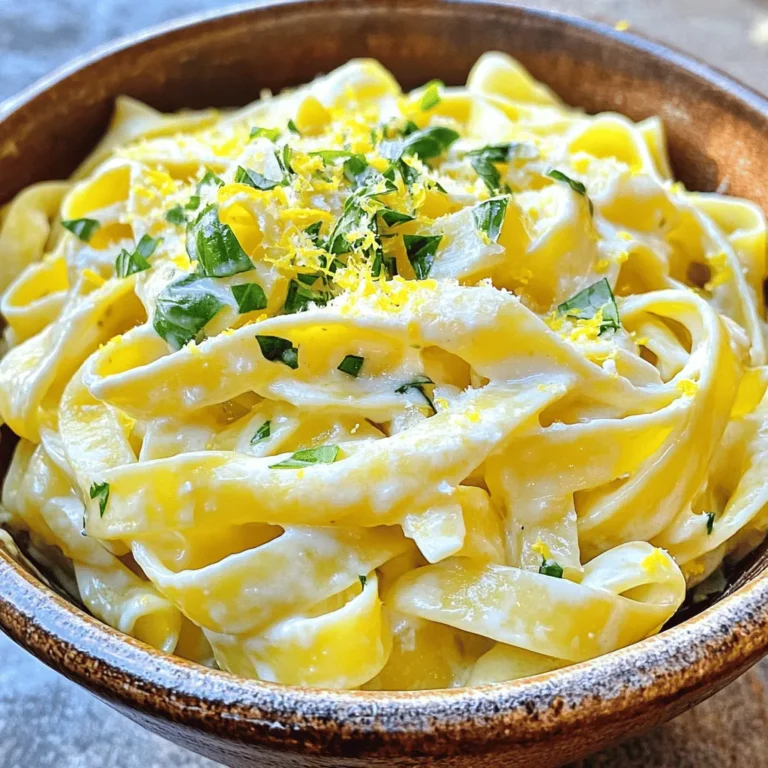
Creamy Lemon Basil Pasta Delightful and Simple Recipe
Cilantro Lime Sweet Potato Tacos Flavorful and Easy
Spicy Thai Basil Chicken Flavorful Weeknight Dinner
Lemon Garlic Shrimp Pasta Simple and Flavorful Dish
Buffalo Ranch Chickpea Wraps Tasty and Quick Meal
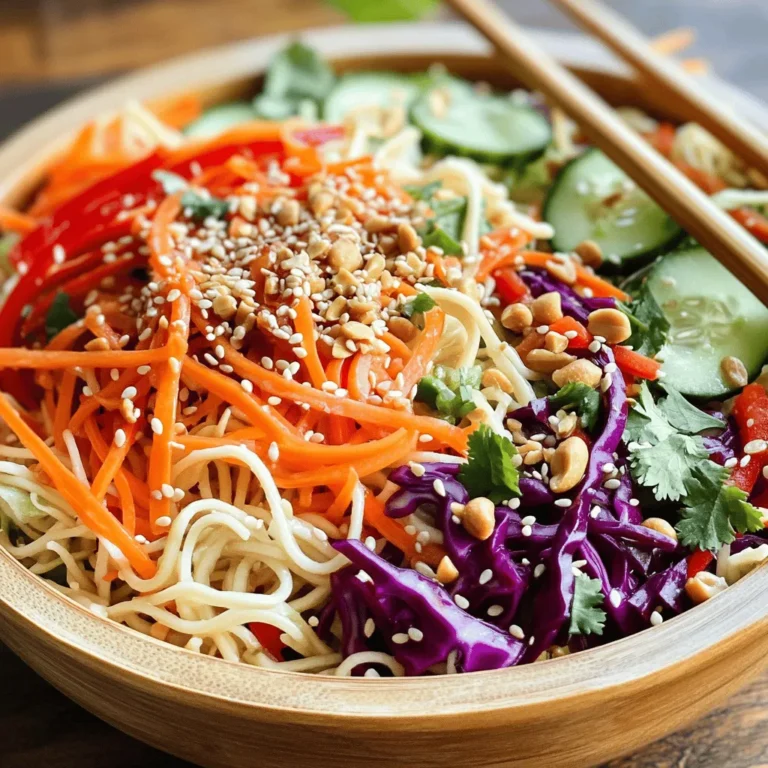
Savory Sesame Ginger Noodle Salad Refreshing Delight
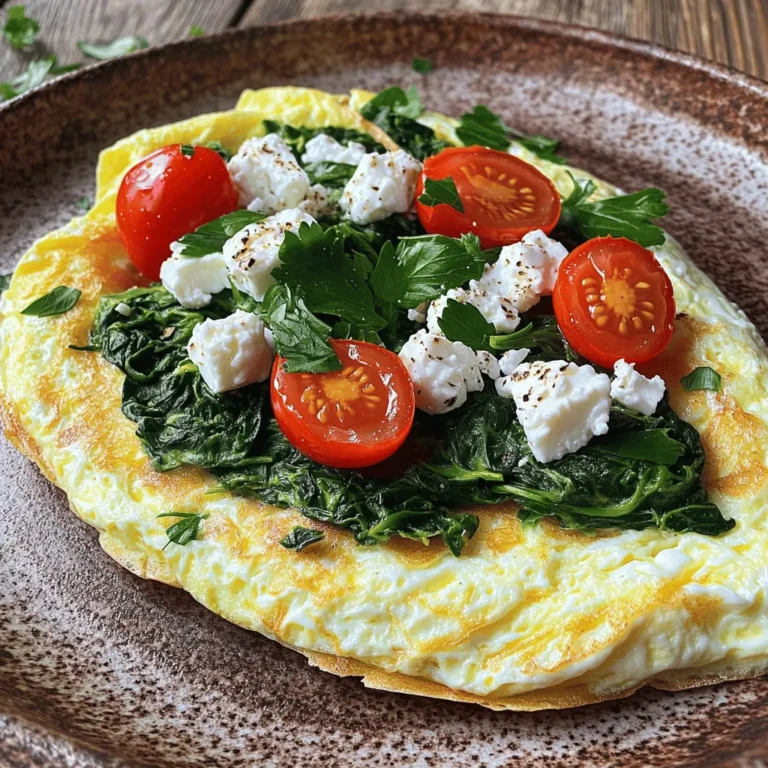
Spinach Egg White Omelette Tasty and Healthy Dish
Sheet Pan Chicken Fajitas Flavorful and Easy Meal
Page navigation
Previous Page
Previous
1
…
34
35
36
37
38
…
64
Next Page
Next
Home
Dinner
Appetizer
Desserts
Drinks
About
Contact
Privacy Policy
Toggle Menu Close
Search for:
Search

![- 1 pound rainbow carrots, peeled and cut into even-sized pieces - 3 tablespoons olive oil - 3 cloves garlic, minced - 1 teaspoon fresh rosemary, chopped - 1 teaspoon fresh thyme, chopped - 1 teaspoon fresh parsley, chopped - 1 tablespoon honey or maple syrup - Zest of 1 lemon - Salt and pepper to taste This dish shines with the bright colors of rainbow carrots. Using fresh herbs adds a wonderful touch. The garlic gives it a robust flavor, while honey or maple syrup adds sweetness. Don't forget the lemon zest; it gives a great citrus kick! Each ingredient plays a role in making this dish special. You can find the full recipe for Garlic Herb Roasted Rainbow Carrots to create this vibrant side dish. - Preheat the oven to 425°F (220°C). - Prepare the baking sheet with parchment paper. First, I love to start by preheating the oven. This step ensures that the carrots roast evenly. Parchment paper helps the carrots not stick to the baking sheet. It also makes cleanup easier. - Combine olive oil, garlic, herbs, honey, lemon zest, salt, and pepper in a bowl. - Toss rainbow carrots in the herb mixture until coated. Next, I mix my ingredients. In a bowl, I combine olive oil, minced garlic, fresh herbs, honey, lemon zest, salt, and pepper. The mix adds great flavor to the carrots. After mixing, I add the rainbow carrots to the bowl. I toss them until they're evenly coated. Each carrot gets a nice layer of the herb mix. - Arrange carrots on the baking sheet in a single layer. - Roasting time and temperature: 20-25 minutes at 425°F (220°C). Now, I arrange the carrots on the baking sheet. I place them in a single layer for even roasting. I roast them for 20 to 25 minutes at 425°F (220°C). Halfway through, I turn the carrots to help them caramelize. They will be tender and slightly sweet when done. This simple dish is a true delight! If you want the full recipe, check it out here. To ensure even roasting, cut your rainbow carrots into similar sizes. This way, they cook at the same rate. Spread them out on the baking sheet, leaving space between each piece. This helps warm air circulate, making them cook nicely. Turn the carrots halfway through roasting. This step adds flavor and helps them caramelize. When you flip them, use a spatula to avoid breaking them. You want each piece to stay whole for a great look. Want a tangy kick? Add balsamic vinegar or a touch of mustard to your mix. This gives depth and a nice contrast to the sweetness of the carrots. You can also try different herbs like dill or oregano for a fun twist. The key is to explore flavors you enjoy. Serving your roasted carrots on a nice platter makes a big difference. Arrange them in a circle or a line for an eye-catching display. Drizzle any glaze left on the baking sheet over the top for extra shine. To make your dish pop, garnish with fresh herbs. A sprinkle of parsley or thyme adds color and freshness. You can even add a squeeze of lemon for brightness. This simple touch makes your dish look gourmet. Check out the [Full Recipe] for more details on making these tasty carrots! {{image_2}} You can switch up the recipe using other root veggies. Try adding parsnips or beets for a colorful twist. These vegetables offer unique tastes and textures. You can also use baby carrots. They make for a cute presentation and cook quickly. Want to change the flavor? Add spices like cumin or paprika. These spices give the dish warmth and depth. You can also add citrus. A bit of orange zest brings a bright touch to the carrots. This zest pairs well with the garlic and herbs. If you want a vegan dish, simply skip the honey and use maple syrup. This keeps the sweetness while keeping it plant-based. For gluten-free diets, this recipe is already safe. Just ensure all your ingredients are gluten-free. Enjoy the dish without worry! For the full details on making Garlic Herb Roasted Rainbow Carrots, check the [Full Recipe]. To keep your garlic herb roasted rainbow carrots fresh, store them in the fridge. Place the cooled carrots in an airtight container. This keeps out moisture and air, which can spoil them. Use them within three to five days for the best taste. If you have leftovers, you can freeze them, but note that the texture may change. To freeze, spread the cooled carrots on a baking sheet. Freeze them for about an hour, then transfer them to a freezer bag. This method prevents them from sticking together. When it’s time to enjoy your carrots again, reheating is key. The best way is to use the oven. Preheat it to 350°F (175°C). Spread the carrots on a baking sheet in a single layer. Heat them for about 10 to 15 minutes, or until warm. This method keeps them crisp. Avoid microwaving them if you can. Microwaving can make the carrots soggy and lose their nice texture. If you must use a microwave, place a damp paper towel over the carrots to help retain moisture without making them mushy. Can I use regular carrots instead of rainbow carrots? Yes, you can use regular carrots. However, rainbow carrots add color and fun to your dish. Their taste is sweeter and richer. You can mix and match if you like. Regular carrots work well in this recipe. How can I make the recipe ahead of time? You can prep the carrots and the herb mix a day early. Just cut the carrots and mix them with the herbs. Store them in the fridge. When you're ready to cook, just roast them as directed in the full recipe. What should I do if my carrots aren’t tender after roasting? If your carrots aren't tender, they may need more time. Check them at 5-minute intervals. Add some water to the baking sheet if they look dry. This steam can help soften them. How do I know when the carrots are done? The carrots are done when they are tender and slightly caramelized. You can test them with a fork. They should be easy to pierce. Look for a golden-brown color on the edges for that perfect finish. Are roasted carrots healthy? Yes, roasted carrots are healthy. They are low in calories and high in fiber. This makes them great for digestion. They also contain vitamins like A and C, which help your immune system. What nutritional benefits do rainbow carrots provide? Rainbow carrots have many health benefits. They provide antioxidants that fight free radicals. The different colors show various nutrients. For example, orange carrots are high in beta-carotene, while purple carrots contain anthocyanins. These nutrients help keep you healthy and strong. This blog post covered a simple and tasty roasted rainbow carrots recipe. You learned about key ingredients like olive oil, fresh herbs, and flavor enhancers. I shared step-by-step instructions to achieve perfect roasting. You also got tips for storage and reheating, along with fun variations. The beauty of this dish lies in its versatility and vibrant colors. Enjoy making it your own, and bring joy to your meals with these delicious carrots. Eating well can also be fun and easy!](https://dailydishlab.com/wp-content/uploads/2025/06/d72d9d4c-d28b-4e8c-993a-1734cc17a3d6-768x768.webp)
![- Sweet Potatoes and Chickpeas - 2 medium sweet potatoes, diced - 1 can (15 oz) chickpeas, drained and rinsed - Aromatics and Spices - 1 onion, finely chopped - 3 cloves garlic, minced - 1 inch ginger, grated - 2 tablespoons curry powder - 1 teaspoon turmeric powder - 1 teaspoon cumin - 1 teaspoon red chili flakes (adjust for spice level) - Liquid Ingredients - 1 can (14 oz) coconut milk - 2 cups vegetable broth - 2 tablespoons olive oil - Salt and pepper to taste - Fresh cilantro, for garnish This mix of ingredients gives the dish its bold and flavorful taste. Sweet potatoes bring a natural sweetness and creaminess. Chickpeas add protein and texture. The onion, garlic, and ginger create a strong base. Spices like curry powder and turmeric give warmth and depth. Coconut milk adds richness, while vegetable broth brings it all together. Don't forget to adjust the red chili flakes to suit your taste. For the full recipe, check out the Sweet Potato & Chickpea Delight 🥔. Sautéing the Aromatics First, grab a large pot and heat olive oil on medium heat. Add finely chopped onion. Sauté for about five minutes. You want the onion to turn translucent. Next, stir in minced garlic and grated ginger. Cook this for two minutes. The aroma will fill your kitchen. Toasting the Spices Now, add curry powder, turmeric, cumin, and red chili flakes. Stir the mix for about one minute. This toasting brings out the spices' flavors. You will notice a warm, fragrant scent. Cooking the Sweet Potatoes Next, incorporate diced sweet potatoes into the pot. Mix them well with the spices. Ensure they are fully coated. This step adds depth to the curry's taste. Adding Coconut Milk and Vegetable Broth Pour in the coconut milk and vegetable broth. Stir the mixture gently. Bring it to a gentle simmer. The sweet potatoes will soften as it cooks. Incorporating Chickpeas and Seasoning Now, add drained and rinsed chickpeas. Stir everything to combine. Season with salt and pepper to your liking. This is where the dish gets its hearty texture. Simmering the Curry Cover the pot and let it simmer for about 20 to 25 minutes. This allows the sweet potatoes to become tender. You want them to be easy to pierce with a fork. Adjusting Seasoning and Serving Once cooked, taste the curry. Adjust the seasoning if needed. You can add more chili for heat or cumin for depth. Serve the curry hot. Garnish with fresh cilantro for a pop of color. For the complete recipe, check the [Full Recipe]. - Perfecting the Texture of Sweet Potatoes To get the best texture, cut sweet potatoes into even pieces. This helps them cook uniformly. If you want them soft and creamy, cook them until tender. You can check by piercing them with a fork. If they break apart easily, they are done. - Balancing Flavor with Seasoning Start with the spices. Toast them to release their oils and enhance their taste. Taste the curry as it cooks. You can always add more salt or spices. If you want more heat, add red chili flakes. For a deeper flavor, add extra cumin. - Ideas for Accompaniments Serve the curry with rice or quinoa. They soak up the sauce well. You can also pair it with naan or pita bread for a fun twist. Add a side salad for some crunch and freshness. - Garnishing Tips Fresh cilantro adds a nice touch. Chop it finely and sprinkle on top just before serving. You can also drizzle a little coconut milk for creaminess and visual flair. For a pop of color, add lime wedges on the side. These tips will help you make the Sweet Potato Chickpea Curry truly special. Be sure to check the Full Recipe for all the details! {{image_2}} You can change up the protein in this dish. Tofu or tempeh works well. Both add great texture and soak up the flavors. For a heartier option, consider lentils. They cook quickly and mix nicely with the sweet potatoes. You can also swap in different veggies. Spinach adds color and nutrition. Kale offers a chewy texture that holds up well in the curry. Carrots or green beans bring crunch. Feel free to get creative with what you have on hand! If you like it hot, increase the red chili flakes. Start with a pinch, then taste as you go. You can also add fresh chili peppers for more heat. Just slice them and toss them in during cooking. For unique flavors, add a dash of cinnamon or nutmeg. These spices add warmth without overpowering the dish. You could also try curry pastes or blends. They can add a different twist to the classic taste. For the full recipe of this tasty dish, check the [Full Recipe]. To keep your sweet potato chickpea curry fresh, follow these tips: - Refrigerating Leftovers: Place leftover curry in an airtight container. It lasts about 3 to 5 days in the fridge. Make sure it cools down before sealing. This helps lock in flavor and freshness. - Freezing for Long-Term Storage: If you want to save some for later, freezing is a great option. Use a freezer-safe container or a heavy-duty freezer bag. Your curry can stay good for up to 3 months. Just remember to leave some space for expansion as it freezes. For the best taste when reheating, consider these methods: - Best Methods for Reheating: The stove is ideal for reheating. Pour the curry into a pot and warm it over low heat. Stir it often to heat evenly. You can also use the microwave. Place it in a microwave-safe bowl and cover it. Heat in short bursts, stirring in between, until hot. These simple storage and reheating tips ensure that your sweet potato chickpea curry remains delicious and satisfying every time you enjoy it. How long does the curry last in the fridge? Sweet Potato Chickpea Curry stays fresh for about 4 to 5 days in the fridge. Store it in an airtight container. The flavors deepen as it sits. Can I make Sweet Potato Chickpea Curry ahead of time? Yes, you can make this curry a day early. This dish tastes even better after resting. Just reheat it gently on the stove or in the microwave. Is this recipe gluten-free or vegan? Absolutely! This recipe is both gluten-free and vegan. It uses wholesome ingredients like sweet potatoes and chickpeas. You can enjoy it without worry. Health Benefits of Sweet Potatoes and Chickpeas Sweet potatoes are rich in vitamins and fiber. They support your immune system and digestion. Chickpeas provide protein and keep you full. They also have good fats and help with heart health. Nutritional Information for the Recipe Each serving of Sweet Potato Chickpea Curry offers: - Calories: 320 - Protein: 10g - Carbohydrates: 50g - Fiber: 12g - Fat: 10g This dish is a great choice for a healthy meal. You get nourishment and flavor in every bite. For the complete recipe, check the [Full Recipe]. This blog post covered the key steps to make a delicious sweet potato chickpea curry. We explored the ingredients, from sweet potatoes to spices. I shared tips on perfecting texture and flavor. You learned how to store and reheat leftovers effectively. In the end, this curry is simple, tasty, and full of nutrition. Feel free to modify it as you like. Enjoy making it your own!](https://dailydishlab.com/wp-content/uploads/2025/06/3a6395ce-0a8b-49f3-888b-6de387966cb9-768x768.webp)
![For these Cilantro Lime Sweet Potato Tacos, you will need: - 2 medium sweet potatoes, peeled and diced - 1 tablespoon olive oil - 1 teaspoon cumin - 1 teaspoon smoked paprika - Salt and pepper to taste - 1 cup black beans, rinsed and drained - 1 avocado, diced - 1/2 cup red cabbage, finely shredded - 1/4 cup fresh cilantro, chopped - 2 tablespoons lime juice - 8 small corn tortillas - Optional toppings: crumbled feta cheese, jalapeño slices, lime wedges Peeling and dicing sweet potatoes can seem tricky, but it's simple. Start by using a sharp peeler to remove the skin. Hold the sweet potato firmly, and peel from top to bottom. Once peeled, cut them into even cubes. This helps them cook at the same time. For chopping vegetables efficiently, keep your knife sharp. A dull knife makes cutting harder and can lead to accidents. Use a cutting board that doesn’t slip. Place a damp cloth under it for extra grip. When chopping red cabbage, slice it in half first. This makes it easier to shred. These tacos are not only tasty but also healthy. Each serving has about: - Calories: 350 - Protein: 10 grams - Fiber: 8 grams These numbers may vary based on the toppings you choose. Enjoy these tacos knowing they are good for you! For the full recipe, visit the link provided. First, set your oven to 400°F (200°C). This temperature helps the sweet potatoes cook perfectly. Next, peel and dice two medium sweet potatoes into small cubes. In a large bowl, toss the sweet potatoes with one tablespoon of olive oil. Add one teaspoon of cumin, one teaspoon of smoked paprika, salt, and pepper to taste. Make sure each piece is well coated with the seasoning. This step brings out the sweet flavor and adds a nice smoky touch. Spread the seasoned sweet potatoes on a baking sheet in a single layer. Roast them in the preheated oven for 25-30 minutes. This brings out their natural sweetness and gives them a great texture. Stir the sweet potatoes halfway through cooking. Stirring helps them brown evenly and prevents them from sticking. Keep an eye on them as they roast. You want them to be tender and slightly caramelized. While the sweet potatoes roast, prepare the taco filling. In a small bowl, mix one cup of black beans, one diced avocado, and half a cup of finely shredded red cabbage. Then, add a quarter cup of chopped cilantro and two tablespoons of lime juice. This mixture adds freshness and creaminess to the tacos. Taste it and add a pinch of salt if needed. The lime juice brightens all the flavors and balances the dish perfectly. Now, you can assemble the tacos! Warm eight small corn tortillas in a skillet or microwave. Place a generous amount of the sweet potato mixture on each tortilla. Top with the black bean and avocado mix. Enjoy your delightful Cilantro Lime Sweet Potato Tacos! For the full recipe, check out the detailed instructions above. To make these tacos truly yours, adjust the spices. If you like heat, add more smoked paprika or a pinch of cayenne. For a sweeter taste, sprinkle a bit of cinnamon. Taste as you go to find your perfect blend. For the sweet potatoes, achieving the right texture is key. Roast them until they are tender but not mushy. Stir halfway through cooking to ensure even crispness. This adds flavor and keeps them from sticking together. Pair these tacos with a fresh salad or a side of rice. A simple corn salad goes well with the flavors too. When it comes to drinks, a light beer or sparkling water with lime works great. Presentation matters! Serve your tacos on a colorful platter. Add lime wedges and extra cilantro for a bright look. This will impress your guests and make the meal feel special. One big mistake is overcooking the sweet potatoes. Check for doneness after 25 minutes. They should be soft but still hold their shape. Another common error is not warming the tortillas. Cold tortillas can break when you fill them. Warm them in a skillet or microwave for a few seconds before adding your filling. This small step makes a big difference in enjoying your tacos. For the complete recipe, check the [Full Recipe]. {{image_2}} To make these tacos vegan and gluten-free, choose the right ingredients. Most of the main ingredients are already vegan. The corn tortillas are gluten-free, but check the label to be sure. If you want to swap out the olive oil, use avocado or coconut oil. You can also add nutritional yeast for a cheesy flavor. This makes the recipe friendly for everyone. Want to add protein? Tofu or tempeh work great here. Just cube the tofu and marinate it in lime juice, cumin, and smoked paprika. Then, sauté it until golden brown. If using tempeh, steam it first to soften it. After that, add your spices and sauté. This way, you keep the flavor strong without losing the essence of the dish. You can change the flavor of your tacos easily. Try adding spices like chili powder or garlic powder for extra taste. For a spicy version, toss in some sliced jalapeños. You can also mix in chipotle sauce for a smoky kick. This way, you can create your perfect taco experience. Remember to taste as you go for the best results. For the full recipe, make sure to check out the details! To keep your cilantro lime sweet potato tacos fresh, store them in the fridge. First, separate the sweet potato filling from the tortillas. Use airtight containers to prevent moisture loss. Place the sweet potatoes and toppings in one container, and keep the tortillas in another. They will stay better this way. Aim to eat leftovers within 3 days for the best taste. When it's time to enjoy your tacos again, reheat the sweet potato filling in a skillet. This method warms them evenly and keeps their texture. To avoid soggy tortillas, warm them separately. You can use a microwave for about 10 seconds or heat them in a dry skillet for a few seconds on each side. This way, they stay soft and pliable. Freezing is a great option for meal prep. To freeze, place the sweet potato filling in a freezer-safe bag. Remove as much air as possible before sealing. Freeze tortillas separately in a different bag. This keeps them fresh for up to 3 months. When you're ready to eat, thaw the filling overnight in the fridge. Reheat it in a skillet and warm the tortillas as described above for the best results. Yes, you can. To save time, roast the sweet potatoes ahead. Store them in an airtight container in the fridge. You can also mix the black beans, avocado, cabbage, and cilantro together. Just keep the lime juice separate until you are ready to serve. This helps keep the avocado fresh. Warm your tortillas just before serving for the best taste. If you want something different, try flour tortillas. You can also use lettuce leaves for a low-carb option. Another idea is to use whole grain or gluten-free tortillas. Each choice adds a unique taste and texture to your tacos. To add heat, you can use jalapeños or serrano peppers. Mix them into the black bean filling for a kick. You can also drizzle hot sauce on top. For an extra spicy twist, sprinkle some chili powder on the sweet potatoes before roasting. There are many great toppings! I love adding crumbled feta cheese for creaminess. Sliced radishes add crunch and color. You can also use fresh lime wedges for an extra zing. Chopped green onions or a dollop of sour cream can enhance the flavor too. Absolutely! These tacos are great for meal prep. You can prepare and store each component separately. When you are ready to eat, just assemble the tacos. This keeps everything fresh and tasty. Plus, it makes lunch or dinner quick and easy. For the full recipe, check the earlier section. This blog post covered everything about making delicious sweet potato tacos. We discussed key ingredients like sweet potatoes, black beans, and spices. You learned how to prepare and cook them for the best flavor. We also explored tips for perfecting the tacos, storage options, and variations to meet different diets. In closing, these tacos are not just tasty; they are easy to make. Feel free to get creative with your ingredients and spices. Enjoy this fun, healthy dish any day of the week.](https://dailydishlab.com/wp-content/uploads/2025/06/d5ef5737-17ff-4d92-abbe-c4319bb4aaa8-768x768.webp)

![- 8 oz spaghetti or linguine - 1 lb large shrimp, peeled and deveined - 4 cloves garlic, minced - 1/4 cup olive oil - 1 lemon (zested and juiced) - 1/4 cup fresh parsley, chopped - 1/2 teaspoon red pepper flakes (optional) - Salt and pepper to taste - Grated Parmesan cheese for serving When I make Lemon Garlic Shrimp Pasta, I start with the main ingredients. The pasta is key. I choose either spaghetti or linguine. Both have the right texture. The shrimp adds protein and flavor. Large shrimp work best. Their size means they cook well and absorb the taste. Next, I grab garlic. Fresh, minced garlic gives the dish a punch of flavor. It's one of my favorite parts. With these main ingredients, we're well on our way to a great meal. Now, I gather the additional ingredients. First, I pour in some olive oil. It helps cook the garlic and shrimp. Then, I zest and juice a lemon. The citrus brightens up the dish and adds freshness. I also chop fresh parsley. It adds color and flavor. If you like heat, add red pepper flakes. They bring a nice kick. Don't forget salt and pepper. They are essential for seasoning. Finally, I always keep grated Parmesan cheese on hand. It makes a great topping that melts into the warm pasta. These ingredients come together for a dish that is simple yet packed with flavor. For the full recipe, you can follow the steps to create this delightful meal. To start, bring a large pot of salted water to a boil. Add 8 ounces of spaghetti or linguine. Cook the pasta until it is al dente, following the package instructions. This usually takes about 8 to 10 minutes. Once done, reserve about 1/2 cup of the pasta water before draining the rest. Set the pasta aside in a large bowl. Next, grab a large skillet and heat 1/4 cup of olive oil over medium heat. Add 4 cloves of minced garlic to the skillet. Sauté the garlic for about 1 minute. Keep an eye on it, so it doesn't burn. After the garlic becomes fragrant, add 1 pound of large shrimp, peeled and deveined. Cook the shrimp for 2 to 3 minutes on each side. They will turn pink when done. Season the shrimp with salt, pepper, and optional red pepper flakes for some heat. Once the shrimp are cooked, it’s time to mix everything. Add the cooked pasta to the skillet with the shrimp. Pour in the juice and zest from 1 lemon. Toss everything well to combine. If the pasta looks dry, add a little of the reserved pasta water. This will help achieve the right consistency. Finally, stir in 1/4 cup of chopped fresh parsley. Adjust the seasoning if needed and serve immediately. For a finishing touch, sprinkle some grated Parmesan cheese on top. Enjoy your delicious meal! To cook your pasta just right, aim for al dente. This means the pasta should be firm yet tender. Cook it according to the package, but check a minute early. This helps keep a good bite. Don’t forget to reserve some pasta water before draining. This water is starchy and helps bind the sauce. If your dish seems dry, just add a splash of this water to get the right texture. Season your dish well. Use salt and pepper to bring out the flavors. For extra zing, add red pepper flakes. They add warmth without overpowering the dish. To really boost the garlic flavor, sauté it gently. Cook it until it's fragrant but not burnt. This way, the garlic infuses the oil with a rich taste, enhancing the shrimp and pasta. Make your dish look great when serving. Sprinkle fresh parsley on top for a pop of color. You can also add a generous amount of grated Parmesan cheese. It adds a nice finish and rich flavor. Pair Lemon Garlic Shrimp Pasta with a crisp salad or some garlic bread. These sides bring balance and make your meal feel complete. For more tasty ideas, check out the Full Recipe. {{image_2}} You can change the pasta type to fit your taste. Use whole wheat or gluten-free pasta. Both options work well with the dish. If you want a unique twist, try using fettuccine or penne. They all absorb the flavors nicely. If shrimp isn't your favorite, swap in other proteins. Chicken or scallops are great alternatives. You can even use tofu for a plant-based meal. Just adjust cooking times to ensure everything cooks evenly. Adding vegetables boosts both flavor and nutrition. Spinach wilts down nicely and adds color. Cherry tomatoes burst with juice and sweetness. You can add these veggies when cooking the shrimp. Herbs and spices can transform this dish. Basil or oregano pair well with lemon. For heat, consider using crushed red pepper flakes. Fresh herbs like basil or cilantro add a pop of freshness. Experiment with what you love! Gluten-free eaters can enjoy this dish too. Use gluten-free pasta instead of traditional options. Make sure to check the label for safe ingredients. For a vegan version, skip the shrimp and Parmesan. Use chickpeas or mushrooms for texture. Nutritional yeast can give a cheesy flavor without the dairy. This way, everyone can enjoy a delicious meal! For the full recipe, check out the [Full Recipe]. To store your Lemon Garlic Shrimp Pasta, place it in an airtight container. This helps keep it fresh. You can store it in the fridge for up to three days. If you want to enjoy it later, make sure it cools down first before sealing the container. When you’re ready to eat the pasta again, there are a few easy ways to reheat it. You can use the microwave or heat it on the stove. If you microwave it, add a splash of water to keep it moist. If you use the stove, warm it over low heat and stir gently. This helps keep the shrimp tender and the pasta tasty. If you want to keep the Lemon Garlic Shrimp Pasta longer, freezing works great. First, let it cool completely. Then, pack it in a freezer-safe container or bag. It can last up to three months in the freezer. To reheat, thaw it overnight in the fridge. Then, warm it on the stove or microwave as mentioned above. Enjoy your delicious meal later with ease! For the complete recipe, check out the Full Recipe. Preparing Lemon Garlic Shrimp Pasta takes about 10 minutes for prep and 10 minutes for cooking. You can have this dish ready in just 20 minutes. This quick time makes it perfect for busy weeknights or a cozy dinner. Yes, you can use frozen shrimp. Just thaw the shrimp before cooking. Place frozen shrimp in a bowl of cold water for about 15-20 minutes. This method works well and keeps shrimp firm. Once thawed, peel and devein them if needed. Then, you can follow the steps in the full recipe. Lemon Garlic Shrimp Pasta goes well with many sides. Here are some great options: - A simple green salad with lemon vinaigrette. - Garlic bread for a crunchy bite. - Steamed asparagus or broccoli for some veggies. - A light tomato salad to balance the dish's flavors. These sides add freshness and texture to your meal, making it even more enjoyable. Lemon Garlic Shrimp Pasta combines fresh flavors and simple steps. We covered ingredients, cooking methods, and helpful tips. Remember to reserve pasta water for the best texture. You can also customize with veggies or different proteins. This dish is quick and enjoyable for any meal. Try it next time you cook. It’s easy, tasty, and sure to impress! Enjoy sharing or savoring this meal with loved ones.](https://dailydishlab.com/wp-content/uploads/2025/06/cb109eed-2e61-4a9b-85d4-6391f29df5eb-768x768.webp)
![- 1 can (15 oz) chickpeas, drained and rinsed - 1/4 cup buffalo sauce - 1/4 cup ranch dressing - 1 cup shredded lettuce - 1 medium carrot, grated - 1/2 cup cherry tomatoes, halved - 4 large whole wheat tortillas - 1/2 cup shredded cheddar cheese (optional) - Fresh cilantro or parsley for garnish - Salt and pepper to taste I love using chickpeas for wraps. They are healthy and filling. The buffalo sauce gives a nice kick, while the ranch dressing adds creaminess. You can easily adjust the buffalo sauce to make it milder if you prefer. The shredded lettuce and grated carrot add crunch and freshness. Cherry tomatoes bring sweetness, making the wraps tasty. Whole wheat tortillas make these wraps hearty. You can choose to add cheese for richness, but it’s optional. Fresh herbs like cilantro or parsley brighten the dish. Don't forget to season with salt and pepper to enhance the flavors. - Alternative sauces (e.g., vegan ranch) - Different cheese options (e.g., goat cheese, dairy-free cheese) - Additional veggies (e.g., bell peppers, avocado) Feel free to mix it up! If you want a vegan option, try vegan ranch. Different cheeses, like goat cheese or dairy-free cheese, can also add unique flavors. Adding more veggies like bell peppers or avocado can make your wraps even better. Customizing the ingredients makes each wrap special and fun! For the full recipe, check it out here. - First, mash the chickpeas in a bowl until they are slightly chunky. - Next, stir in the buffalo sauce, ranch dressing, salt, and pepper. - In another bowl, mix shredded lettuce, grated carrot, and halved cherry tomatoes. - Lay out your tortillas flat on a clean surface. - Place an even amount of the chickpea mix in the center of each tortilla. - Top the chickpea mix with the fresh veggie mix and cheese if you want. - Fold the sides of the tortilla inwards. - Now, roll the tortilla tightly from the bottom to form a wrap. - If you want extra crunch, grill the wraps on a non-stick skillet for 1-2 minutes on each side. - You can also bake them in the oven or use an air fryer for a different texture. These simple steps will give you tasty Buffalo Ranch Chickpea Wraps! For the full recipe, check out the section above. To make your Buffalo Ranch Chickpea Wraps even better, adjust the spice levels. If you love heat, add more buffalo sauce. Just start with a little and taste as you go. This way, you can find the right kick for you. Seasoning is key. Use salt and pepper to balance the flavors. A little extra ranch dressing can help too. It adds creaminess and cools down the heat. When wrapping your tortillas, avoid common mistakes. One mistake is overfilling. If you pack too much in, the wrap can burst. Use a spoon to measure your filling. A good amount is about 1/4 cup of the chickpea mix. Another mistake is underfilling. This can lead to a sad wrap. Make sure there’s enough filling to enjoy. For sides, think about fresh veggies or chips. Carrot sticks or cucumber slices pair well. You can also serve the wraps with dips. Try a creamy ranch or tangy salsa. For a fun presentation, slice the wraps in half and stand them up on a plate. Sprinkle fresh cilantro on top to add color. These small touches make your meal look great! You can find the full recipe for Buffalo Ranch Chickpea Wraps to guide you in creating this dish. {{image_2}} You can easily make these wraps fit various diets. For a vegan option, simply use a vegan ranch dressing. This keeps the creamy taste while making it plant-based. If you're gluten-free, swap out the whole wheat tortillas for gluten-free wraps. You can also create a low-carb version. Just use large lettuce leaves instead of tortillas. This gives you a fresh crunch without the carbs. Want to spice things up? You can add herbs like cilantro or dill to the chickpea mix. This extra touch brings freshness to each bite. You can also experiment with different sauces. Try using a spicy sriracha sauce or a tangy barbecue sauce. Each sauce changes the wraps' flavor profile and keeps them exciting. Get creative with global flavors! You could make Mediterranean wraps by adding hummus, olives, and feta cheese. For a BBQ twist, mix in some grilled corn and use a smoky BBQ sauce. Pair these wraps with global side dishes like a light tabbouleh salad or a zesty coleslaw. These sides make the meal even more fun and flavorful. For the full recipe, check out the [Full Recipe]. To keep your Buffalo Ranch Chickpea Wraps fresh, store them in the refrigerator. Wrap each one tightly in plastic wrap or foil. This helps keep them from drying out. You can also place them in a sealed container, but ensure they are not stacked too tightly. If you want to save leftovers for later, freezing is a great option. Wrap each wrap in plastic wrap, then place them in a freezer bag. This can keep them fresh for up to three months. When it's time to eat your wraps, reheating them safely is key. You can use a microwave, but it may make the wraps soggy. Instead, I recommend using a skillet. Heat a non-stick skillet over medium heat and place the wrap in it. Cook for about two minutes on each side. This will keep the wrap crispy. If you do use a microwave, place a paper towel under the wrap. This helps absorb excess moisture. In the fridge, your wraps can last for about three days. Always check for signs of spoilage. If you see mold or if the wraps smell off, it’s best to toss them. Fresh ingredients like lettuce and tomatoes may wilt, so keep an eye on those. If they look slimy or discolored, they have gone bad. Enjoy your wraps while they are fresh for the best taste! Buffalo Ranch Chickpea Wraps are a tasty meal made with simple ingredients. They feature mashed chickpeas mixed with spicy buffalo sauce and creamy ranch dressing. You can add fresh veggies like shredded lettuce, grated carrot, and halved cherry tomatoes. These wraps get wrapped in whole wheat tortillas. They are fun to make and even better to eat! Yes, you can make these wraps ahead of time! Just prepare the chickpea mixture and the fresh veggie mix. Store each in separate containers in the fridge. When you are ready to eat, fill the tortillas and wrap them up. You can keep them in the fridge for up to three days. If you want, you can also freeze them for later. Just wrap them tightly in foil or plastic wrap. If you don’t have chickpeas, you can use other legumes. Black beans or white beans work well. You can also try cooked lentils or even shredded chicken for extra protein. Each option brings a different flavor and texture to the wraps. The spice level depends on the buffalo sauce you choose. Some sauces are mild, while others are very hot. You can start with a little sauce and add more to taste. This way, you control the heat in your wraps. Absolutely! If you want to skip ranch dressing, there are other tasty options. You can use yogurt, hummus, or even guacamole for a different flavor. Each adds a nice creaminess and works well with the spicy chickpeas. Buffalo Ranch Chickpea Wraps are easy to make and packed with flavor. You can mix chickpeas with sauces and fresh veggies in whole wheat tortillas. Feel free to customize, grill, or try different sauces for unique tastes. Remember to store them right to keep them fresh. With these wraps, you can enjoy a tasty meal that fits your style, whether vegan or gluten-free. Dive into this fun recipe and share with friends for a delicious treat!](https://dailydishlab.com/wp-content/uploads/2025/06/5f9195e4-7aa1-4124-96b6-1f6b3598d73d-768x768.webp)
 for all the details! {{image_2}} You can easily change the protein in your fajitas. Try using steak or shrimp instead of chicken. Both options add great flavor and texture. For steak, slice it thinly to cook evenly. Shrimp cooks fast, so watch it closely. You can also mix up the veggies. Instead of just bell peppers and onion, consider adding zucchini, mushrooms, or corn. Each veggie brings its own taste. This way, you can create your own flavor profile. If you need a gluten-free option, skip the tortillas and serve the fajitas on a bed of lettuce. This keeps the meal light and crunchy. For a vegetarian version, swap the chicken for black beans or tofu. Season them the same way as chicken. This adds protein and keeps it filling. You can also add extra veggies to enhance the dish. These swaps and modifications make it easy to customize your sheet pan chicken fajitas. Enjoy making them your own! You can find the full recipe above. After cooking, let your fajitas cool down. This helps keep the taste fresh. Store leftovers in the fridge. Use airtight containers to keep them safe. Make sure the lid seals tight to prevent air from getting in. You can keep them in the fridge for up to three days. If you want to save them longer, try freezing them. They will last about three months in the freezer. You can reheat your fajitas in two main ways: the microwave or the oven. - Microwave: Place the fajitas on a microwave-safe plate. Cover them with a damp paper towel to keep moisture. Heat for about one minute. Check if they are warm enough. If not, heat in 30-second bursts until hot. - Oven: Preheat your oven to 350°F (175°C). Place the fajitas on a baking sheet. Cover with foil to keep them moist. Heat for about 10-15 minutes. This method keeps the texture nice and crispy. To keep flavor and texture, avoid overheating. This way, your fajitas taste just as good as when you first made them. Enjoy your meal again with the same great taste! For the full recipe, check the recipe section. How long to bake chicken fajitas? Bake chicken fajitas for 20-25 minutes at 400°F (200°C). Check that the chicken is fully cooked. The veggies should be tender and slightly caramelized. This timing helps the flavors blend well. Can I use frozen chicken for this recipe? Yes, you can use frozen chicken. However, thaw it first to ensure even cooking. If you cook it from frozen, increase the baking time by 10-15 minutes. Always check the chicken’s internal temperature for safety. What toppings go well with fajitas? Toppings can make your fajitas special. Here are some great ideas: - Fresh cilantro - Sour cream - Guacamole - Salsa - Shredded cheese How to make homemade tortillas? Making homemade tortillas is easy and fun. You need flour, water, salt, and oil. Mix the ingredients, knead the dough, and let it rest. Then, roll out small balls and cook them on a hot skillet. This adds a fresh touch to your fajitas. What sauces pair best with chicken fajitas? Many sauces can enhance your chicken fajitas. A few popular choices are: - Salsa verde - Chipotle sauce - Creamy ranch dressing - Spicy barbecue sauce These sauces add extra flavor and make each bite even better. This blog post covered how to make delicious sheet pan chicken fajitas. We discussed the key ingredients, preparation steps, and cooking instructions. I shared tips for perfecting your dish and suggested ways to serve it. We also explored ingredient swaps and dietary options to suit your needs. Lastly, I provided storage and reheating advice to enjoy leftovers. With these insights, you can create flavorful fajitas that impress your family and friends. Enjoy your cooking adventure!](https://dailydishlab.com/wp-content/uploads/2025/06/92060734-80b3-49a4-9e1c-290f85b37bb8-768x768.webp)