Skip to content
About
Contact
Cookie Policy
Copyright Policy
Disclaimer
Search
Home
Dinner
Appetizer
Desserts
Drinks
About
Contact
Privacy Policy
Toggle Menu
Home
/
Dinner
- Page 40
Dinner
Chicken and Rice Skillet Alfredo Quesadilla Delight
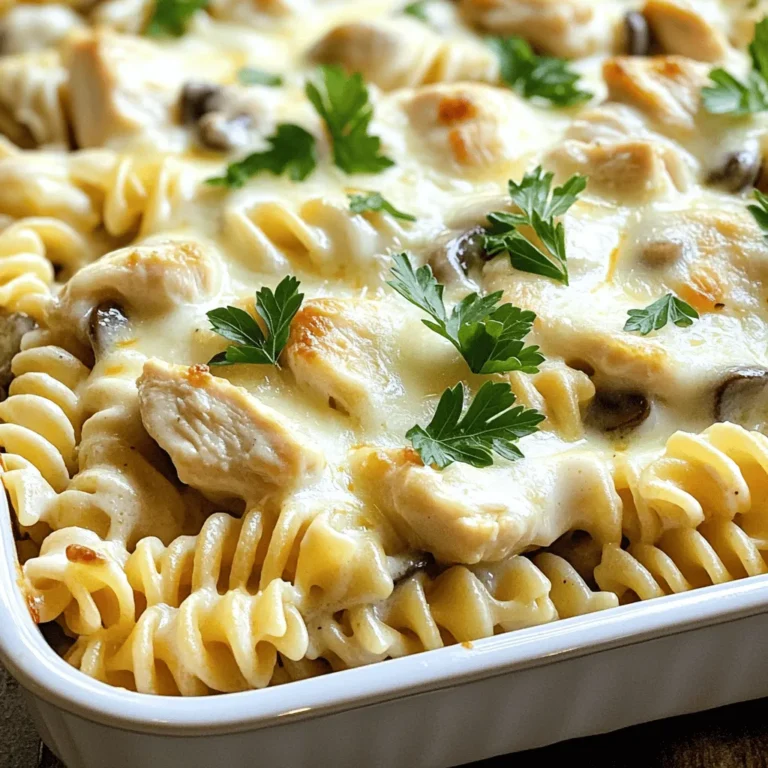
Chicken and Mushroom Alfredo Casserole Delicious Dish
Chicken and Cheese Quesadilla Alfredo Casserole Delight
Chicken and Broccoli Alfredo Casserole Cozy Family Meal
Chicken and Cheese Enchiladas Alfredo Casserole Delight
Savory Chicken and Rice Skillet Alfredo Casserole
Chicken and Mushroom Alfredo Bake Flavorful Delight
Chicken and Broccoli Alfredo Bake Easy Comfort Food
Chicken and Cheese Enchiladas Alfredo Bake Delight
Chicken and Rice Skillet Alfredo Bake Hearty Comfort Meal
Page navigation
Previous Page
Previous
1
…
38
39
40
41
42
…
64
Next Page
Next
Home
Dinner
Appetizer
Desserts
Drinks
About
Contact
Privacy Policy
Toggle Menu Close
Search for:
Search


![To make this tasty dish, you need some key items. Here is what you will need: - 2 cups cooked pasta (penne or rotini works best) - 1 lb chicken breast, diced - 8 oz mushrooms, sliced - 2 cups broccoli florets (fresh or frozen) - 3 cups Alfredo sauce (store-bought or homemade) - 1 cup shredded mozzarella cheese - ½ cup grated Parmesan cheese - 2 tablespoons olive oil - 2 cloves garlic, minced - Salt and pepper to taste - 1 teaspoon Italian seasoning These ingredients create a rich and creamy flavor that everyone will love. The right seasonings make your casserole pop. Salt and pepper add basic flavor. Italian seasoning gives it a nice herbal touch. I often use fresh garlic to add depth. The garlic will make your kitchen smell amazing as it cooks. Don’t skip these steps; they make a big difference! Garnishes can make your dish look more inviting. I like to use fresh parsley for a burst of color. You can also add extra cheese on top if you want a cheesier finish. These little touches make your casserole feel special and more appealing. Use what you enjoy most! If you want the full details, check the Full Recipe. Start by gathering your ingredients. You need cooked pasta, chicken, mushrooms, broccoli, and sauce. Also, have mozzarella and Parmesan cheese ready. Dice the chicken and slice the mushrooms. This helps the cooking go fast. Mince the garlic too. Don’t forget to measure out the olive oil and seasonings. In a large skillet, heat olive oil over medium heat. Once hot, add the diced chicken. Season it with salt, pepper, and Italian seasoning. Cook for 5-7 minutes until the chicken turns white. It should not be pink inside. Next, add minced garlic and sliced mushrooms. Sauté these for 3-4 minutes. The mushrooms will become soft and tasty. Finally, stir in the broccoli florets. Cook for an extra 2 minutes until they turn bright green. In a big bowl, mix the cooked pasta with the chicken and vegetables. Pour in the Alfredo sauce and stir well. Make sure everything is coated evenly. Transfer this mixture to a greased baking dish. Spread it out evenly. Now, top it with mozzarella and Parmesan cheese. Bake it in a preheated oven at 375°F for 25-30 minutes. Look for bubbly, golden cheese on top. When it’s ready, let it cool for 5 minutes before serving. You can find the Full Recipe for more details and serving tips. To cook chicken well, use a skillet over medium heat. First, add olive oil and let it warm. Then, add diced chicken to the hot oil. Season with salt, pepper, and Italian seasoning. Cook for 5-7 minutes until the chicken turns white and is no longer pink. This step ensures juicy chicken for your casserole. The key to creamy Alfredo sauce is gentle heating. If you use store-bought sauce, warm it on low heat. If you make it from scratch, stir constantly to avoid lumps. You want it smooth and silky. Mix the sauce well with pasta before adding other ingredients. This helps coat everything evenly and keeps it creamy. Ovens can vary, so check your casserole while it bakes. I suggest baking for 25-30 minutes. If the top isn’t golden, leave it for a few more minutes. To avoid overcooking, always look for bubbling cheese. When the cheese is melted and golden, it’s ready to serve. Adjust your time based on your oven’s heat. {{image_2}} You can switch out the chicken for other meats. Try diced turkey or cooked ham. Shrimp works well too. Each option adds a different taste to the dish. You can also use ground beef for a heartier flavor. Just make sure it's fully cooked. If you want a meatless meal, skip the chicken. Replace it with tofu or tempeh. Both will soak up the sauce and add protein. You can also use chickpeas for a fun twist. This way, you keep it filling and tasty. Boost the health of your casserole by adding more vegetables. Spinach, bell peppers, or zucchini are great choices. You can mix in frozen peas or corn too. Just remember to keep the cooking time in mind. You want all the veggies to be tender but not mushy. They add color and flavor to your dish! To keep your Chicken and Mushroom Alfredo Casserole fresh, store it in an airtight container. Place it in the fridge right after it cools down. It will stay good for up to three days. Make sure to label the container with the date. This helps you track how long it has been stored. When you’re ready to enjoy your leftovers, preheat your oven to 350°F (175°C). Place the casserole in an oven-safe dish. Cover it with foil to keep it moist. Heat for about 20 minutes or until it's warm all the way through. You can also use the microwave. Just heat in short bursts and stir in between until hot. If you want to save the casserole for later, freezing is a great option. Allow the dish to cool completely before freezing. Use a freezer-safe container or wrap it tightly in plastic wrap and foil. It can last for up to three months in the freezer. To reheat, thaw it overnight in the fridge and then bake as mentioned above. Enjoy your creamy, cheesy meal anytime! Yes, you can make this dish ahead of time. Prepare the casserole, but do not bake it. Cover it tightly with plastic wrap or foil. Store it in the fridge for up to two days. When you are ready to eat, bake it straight from the fridge. Just add a few extra minutes to the cooking time. This keeps the flavors fresh and tasty. If you need a substitute, try cream cheese mixed with milk. This gives a creamy texture. You can also use a white sauce made from butter, flour, and milk. For a lighter option, consider using Greek yogurt mixed with a bit of cheese. These options will still keep your casserole rich and delicious. Yes, frozen chicken and vegetables work well in this recipe. If using frozen chicken, thaw it first. Cut it into small pieces before cooking. For frozen vegetables, you can add them straight to the skillet. Just cook them a little longer to ensure they heat through. This makes the prep easy and quick, while still tasting great. You can find the full recipe for Chicken and Mushroom Alfredo Casserole [Full Recipe]. This blog covered everything you need for Chicken and Mushroom Alfredo Casserole. We discussed the ingredients, from required items to tasty garnishes. I shared easy steps for preparing, cooking, and assembling the dish. Plus, I gave tips for perfect chicken and sauce. We explored variations, storage, and answered common questions. Creating this dish can be simple and fun. You can enjoy different flavors and textures. Don't hesitate to try your own spin on it. Enjoy your cooking adventure!](https://dailydishlab.com/wp-content/uploads/2025/06/668e601b-10d5-4ca8-81a3-3ea93e17acf1-768x768.webp)

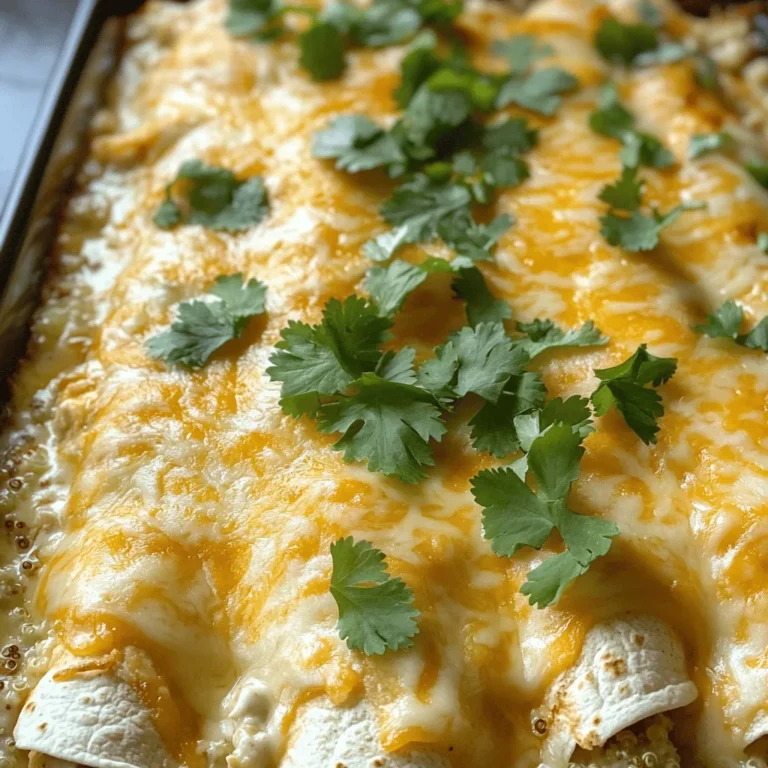
. First, preheat your oven to 350°F (175°C). This makes sure your casserole cooks evenly. Next, grab a large baking dish. Spread a thin layer of alfredo sauce on the bottom. This helps prevent sticking. Now, let’s sauté some garlic and onion. In a skillet, heat a tablespoon of oil over medium heat. Add the minced garlic and diced onion. Cook until the onion is clear, about 4-5 minutes. This step brings out great flavor. Next, add the shredded chicken, black beans, corn, cumin, chili powder, salt, and pepper. Mix well and cook for 3-4 minutes. This allows the flavors to blend nicely. Now, let’s dip the tortillas in alfredo sauce. Coat both sides lightly for the best flavor. Lay 6 tortillas flat in the baking dish. Overlap them slightly, if needed. Next, it's time to assemble the layers. Spread half of the chicken and bean mixture over the tortillas. Then, sprinkle half of the shredded cheese on top. Repeat this process with the remaining tortillas and chicken mixture. Finish by pouring the rest of the alfredo sauce and topping with the last of the cheese. To bake, cover the dish with aluminum foil, shiny side in. Bake for 25 minutes. This keeps moisture in. After that, remove the foil and bake for another 10-15 minutes. You want the cheese to be bubbly and golden brown. Let the casserole cool for 5 minutes before serving. Garnish with fresh cilantro for a tasty touch. For the full recipe, check out the complete details. You can make this casserole a day before. Just prepare each part and store them in the fridge. Keep the tortillas, chicken mixture, and sauce separate until you are ready to bake. This way, the flavors blend well. When ready, layer as directed in the Full Recipe. Bake it straight from the fridge for about 10 extra minutes. Taste is key. Adjust the seasoning to fit your preference. If you like it spicier, add more chili powder. For a creamier texture, stir in a bit more alfredo sauce. You can also mix in a splash of milk or cream for extra richness. This makes every bite so much better. Pair your casserole with simple side dishes like a fresh salad or rice. These balance the cheesy richness of the enchiladas. For garnish, sprinkle fresh cilantro on top. You could also add sliced green onions or diced tomatoes for color. This makes your dish look as good as it tastes! {{image_2}} You can switch up the protein in this dish. Instead of chicken, try beef or shrimp. Ground beef adds a nice flavor. Shrimp gives a light touch. Both options work well with the creamy sauce. For a vegetarian version, use black beans or lentils. They add protein and keep it satisfying. Boost the flavor by adding spices. Try a pinch of cayenne for heat. You can also mix in smoked paprika for a smoky taste. Adding vegetables makes it even better. Bell peppers, spinach, or zucchini all work great. They add color and nutrients to your meal. If you need a gluten-free meal, corn tortillas are your best choice. They hold up well and taste great. You can also find gluten-free alfredo sauce at the store. Check labels to ensure it meets your needs. This way, everyone can enjoy the casserole without worry. For the full recipe, be sure to check out the ingredients and instructions. To keep your Chicken and Cheese Enchiladas Alfredo Casserole fresh, use airtight containers. Glass or plastic containers with tight lids work best. This keeps the casserole from drying out and helps it stay tasty. In the fridge, the casserole lasts about three to four days. You can freeze the casserole before or after baking. If you freeze it before baking, wrap it tightly in plastic wrap and then again in foil. This helps prevent freezer burn. If you choose to freeze it after baking, wait for it to cool first. Then, store it in a freezer-safe container. When you are ready to eat, thaw the casserole overnight in the fridge. To reheat, place it in the oven at 350°F (175°C) until warm all the way through. You can also microwave it for a quicker option, but check often to avoid overcooking. Enjoy your delicious casserole, even days later! For the full recipe, check out the complete details. How to reheat Chicken and Cheese Enchiladas Alfredo Casserole? To reheat, preheat your oven to 350°F (175°C). Place the casserole in a baking dish and cover with foil. Bake for about 20 minutes or until hot. You can also use a microwave. Heat in short intervals, stirring in between, until warm. Can I make it ahead of time? Yes, you can prepare the casserole a day before. Assemble it and store it in the fridge. Just bake it when you’re ready to serve. This saves time and adds flavor as it sits. What can I serve with Chicken and Cheese Enchiladas Alfredo Casserole? I love serving this casserole with a fresh salad or some Mexican rice. You can also add guacamole, sour cream, or fresh salsa. These sides balance the richness and make the meal more delicious. What’s the best way to adjust the spice level? To change the spice level, you can add more or less chili powder. If you want it milder, skip the chili powder. For more heat, add diced jalapeños or a dash of hot sauce. How to tell when it's done baking? You’ll know it’s done when the cheese is bubbly and golden brown. The casserole should be hot all the way through. A knife inserted in the center should come out warm. Enjoy the full recipe to make this dish shine! This blog post covered a delicious Chicken and Cheese Enchiladas Alfredo Casserole. We discussed the key ingredients, including chicken, tortillas, and cheese. I offered tips on how to prepare, layer, and bake the dish for perfect results. Remember to try the variations to suit your taste. In summary, this dish is easy to make and full of flavor. It works well for gatherings or busy weeknights. Enjoy this tasty casserole and make it your own!](https://dailydishlab.com/wp-content/uploads/2025/06/c52f16b1-e126-40f1-801c-467dac7db649-768x768.webp)

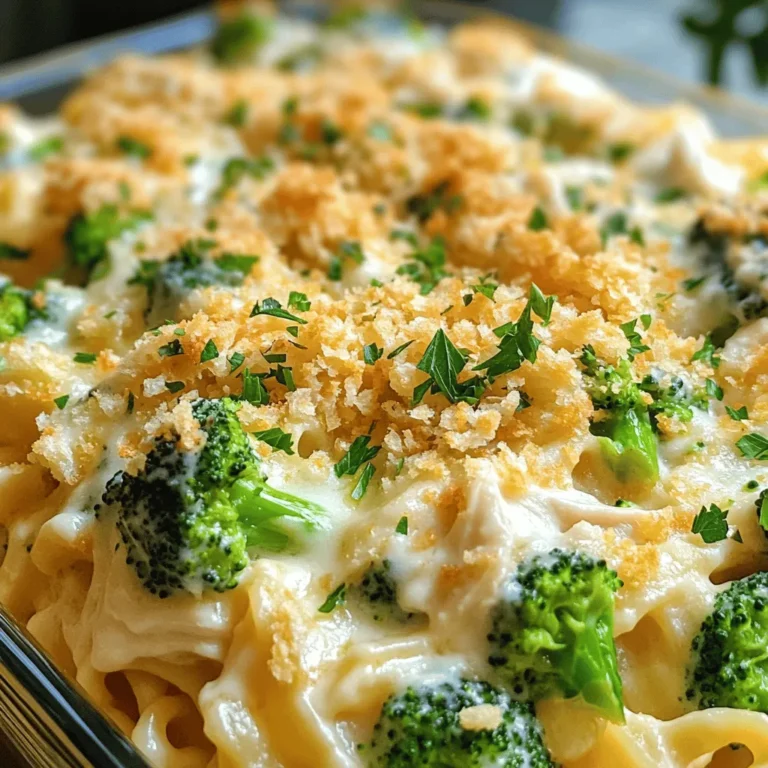
![- 2 cups cooked rotini pasta - 2 cups chicken breast, cooked and shredded - 2 cups broccoli florets (fresh or frozen) - 2 cups Alfredo sauce (store-bought or homemade) - 1 cup shredded mozzarella cheese - 1/2 cup grated Parmesan cheese - 1 teaspoon garlic powder - 1 teaspoon Italian seasoning - Salt and pepper to taste - 2 tablespoons olive oil - 1/4 cup breadcrumbs (optional, for topping) I love using rotini pasta for this dish. Its spiral shape holds the creamy sauce well. I often cook the chicken breast in advance to save time. Shredded chicken adds a nice texture and makes it easy to mix. Broccoli brings color and nutrients to the bake. Fresh or frozen works great; I use whatever I have on hand. Alfredo sauce is the star here. You can use store-bought sauce for quick prep. But if you want to make it from scratch, it’s simple and tasty. The cheese blend gives that rich, gooey feel we all crave. I love combining mozzarella for stretch and Parmesan for sharpness. The garlic powder and Italian seasoning add depth to the flavor. Adjust the salt and pepper to your liking. If you want a crunchy topping, sprinkle some breadcrumbs on top. The optional olive oil can help the broccoli sauté nicely. For the full recipe, you can check out the [Full Recipe]. Enjoy making this easy comfort food! - Preheat the oven to 350°F (175°C). - Sauté broccoli until tender, about 3-5 minutes. - Combine cooked rotini, shredded chicken, broccoli, and Alfredo sauce in a mixing bowl. - Mix in garlic powder, Italian seasoning, salt, and pepper. - Transfer mixture to a greased baking dish and top with cheeses and optional breadcrumbs. - Bake covered for 20 minutes, then uncover and bake for an additional 10-15 minutes. This dish is simple and comforting. Every step builds on the last, making it easy to follow. You can use the ready-made Alfredo sauce or make your own. I find that the homemade version adds a touch of warmth. Sautéing the broccoli adds a nice crunch. It takes only a few minutes, but it brings out the flavor. When mixing the ingredients, be sure to coat everything well with the sauce. This gives each bite a creamy texture. As you bake the dish, the cheese melts and gets bubbly. If you choose to add breadcrumbs, they give a nice crunch on top. The best part? The whole kitchen smells amazing! You will love how easy it is to make this Chicken and Broccoli Alfredo Bake. For the full recipe, check the details above! - Use homemade Alfredo sauce for richer taste. - Adjust seasoning based on personal preference. To make your dish shine, I suggest making your own Alfredo sauce. It gives a deeper taste than store-bought. You can blend butter, cream, and Parmesan for a creamy mix. Taste as you go. You might want more salt or garlic powder. Personal touches make every meal special. - Ensure chicken is cooked properly before shredding. - Use a food processor for quicker broccoli chopping. Cooking your chicken well is key. It should be juicy and easy to shred. Use a food thermometer to check it reaches 165°F (75°C). For broccoli, cut down on prep time by using a food processor. Just pulse it a few times. This makes the florets small and ready to cook. - Garnish with fresh parsley or additional cheese before serving. - Serve with a side salad for a balanced meal. For a beautiful dish, add fresh parsley on top. It gives color and freshness. You can also sprinkle more cheese for a rich look. Pair it with a side salad. The crunch and freshness balance the creamy bake. It makes the meal more complete and colorful. {{image_2}} You can easily change this recipe to fit your taste. - Substitute chicken with turkey or shrimp. - Replace rotini with penne or any pasta of your choice. These swaps let you enjoy a new dish while still keeping that creamy goodness. If you need to follow a special diet, I have good news! - Make it gluten-free by using gluten-free pasta. - For vegan options, replace chicken and cheese with plant-based choices. These changes help everyone enjoy this dish without worry. Want to spice things up? Adding extra flavor is simple! - Add spices like red pepper flakes for heat. - Incorporate vegetables like peas or bell peppers for added nutrients. These little tweaks can make your meal even more exciting and healthy. After you enjoy your Chicken and Broccoli Alfredo Bake, let it cool completely. Place the leftovers in airtight containers. This keeps the dish fresh. Store it in the fridge for 3-4 days. This way, you can savor it again! Want to save some for later? Freeze portions in a freezer-safe container. This dish stays good for up to 3 months. When you want to eat it, you can reheat it directly from frozen. Alternatively, thaw it in the fridge first for a few hours. When it’s time to enjoy your leftovers, you have a few options. You can microwave it for a few minutes. Or, heat it in the oven until it's warm. To keep it creamy, add a splash of Alfredo sauce when reheating. This helps bring back that delicious texture! Prep time is around 15 minutes, total time is about 50 minutes. The first 15 minutes focus on chopping and mixing your ingredients. After that, you bake for about 30 minutes. This makes it a quick and easy meal option for busy days. Yes, frozen broccoli works well; just heat until thawed. Frozen broccoli saves time and still gives you a great taste. Just remember to cook it until it's hot, and then you can mix it into the dish. You can substitute with a homemade cheese sauce or a light cream sauce. If you want to change things up, a white sauce made with butter, flour, and milk works well. This gives you a nice base for your bake while keeping it creamy. This Chicken and Broccoli Alfredo Bake is easy to make and very tasty. You learned the main ingredients, cooking steps, and some great tips to boost flavor. Remember to use what you like, whether it’s different pasta or swaps for chicken. This dish is perfect for any meal and great for leftovers too. Enjoy it fresh or freeze it for later. I hope you try this recipe and make it your own. Happy cooking!](https://dailydishlab.com/wp-content/uploads/2025/06/210480af-1509-4181-b504-69c18569c886-768x768.webp)
![- 2 cups cooked rice (white or brown) - 1 lb boneless, skinless chicken breasts, diced - 2 cups broccoli florets (fresh or frozen) - 1 cup heavy cream - 1 cup chicken broth - 1 cup grated Parmesan cheese - 2 cups shredded mozzarella cheese - 2 tablespoons olive oil - 3 cloves garlic, minced - 1 teaspoon Italian seasoning - Salt and pepper to taste - Fresh parsley, chopped (for garnish) When creating my Chicken and Rice Skillet Alfredo Bake, I focus on fresh and simple ingredients. The rice serves as the base, and you can use either white or brown rice. Both options bring a nice texture. I always use boneless, skinless chicken breasts because they are lean and cook quickly. Adding broccoli is a great way to boost nutrition. You can use fresh florets or frozen ones, whichever you have on hand. The heavy cream and chicken broth create a rich sauce that binds everything together. I love using both Parmesan and mozzarella cheese. Parmesan adds a sharp flavor, while mozzarella gives a creamy melt. Olive oil is my go-to for sautéing the chicken. Garlic brings a wonderful aroma and taste to the dish. Italian seasoning adds depth to the flavor. Finally, I season with salt and pepper to enhance all the ingredients. A sprinkle of fresh parsley adds a pop of color and freshness to finish the dish. This recipe is perfect for families or a cozy dinner with friends. You can find the full recipe [here]. - Preheat your oven to 375°F (190°C). Getting the oven hot is key to a great bake. This helps the cheese melt perfectly and gives a nice color to the top. - Heat olive oil over medium heat. - Season and cook diced chicken until no longer pink (5-7 mins). In a large skillet, add olive oil. Let it heat for a minute. Then, toss in your seasoned chicken. You want to cook it until it’s no longer pink. This usually takes about 5 to 7 minutes. Stir often to make sure it cooks evenly. - Add garlic, rice, and broccoli to the skillet. - Combine the cream mixture and cheese before baking. Once the chicken is cooked, add minced garlic. Cook it for just a minute until fragrant. Then, stir in the cooked rice and broccoli. Mix well. In a bowl, whisk together heavy cream, chicken broth, and half the Parmesan cheese. Pour this over the chicken and rice. Stir until everything is combined. This step is crucial because it brings all the flavors together. It’s the heart of the dish. After mixing, sprinkle the top with mozzarella and the rest of the Parmesan. Now, your dish is ready for the oven! For the full recipe, refer to the above ingredients and steps. - Make sure the chicken is cooked through but not dry. - To check, cut into a piece. It should be white, not pink. If it is still pink, keep cooking it for a bit longer. - Choose the right type of rice for the perfect texture. - I suggest using long-grain rice. It holds up well when mixed with sauce. Brown rice gives a nutty taste, while white rice is softer. - Garnish with freshly chopped parsley for color. - Just a sprinkle adds bright green and freshness to your dish. It makes it look fancy! - Serve with a side salad for a balanced meal. - A simple green salad with a light dressing can complement the creamy dish well. It adds crunch and freshness. These tips can help you create a tasty Chicken and Rice Skillet Alfredo Bake that looks great on the table. For the full recipe, check the above section. {{image_2}} You can easily change this recipe to fit your needs. Here are some quick ideas: - Use cauliflower rice for a low-carb version. This swap keeps the dish tasty and light. - Substitute chicken with shrimp or tofu for different proteins. Both options add unique flavors and textures. Want to spice things up? Here are some flavor additions: - Add spicy seasonings for heat. A pinch of cayenne or red pepper flakes can make it pop. - Incorporate different vegetables like bell peppers or spinach. These veggies not only add color but also boost nutrition. Feel free to mix and match these ideas to create your perfect Chicken and Rice Skillet Alfredo Bake. Your taste buds will thank you! For the full recipe, check out the details above. Store your Chicken and Rice Skillet Alfredo Bake in an airtight container. It keeps well in the fridge for up to three days. If you have extra portions, freezing them is a great option. For freezing, use freezer-safe bags or containers. Remove as much air as possible to prevent freezer burn. Label the container with the date before placing it in the freezer. You can reheat your dish in the microwave or oven. For the microwave, place a portion in a bowl and cover it with a damp paper towel. Heat for one to two minutes, stirring halfway. For the oven, preheat it to 350°F (175°C). Place the dish in an oven-safe container, cover it with foil, and heat for about 20 minutes. This method helps keep the cheese nice and melty. To maintain texture, add a splash of cream or broth before reheating. This helps prevent it from drying out. Enjoy your comforting meal again! - Can I make this dish ahead of time? Yes, you can. Prepare the dish up to the baking step, then store it in the fridge. When ready, bake it for about 25 minutes at 375°F (190°C). This makes it easy for busy days. - How do I know when the chicken is cooked through? The chicken should be white and no longer pink in the center. You can also use a meat thermometer. It should read 165°F (74°C) to ensure it's safe to eat. - What can I serve with Chicken and Rice Skillet Alfredo Bake? This dish pairs well with a fresh side salad or steamed vegetables. You can also serve garlic bread for added comfort. - Is it possible to make this dish gluten-free? Yes, you can make it gluten-free. Just use gluten-free pasta or rice. Check that your chicken broth does not contain gluten. This way, everyone can enjoy the meal! For the full recipe, check out the detailed instructions above and enjoy a hearty comfort meal! This Chicken and Rice Skillet Alfredo Bake is simple and tasty. We covered every step, from selecting fresh ingredients to storing leftovers. Remember, you can customize the recipe with different proteins and spices. This dish is perfect for a quick dinner. Keep experimenting with flavors and textures. Enjoy the cooking process and have fun with your food. Your family will love this meal!](https://dailydishlab.com/wp-content/uploads/2025/06/4392da79-0369-4862-8466-e1a2d5a9e46b-768x768.webp)