
Looking for a quick and tasty meal? You can whip up this Easy Vegetable Pad Thai in no time! With fresh veggies, flavorful noodles, and a simple sauce, it’s a dish everyone will love. Whether you’re a busy parent, a student, or just want a quick dinner, this recipe fits the bill. Let’s dive into this delicious journey of flavors and textures! Your taste buds will thank you!
Why I Love This Recipe
- Quick and Easy: This dish comes together in just 30 minutes, making it perfect for a weeknight dinner.
- Versatile Ingredients: You can easily customize the vegetables based on what you have on hand or your personal preferences.
- Flavorful Sauce: The combination of soy sauce, tamarind paste, and lime juice creates a deliciously tangy and savory flavor.
- Healthy and Fresh: Packed with colorful vegetables, this recipe is a great way to incorporate more nutrients into your meal.
Ingredients
Main Ingredients for Easy Vegetable Pad Thai
To make Easy Vegetable Pad Thai, you need just a few key items. Here’s what you’ll need:
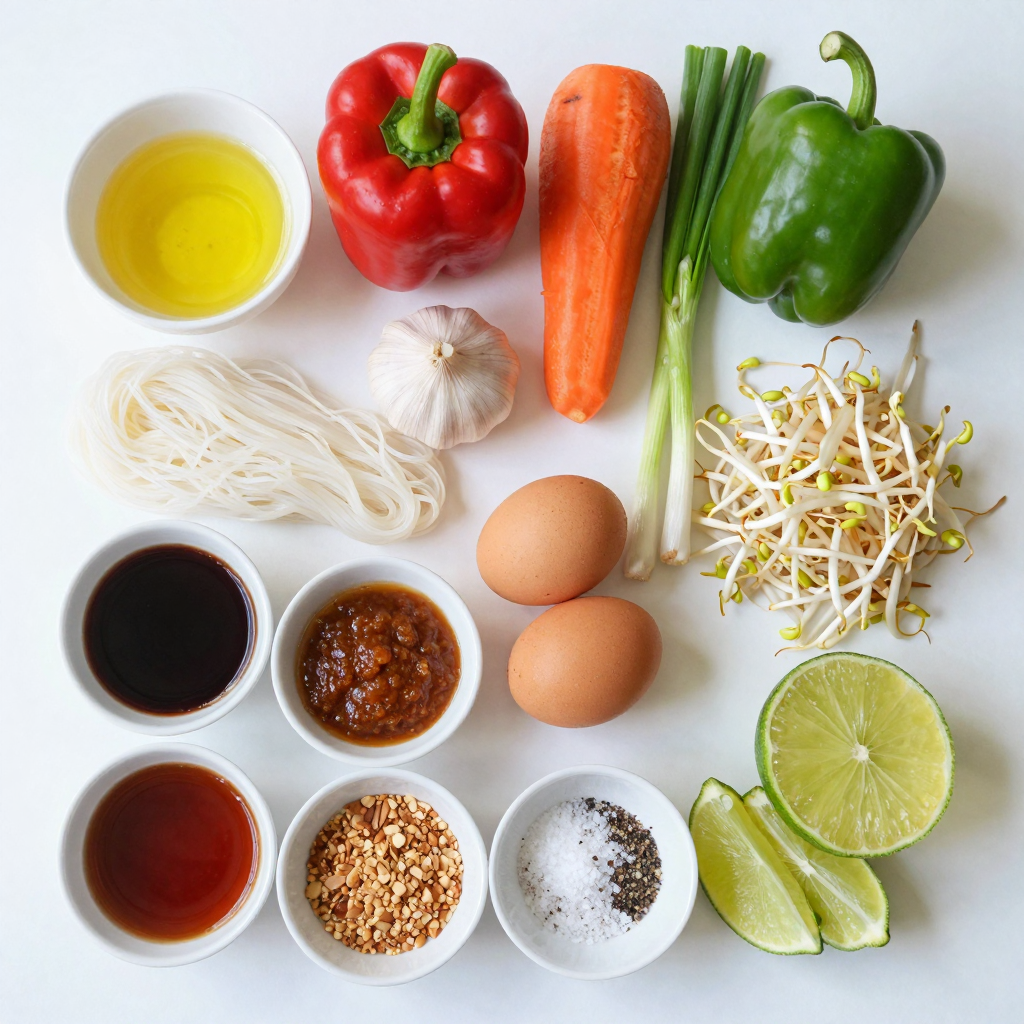
– 8 oz rice noodles
– 2 tablespoons vegetable oil
– 1 red bell pepper, julienned
– 1 green bell pepper, julienned
– 1 carrot, shredded
– 3 green onions, chopped (whites and greens separated)
– 2 cloves garlic, minced
– 1 cup bean sprouts
– 2 large eggs (optional for non-vegetarians)
– 3 tablespoons soy sauce
– 1 tablespoon tamarind paste
– 1 tablespoon brown sugar
– 1 tablespoon lime juice
– Salt and pepper to taste
– Crushed peanuts and lime wedges for garnish
These ingredients create a bright and fresh flavor. Each one adds its own twist to the dish.
Optional Ingredients for Customization
You can easily change this recipe to fit your taste. Here are some optional ingredients you might like:
– Tofu or tempeh for protein
– Broccoli or snap peas for more veggies
– Chili flakes for heat
– Cilantro for extra flavor
– Sesame oil for a nutty taste
These additions help you make the dish your own. Feel free to mix and match based on what you have at home.
Best Types of Rice Noodles to Use
For this recipe, you want to use the right rice noodles. Here are the best types to choose from:
– Flat rice noodles: These are the most common for Pad Thai. They soak up flavors well.
– Thin rice vermicelli: Great for a lighter dish, but cook them less time.
– Thick rice noodles: Chewy and satisfying, but they may need longer cooking.
I recommend going for flat rice noodles. They give you that authentic flavor and texture you crave.
Step-by-Step Instructions
Cooking the Rice Noodles
To start, cook the rice noodles. Follow the package instructions closely. Usually, this means boiling them in water for about 5 to 7 minutes. You want them soft but not mushy. Once they are ready, drain them in a colander. Rinse with cold water to stop the cooking. Set the noodles aside.
Preparing the Vegetables
Next, let’s prepare the vegetables. Take your red and green bell peppers and slice them into thin strips, called julienne. Shred the carrot finely using a grater or a sharp knife. For the green onions, chop them into small pieces but keep the white and green parts separate. Mince the garlic into tiny bits. Once you finish, everything will be ready to cook.
Combining Ingredients for the Perfect Pad Thai
Now, it’s time to bring everything together. In a large wok or skillet, heat the vegetable oil over medium-high heat. Add the minced garlic first and stir for about 30 seconds. It should smell great! Then, toss in the julienned peppers and shredded carrot. Stir-fry these for about 3 to 4 minutes. They should soften but still have a little crunch. If you want eggs, push the veggies to one side of the pan. Crack the eggs in the empty space and scramble them. Mix the cooked eggs with the veggies.
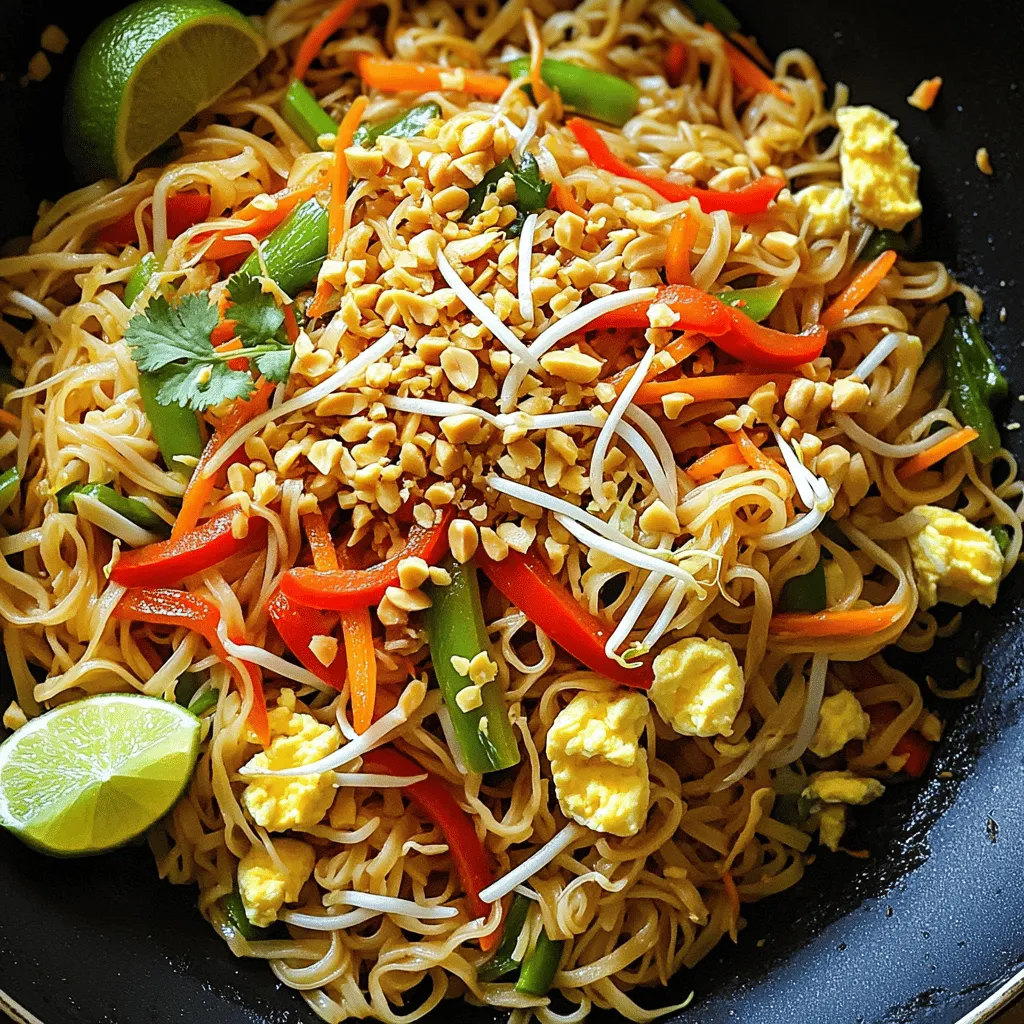
Add the drained rice noodles to the wok. Next, add the chopped green onion whites, bean sprouts, soy sauce, tamarind paste, brown sugar, and lime juice. Toss everything together until well mixed and heated through. Taste and add salt and pepper as needed. Your Easy Vegetable Pad Thai is ready! Serve it hot, garnished with crushed peanuts and lime wedges.Enjoy!
Pro Tips
- Use Fresh Ingredients: Always choose fresh vegetables for the best flavor and texture in your Pad Thai.
- Prep Ahead: Chop all your vegetables and measure out your sauces before you start cooking to streamline the process.
- Adjust Sweetness: Feel free to adjust the brown sugar to taste; some prefer a sweeter Pad Thai, while others like it more savory.
- Garnish Generously: Don’t skip the crushed peanuts and lime wedges; they add a delightful crunch and tang that enhances the dish.
Tips & Tricks
How to Achieve the Best Flavor
To get great flavor in your Easy Vegetable Pad Thai, focus on the sauce. Use fresh ingredients like lime juice and tamarind paste. They add a nice tang. Make sure to taste as you mix. Adjust the soy sauce and sugar to your liking. If you want more heat, add some chili flakes. This will make your dish pop!
Techniques for Perfectly Cooked Vegetables
Cooking your veggies just right is key. Start with high heat in your wok or skillet. This helps keep them crisp. Cut your vegetables into thin strips for even cooking. Stir-fry them quickly. This usually takes just a few minutes. Add bean sprouts last, as they need only a brief cook. This way, they stay crunchy.
Serving Suggestions for Your Pad Thai
For the best experience, serve your Pad Thai hot. Top it with crushed peanuts; they add a nice crunch. A squeeze of lime juice brightens the flavors too. You can also add fresh herbs like cilantro for a fresh touch. Serve it with lime wedges on the side for extra zing. For a fun twist, pair it with spring rolls or a light salad.
Variations
Gluten-Free Options
You can easily make this dish gluten-free. Use rice noodles, which are naturally gluten-free. Instead of soy sauce, try tamari. Tamari tastes similar but has no gluten. Always check labels to be sure.
Adding Protein: Tofu vs. Eggs
Tofu is a great option for plant-based protein. It adds texture and absorbs flavors well. Use firm tofu for the best results. Cut it into cubes and sauté until golden. If you eat eggs, they work too. Just scramble them before mixing with the veggies. Both choices are tasty and filling.
Spice Level Adjustments
Want more heat? Add red pepper flakes or chili paste. Start with a small amount; you can always add more. If you like it mild, skip the spicy ingredients. The beauty of this dish is you can customize it to your taste. Enjoy experimenting with flavors!
Storage Info
How to Store Leftover Pad Thai
To keep your leftover Pad Thai fresh, place it in an airtight container. Make sure to cool it down first. Store it in the fridge. It should last for about three days.
Reheating Techniques for Best Results
Reheat your Pad Thai in a pan for the best texture. Add a splash of water or soy sauce. This helps make it moist again. Heat it on low, stirring gently. You can also use the microwave. Just cover it to keep moisture in.
Freezing Pad Thai for Future Meals
If you want to save Pad Thai for later, freezing is a good option. Cool it completely before packing it. Use freezer-safe containers or bags. It can last up to three months in the freezer. When ready to eat, thaw it in the fridge overnight before reheating. For best results, eat it within a month.
FAQs
How do I make the sauce for Easy Vegetable Pad Thai?
To make the sauce, mix soy sauce, tamarind paste, brown sugar, and lime juice. This blend gives the dish a sweet and tangy flavor. You want to balance these ingredients to your taste.Adjust to make it perfect for you!
Can I use different vegetables in this recipe?
Absolutely! You can swap in any veggies you like. Broccoli, snap peas, and zucchini work great. Use what you have on hand. Just remember to cut them into small pieces for even cooking. The goal is to keep a nice crunch while adding color to your dish!
What can I substitute for tamarind paste?
If you can’t find tamarind paste, you can use lime juice or a mix of vinegar and sugar. This will mimic the tangy flavor of tamarind. Another option is to use a store-bought pad Thai sauce that contains tamarind. Experiment to find what you enjoy best!
Ingredients
Main Ingredients for Easy Vegetable Pad Thai
To make this dish shine, you need fresh and colorful ingredients. Here’s what you’ll need:
– 8 oz rice noodles
– 2 tablespoons vegetable oil
– 1 red bell pepper, julienned
– 1 green bell pepper, julienned
– 1 carrot, shredded
– 3 green onions, chopped (whites and greens separated)
– 2 cloves garlic, minced
– 1 cup bean sprouts
Optional Ingredients for Customization
Feel free to tweak this recipe to fit your taste. Here are some extras:
– 2 large eggs (optional for non-vegetarians)
– Crushed peanuts for garnish
– Lime wedges for garnish
Best Types of Rice Noodles to Use
For the best texture, I suggest flat rice noodles. Look for the wide ones labeled as “Pad Thai noodles.” They soak up flavors well and make the dish more satisfying. If you prefer thinner noodles, rice vermicelli works too. Just keep an eye on cooking time, as they cook faster.
You now have all you need for an Easy Vegetable Pad Thai. You learned about key ingredients, cooking steps, and how to customize your dish. Remember to use fresh veggies for great taste. Adjust flavors to fit your style, whether that’s adding spice or protein. Store any leftovers properly for a tasty meal later. Enjoy creating this dish and impressing yourself with your cooking skills. Now, grab your ingredients and get started on this delightful, vibrant meal!


