Garlic Roasted Brussels Sprouts Simple and Tasty Side

Looking for a quick and tasty side dish? Garlic Roasted Brussels Sprouts are here to impress! This simple recipe combines fresh Brussels sprouts with minced garlic and olive oil, creating a dish bursting with flavor. Perfectly roasted, these sprouts become crispy on the outside and tender inside. Whether you’re preparing a weeknight meal or a special gathering, this side will elevate your dining experience. Ready to bring some deliciousness to your table? Let’s dive in!
Why I Love This Recipe
- Simple Preparation: This recipe requires minimal ingredients and effort, making it a perfect side dish for busy weeknights.
- Flavorful Combination: The garlic and balsamic glaze create a deliciously savory and slightly tangy flavor that enhances the natural sweetness of the Brussels sprouts.
- Health Benefits: Brussels sprouts are packed with vitamins and nutrients, making this dish a nutritious addition to any meal.
- Versatile Side: This dish pairs well with a variety of main courses, from roasted meats to vegetarian options, making it a versatile choice for any occasion.
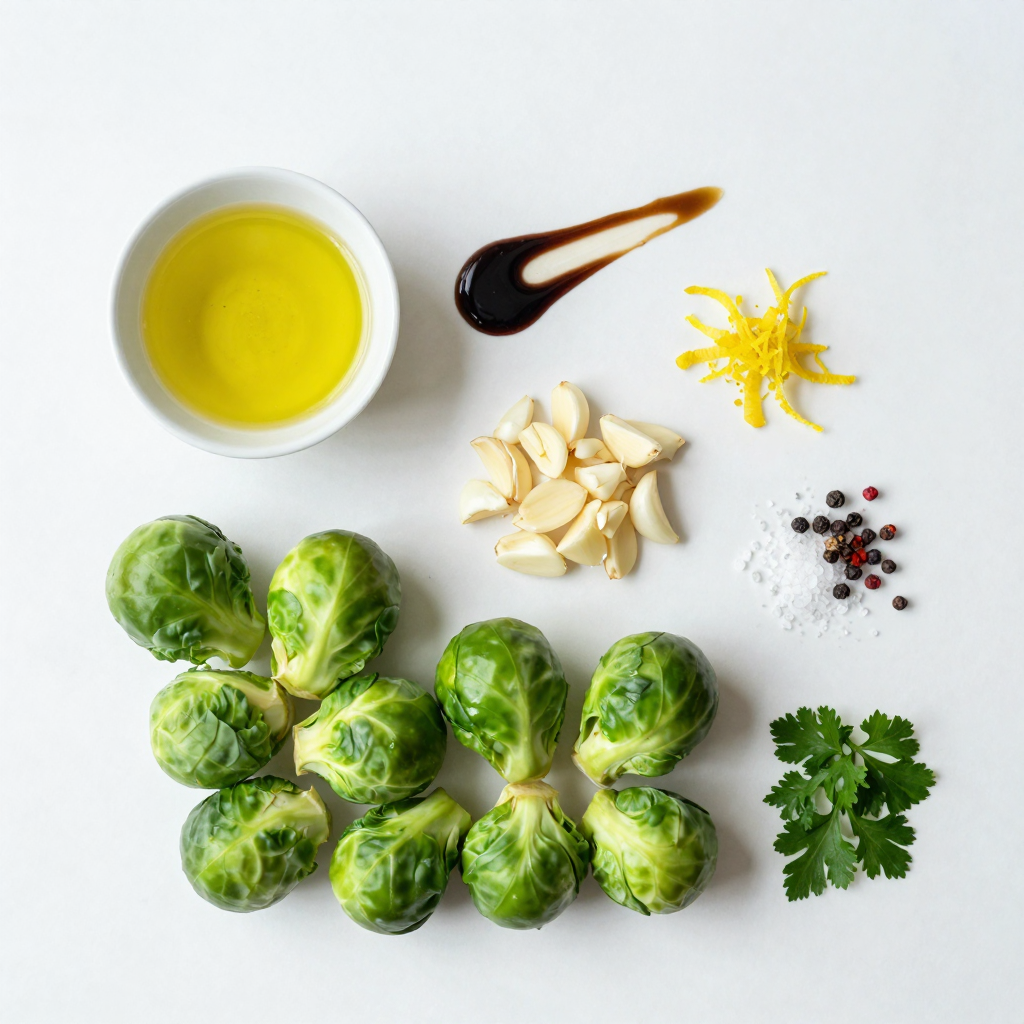
Ingredients
Main Ingredients
- 1 pound Brussels sprouts, trimmed and halved
- 4 cloves garlic, minced
- 3 tablespoons olive oil
Additional Flavor Components
- 1 tablespoon balsamic glaze
- 1 teaspoon lemon zest
- Salt and pepper to taste
Optional Ingredients
- ½ teaspoon red pepper flakes
- Fresh parsley for garnish
For this garlic roasted Brussels sprouts recipe, I focus on simple yet bold flavors. The main ingredients are crucial. Start with fresh Brussels sprouts. Trim and halve them for even cooking. The garlic adds a punch of flavor. Mince it finely to release its natural oils. Olive oil helps the sprouts roast beautifully. It gives them a rich taste and helps with crisping.
Next, the additional flavor components lift the dish. Balsamic glaze adds sweetness and depth. The lemon zest brings a bright note that balances the flavors. Don’t forget salt and pepper. They enhance all the tastes in this dish.
If you want a kick, add red pepper flakes. They provide warmth without overpowering the taste. Finally, fresh parsley is a great garnish. It adds color and freshness to your finished dish.Each component plays a role in creating a delicious side. Enjoy the process, and let the flavors shine!

Step-by-Step Instructions
Preparing the Brussels Sprouts
- Preheat the oven to 400°F (200°C).
- In a large mixing bowl, combine the halved Brussels sprouts and minced garlic.
First, I start by preheating the oven. This step is crucial because it ensures even cooking. Next, I take the Brussels sprouts, trim off the tough ends, and slice them in half. I add them to a bowl along with the minced garlic. The garlic adds a strong flavor that pairs well with the sprouts.
Coating the Vegetables
- Drizzle olive oil over the mixture.
- Season with salt, pepper, and red pepper flakes if using.
After mixing the sprouts and garlic, I drizzle olive oil over the top. This oil helps the vegetables crisp up in the oven. Then, I sprinkle salt and pepper to taste. If I want a bit of heat, I add red pepper flakes. Toss everything together until the Brussels sprouts are well coated.
Roasting Process
- Spread on a baking sheet.
- Roast for 20-25 minutes, stirring halfway.
Next, I spread the Brussels sprouts on a baking sheet. I want them in a single layer for the best roasting. I place the baking sheet in the oven and set a timer for 20-25 minutes. Halfway through, I give them a stir. This helps them roast evenly. When they are done, the edges will be crispy, and the centers will be tender.
Pro Tips
- Choose Fresh Brussels Sprouts: Look for firm, bright green Brussels sprouts that are tightly closed for the best flavor and texture.
- Even Cutting: Halve the Brussels sprouts evenly to ensure they cook at the same rate, resulting in uniform tenderness and crispiness.
- Don’t Overcrowd the Pan: Spread the Brussels sprouts out in a single layer on the baking sheet to allow proper airflow, which helps them roast evenly and become crispy.
- Adjust Seasoning: Feel free to tweak the amount of garlic, salt, or red pepper flakes to suit your taste preferences for an extra flavor boost.
Tips & Tricks
Ensuring Perfect Roasting
To get crispy edges and tender centers, start with even spacing on the baking sheet. I always make sure the Brussels sprouts are laid out in a single layer. This helps them roast evenly. If they crowd each other, they will steam instead of roast. I recommend using a large baking sheet for this recipe.
Enhancing Flavor
You can boost the flavor of your Brussels sprouts with extra spices or herbs. Try adding a pinch of smoked paprika or a sprinkle of thyme. This gives a nice depth to the dish. For a touch of acidity, drizzle on balsamic glaze and add a bit of lemon zest. This balance brightens the flavors and makes each bite pop.
Presentation Ideas
Garnishing with fresh parsley adds a splash of color. I love to sprinkle it on right before serving. It makes the dish look fresh and inviting. For serving suggestions, these roasted sprouts pair well with grilled chicken or fish. They are also great at holiday dinners or casual barbecues.

Variations
Ingredient Swaps
You can easily change the flavor of your Garlic Roasted Brussels Sprouts by swapping ingredients.
- Using different types of vinegar: Instead of balsamic glaze, try apple cider vinegar or red wine vinegar. These options add a different tangy taste.
- Substituting olive oil with other options: If you prefer, use avocado oil or melted coconut oil. Both give a unique flavor and can be just as healthy.
Flavor Additions
Adding more flavors can make this dish even better.
- Adding cheese: Sprinkling Parmesan or feta cheese on the sprouts before serving adds creaminess. The cheese melts slightly and creates a rich taste.
- Incorporating nuts for crunch: Toss in some chopped pecans or walnuts. They add a nice crunch and a nutty flavor that pairs well with the sprouts.
Dietary Adaptations
You can modify this recipe to fit different diets.
- Making it vegan or gluten-free: This dish is already vegan and gluten-free. Just make sure to use the right vinegar and oil.
- Low-calorie options for a lighter dish: Use less oil or skip the cheese. You can also add more veggies, like carrots or bell peppers, for bulk without many calories.
Storage Info
Refrigerating Leftovers
To store your leftover garlic roasted Brussels sprouts, place them in an airtight container. This keeps them fresh and prevents any odors from mixing. You can store the sprouts in the fridge for up to 3 days. After that, they may lose their crispness and flavor.
Reheating Instructions
When you’re ready to enjoy your leftovers, you can reheat them easily. The best method is to use the oven. Preheat your oven to 350°F (175°C). Spread the sprouts on a baking sheet and heat for about 10-15 minutes. This method helps keep the edges crispy. You can also use a microwave, but it may make the sprouts a bit soggy. If you choose the microwave, heat in short bursts and check often.
Freezing Guidelines
If you want to save some for later, freezing is a great option. First, let the Brussels sprouts cool completely. Then, place them in a single layer on a baking sheet. Freeze for about an hour, then transfer them to a freezer-safe bag. This way, they won’t stick together. You can freeze them for up to 3 months. To thaw, place them in the fridge overnight. Reheat them in the oven like before for the best texture.
FAQs
Can I make Garlic Roasted Brussels Sprouts ahead of time?
Yes, you can make Garlic Roasted Brussels Sprouts ahead of time. To do this, cook them as usual. After roasting, let them cool completely. Then, place them in an airtight container. Store them in the fridge for up to three days. When you want to serve them, reheat in the oven at 350°F (175°C) for about 10 minutes. This way, they stay crispy and tasty.
What can I serve with Garlic Roasted Brussels Sprouts?
Garlic Roasted Brussels Sprouts taste great with many dishes. You can pair them with grilled chicken, salmon, or steak. They also go well with grains. Try serving them with quinoa or brown rice. For a vegetarian option, serve them with a hearty lentil salad. The flavors merge beautifully, creating a satisfying meal.
How do I choose fresh Brussels sprouts?
Choosing fresh Brussels sprouts is easy with a few tips. Look for sprouts that are bright green and firm. Avoid those that are yellow or have brown spots. Smaller sprouts are often sweeter. When you press a sprout, it should feel solid. This shows it is fresh. You want the best quality for your dish.
In this article, we explored how to make delicious garlic roasted Brussels sprouts. We covered everything from the main ingredients to step-by-step instructions for perfect roasting. Remember to use even spacing on the baking sheet for crispy edges. You can also experiment with flavors and ingredients. Whether you are vegan or just looking for a tasty side dish, this recipe is versatile. Enjoy what you create, and share it with others! It’s a simple, tasty addition to any meal.

Garlic Roasted Brussels Sprouts
Ingredients
1 pound Brussels sprouts, trimmed and halved
4 cloves garlic, minced
3 tablespoons olive oil
1 tablespoon balsamic glaze
1 teaspoon lemon zest
Salt and pepper to taste
½ teaspoon red pepper flakes (optional)
Fresh parsley, chopped for garnish
Instructions
Preheat your oven to 400°F (200°C).
In a large mixing bowl, combine the halved Brussels sprouts and minced garlic.
Drizzle the olive oil over the Brussels sprouts, add the salt, pepper, and red pepper flakes if using. Toss until evenly coated.
Spread the Brussels sprouts out in a single layer on a baking sheet covered with parchment paper.
Roast in the preheated oven for 20-25 minutes, or until the edges are crispy and the centers are tender, stirring halfway through.
Once roasted, remove from the oven and drizzle with balsamic glaze and lemon zest. Toss gently to combine.
Serve hot, garnished with fresh chopped parsley for a burst of color and flavor.
Prep Time: 10 minutes | Total Time: 35 minutes | Servings: 4

Garlic Roasted Brussels Sprouts
Ingredients
- 1 pound Brussels sprouts, trimmed and halved
- 4 cloves garlic, minced
- 3 tablespoons olive oil
- 1 tablespoon balsamic glaze
- 1 teaspoon lemon zest
- to taste Salt and pepper
- 0.5 teaspoon red pepper flakes (optional)
- for garnish Fresh parsley, chopped
Instructions
- Preheat your oven to 400°F (200°C).
- In a large mixing bowl, combine the halved Brussels sprouts and minced garlic.
- Drizzle the olive oil over the Brussels sprouts, add the salt, pepper, and red pepper flakes if using. Toss until evenly coated.
- Spread the Brussels sprouts out in a single layer on a baking sheet covered with parchment paper.
- Roast in the preheated oven for 20-25 minutes, or until the edges are crispy and the centers are tender, stirring halfway through.
- Once roasted, remove from the oven and drizzle with balsamic glaze and lemon zest. Toss gently to combine.
- Serve hot, garnished with fresh chopped parsley for a burst of color and flavor.


![- 6 large eggs - 1 ripe avocado, peeled and pitted - 2 tablespoons lime juice - 1 teaspoon lime zest - 1 teaspoon Dijon mustard - Salt and pepper to taste - 1 tablespoon fresh cilantro, chopped (for garnish) - A pinch of chili powder (optional, for a hint of spice) These ingredients make your Avocado Lime Deviled Eggs fresh and tasty. The eggs provide a great base. The creamy avocado adds richness. Lime juice and zest give a bright flavor. Dijon mustard adds a gentle tang. Adjust salt and pepper to your taste. The cilantro adds a fresh touch. If you like spice, sprinkle in some chili powder. You can find the Full Recipe for step-by-step guidance. Enjoy making these delightful bites! To boil eggs perfectly, start with cold water. Place your eggs in a pot and fill it with water. Make sure the water covers the eggs by about an inch. Heat the pot over medium-high heat until it boils. When it starts to boil, cover the pot and turn off the heat. Let the eggs sit for 10-12 minutes. This method keeps them tender and easy to peel. Timing is key, as undercooked eggs will be runny, while overcooked eggs will turn green. Next, prepare the avocado filling. Halve the ripe avocado and take out the pit. Scoop the flesh into a mixing bowl. Mash it until it is smooth and creamy. To avoid browning, add lime juice right away. The acid in lime helps keep the green color. Mix in the egg yolks, lime zest, and Dijon mustard for flavor. The right texture is creamy but not too runny. Now it's time to fill the egg whites. After peeling and halving the boiled eggs, remove the yolks. Add the yolks to the avocado mixture and stir well. Use a piping bag for neat filling. This allows for even distribution. If you don’t have a piping bag, a spoon works too. Just make sure the filling is heaped nicely in each half. This step makes them look beautiful and appetizing. For a complete recipe, check out the [Full Recipe]. To make your avocado lime deviled eggs shine, you need to balance the lime and avocado perfectly. The lime adds a bright taste, while the avocado brings creaminess. I suggest starting with two tablespoons of lime juice. You can add more if you prefer a stronger lime flavor. Adjusting seasonings is key. After mixing the filling, taste it. If it needs more zing, add a pinch of salt or a dash of pepper. If you like a kick, consider a sprinkle of chili powder. These small tweaks can elevate your dish. Garnishing enhances the look of your deviled eggs. Fresh cilantro adds a lovely green touch. A sprinkle of chili powder not only adds color but also hints at spice. When serving, arrange the eggs on a bright platter. This will catch the eye at any party. You can also place them in an egg carton for a fun and unique display. One common mistake is overcooking the eggs. This can make the yolks dry and crumbly. Follow the cooking time closely for perfect results. Another mistake is not mixing the filling well. Ensure all ingredients blend smoothly. This makes a creamy, cohesive filling that tastes great. You want every bite to be delicious. {{image_2}} For a kick, add jalapeños or hot sauce. This spice brings a nice heat to the creamy filling. Start with a small amount of diced jalapeños. You can always add more if you like it spicier. A few drops of your favorite hot sauce can also do the trick. Mix it into the avocado filling for heat in every bite. You can make your deviled eggs even better by adding veggies. Chopped bell peppers, diced tomatoes, or shredded carrots can give a nice crunch. You can also use fresh herbs like dill or basil. They add unique flavors and brighten up your eggs. Just mix them into the filling for an extra layer of taste. If you need to make this dish vegan, swap the eggs for chickpeas. Mash cooked chickpeas with the avocado and lime. This keeps the creamy texture and adds protein. For a low-carb option, skip the eggs altogether. Use avocado, lime, and your choice of herbs. These modifications keep the flavors fresh and tasty. Use the Full Recipe to try these variations and discover your favorite twist on this classic dish! To keep your Avocado Lime Deviled Eggs fresh, store them in the fridge. Place them in an airtight container. This helps prevent the eggs from drying out or absorbing other smells. If you don’t have a container, cover the eggs tightly with plastic wrap. Aim to eat them within two days for the best taste and texture. Can you freeze Avocado Lime Deviled Eggs? No, you should not freeze these deviled eggs. The avocado can change texture when frozen. It may become grainy and lose its creamy flavor. How to properly freeze and thaw Since freezing is not a good option, focus on eating your deviled eggs fresh. If you want to make them ahead, prepare the filling and store it separately. You can fill the egg whites just before serving. How long do they last in the fridge? These eggs will last up to two days in the fridge. After that, they may start to lose their fresh taste. Signs of spoilage Look for changes in color or texture. If the filling turns brown or smells off, it’s best to discard the eggs. Always trust your senses when it comes to food safety. Yes, you can use different types of avocados. Hass avocados are creamy and rich, making them perfect for this recipe. Florida avocados are larger and milder in flavor. They can work too but may change the taste and texture slightly. If you want a rich, smooth filling, go with Hass. If you prefer a lighter flavor, choose Florida avocados. You can use other citrus fruits instead of lime. Lemon juice is a great option and adds a nice tang. Grapefruit juice can also work well if you want a unique twist. Just remember to adjust the amount to your taste. Each citrus fruit brings its own flavor and can change the dish's overall taste. You can make these deviled eggs ahead of time. Prepare the filling and store it in the fridge. Fill the egg whites just before serving to keep them fresh. This method ensures the eggs stay firm and the filling remains vibrant. You can also boil the eggs a day before and store them in the fridge. These deviled eggs pair well with many dishes. They make a great starter for brunch or a party. You can serve them with cocktails like margaritas or mojitos. They also go well with fresh salads or light soups. Feel free to be creative and mix them with your favorite dishes! Yes, you can make these deviled eggs gluten-free. All the ingredients in this recipe are naturally gluten-free. Just ensure that the Dijon mustard you use is also gluten-free. Most brands offer gluten-free options, so check the label to be sure. Enjoy this tasty treat without any worries! In this post, we explored Avocado Lime Deviled Eggs, covering ingredients, tips, and variations. You learned how to boil eggs perfectly, prepare the filling, and assemble the dish. We also discussed storage methods and answers to common questions. Remember, balancing flavors and avoiding overcooking are key. With a few simple tweaks or additions, you can make this dish your own. Enjoy this tasty twist on a classic!](https://dailydishlab.com/wp-content/uploads/2025/07/08a04e97-d91e-4bc2-a0e0-9f1f6250904f-768x768.webp)