

If you’re looking for a simple side dish that bursts with flavor, try my Honey Lemon Glazed Carrots! This quick recipe transforms baby carrots into a sweet and tangy treat. With just a few easy steps and basic ingredients, you’ll have a vibrant dish that pairs well with any meal. Let’s dive into this delightful recipe that’s sure to impress your family and friends!
Why I Love This Recipe
- Simple Preparation: This recipe is easy to follow, making it perfect for both novice and experienced cooks.
- Delicious Flavor: The combination of honey and lemon creates a sweet yet tangy glaze that enhances the natural sweetness of the carrots.
- Healthy Side Dish: Carrots are packed with nutrients, and this recipe highlights their health benefits while being incredibly tasty.
- Beautiful Presentation: The vibrant color of the glazed carrots, topped with fresh parsley, makes for an eye-catching addition to any meal.
Ingredients
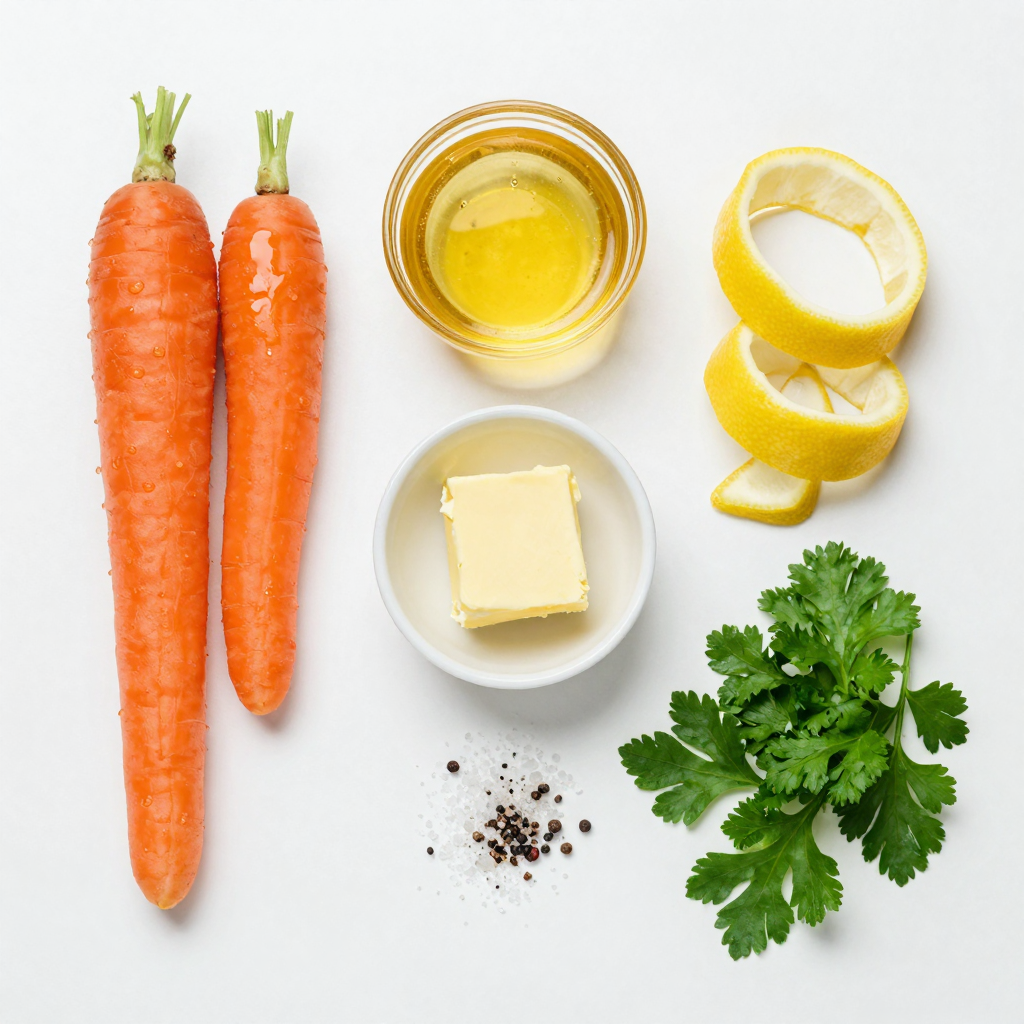
List of Ingredients
– 1 lb baby carrots, peeled
– 3 tablespoons honey
– 2 tablespoons fresh lemon juice
– 1 tablespoon unsalted butter
– 1 teaspoon lemon zest
– Salt and pepper to taste
– Fresh parsley, chopped (for garnish)
Cooking Tools Needed
– Medium saucepan
– Colander
– Wooden spoon or spatula
Measurement Conversions
– 1 tablespoon equals 3 teaspoons. So, 3 tablespoons of honey is 9 teaspoons.
– One pound of baby carrots is about 450 grams.
When you gather these ingredients, you set the stage for a bright and tasty dish. Each item plays a key role in creating that sweet and tangy flavor you will love. The baby carrots offer natural sweetness, while honey and lemon add a lovely glaze. I always use fresh lemon juice and zest for the best taste.
The butter brings all these flavors together and gives the carrots a nice shine. Don’t forget the salt and pepper; they will elevate the taste. Fresh parsley adds a pop of color and freshness when you serve.
Having the right tools makes cooking easier. A medium saucepan helps you boil and glaze the carrots. A colander is perfect for draining them. A sturdy wooden spoon or spatula will help you mix everything well.
Now you are ready to bring these ingredients together. The recipe is simple but packed with flavor.
Step-by-Step Instructions
Preparing the Carrots
First, I fill a medium saucepan with 4 cups of water. I bring the water to a boil over high heat. Next, I add 1 pound of peeled baby carrots to the boiling water. I cook them for about 5 minutes. The goal is to make them slightly tender but still crisp. After 5 minutes, I drain the carrots in a colander and set them aside. This step keeps them from getting too soft later.
Making the Honey Lemon Glaze
In the same saucepan, I melt 1 tablespoon of unsalted butter over medium heat. Once the butter melts, I stir in 3 tablespoons of honey, 2 tablespoons of fresh lemon juice, and 1 teaspoon of lemon zest. I mix these well and let the glaze simmer for about 2 minutes. This simmering helps the flavors blend together nicely.
Coating the Carrots
Now, I add the drained carrots back into the saucepan. I toss them in the honey lemon glaze, coating them fully. It’s important to make sure each carrot gets a good amount of glaze. I season with salt and pepper to taste. Then, I continue to cook for another 4 to 5 minutes. The carrots should become fully tender and the glaze will thicken slightly. When done, I remove the pan from heat and garnish with freshly chopped parsley before serving.
Pro Tips
- Use Fresh Ingredients: Fresh baby carrots and organic honey will enhance the flavor of your dish significantly.
- Adjust Sweetness: Feel free to adjust the amount of honey based on your preference for sweetness.
- Enhance Flavor: Adding a pinch of cinnamon or nutmeg can add a warm flavor profile to the glaze.
- Garnish Thoughtfully: Fresh parsley not only adds color but also a fresh taste that complements the sweet glaze beautifully.
Tips & Tricks
How to Perfect the Limón Glaze
To make the glaze just right, you need to balance the sweetness of honey and the acidity of lemon. Start with equal parts honey and lemon juice. You can always adjust later. If it tastes too sweet, add more lemon juice. If it seems too tart, stir in more honey.
To thicken the glaze, simmer it longer. This allows the water to evaporate, creating a richer flavor. You can also mix in a bit of cornstarch if you want a thicker texture quickly. Just dissolve it in water first, then stir it into the glaze.
Choosing the Best Carrots
When selecting carrots, always go for fresh over frozen when possible. Fresh carrots have a better taste and texture. Look for carrots that feel firm and have vibrant color. If you can, choose organic carrots. They often have more flavor and fewer chemicals.
Conventional carrots can be fine too, but wash them well. Their skins may have pesticides.
Serving Suggestions
Honey lemon glazed carrots pair well with proteins like chicken or fish. They add color and flavor to your plate. Try them with roasted chicken for a comforting meal.
For side dishes, consider serving them with rice or mashed potatoes. These options soak up the delicious glaze. You can also serve them next to a fresh salad for a crisp contrast.
Variations
Different Types of Carrots
Using different types of carrots can change the look and taste of your dish. Rainbow carrots bring vibrant colors and unique flavors to your meal. These carrots can be orange, purple, yellow, or even white. Each type adds a fun twist to your plate.
You can also substitute whole carrots instead of baby carrots. Whole carrots are often cheaper. Just peel and cut them into sticks. This change will still give you that sweet, honey lemon glaze.
Flavor Enhancements
You can make your honey lemon glazed carrots even better with a few simple additions. Adding herbs like thyme or rosemary gives a fresh taste. These herbs pair well with the sweet glaze and add depth.
For those who like spice, try incorporating cayenne pepper. A pinch can add a nice kick to the carrots. Just be careful not to add too much; you want a balance of flavors.
Alternative Sweeteners
If you want to try something different, you can use maple syrup or agave nectar instead of honey. These options work well and can fit different diets. They still provide that sweet flavor you love.
When using these alternative sweeteners, you may need to adjust the amount. Start with less and taste as you go. This way, you can find the perfect balance for your dish.
Storage Info
Storing Leftovers
To keep your honey lemon glazed carrots fresh, store them in the fridge. Place them in an air-tight container. This helps keep moisture in and prevents odors from other foods. Use the leftovers within three days for the best taste.
Reheating Tips
When it’s time to enjoy your leftovers, reheat them gently. The best method is using the stovetop. Heat on low and stir often. This keeps the texture nice and tender. If you’re short on time, you can use the microwave. Heat in short bursts, stirring in between.
Freezing Honey Lemon Glazed Carrots
You can freeze these carrots, but the texture might change. To freeze, let them cool completely first. Then, place them in a freezer-safe bag. When you’re ready to eat, defrost them overnight in the fridge. Be aware, freezing can make them a bit softer, but the flavor stays great. Enjoy them as a quick side dish anytime!
FAQs
What is the best way to cut carrots for this recipe?
For this recipe, I recommend using baby carrots. They are small and sweet. If you use regular carrots, cut them into 1-inch pieces. This size helps them cook evenly and ensures they soak up the honey lemon glaze. You can also slice them into thin rounds for a different look and texture. Just remember, uniform sizes mean even cooking.
Can I make Honey Lemon Glazed Carrots in advance?
Yes, you can make Honey Lemon Glazed Carrots in advance! Cook the carrots and glaze them as the recipe states. Let them cool and store in the fridge for up to three days. When ready to serve, reheat them gently in a pan. Add a splash of lemon juice to freshen the flavor. This makes for an easy side dish at your next meal.
Are there any dietary modifications for this recipe?
Absolutely! To make this recipe gluten-free, check that your honey is pure and free from additives. For a vegan version, swap the butter for olive oil or vegan butter. To reduce sugar, you can use less honey or substitute with maple syrup. Each option keeps the great flavor while fitting different dietary needs.
How do I know when the carrots are done?
You can tell the carrots are done by looking and tasting. They should be bright in color and tender when pierced with a fork. If they feel soft but still firm, they are ready. For the best result, taste one. It should be sweet, tangy, and melt in your mouth. If it needs more cooking, give it a few extra minutes in the glaze.
This blog post has shown you how to make Honey Lemon Glazed Carrots. You learned the ingredients needed, steps to prepare the carrots, and tips for perfecting the glaze. Remember, balancing sweetness and acidity makes a great dish. You can even try different carrots and flavor enhancers. Store leftovers properly to keep them tasty. With these tricks, serving this dish will impress everyone. Enjoy your cooking and feel confident with your new skills in the kitchen!


