Jalapeño Popper Dip Flavorful and Simple Recipe

Are you ready to spice up your snack game? My Jalapeño Popper Dip is packed with creamy goodness and bold flavors, making it the perfect dish for parties or movie nights. This easy recipe combines cream cheese, mixed cheeses, and fresh jalapeños for the ultimate crowd-pleaser. Follow my simple steps, and you’ll impress your friends and family with your culinary skills. Let’s dive into this delicious dip that’s sure to be a hit!
Ingredients
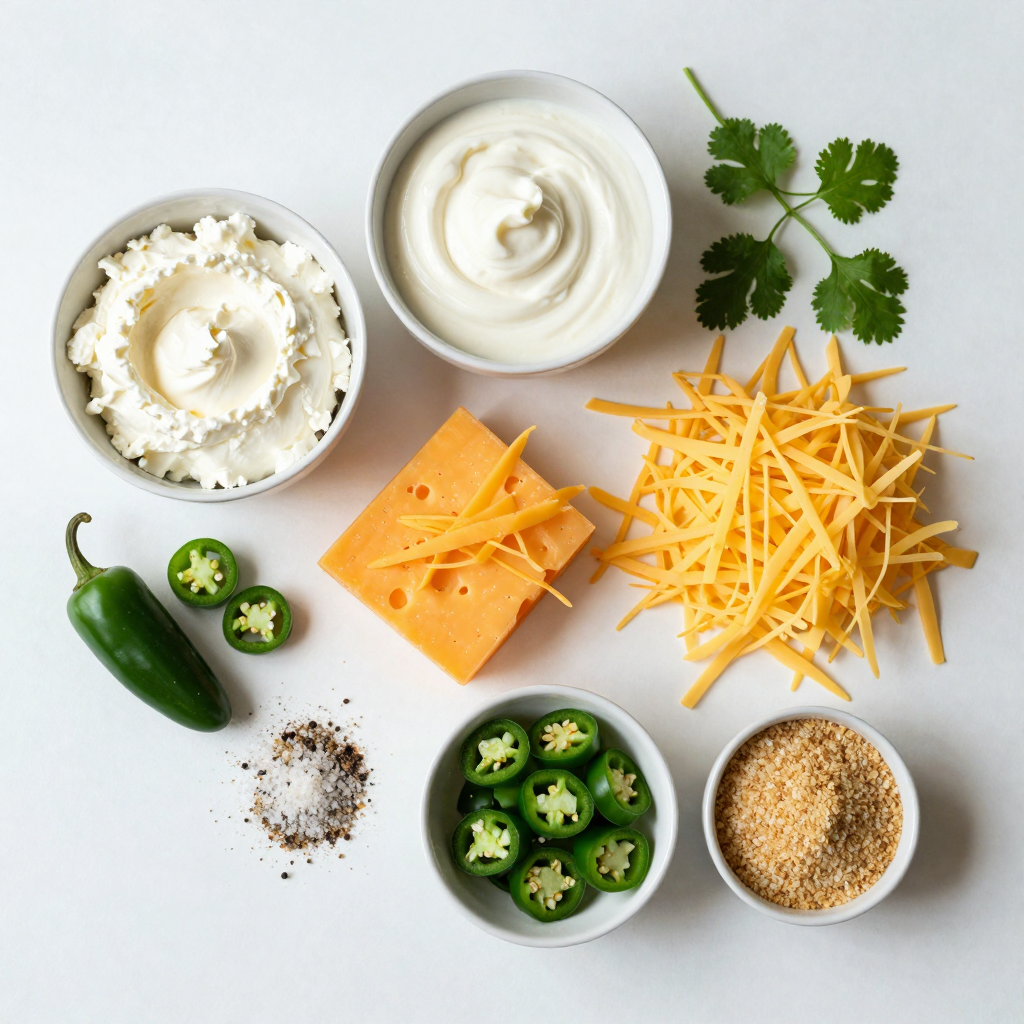
To make a tasty Jalapeño Popper Dip, you need a few simple ingredients. Here’s what you will need:
- 8 oz cream cheese, softened
- 1 cup sour cream
- 1 cup shredded cheddar cheese
- 1 cup shredded mozzarella cheese
- 2-3 fresh jalapeños, finely chopped
- 1/2 cup canned jalapeños, drained and chopped
- 1/2 teaspoon garlic powder
- 1/2 teaspoon onion powder
- Salt and pepper to taste
- 1/4 cup breadcrumbs (optional)
- Fresh cilantro for garnish (optional)
These ingredients blend to create a rich and creamy dip. The jalapeños add a great kick. If you prefer less heat, use fewer fresh jalapeños. You can also swap in different cheeses if you like. Try pepper jack for extra spice! Remember, this dip is all about your taste. So feel free to adjust as you go.
Step-by-Step Instructions
Preparation Steps
1. Preheat your oven to 350°F (175°C). While it heats, lightly grease a baking dish. An 8×8 inch dish works great for this dip.
2. In a large bowl, mix the softened cream cheese and sour cream. Blend until smooth and creamy. This creates a rich base.
3. Incorporate the shredded cheeses next. Add 1 cup of cheddar and 1 cup of mozzarella. Stir until everything is evenly mixed.
Finalizing the Dip
1. Add jalapeños and seasonings to the cheese mixture. Include both fresh and canned jalapeños for extra flavor.
2. Transfer the dip mixture into your greased baking dish. Spread it evenly across the dish.
3. If you want a crunchy topping, sprinkle breadcrumbs over the dip. This adds great texture.
4. Bake in your oven for 20-25 minutes. Look for a bubbly dip with a light golden top.
5. After baking, remove the dip from the oven. Let it cool slightly before serving.Enjoy your delicious Jalapeño Popper Dip with chips or bread!
Tips & Tricks
Achieving the Perfect Dip
To get a great dip, start with the cream cheese. It should be very soft. This helps mix it with sour cream easily. If your cream cheese is cold, the dip will be lumpy.
For spice lovers, you can adjust the heat. Use more fresh jalapeños if you want it spicier. If you prefer less heat, use fewer fresh jalapeños. The canned jalapeños add flavor without too much heat.
Baking is key for texture. Bake the dip for 20 to 25 minutes. The top should be golden and bubbly. This means it’s ready to serve!
Presentation Suggestions
Serve the dip warm. It pairs well with tortilla chips or sliced bread. Use sturdy chips for dipping to avoid breakage.
For a colorful touch, add fresh cilantro on top. This not only looks nice but adds flavor too. You can also serve extra jalapeños on the side for those who want more heat.

Variations
Dietary Adjustments
If you’re looking for gluten-free options, you can skip the breadcrumbs. Instead, use crushed corn chips or gluten-free crackers on top. These choices add crunch without gluten. Many people enjoy the same creamy texture without the gluten!
For a vegan version, swap the cream cheese and sour cream for vegan alternatives. Use cashew cream or almond cream cheese. Nutritional yeast can add a cheesy flavor without dairy. Vegan shredded cheese also works well. This way, everyone can enjoy the dip!
Flavor Enhancements
To make your dip even tastier, try adding spices. Smoked paprika gives a warm, smoky flavor. Cumin adds earthiness, while cayenne pepper can boost the heat. Just remember to taste as you go. You can always add more spice, but you can’t take it out!
Another fun twist is to mix in crispy bacon pieces. Bacon adds a savory crunch that many people love. You can also toss in extra veggies like bell peppers or corn for added texture and flavor. These options turn your dip into a hearty treat!
Storage Info
Leftover Storage
To keep your Jalapeño Popper Dip fresh, store it in an airtight container. This method helps lock in flavor and moisture. You can refrigerate it for up to four days. If you want to keep it longer, freeze the dip for up to two months. Just remember to thaw it in the fridge before reheating.
Reheating Tips
For the best taste and texture, reheat your dip in the oven. Preheat it to 350°F (175°C) and place the dip in an oven-safe dish. Cover it with foil to keep it moist. Bake for about 15-20 minutes until warm. To avoid sogginess, don’t microwave it for long periods. Microwaving can make it watery. If you must use the microwave, heat it in short bursts, stirring in between. Enjoy your dip warm for the best flavor!
FAQs
Common Questions about Jalapeño Popper Dip
How long does it take to prepare?
It takes about 10 minutes to prepare this dip. After that, baking it takes around 20 to 25 minutes. So, in total, you will spend about 35 minutes from start to finish.
Can I make this dip ahead of time?
Yes, you can make this dip ahead of time. Prepare the dip and store it in the fridge. Bake it when you are ready to serve. This way, you save time on busy days or for gatherings.
Serving and Pairing Tips
What goes well with Jalapeño Popper Dip?
This dip pairs great with tortilla chips, sliced baguette, or fresh veggies. You can also serve it with crackers or pita chips for a tasty snack. If you want more heat, add extra jalapeños on the side.
Can I serve it cold?
I recommend serving Jalapeño Popper Dip warm. The flavors shine best when it is hot and bubbly. However, if you have leftovers, you can enjoy it cold. Just keep in mind that the texture will change a bit.
This blog post covered how to make a delicious Jalapeño Popper Dip. You learned about the key ingredients, easy-to-follow steps, and handy tips. I shared variations for diets and flavor.
For best results, don’t rush baking time and adjust spice levels to your taste. Enjoy this dip hot with chips or bread. With proper storage, you can savor leftovers too. Now, it’s time to create your own perfect dip and impress everyone at your next gathering.


![To create a vibrant Cucumber Dill Greek Salad, you need fresh ingredients. Each element adds flavor and texture. Here’s what you will need: - Cucumber: 2 large, diced - Cherry tomatoes: 1 cup, halved - Red onion: 1 small, thinly sliced - Bell pepper: 1 (any color), diced - Kalamata olives: 1 cup, pitted and halved - Feta cheese: 1 cup, crumbled - Fresh dill: 1 tablespoon, chopped (or 1 teaspoon dried) - Olive oil: 3 tablespoons, extra-virgin - Lemon juice: 2 tablespoons - Salt and pepper: to taste These ingredients come together to form a refreshing and simple dish. The combination of cool cucumbers and tangy feta creates a delightful contrast. Adding olives brings a briny kick, while fresh dill adds a nice herbal note. Each bite is crisp, flavorful, and satisfying. Using high-quality ingredients is key. Choose firm cucumbers and ripe tomatoes. Fresh herbs make a big difference, too. For the best taste, use extra-virgin olive oil and fresh lemon juice. If you want to explore the full process, check out the Full Recipe for step-by-step guidance. Enjoy making this delicious salad! Start by peeling the cucumbers. You can skip this if you prefer the skin. Next, dice the cucumbers into small, bite-sized pieces. Then, take your cherry tomatoes and cut them in half. For the red onion, slice it thinly. Finally, dice the bell pepper into small pieces. Each vegetable adds color and crunch to our salad. In a large serving bowl, mix the diced cucumbers, halved cherry tomatoes, sliced red onion, and diced bell pepper. These fresh veggies create a nice base. Now, gently fold in the Kalamata olives and crumbled feta cheese. Be careful not to break the feta. This adds a creamy texture to the salad. In a small bowl, whisk together the extra-virgin olive oil and fresh lemon juice. This will be our dressing. Then, add the chopped dill, salt, and pepper. Whisk again until it is well mixed. The dressing brings all the flavors together. Drizzle the dressing over the salad. Use a large spoon to gently toss everything together. Make sure all ingredients are well coated. This step is key for a tasty salad. Taste the salad and adjust the seasoning. You can add more salt, pepper, or lemon juice if needed. For the best flavor, let the salad sit for about 10-15 minutes before serving. This allows the flavors to meld and enhances the taste. For the full recipe, check out the link. Fresh vegetables are key to a great salad. They add crunch and flavor. For the best taste, pick firm cucumbers, ripe tomatoes, and crisp bell peppers. Look for bright colors and smooth skins. This ensures they are fresh and packed with nutrients. Kalamata olives are a must for this dish. They bring a rich, briny taste. Seek out authentic Kalamata olives, as they offer the best flavor. Check for olives that are dark purple or black, with a smooth texture. Avoid any that look shriveled or dry. For presentation, serve this salad in a large bowl. Arrange the veggies in layers for a colorful look. You can also use small mason jars for individual servings. This fun style makes it easy to grab and enjoy. Pair this salad with grilled chicken or fish for a complete meal. You can also serve it with pita bread for a light lunch. It goes well with tzatziki sauce, which adds a nice creaminess. Marinating the salad adds depth. Let it sit for about 10-15 minutes before serving. This helps the flavors blend. If you have time, prepare it early in the day. It will taste even better after a few hours in the fridge. Serve this salad chilled for the most refreshing experience. It’s perfect for hot days or summer gatherings. Enjoy it as a side dish or a light main course. For more flavor, try adding a splash of red wine vinegar or a pinch of garlic. For the full recipe, check out the Cucumber Dill Greek Salad. {{image_2}} You can switch up the cheese in this salad. If you want a twist, try goat cheese or ricotta. Both add a creamy texture and taste. For dressings, consider balsamic vinegar or yogurt-based dressings. Each option brings its own flair to the salad. This salad shines with fresh, seasonal veggies. In summer, add ripe avocado or sweet corn. In fall, try diced apples or roasted nuts for crunch. Change the herbs too; basil or mint can give a new flavor. Adjust the dressing with spices fitting the season for a unique touch. Get creative by adding elements from other cuisines. Try diced jalapeños for a spicy kick or sprinkle with sesame seeds for an Asian vibe. You can also mix in chopped cilantro or lime juice for a Mexican twist. Explore fusion recipes, like adding quinoa for a heartier meal. To keep your Cucumber Dill Greek Salad fresh, refrigerate any leftovers right away. Use an airtight container to store the salad. This keeps flavors intact and prevents wilting. Make sure to seal the container tightly. You can enjoy the salad for about 3 to 4 days in the fridge. Check for signs of spoilage before eating. Look for wilting or a sour smell. If the salad looks off, it's best to toss it. Leftover salad can be used in many ways. Try mixing it with cooked pasta for a quick dish. You can add it to a wrap for a tasty lunch. Chopped salad makes a great topping for grilled chicken or fish. Get creative and enjoy your leftovers! For the full recipe, check the [Full Recipe]. Yes, you can make this salad ahead of time. To prepare in advance, chop the vegetables and store them separately. Keep the dressing in a jar. Just before serving, mix everything together. This keeps the veggies crisp and fresh. The salad stays good for about three days in the fridge. Use an airtight container to store it. If you notice any signs of spoilage, like a strange smell or mushy veggies, throw it away. This salad can be made vegan. Just skip the feta cheese or use a plant-based cheese. You can also replace the honey in the dressing with agave syrup for sweetness. This way, everyone can enjoy it. This salad goes well with grilled chicken or fish. You can also serve it with pita bread and hummus. For a full meal, pair it with rice or quinoa dishes. To boost the dressing's flavor, add more lemon juice or dill. You can also mix in a pinch of garlic powder or a splash of red wine vinegar. Taste as you go to find your perfect balance. For the complete recipe, check out the Full Recipe. This blog post covered everything you need for a perfect Cucumber Dill Greek Salad. You learned about key ingredients, step-by-step preparation, and expert tips for the best taste. Remember to choose fresh produce and experiment with variations to suit your taste. This salad is easy to make and can be tweaked for any season or diet. Enjoy this tasty dish at your next meal or gathering, and feel free to get creative with leftovers. A fresh salad can brighten any plate!](https://dailydishlab.com/wp-content/uploads/2025/07/5e5811ac-3a9b-4435-8173-96f3851851ae-768x768.webp)


![To make delicious zucchini corn fritters, gather these simple ingredients: - 2 medium zucchinis, grated - 1 cup sweet corn (fresh, canned, or frozen) - 1/2 cup all-purpose flour - 1/4 cup cornmeal - 2 large eggs - 1/4 cup green onions, finely chopped - 1 teaspoon garlic powder - 1 teaspoon onion powder - 1/2 teaspoon paprika - Salt and pepper to taste - Olive oil for frying - Optional: fresh cilantro or parsley for garnish These ingredients work together to create a tasty and crispy fritter. The zucchini and corn give it a sweet taste, while the spices add flavor. The flour and cornmeal help bind the mixture, ensuring your fritters hold their shape. Using fresh ingredients makes a big difference. I always prefer freshly grated zucchini and sweet corn when available. This helps the fritters taste better. Don't forget to check out the Full Recipe for detailed instructions on how to make these fritters come to life! Grating and Moisture Removal Start by grating the zucchinis with a box grater. Use medium-sized zucchinis for the best texture. After grating, place the zucchini in a clean kitchen towel. Squeeze the towel tightly to remove excess moisture. This is key for crispy fritters. If you skip this step, your fritters may turn out soggy. Combining Ingredients In a large mixing bowl, combine your drained zucchini with sweet corn. You can use fresh, canned, or frozen corn. Add all-purpose flour, cornmeal, and eggs to the bowl. Toss in chopped green onions, garlic powder, onion powder, paprika, salt, and pepper. Mix everything until it is well combined. Your batter should be thick and sticky. Heating the Skillet Heat a non-stick skillet over medium heat. Add enough olive oil to coat the bottom of the pan lightly. This helps the fritters fry evenly and get golden brown. Frying Process Once the oil is hot, scoop about 1/4 cup of the fritter mixture onto the skillet. Flatten each scoop slightly with a spatula. Cook for about 3-4 minutes on each side. Watch for a golden color to know they are done. If they brown too fast, lower the heat a bit. Draining Excess Oil Once the fritters are cooked, transfer them to a plate lined with paper towels. This step helps absorb any excess oil. It makes them less greasy and more enjoyable. Garnishing Options Serve the fritters warm. You can garnish them with fresh cilantro or parsley for a nice pop of color. They pair perfectly with sour cream or a zesty avocado sauce. These simple additions elevate the dish even more. For the full recipe, refer to the [Full Recipe]. Importance of Moisture Removal To get crispy fritters, you must remove excess moisture from the zucchini. Grating the zucchini is just the first step. After grating, use a clean kitchen towel to squeeze out as much water as you can. This simple step makes all the difference. Wet fritters become soggy and won’t crisp up well. Adjusting Cooking Temperature Cooking temperature is key. If the pan is too hot, the fritters burn outside but stay raw inside. If it's too low, they soak up oil and become greasy. I recommend medium heat. This allows the fritters to cook evenly and turn golden brown. Pay attention while frying. Adjust the heat as needed to keep them from burning. Adding Herbs or Spices You can easily boost the flavor of your fritters. Try adding fresh herbs like cilantro or parsley. These add a fresh taste and color. You can also use spices like cumin or chili powder for a kick. Experiment with flavors to find what you enjoy most. Serving Suggestions Serve your fritters warm for the best taste. They go great with a dollop of sour cream or yogurt. For a twist, try a zesty avocado sauce. This adds creaminess and a bright flavor. You can also serve them alongside a fresh salad for a light meal. Recommended Frying Pan A non-stick skillet works best for frying these fritters. It helps prevent sticking and makes flipping easier. If you don’t have non-stick, use a well-seasoned cast iron pan. Both options help achieve that perfect golden crust. Tools for Grating and Mixing For grating zucchini, a box grater is perfect. It gives you nice, even shreds. You will also need a large mixing bowl to combine all the ingredients. A sturdy spatula helps mix everything well, ensuring all the flavors blend. For the best results, keep your tools handy and clean to make cooking smooth. {{image_2}} To make your zucchini corn fritters gluten-free, you can substitute the all-purpose flour. Use a gluten-free flour blend instead. This will keep the fritters light and crispy. You can also use almond flour or chickpea flour for added flavor and texture. Cornmeal is a great choice too, as it adds crunch. If you want to make these fritters vegan, you can replace the eggs with flaxseed meal. Mix one tablespoon of flaxseed meal with three tablespoons of water. Let it sit for about five minutes until it thickens. You can also use unsweetened applesauce as a binder; about 1/4 cup should work well. Adding cheese can elevate your fritters. A sharp cheddar or feta cheese adds great taste. Mix in about 1/2 cup of grated cheese to the batter. You can also incorporate different vegetables like grated carrots or bell peppers for extra flavor and color. Each adds a unique twist to the base recipe. For the full recipe, check out the detailed steps above. After you enjoy your zucchini corn fritters, store any leftovers for later. Here’s how to do it right: - Refrigeration Tips: Place the fritters in an airtight container. They can last up to three days in the fridge. If you want to keep them crispy, place a paper towel in the container. This helps absorb moisture. - Best Practices for Freezing: If you want to freeze them, layer the fritters with parchment paper in a freezer-safe bag. They freeze well for up to three months. When you’re ready to eat, thaw overnight in the fridge before reheating. To enjoy your fritters again, follow these simple steps: - Methods for Best Results: The best way to reheat fritters is on the stove. Heat a non-stick skillet over medium heat. Add a little olive oil and cook for about two minutes on each side. This keeps them nice and crispy. - Avoiding Sogginess: To keep them from getting soggy, avoid using the microwave. The microwave steams them and removes their crunch. Always opt for stovetop reheating for the best texture. Now you can enjoy your delicious zucchini corn fritters any time! To make zucchini corn fritters, start with simple steps. First, grate two medium zucchinis and squeeze out moisture. This step helps the fritters stay crispy. Next, combine the zucchini with one cup of sweet corn, half a cup of flour, and a quarter cup of cornmeal. Add two large eggs, a quarter cup of chopped green onions, garlic powder, onion powder, paprika, salt, and pepper. Mix until well-blended. Heat olive oil in a skillet over medium heat. Scoop about a quarter cup of the mixture for each fritter. Cook for 3-4 minutes on each side. This quick recipe will give you crispy and tasty fritters. You can find the full recipe at the beginning of this article. Yes, you can bake zucchini corn fritters. Preheat your oven to 400°F (200°C). Line a baking sheet with parchment paper. Shape the fritters and place them on the sheet. Brush the tops lightly with olive oil for a golden finish. Bake for about 20-25 minutes or until they are crisp and golden brown. Baking is a healthier option and still gives great results. Zucchini corn fritters pair well with many side dishes. Consider serving them with a dollop of sour cream or Greek yogurt. A zesty avocado sauce adds a nice touch too. You can also serve them with a fresh salad for a balanced meal. Try adding a side of salsa for a fun flavor kick. These options enhance the experience of enjoying your fritters. To keep your fritters from falling apart, moisture removal is key. Squeeze out as much liquid from the grated zucchini as possible. Use enough flour and cornmeal to bind the ingredients. Eggs act as a binder, so don’t skip them. Mixing well will also help combine everything evenly. If the mixture feels too wet, add a bit more flour until it holds together. In this post, I covered how to make delicious Zucchini Corn Fritters. We went over the ingredients, from zucchini to sweet corn, and shared tips for crispy results. You learned how to prepare, cook, and store your fritters. I encourage you to try different variations and flavors. Experiment with herbs or make it gluten-free. No matter how you create them, these fritters will be a tasty addition to your meals. Enjoy your cooking!](https://dailydishlab.com/wp-content/uploads/2025/07/ca44245d-9b60-45de-8deb-be1df19ec037-768x768.webp)
