
Looking for a simple and delicious dessert? No-Bake White Chocolate Raspberry Bars are your answer! You can whip up these tasty treats with just a handful of ingredients. In this post, I’ll share easy steps, tips for perfect results, and even some fun variations. Get ready to impress your friends and family with this delightful dessert that’s both creamy and fruity! Let’s dive into the sweet details!
Why I Love This Recipe
- Deliciously Creamy: The combination of white chocolate and sweetened condensed milk creates a rich, creamy texture that melts in your mouth.
- Fresh and Fruity: Fresh raspberries add a burst of tartness that perfectly balances the sweetness of the white chocolate.
- No Baking Required: This recipe is perfect for warm days or when you want a quick dessert without turning on the oven.
- Easy to Customize: You can easily modify this recipe by adding other fruits or nuts to suit your taste preferences.
Ingredients
List of Required Ingredients
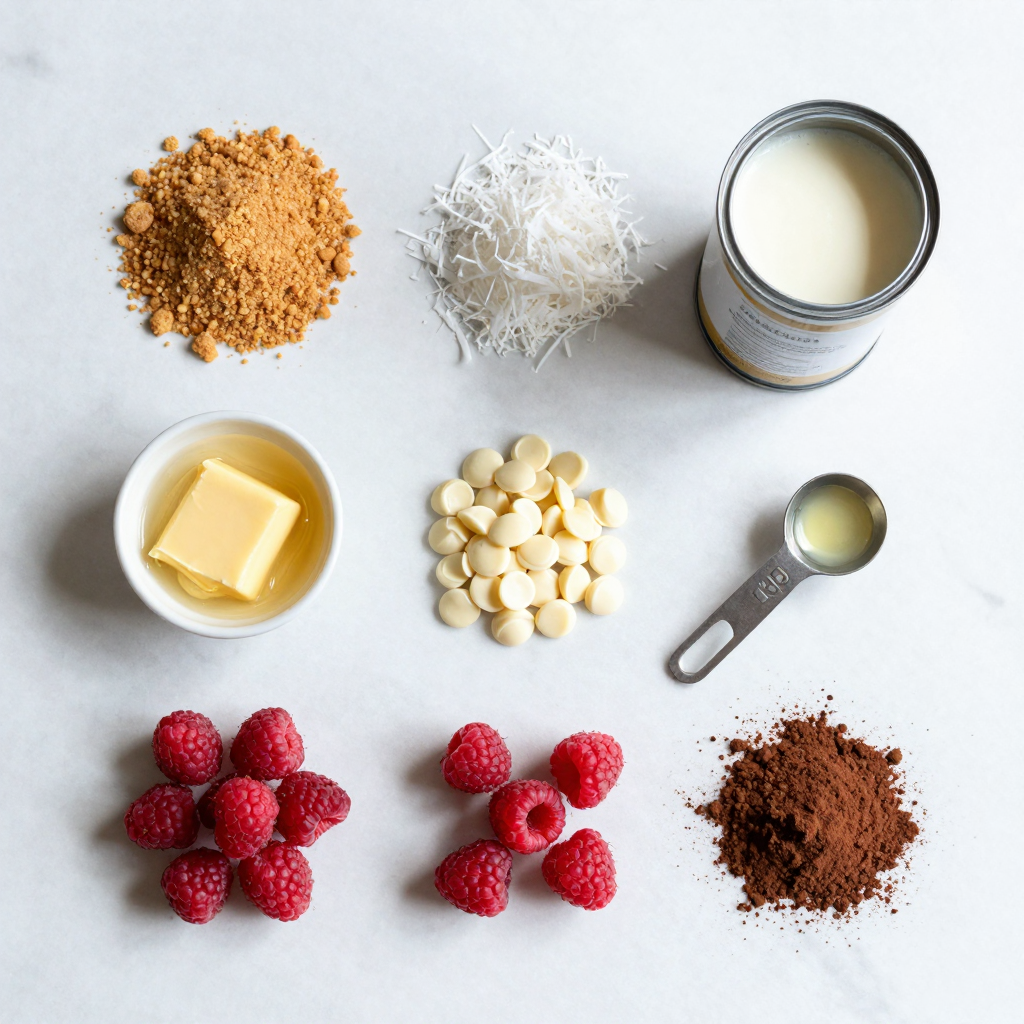
To make No-Bake White Chocolate Raspberry Bars, you need:
– 1 cup graham cracker crumbs
– 1/2 cup unsweetened shredded coconut
– 1/3 cup melted butter
– 1 cup white chocolate chips
– 1 can (14 oz) sweetened condensed milk
– 1 teaspoon vanilla extract
– 1 cup fresh raspberries (plus extra for topping)
– 1/4 cup unsweetened cocoa powder (for dusting)
Ingredient Substitutions
You can swap out graham cracker crumbs for digestive biscuits if needed. For coconut flakes, you may use finely chopped nuts or oats. If you want to substitute white chocolate, try using dark chocolate or even a dairy-free option.
Fresh Raspberry Selection Tips
When choosing raspberries, look for ones that are bright and firm. Ripe raspberries have a deep color and a sweet scent. They are usually best in summer but can be found year-round in stores. Selecting fresh fruit makes your dessert taste better!
Step-by-Step Instructions
Preparation Process
To start, we need to mix the crust ingredients. In a bowl, combine 1 cup of graham cracker crumbs and 1/2 cup of shredded coconut. Then, pour in 1/3 cup of melted butter. Stir until it all comes together nicely.
Next, press the crust into the bottom of a lined 8×8 inch baking dish. Make sure it is even and packed down well. This crust will hold the bars together and add a great texture.
Making the Filling
Now it’s time to make the filling. First, melt 1 cup of white chocolate chips. Use a microwave-safe bowl and heat in 30-second bursts. Stir between each burst until the chocolate is smooth and melted.
Once melted, mix in 1 can (14 oz) of sweetened condensed milk and 1 teaspoon of vanilla extract. Stir until everything is well combined. This mixture will be rich and creamy.
Assembling the Bars
Now we’ll fold in the raspberries. Take 1 cup of fresh raspberries and gently fold them into the white chocolate mixture. Be careful not to crush them too much; we want to keep the chunks of fruit intact.
Pour the white chocolate mixture over the crust in the baking dish. Use a spatula to spread it evenly. This is where the bars start to come together!
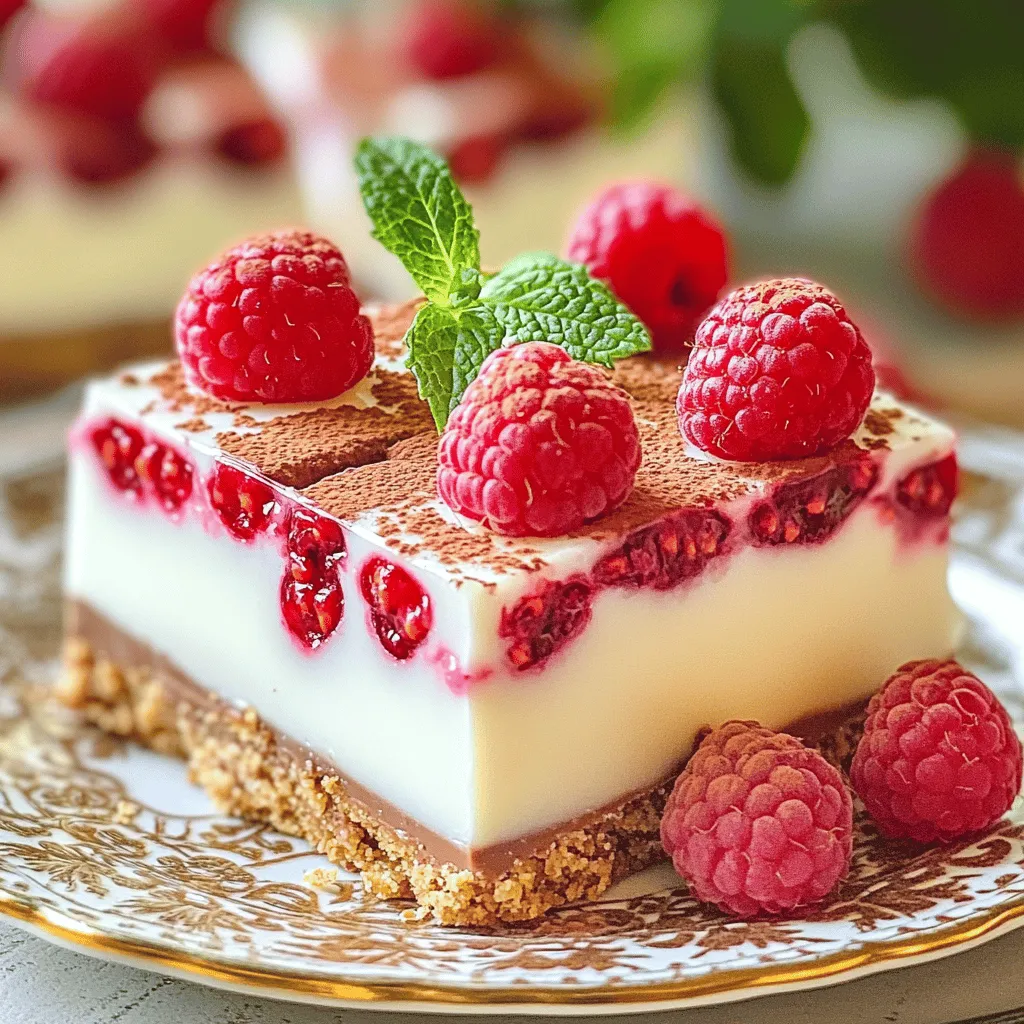
After pouring, sprinkle extra raspberries on top for a pretty finish. Finally, refrigerate the bars for at least 4 hours or until set. Once set, dust the top lightly with cocoa powder before slicing into squares.
Pro Tips
- Choose Quality White Chocolate: Using high-quality white chocolate will enhance the flavor of your bars significantly. Look for chocolate that contains cocoa butter for the best results.
- Fresh Raspberries: Opt for fresh, ripe raspberries to achieve the best taste and texture. If you can’t find fresh ones, consider using frozen raspberries, but make sure to thaw and drain them first.
- Chill Thoroughly: Allow the bars to chill for the full 4 hours to ensure they set properly. This will make cutting them into squares much easier.
- Garnishing Tips: For an elegant touch, add a few mint leaves alongside the raspberries for garnish. This adds a pop of color and freshness to your presentation.
Tips & Tricks
Successful Preparation Tips
To make these bars shine, pay attention to the chocolate. Avoiding chocolate seizing is key. Always melt white chocolate on low heat. If it gets too hot, it can clump. Stir it often while melting. This keeps the texture smooth.
For perfect bars, the texture matters. The crust should be firm but not hard. If it feels too crumbly, add a bit more melted butter. The filling should be creamy and thick. When mixing in raspberries, do it gently. You want to keep the berries whole for bursts of flavor.
Presentation Tips
Serving these bars is part of the fun. Chill them well before serving. I like to plate them on a nice dish. For a pop of color, use fresh raspberries on top. Dusting the bars with cocoa powder adds a nice touch. A mint leaf can brighten the plate too.
You can also serve them with a scoop of vanilla ice cream. The cold creaminess pairs well with the sweet bars.
Storing and Tasting Notes
Chilling the bars is crucial. They need at least four hours in the fridge. This helps them set properly. For the best taste, eat them cold.
When slicing, use a sharp knife. Run it under hot water first. This makes clean cuts and keeps the bars neat. Store any leftovers in an airtight container in the fridge. These no-bake bars can last up to a week.
Variations
Flavor Variations
You can add nuts to the mix for a nice crunch. Chopped almonds or walnuts work well. They add texture and flavor. You can also experiment with different fruits. Try strawberries or blueberries for a twist. Each fruit brings its own sweetness and tartness. Mix and match to find your favorite blend.
Dietary Adjustments
For gluten-free options, use gluten-free graham crackers. This simple swap makes it safe for those with gluten issues. You can also make vegan adaptations. Replace white chocolate with vegan chocolate chips. Use coconut cream instead of sweetened condensed milk. These changes keep the bars creamy and tasty without dairy.
Seasonal Variations
Using seasonal fruits can enhance flavor. In summer, fresh peaches or cherries are fantastic. In the fall, consider adding spiced apples. For holiday-themed variations, think of peppermint or eggnog flavors. You can mix in peppermint extract for a festive touch. These twists make the bars special for any occasion.
Storage Info
Short-Term Storage
To keep the no-bake white chocolate raspberry bars fresh, refrigerate them. Place the bars in an airtight container. This helps to keep moisture out. You can also cover them tightly with plastic wrap. Store them in the fridge for up to one week. This way, they stay cool and tasty.
Long-Term Storage
For longer storage, freeze the bars. First, cut them into squares. Wrap each piece in plastic wrap. Then, place them in a freezer-safe bag or container. This protects them from freezer burn. When you want to enjoy them, just remove the bars from the freezer. Let them thaw in the fridge for a few hours. This keeps the texture nice and creamy.
Shelf Life
When stored properly, these bars last about one week in the fridge. If frozen, they can last up to three months. Just remember to keep them sealed. This helps maintain their flavor and quality.Enjoy every bite!
FAQs
Can I use frozen raspberries?
Yes, you can use frozen raspberries. However, they may change the texture. Frozen raspberries release more juice than fresh ones. This can make your bars a bit mushy. If you use frozen raspberries, try to drain off excess liquid. This way, you keep the bars firm and tasty.
Can I substitute white chocolate chips?
You can use other types of chocolate. Milk chocolate or dark chocolate works well. Each choice gives a different taste. Milk chocolate adds sweetness while dark chocolate gives a rich flavor. You can also try using yogurt chips for a tangy twist. Just make sure to melt them as you would with white chocolate.
How to cut the bars neatly?
To cut the bars neatly, use a sharp knife. First, chill the bars well. This helps them set firmly. Before slicing, run the knife under hot water. Wipe it dry, then cut the bars. This method helps prevent sticking and makes clean cuts.
Can I make these bars ahead of time?
Yes, you can make these bars ahead of time. They stay fresh in the fridge for about a week. For best results, prepare them a day or two before you need them. This gives the flavors time to blend.
To sum up, we discussed how to make delicious raspberry bars. We covered the ingredients and substitutions, focusing on fresh raspberries and their selection. Then, we walked through the preparation steps and offered tips for success. This includes storage methods and variations to try.
Explore your creative side with flavors or adjust for dietary needs. With these recipes and tips, you’ll impress everyone who tries your bars. Enjoy baking and savoring these treats!


