

Join me as we whip up a Peach Cream Cheese Danish that’s both simple and delightful! This recipe combines sweet peaches and creamy cheese for a treat you’ll love. I’ll guide you through each step, covering everything from the best ingredients to secret tips. Whether you’re a baking novice or a pro, this danish will wow your taste buds. Let’s create something special together!
Why I Love This Recipe
- Delicious Flavor Combination: The sweet, juicy peaches perfectly complement the creamy, rich cream cheese, creating a delightful balance that is irresistible.
- Easy to Make: This recipe uses refrigerated crescent roll dough, making it quick and simple to prepare, perfect for busy mornings or last-minute desserts.
- Perfect for Any Occasion: Whether it’s a brunch, a picnic, or a casual dessert, these danishes are versatile and sure to impress your guests.
- Customizable: You can easily switch out the peaches for other fruits, allowing you to adapt the recipe to your taste or what you have on hand.
Ingredients
Essential Ingredients for Peach Cream Cheese Danish
To make Peach Cream Cheese Danish, you need these key items:
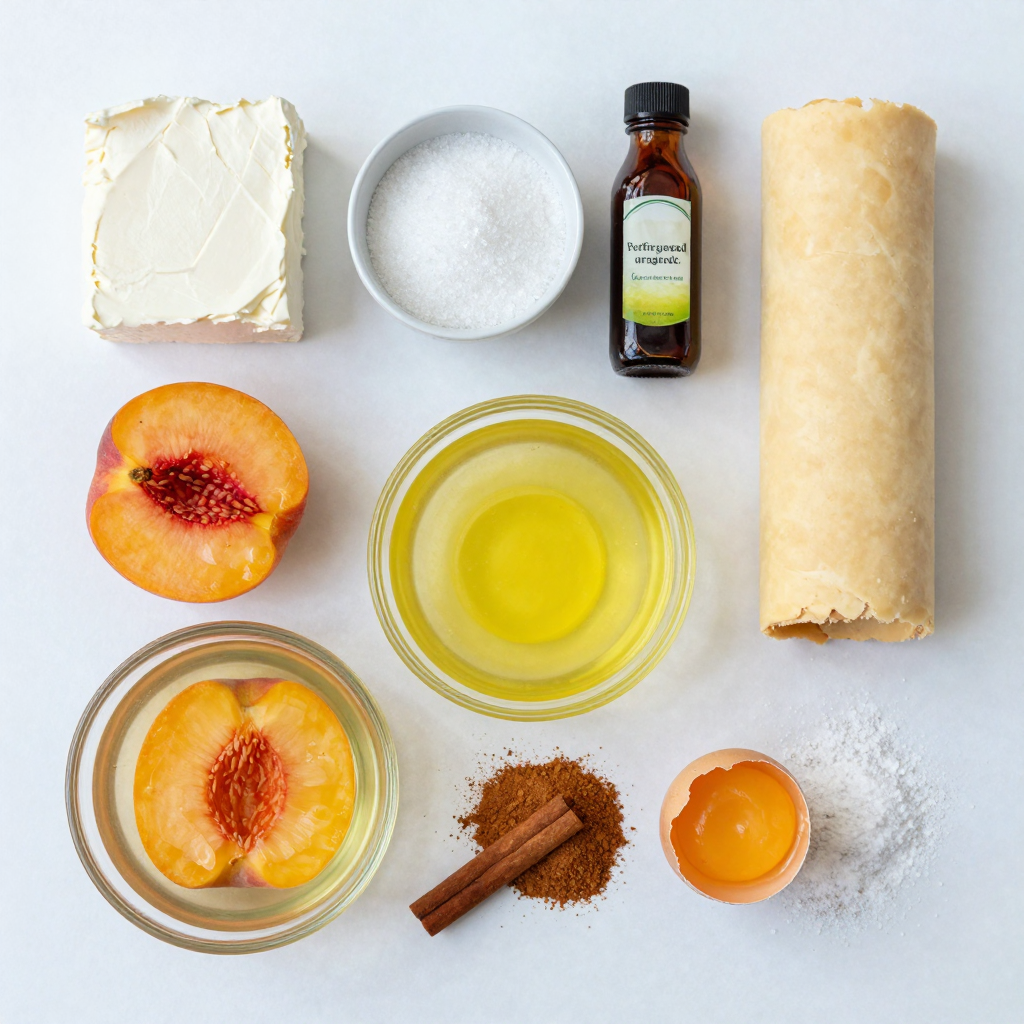
– 1 package (8 oz) cream cheese, softened
– 1/4 cup granulated sugar
– 1 teaspoon vanilla extract
– 1 package (1 lb) refrigerated crescent roll dough
– 2 ripe peaches, sliced thin
– 1 tablespoon lemon juice
– 1 teaspoon ground cinnamon
– 1 egg, beaten (for egg wash)
– Powdered sugar for drizzling
These ingredients create a creamy filling and a flaky crust. The peaches add a sweet touch.
Optional Ingredients for Enhanced Flavor
You can add a few extra ingredients for more taste:
– 1 tablespoon honey for sweetness
– 1/2 teaspoon almond extract for a nutty note
– Chopped nuts for crunch
These extras can take your danish to the next level. Try them out for a twist!
Cooking Tools and Equipment Needed
Gather these tools for easy cooking:
– Mixing bowls
– Whisk or electric mixer
– Baking sheet
– Parchment paper
– Knife and cutting board
Having the right tools makes the process smooth. You will feel like a pro in no time!
Step-by-Step Instructions
Preparing the Cream Cheese Filling
To start, gather your cream cheese, sugar, and vanilla extract. Beat the softened cream cheese in a bowl. Add the granulated sugar and vanilla extract next. Mix until you have a smooth and creamy filling. This step is simple but key. You want a rich flavor that pairs well with the peaches. Set this bowl aside as you move on.
Assembling the Peach Danish
Now, let’s work with the crescent roll dough. Open the package and unroll it on a floured surface. Pinch the seams to form a rectangle. This helps keep the dough intact. Cut the dough into squares about 4 inches by 4 inches. Make a small indentation in the center of each square. This is where your filling will go.
Next, take your sliced peaches. Toss them with lemon juice and ground cinnamon. This mix adds a bright taste. Place a tablespoon of the cream cheese filling in the center of each dough square. Top it with a few peach slices. You can fold the corners over the filling to create a pocket. This keeps the delicious filling inside.
Baking Tips for Perfect Results
Before baking, brush the tops with a beaten egg. This gives the danishes a lovely golden color. Preheat your oven to 375°F (190°C). Line a baking sheet with parchment paper to prevent sticking. Bake the danishes for 15-18 minutes. Look for a golden brown color and puffed dough.
Let them cool for a few minutes. Drizzle with powdered sugar for that sweet touch. Enjoy your Peach Cream Cheese Danish as a delightful treat!
Pro Tips
- Choose Ripe Peaches: For the best flavor, select peaches that are slightly soft to the touch and fragrant. This ensures a sweet and juicy filling in your danishes.
- Pinch Seams Well: Make sure to pinch the seams of the crescent dough together firmly to avoid any filling leakage during baking.
- Experiment with Spices: While cinnamon is classic, feel free to add nutmeg or cardamom for a unique twist on the flavor profile of your danish.
- Serve Warm: For the best experience, serve these danishes warm right out of the oven. The cream cheese will be creamy, and the peaches will be perfectly tender.
Tips & Tricks
How to Achieve the Best Flavor and Texture
To make your Peach Cream Cheese Danish shine, use ripe peaches. They add sweetness and flavor. You can also sprinkle a bit of extra sugar on the peaches before baking. It helps them caramelize and enhances their taste. For a rich creaminess, ensure your cream cheese is at room temperature. This makes it easy to blend with sugar and vanilla. Don’t rush this step. A smooth filling gives the best texture.
Troubleshooting Common Issues
If your danishes don’t puff up, check your oven temperature. An oven that is too cool can lead to flat pastries. Also, ensure you seal the edges well. If they open during baking, the filling will spill out. If the dough is too sticky, add a bit of flour when rolling it out. This will help prevent sticking and make it easier to shape.
Recommended Serving Suggestions
These danishes are perfect warm. You can serve them with a scoop of vanilla ice cream or a dollop of whipped cream. For a fun twist, try pairing them with a cup of coffee or tea. They also make a great breakfast treat or a delightful dessert.Enjoy!
Variations
Alternative Fruits to Use in the Danish
You can change up the fruit in your Danish. Try using apples, berries, or pears. Each fruit gives a new taste. Apples add crunch, while berries bring a sweet-tart flavor. For pears, use ripe ones for the best texture. You can mix fruits too! Combine peaches with blueberries for a fun twist. This way, you can create your favorite flavor each time.
Gluten-Free or Vegan Substitutions
If you need gluten-free options, look for gluten-free crescent roll dough. Many brands have tasty choices that work well. For a vegan version, swap cream cheese for plant-based cream cheese. Use a vegan egg wash or skip it for a golden look. You can also replace sugar with maple syrup or agave for sweetening. These changes let everyone enjoy the Danish!
Flavor Add-ins for Customization
Want to make your Danish even better? Add spices like nutmeg or ginger for warmth. You can mix in a splash of almond extract for a nutty taste. Try adding a dollop of jam on top of the cream cheese too. You can experiment with different flavors! The possibilities are endless, and you can find your perfect combo.
Storage Info
How to Store Leftover Danish
To keep your Peach Cream Cheese Danish fresh, place it in an airtight container. This will help preserve its flavor and texture. You can store it in the fridge for up to three days. Just make sure it is completely cool before sealing it. If you prefer to keep it longer, freezing is a great option.
Best Practices for Reheating
When you want to enjoy your leftover Danish, reheating is simple. Preheat your oven to 350°F (175°C). Place the Danish on a baking sheet for about 10-15 minutes. This will warm it up nicely and keep the pastry crisp. You can also use a microwave if you’re in a hurry, but the oven gives better results.
Freezing Options for Peach Cream Cheese Danish
If you want to freeze the Danish, wrap each piece tightly in plastic wrap. Then, place them in a freezer-safe bag. They can last up to three months in the freezer. When you’re ready to eat, just thaw them in the fridge overnight. Reheat in the oven for the best taste.
FAQs
Can I use canned peaches instead of fresh?
Yes, you can use canned peaches. They save time and are easy to find. Just make sure to drain them well. Canned peaches can be softer than fresh ones. This may change the texture slightly. If you want a firmer bite, fresh peaches are best.
How do I know when the danishes are done baking?
You will know the danishes are done when they turn golden brown. The dough should be puffy and cooked through. You can also check the bottom. It should feel firm and have a slight crunch. If they look undercooked, give them a few more minutes.
Can I prepare the dough ahead of time?
Yes, you can prepare the dough ahead of time. Just keep it covered in the fridge. Make sure to use it within a day or two. If you want to freeze it, roll it out and wrap it tightly. When ready, thaw it in the fridge overnight before using.Enjoy your baking!
You now know how to make a delicious Peach Cream Cheese Danish. We covered key ingredients, step-by-step instructions, and handy tips. You can adjust flavors and even swap out fruits. Remember, storing leftovers properly keeps them fresh. Don’t shy away from experimenting with options like vegan swaps. Making this treat is fun and easy! Enjoy baking and sharing your tasty danish creations!


