Peach Upside Down Cake Irresistible Dessert Recipe

If you love sweet, sticky desserts, you’ll adore this Peach Upside Down Cake! This recipe shines with juicy peaches and a caramel glaze that will leave your taste buds dancing. I’ll guide you through each step, from gathering your ingredients to baking the perfect cake. Whether you’re a baking novice or an experienced chef, I promise you’ll find joy in this delightful treat. Let’s get started on this irresistible dessert!
Why I Love This Recipe
- Delicious Flavor Combination: The sweetness of ripe peaches paired with the caramelized brown sugar creates a mouthwatering flavor that is simply irresistible.
- Easy to Make: This recipe is straightforward and requires minimal preparation, making it perfect for bakers of all skill levels.
- Beautiful Presentation: The upside-down design showcases the peaches beautifully, making it an impressive dessert for guests.
- Perfect for Any Occasion: Whether it’s a summer gathering or a cozy family dinner, this cake is versatile enough to suit any event.
Ingredients
Complete List of Ingredients
To make your Peach Upside Down Cake, gather these fresh ingredients:
- 4 ripe peaches, pitted and sliced
- 1/2 cup unsalted butter, melted
- 3/4 cup brown sugar
- 1 cup all-purpose flour
- 1 teaspoon baking powder
- 1/2 teaspoon baking soda
- 1/4 teaspoon salt
- 1/2 cup granulated sugar
- 2 large eggs
- 1 teaspoon vanilla extract
- 1/2 cup buttermilk
- 1 teaspoon ground cinnamon (optional for extra flavor)
Ingredient Substitutions
If you need swaps for any ingredient, here are some ideas:
- Use coconut oil or margarine instead of butter.
- Replace brown sugar with white sugar for a lighter taste.
- Swap all-purpose flour for almond flour for a gluten-free option.
- You can use yogurt if you don’t have buttermilk on hand. Just mix it with a little water to thin it out.
Fresh vs. Canned Peaches
Fresh peaches bring a juicy flavor to the cake. They have a natural sweetness that shines through when baked. If fresh peaches are out of season, canned peaches are a good alternative. Just make sure to drain them well. Canned peaches can be sweeter, so adjust the sugar in your batter accordingly. Whether you choose fresh or canned, both options can make a delicious cake.

Step-by-Step Instructions
Preparing the Cake Pan
Start by preheating your oven to 350°F (175°C). Grease a 9-inch round cake pan with butter. This step helps the cake slide out easily later. Next, in a small bowl, mix the melted butter and brown sugar. Pour this mixture into the cake pan. Spread it evenly across the bottom. Now, take your sliced peaches and arrange them over the brown sugar mix. Overlap them slightly for a nice design.
Mixing the Dry Ingredients
In a separate mixing bowl, whisk together the flour, baking powder, baking soda, salt, and cinnamon if you want extra flavor. Make sure there are no lumps. This helps the cake rise evenly. Set this bowl aside while you prepare the wet ingredients.
Combining Wet Ingredients and Baking
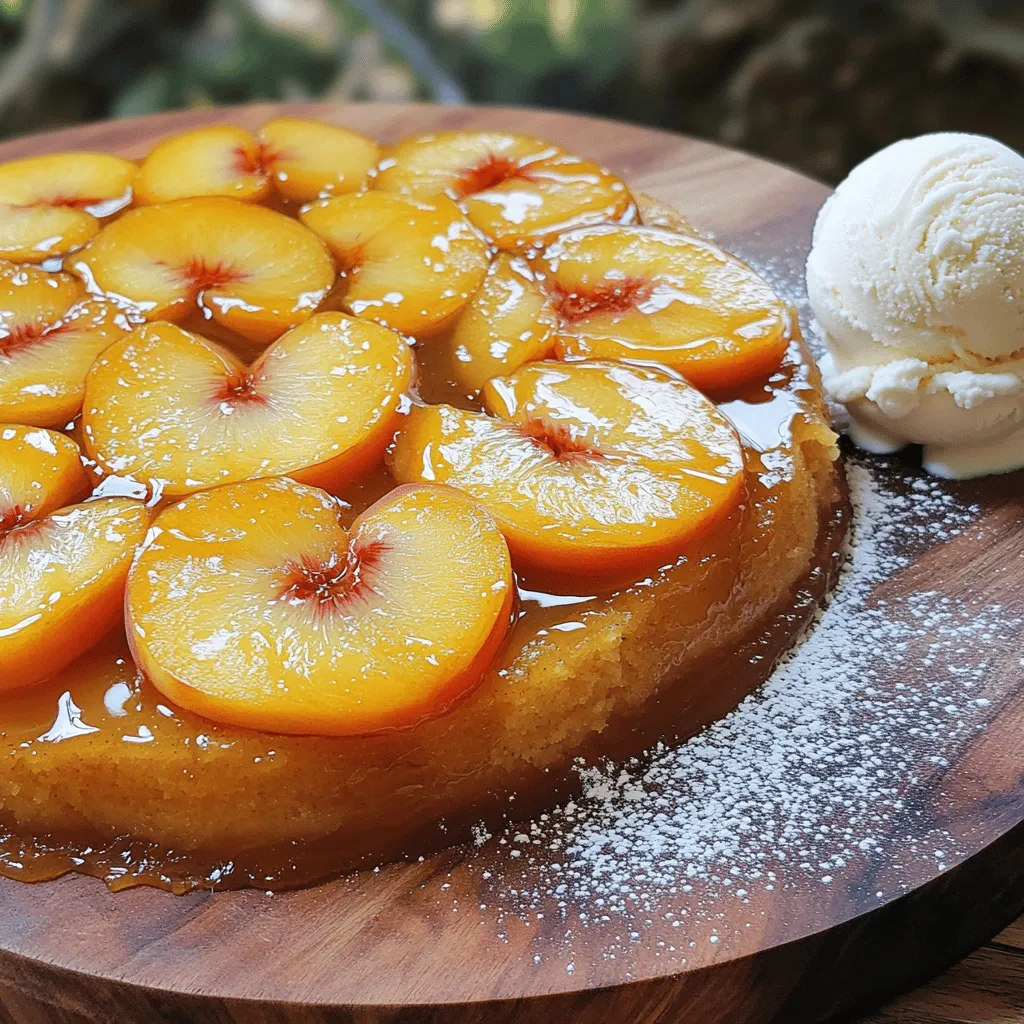
In another bowl, beat the granulated sugar and melted butter until it’s creamy. Add the eggs one at a time, mixing well after each addition. Then stir in the vanilla extract. Gradually add the dry mixture to the wet mix, alternating with buttermilk. Mix until just combined; do not overmix. Pour this cake batter over the arranged peaches in the pan, smoothing it out. Bake it in your preheated oven for 30-35 minutes. Check for doneness with a toothpick. Once done, cool the cake for about 10 minutes. Invert it onto a serving plate to show off those peaches. Let it cool completely before slicing. Enjoy this delightful peach upside down cake!
Pro Tips
- Choose Ripe Peaches: Make sure to select peaches that are slightly soft to the touch and fragrant for the best flavor and texture in your cake.
- Prevent Sticking: To avoid the cake sticking to the pan, ensure that you grease the pan thoroughly with butter and consider using parchment paper on the bottom.
- Cool Before Serving: Allow the cake to cool completely before slicing. This helps maintain its structure and makes for cleaner slices.
- Flavor Variations: For an extra flavor boost, try adding a splash of almond extract to the batter or a sprinkle of nutmeg along with cinnamon.
Tips & Tricks
Achieving the Perfect Caramel Topping
To make the caramel topping perfect, start with unsalted butter. Melt it slowly. Mix it well with brown sugar. This creates a smooth blend. Pour the mixture into the cake pan, spreading it evenly. This step is key for a great look and taste. Make sure the peaches sit on it nicely. They should soak up that sweet flavor while baking.
Avoiding Common Baking Mistakes
Many bakers make mistakes that affect the cake. First, always measure your ingredients carefully. Too much flour can make your cake dense. Also, don’t skip the buttermilk. It adds moisture and helps the cake rise. Be gentle when mixing the batter. Overmixing can lead to a tough cake. Finally, don’t open the oven door too soon. This can cause the cake to sink in the middle.
How to Test for Doneness
To check if your cake is done, use a toothpick. Insert it into the center of the cake. If it comes out clean, the cake is ready. If there’s batter on the toothpick, bake it a bit longer. Remember to keep an eye on the time too. Typically, your cake will bake for 30 to 35 minutes. Once done, let it cool briefly before flipping it over. This helps keep the caramel intact.

Variations
Adding Nuts or Other Fruits
You can add a fun twist to your peach upside down cake by including nuts or other fruits. Walnuts or pecans add a nice crunch. Just sprinkle them over the brown sugar and butter mix before adding the peaches. If you want to mix it up, you can use berries, like blueberries or raspberries. They add color and a tart flavor that pairs well with sweet peaches.
Gluten-Free Version
If you need a gluten-free option, it’s easy to adapt this recipe. Simply swap the all-purpose flour for a gluten-free flour blend. Make sure the blend has a good mix of flours and starches for the best texture. You might also want to add a bit of xanthan gum to help with the cake’s structure. This way, everyone can enjoy this delicious dessert!
Flavor Enhancements (e.g., Spices)
You can elevate the flavor with some spices. Ground cinnamon is a great choice, but you can also try nutmeg or ginger. Just add a teaspoon to the dry ingredients. For a more complex taste, consider adding a splash of almond extract or a dash of lemon zest. These little changes make a big difference and keep your cake exciting.
Storage Info
Best Practices for Storing Cake
To keep your Peach Upside Down Cake fresh, store it in an airtight container. Place it at room temperature if you plan to eat it within two days. If longer, refrigerate it to extend its shelf life. Make sure to wrap it tightly with plastic wrap to prevent it from drying out.
How to Freeze Peach Upside Down Cake
You can freeze this cake for up to three months. First, let the cake cool completely. Then, slice it into individual pieces for easy serving. Wrap each slice in plastic wrap and then in aluminum foil. Label the packages with a date. When you’re ready to eat, simply thaw the slices in the fridge overnight.
Reheating Tips
To reheat your cake, preheat your oven to 350°F (175°C). Place the cake slices on a baking sheet. Warm them in the oven for about 10-15 minutes. You can also microwave individual slices for about 30-45 seconds. Enjoy the warm, delicious flavors, just like fresh out of the oven.
FAQs
How to Make Peach Upside Down Cake Without Buttermilk?
You can make peach upside down cake without buttermilk. Substitute buttermilk with regular milk. Add one teaspoon of vinegar or lemon juice to the milk. Let it sit for five minutes. This will mimic buttermilk’s tangy flavor. Use this mixture in the recipe as you would the buttermilk.
Can I Use Frozen Peaches for This Recipe?
Yes, you can use frozen peaches. Just thaw them before using. Pat them dry to remove excess moisture. This helps keep the cake from getting soggy. Frozen peaches may be softer than fresh ones. The taste will still be delicious.
What is the Best Way to Serve Peach Upside Down Cake?
Serve peach upside down cake warm or at room temperature. Dust it lightly with powdered sugar. A scoop of vanilla ice cream pairs well with it. The creaminess balances the sweetness of the peaches. You can also serve it with whipped cream. Enjoy your delightful dessert!
This blog post guides you through making a peach upside-down cake. We covered key ingredients, substitutions, and the difference between fresh and canned peaches. The step-by-step instructions make mixing and baking easy. Tips helped you perfect the caramel, avoid common mistakes, and check for doneness. You also learned variations for flavor and texture. Finally, we shared storage best practices and answered common questions.
Baking is fun and rewarding. Enjoy this delightful treat and share it with others!

Peach Upside Down Cake
Ingredients
4 ripe peaches, pitted and sliced
1/2 cup unsalted butter, melted
3/4 cup brown sugar
1 cup all-purpose flour
1 teaspoon baking powder
1/2 teaspoon baking soda
1/4 teaspoon salt
1/2 cup granulated sugar
2 large eggs
1 teaspoon vanilla extract
1/2 cup buttermilk
1 teaspoon ground cinnamon (optional for extra flavor)
Instructions
Preheat your oven to 350°F (175°C). Grease a 9-inch round cake pan with butter and set aside.
In a small bowl, combine the melted butter and brown sugar. Pour this mixture into the prepared cake pan, spreading it evenly across the bottom.
Arrange the sliced peaches over the brown sugar mixture, overlapping them slightly to create a beautiful design. Set aside.
In a mixing bowl, whisk together the flour, baking powder, baking soda, salt, and ground cinnamon (if using).
In another bowl, beat the granulated sugar and melted butter until creamy. Add the eggs one at a time, mixing well after each addition. Stir in the vanilla extract.
Gradually add the dry ingredients to the butter-sugar mixture, alternating with the buttermilk. Mix until just combined, being careful not to overmix.
Pour the cake batter over the arranged peaches in the cake pan, smoothing it out evenly.
Bake in the preheated oven for 30-35 minutes, or until a toothpick inserted in the center comes out clean.
Once baked, remove the cake from the oven and allow it to cool for about 10 minutes. Carefully invert the cake onto a serving plate while it’s still warm to reveal the peaches.
Let it cool completely before slicing to serve.
Prep Time: 15 minutes | Total Time: 50 minutes | Servings: 8
– Presentation Tips: Serve warm or at room temperature, dusted with powdered sugar and accompanied by a scoop of vanilla ice cream for a delightful dessert experience.

Peach Upside Down Cake
Ingredients
- 4 pieces ripe peaches, pitted and sliced
- 1/2 cup unsalted butter, melted
- 3/4 cup brown sugar
- 1 cup all-purpose flour
- 1 teaspoon baking powder
- 1/2 teaspoon baking soda
- 1/4 teaspoon salt
- 1/2 cup granulated sugar
- 2 large eggs
- 1 teaspoon vanilla extract
- 1/2 cup buttermilk
- 1 teaspoon ground cinnamon (optional for extra flavor)
Instructions
- Preheat your oven to 350°F (175°C). Grease a 9-inch round cake pan with butter and set aside.
- In a small bowl, combine the melted butter and brown sugar. Pour this mixture into the prepared cake pan, spreading it evenly across the bottom.
- Arrange the sliced peaches over the brown sugar mixture, overlapping them slightly to create a beautiful design. Set aside.
- In a mixing bowl, whisk together the flour, baking powder, baking soda, salt, and ground cinnamon (if using).
- In another bowl, beat the granulated sugar and melted butter until creamy. Add the eggs one at a time, mixing well after each addition. Stir in the vanilla extract.
- Gradually add the dry ingredients to the butter-sugar mixture, alternating with the buttermilk. Mix until just combined, being careful not to overmix.
- Pour the cake batter over the arranged peaches in the cake pan, smoothing it out evenly.
- Bake in the preheated oven for 30-35 minutes, or until a toothpick inserted in the center comes out clean.
- Once baked, remove the cake from the oven and allow it to cool for about 10 minutes. Carefully invert the cake onto a serving plate while it’s still warm to reveal the peaches.
- Let it cool completely before slicing to serve.

![To make these delicious pancakes, gather the following ingredients: - 1 cup all-purpose flour - 1 tablespoon baking powder - 1 teaspoon ground cinnamon - 1/2 teaspoon ground nutmeg - 1/4 teaspoon salt - 1 cup pumpkin puree (canned or fresh) - 1 cup milk (or non-dairy alternative) - 1 large egg - 2 tablespoons brown sugar - 1 teaspoon vanilla extract - 2 tablespoons melted butter (or coconut oil) - For the cinnamon swirl: - 2 tablespoons brown sugar - 1 teaspoon ground cinnamon - 1 tablespoon melted butter You can swap some ingredients for different options. Here are a few ideas: - For all-purpose flour, try whole wheat flour for a heartier pancake. - If you want a dairy-free option, use almond milk or oat milk instead of regular milk. - Replace the large egg with a flax egg (1 tablespoon ground flaxseed mixed with 2.5 tablespoons water). - Coconut oil can replace butter for a dairy-free pancake. Using fresh pumpkin can give your pancakes a vibrant taste. Fresh pumpkin has a rich texture and a sweet flavor. However, canned pumpkin works well too. It is convenient and saves time. Canned pumpkin is often cooked and pureed, making it ready to use. Both options can provide the delicious taste you want. So, choose based on your time and preference. To make Cinnamon Swirl Pumpkin Pancakes, start by gathering your ingredients. In a large bowl, whisk together the flour, baking powder, ground cinnamon, nutmeg, and salt. This helps the dry ingredients mix well. In another bowl, blend the pumpkin puree, milk, egg, brown sugar, vanilla extract, and melted butter until smooth. Pour this mixture into the dry ingredients and stir gently. Remember, a few lumps are okay; overmixing can make pancakes tough. Next, prepare the cinnamon swirl. In a small bowl, mix brown sugar, ground cinnamon, and melted butter until it forms a paste. Preheat your skillet over medium heat. Lightly grease it with cooking spray or butter. For each pancake, pour about 1/4 cup of batter onto the skillet. Use the back of a spoon to create a swirl with the cinnamon mix on top of the batter. Cook the pancakes until bubbles form on the surface, about 2-3 minutes. Then, carefully flip them and cook for another 1-2 minutes until golden brown. Repeat this process until you finish all the batter and swirl. These steps will give you fluffy and flavorful pancakes. To achieve the right pancake texture, keep these tips in mind: - Use fresh ingredients. Fresh baking powder gives better rise. - Avoid overmixing the batter. This keeps pancakes light and fluffy. - Let the batter rest for a few minutes. This helps the gluten relax. - Adjust your heat. If pancakes brown too quickly, reduce the heat. These small adjustments can make a big difference in your pancake outcome. The cinnamon swirl is what makes these pancakes special. Here’s how to incorporate it perfectly: - When you pour the batter, do it in a circular motion. This helps the swirl blend nicely. - Use a spoon to create a gentle spiral. Don’t press too hard; you want a light touch. - If you have leftover swirl, drizzle it on top when serving. This will enhance the flavor and visual appeal of your pancakes. If you want more tips or the full recipe, check out the details I provided earlier. Enjoy your cooking! To make your pancakes fluffy, use a light hand when mixing. Overmixing can lead to tough pancakes. Mix until just combined, leaving some lumps in the batter. Also, let the batter rest for a few minutes before cooking. This helps the baking powder to activate and creates a lighter texture. Use a non-stick skillet or griddle for even cooking, and keep the heat at medium. This way, you avoid burning the outside while the inside remains raw. If you want thicker pancakes, add a bit more flour. For thinner pancakes, add a little milk. You can also change the spices to match your taste. Love nutmeg? Add a bit more! Prefer a sweeter pancake? Increase the brown sugar slightly. Always taste your batter before cooking to get it just right. You can even mix in chocolate chips or nuts for extra flavor. Serve your pancakes warm with maple syrup or honey. A dollop of whipped cream adds a nice touch, too. For a fun twist, sprinkle some chopped pecans or walnuts on top. You can also add a sprinkle of cinnamon for added warmth. If you want to make it a full breakfast, serve alongside crispy bacon or fresh fruit. These pancakes also pair well with a cup of hot coffee or chai tea. For the full recipe, check out the complete instructions above. {{image_2}} You can make these pancakes gluten-free. Swap the all-purpose flour for a gluten-free blend. Look for one that works well in baking. You can also use almond flour or oat flour. Just keep in mind that the texture may change slightly. Adding a little xanthan gum helps to bind the batter. This keeps your pancakes light and fluffy. To make this recipe vegan, use a non-dairy milk like almond or oat milk. Replace the egg with a flax egg. Just mix one tablespoon of ground flaxseed with three tablespoons of water. Let it sit for five minutes to thicken. You can also use vegan butter or coconut oil in place of regular butter. These swaps keep the pancakes rich and tasty without any dairy or eggs. Spice it up! You can add different flavors to your pancakes. Try adding a dash of ginger or allspice for a warm kick. Chopped nuts, like walnuts or pecans, add a nice crunch. You can also fold in chocolate chips for a sweet treat. For a fruity twist, add blueberries or cranberries. Each variation gives a new taste to your pancakes. These ideas let you customize your breakfast to fit your mood. For the full recipe, check out the *Full Recipe* section. After you enjoy your cinnamon swirl pumpkin pancakes, store leftovers properly. Let the pancakes cool to room temperature. Then, stack them with parchment paper in between each. This helps prevent them from sticking. Place the stack in an airtight container or wrap them tightly in plastic wrap. Keep them in the fridge for up to three days. If you want to save pancakes for later, freezing is a great option. Place cooled pancakes in a single layer on a baking sheet. Freeze them for about an hour. Once frozen, transfer them to a freezer-safe bag. This prevents them from sticking together. They can last up to two months in the freezer. To reheat, you can use a microwave or a toaster oven. For the microwave, heat them for about 30 seconds. Check if they are warm enough. For the toaster oven, set it to a low temperature and heat until warmed through. Pancakes in the fridge should be eaten within three days. If they start to smell sour or look dry, it’s time to toss them. Frozen pancakes can last up to two months. Be sure to check for freezer burn or ice crystals before eating. If they seem off, it’s best to err on the side of caution. Enjoy your delicious cinnamon swirl pumpkin pancakes at their best! For the full recipe, check out the [Full Recipe]. Yes, you can make the batter ahead of time. Mix your dry and wet ingredients separately, then store them in the fridge. Just remember to combine them when you're ready to cook. This makes your mornings easier and faster! You can use several alternatives to milk. Almond milk, soy milk, or oat milk work well. If you want a creamier taste, try coconut milk. Each option adds a unique flavor to your pancakes. Look for bubbles on the surface of the pancakes. When bubbles form, it’s time to flip them. Cook until they turn golden brown on both sides. A good pancake should feel firm but springy to the touch. Enjoy your cooking! For the full recipe, check out the details above. In this blog post, we explored how to make delicious cinnamon swirl pumpkin pancakes. We covered the essential ingredients and suggested alternatives, like fresh versus canned pumpkin. You learned step-by-step instructions for perfect pancakes and tips for cooking and serving. We also shared variations, including gluten-free and vegan options. Finally, we went over storage tips to keep leftovers fresh. Enjoy making these pancakes! They’re easy, tasty, and perfect for any meal.](https://dailydishlab.com/wp-content/uploads/2025/07/40c25aa9-222c-4f53-9c69-0bb881f505c1-768x768.webp)

![- Fresh strawberries - Semi-sweet chocolate chips - Coconut oil for smooth melting - Crushed nuts (almonds or hazelnuts) - Colorful sprinkles - Lollipop sticks - Microwave-safe bowl - Parchment paper To make delicious chocolate-covered strawberry pops, you need a few key items. Start with fresh strawberries. Choose ripe, firm ones for the best taste. Next, grab semi-sweet chocolate chips. They melt well and add a rich flavor. Also, use coconut oil. This helps the chocolate melt smoothly and stick to the strawberries. You can add fun toppings to make your pops even better. Try crushed nuts, like almonds or hazelnuts, for a crunchy bite. Colorful sprinkles also add a nice touch. They make the pops look festive and fun. For the tools, have lollipop sticks ready. They help you hold the strawberries while dipping. Use a microwave-safe bowl for melting the chocolate. Finally, get parchment paper. It keeps your pops from sticking as they cool. With these ingredients and tools, you're all set to create a tasty delight. For the full recipe, check the details above. First, wash the strawberries gently. Make sure they are dry. Any water will stop the chocolate from sticking. You can use a paper towel to help. Next, take the lollipop sticks. Push one stick into the stem end of each strawberry. Aim to push it about halfway in. This gives you a nice handle for dipping. Now, let’s melt the chocolate. In a microwave-safe bowl, mix the chocolate chips with coconut oil. The coconut oil helps the chocolate melt smoothly. Microwave this mix in 30-second bursts. Stir after each burst until it is fully melted. Be careful not to overheat it, or the chocolate can burn. Hold the strawberry by the stick. Dip it into the melted chocolate. Make sure to cover it fully. Let any extra chocolate drip off. After dipping, it’s time to add toppings. While the chocolate is still wet, sprinkle on crushed nuts or colorful sprinkles. This helps them stick well. Finally, place the dipped strawberries upright in a container or on parchment paper. Let them sit until the chocolate hardens. This usually takes about 15-20 minutes at room temperature. If you’re in a hurry, the fridge works too; just chill them for 10 minutes. To get a smooth coat on your pops, always add coconut oil. Coconut oil helps the chocolate melt evenly. This helps create a shiny finish that looks great. If you don't have coconut oil, you can use vegetable oil. Just keep in mind that it may not shine as much. When you melt the chocolate, do it slowly. Use short bursts in the microwave. Stir well after each burst to keep the texture just right. Making your chocolate-covered strawberry pops look fun is easy. Use colorful lollipop holders to make them pop at parties. Consider sticking them in a piece of foam or a pretty container. You can also arrange them in a fun shape, like a heart. Another idea is to drizzle white chocolate on top for a more stylish look. These small touches make your dessert stand out. Watch out for moisture! If your strawberries are wet, the chocolate will not stick. Always dry them well before dipping. Another mistake is overheating the chocolate. If it gets too hot, it can clump. This ruins the smooth finish you want. Always use a low heat and stir often to prevent this. {{image_2}} You can switch up the chocolate for your pops. Dark chocolate gives a rich taste. Milk chocolate is sweet and creamy. White chocolate adds a fun twist with its sweet flavor. You can also add flavor. Try a drop of peppermint extract for a cool touch. Vanilla extract brings a warm, sweet note to the mix. Get creative with toppings! Coconut flakes add a tropical flair. Mini chocolate chips bring extra sweetness and crunch. You can also use crushed nuts for a nutty bite. Rainbow sprinkles make the pops fun and colorful. Just make sure to add them right after dipping the strawberry. Make your pops party-ready! For holidays, decorate with colors that match the theme. Use red and green for Christmas or pastel colors for Easter. You can even customize them for birthdays. Just add sprinkles or edible glitter to match the party theme. These small touches make your pops stand out! For the complete recipe, check out the [Full Recipe]. Store chocolate-covered strawberry pops in a cool, dry place. The ideal temperature is between 60°F and 70°F. Keep them away from direct sunlight. This helps keep the chocolate smooth and shiny. To stack the pops, use a container with dividers. Place parchment paper between layers. This prevents them from sticking to each other. If you don't have dividers, lay them flat on a tray lined with parchment paper. For the best taste, eat the pops within two days. After that, the strawberries may lose their freshness. You can freeze chocolate-covered strawberry pops. Wrap them well in plastic wrap, then place them in a freezer bag. They can last up to a month in the freezer. To enjoy, thaw them in the fridge. Avoid thawing at room temperature. This keeps the chocolate from getting too soft. If you have leftover chocolate, pour it into molds. You can make chocolate bites or bars. This is a fun way to enjoy extra chocolate. For leftover strawberries, try making a smoothie. Blend them with yogurt or milk. You can also slice them for topping on pancakes or oatmeal. This way, nothing goes to waste, and you enjoy more treats. You can use frozen strawberries, but they change the texture. They may become mushy when thawed. This can affect how well the chocolate sticks to them. Fresh strawberries hold up better, ensuring a firm bite. If you choose frozen, let them thaw completely and dry them well before dipping. To make the chocolate smoother, you can add coconut oil during melting. This helps create a nice, glossy finish. Melt the chocolate in short bursts in the microwave, stirring well in between. Avoid overheating, as this can make the chocolate clumpy. Stirring helps keep the heat even, giving you a smooth result. Yes, there are vegan options! You can use dairy-free chocolate chips for a vegan treat. Look for brands that use plant-based ingredients. For toppings, consider nuts, seeds, or dairy-free sprinkles. This way, you can enjoy chocolate-covered strawberry pops while sticking to a vegan diet. We explored how to create delicious chocolate-covered strawberry pops, from essential ingredients to creative variations. Remember, fresh strawberries, coconut oil, and careful melting are key. Avoid common mistakes like moisture and overheating for the best results. With these tips, you can impress at any event. Enjoy experimenting with toppings and flavors, and get creative in your presentations. These treats are not just tasty; they can also be fun to make and share. Happy dipping!](https://dailydishlab.com/wp-content/uploads/2025/07/28782691-e2ef-4ba1-b328-d9019563a0b5-768x768.webp)

![To make the best ever blueberry pancakes, you'll need some simple and fresh ingredients. Each one plays an important role in making these pancakes fluffy and delicious. - Overview of fresh blueberries Fresh blueberries are the star of this dish. They add natural sweetness and a lovely burst of flavor. Look for plump, firm berries without any wrinkles. Rinse them gently before using. - Essential dry ingredients You will need: - 1 cup all-purpose flour - 2 tablespoons sugar - 2 teaspoons baking powder - 1/2 teaspoon baking soda - 1/4 teaspoon salt These ingredients help create the perfect pancake base. The baking powder and baking soda give the pancakes their light, airy texture. - Important wet ingredients The wet ingredients are just as crucial: - 1 cup buttermilk (you can use milk with vinegar as a substitute) - 1 large egg - 2 tablespoons melted butter (plus some for cooking) - Zest of 1 lemon - 1 teaspoon vanilla extract These help bind the mixture and add flavor. Buttermilk makes the pancakes tender and rich. You can find the full recipe at the end of this article. Enjoy making these delightful pancakes! 1. Mixing dry ingredients: Start by sifting together the flour, sugar, baking powder, baking soda, and salt in a large bowl. This step helps to break up any lumps and ensures the ingredients blend well. 2. Combining wet ingredients: In a separate bowl, whisk the buttermilk, egg, melted butter, lemon zest, and vanilla extract. Whisk until everything is smooth and well-mixed. The lemon zest adds a fresh taste. 3. Folding in blueberries: Pour the wet mix into the dry mix. Gently fold the two together. Remember, do not overmix! A few lumps are okay. Now, fold in the fresh blueberries. Save a few for garnishing later. 1. Heating the pan: Heat a non-stick skillet or griddle over medium heat. Add a little melted butter to coat the surface. This helps the pancakes cook evenly and prevents sticking. 2. Pouring the batter: Use a 1/4 cup measure to pour the batter onto the skillet. Space them out to give each pancake room to spread as they cook. 3. Checking for doneness: Cook the pancakes until bubbles form on the surface, about 2-3 minutes. Flip them and cook for another 1-2 minutes until golden brown. This ensures a fluffy inside and a nice crust outside. 1. Plating the pancakes: Stack the pancakes neatly on a plate. A tall stack looks impressive and inviting. 2. Topping ideas: Top with additional blueberries, a drizzle of maple syrup, or a dollop of whipped cream. These toppings add flavor and make the dish more fun. 3. Presentation tips: For a beautiful finish, sprinkle some lemon zest on top. It adds color and a lovely aroma. Enjoy your best ever blueberry pancakes! Check the [Full Recipe] for more details. When you pick blueberries, fresh is best. Fresh blueberries are plump and juicy. They burst with flavor in each bite. Frozen blueberries can work too, but they may be mushy. If you want the best taste, choose fresh. To find ripe blueberries, look for a deep blue color. Avoid any that are red or green. Check for firmness; soft berries may be overripe. Smell them too, as ripe blueberries have a sweet scent. Store your blueberries in the fridge. Keep them in their original container. This helps them stay fresh for longer. If you wash them, dry them well before storing. Mixing the batter is key for fluffy pancakes. Avoid overmixing. Stir just enough to combine the wet and dry ingredients. Some lumps are okay! Overmixing makes pancakes tough, not fluffy. For fluffier pancakes, use buttermilk. The acidity helps create air bubbles. You can also add baking powder for extra lift. After mixing, let the batter rest for about 5 minutes. This allows the ingredients to hydrate. Resting makes your pancakes rise better. Choose a non-stick skillet or griddle for cooking. These surfaces help prevent sticking. Make sure to heat it over medium heat. Too hot can burn your pancakes, while too low can make them soggy. Use a little melted butter on the pan to coat it. This adds flavor and helps with browning. Watch for common pitfalls. Don’t flip too soon; wait for bubbles to form. If you flip too early, your pancakes may be raw inside. Flip only once for the best texture. {{image_2}} To make your blueberry pancakes even better, try adding some spices. A pinch of cinnamon or nutmeg can warm up the flavor. You can also add lemon or orange zest for a bright, fresh taste. Using different extracts like almond or coconut can add a unique twist too. These small changes can change your pancake game completely. For those who need to avoid gluten, you can use gluten-free flour options. These flours work well and keep the pancakes fluffy. If you want to make your pancakes vegan, use substitutes like flax eggs and plant-based milk. You can also reduce sugar by using mashed bananas or applesauce. These swaps keep your pancakes tasty while meeting dietary needs. Pancakes are fun to serve in many ways. Stack them high with a colorful fruit compote on top. You can add nuts or even chocolate chips for extra flavor. If you want something different, try savory pancake variations. Adding cheese or herbs can turn your sweet pancakes into a hearty meal. Enjoy exploring all these tasty options! To keep your pancakes fresh, store them properly. Place leftover pancakes in an airtight container. If you plan to eat them soon, refrigerate them. - Refrigeration: Leftover pancakes last up to 3 days in the fridge. Make sure they are cool before sealing the container. This helps prevent sogginess. - Freezing Guidelines: For longer storage, freeze pancakes. Stack them with parchment paper in between each one. Use a freezer-safe bag or container. They can last up to 2 months in the freezer. When you’re ready to enjoy your pancakes again, reheating is simple. Here are the best methods: - Best Methods for Reheating: Use a microwave or a skillet. For the microwave, heat on medium power for 20-30 seconds. If using a skillet, warm them on low heat for a few minutes until hot. - Tips for Maintaining Texture: To keep pancakes fluffy, cover them with a damp paper towel in the microwave. This helps steam them. If using a skillet, add a little butter before reheating. Knowing how long your pancakes last ensures you enjoy them at their best. - Shelf Life in the Fridge: Pancakes keep well for up to 3 days in the fridge. After that, they may dry out or lose flavor. - Shelf Life in the Freezer: In the freezer, pancakes last up to 2 months. For best taste, eat them within the first month. To make blueberry pancakes from scratch, follow these steps: 1. Mix Dry Ingredients: Start by sifting together 1 cup of all-purpose flour, 2 tablespoons of sugar, 2 teaspoons of baking powder, 1/2 teaspoon of baking soda, and 1/4 teaspoon of salt in a large bowl. 2. Combine Wet Ingredients: In another bowl, whisk together 1 cup of buttermilk, 1 large egg, 2 tablespoons of melted butter, the zest of 1 lemon, and 1 teaspoon of vanilla extract until smooth. 3. Combine Mixtures: Pour the wet ingredients into the dry mixture. Gently fold until just mixed. A few lumps are fine, so don't overdo it. 4. Add Blueberries: Carefully fold in 1 cup of fresh blueberries. Save some for the top later. 5. Heat the Pan: Heat a non-stick skillet over medium heat. Add a bit of melted butter to coat it. 6. Cook Pancakes: Pour 1/4 cup of batter for each pancake. Cook until bubbles form, then flip and cook until golden. 7. Serve: Stack the pancakes, add more blueberries, and drizzle with maple syrup or honey. Yes, you can use frozen blueberries. Here are some tips: - Do not thaw the blueberries before using them. This helps keep them intact during cooking. - Add them directly to the batter. This way, they will stay cold and firm. - You might need to cook the pancakes a little longer to ensure they are done. Pancakes stick for a few reasons: - The pan may not be hot enough. Make sure your skillet is at medium heat. - You might not be using enough butter. Add more butter to the pan before cooking. - Using a non-stick pan is key. If your pan isn’t non-stick, consider switching. Here are some tasty ideas to serve with pancakes: - Maple syrup is a classic choice. - Fresh fruit like sliced bananas or strawberries adds color. - A dollop of whipped cream makes it extra special. - You can also try yogurt for a creamy texture. Yes, you can adapt this recipe for gluten-free pancakes. Use gluten-free flour blends that substitute for all-purpose flour. - Look for blends that include xanthan gum for better texture. - You can also use almond flour or coconut flour with some adjustments to liquid. To keep your pancakes light and fluffy, follow these tips: - Avoid overmixing the batter; mix until just combined. - Let the batter rest for a few minutes. This helps with texture. - Ensure you use fresh baking powder for the best rise. This blog post covered everything you need for perfect blueberry pancakes. We explored key ingredients, step-by-step instructions, and tips for the best texture. You learned how to enhance flavors and adapt the recipe for dietary needs. We also discussed storing and reheating leftover pancakes. With these insights, you can create fluffy, delicious pancakes that everyone will love. Enjoy making them again and again!](https://dailydishlab.com/wp-content/uploads/2025/06/88cf7048-30d4-446e-9952-44c38fb788a9-768x768.webp)
