Tricolored Pasta Salad Fresh and Flavorful Delight

Are you ready to elevate your next meal with a burst of color and flavor? Tricolored Pasta Salad is a fresh and tasty delight that’s simple to make. With vibrant ingredients and a zesty dressing, this dish will impress at any gathering. Whether you want a quick lunch or a side for dinner, this salad fits the bill. Let’s dive into how to whip up this colorful treat!
Ingredients
Main Ingredients for Tricolored Pasta Salad
- 2 cups tricolored rotini pasta
- 1 cup cherry tomatoes, halved
- 1 cup cucumber, diced
- 1/2 cup black olives, sliced
- 1/2 cup feta cheese, crumbled
- 1/4 cup red onion, finely chopped
- 1/4 cup fresh basil, chopped
Dressing Ingredients
- 1/4 cup extra virgin olive oil
- 2 tablespoons red wine vinegar (or apple cider vinegar)
- 1 teaspoon garlic powder
- Salt and freshly ground black pepper to taste
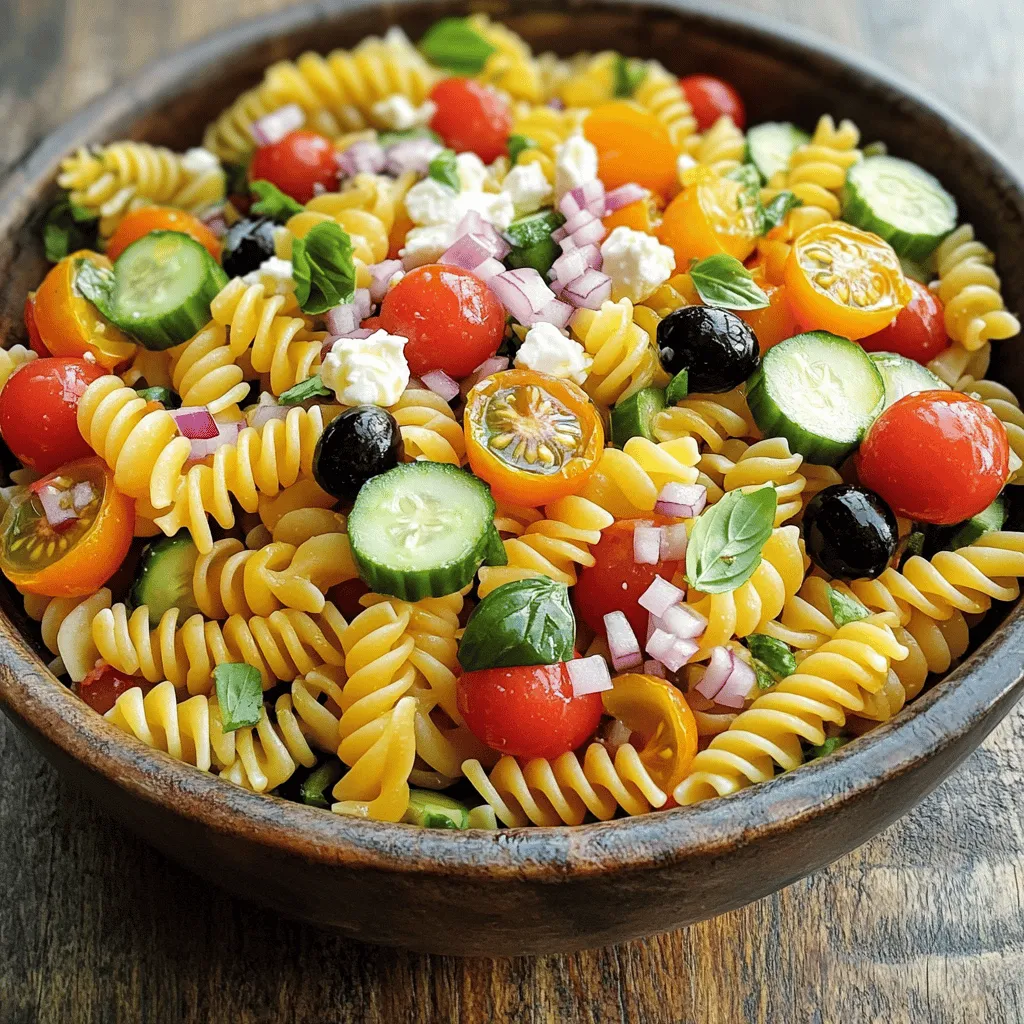
Tricolored pasta salad bursts with bright flavors and colors. Each ingredient adds a unique taste. The rotini pasta gives a fun twist. I love using cherry tomatoes for their sweetness. Cucumbers add crunch, while olives bring a salty bite. Feta cheese adds creaminess, and fresh basil gives a nice aroma.
The dressing is simple but key. It blends olive oil, vinegar, and garlic for a zesty kick. A touch of salt and pepper enhances the flavors perfectly. I like to whisk it until it’s smooth and creamy.It’s easy to follow, so anyone can make this dish! Enjoy every vibrant bite of this fresh and flavorful delight.
Step-by-Step Instructions
Cooking the Pasta
- Fill a large pot with water and add salt.
- Bring the water to a boil.
- Add the tricolored rotini and cook for 8-10 minutes.
- Test the pasta for doneness; it should be al dente.
- Drain the pasta in a colander and rinse under cold water.
Preparing the Vegetables
- While the pasta cooks, prepare your veggies.
- Halve the cherry tomatoes into two pieces.
- Dice the cucumber into small cubes.
- Chop the fresh herbs, like basil, finely.
Making the Dressing
- In a small bowl, combine olive oil and vinegar.
- Add garlic powder, salt, and pepper.
- Whisk the mixture until it becomes creamy.
Combining Ingredients
- In a large bowl, mix the cooled pasta with the vegetables.
- Add the halved tomatoes, diced cucumber, and chopped herbs.
- Ensure everything is evenly mixed for great flavor.
Dressing the Salad
- Drizzle the dressing over the pasta and veggies.
- Gently toss everything to coat without breaking the pasta.
Chilling and Serving
- Cover the salad with plastic wrap or a lid.
- Refrigerate for at least 30 minutes to blend flavors.
- Serve chilled or at room temperature for a fresh taste.
This Tricolored Pasta Salad is a vibrant dish that brings summer to your table.Enjoy!
Tips & Tricks
Perfecting the Pasta
To make great tricolored pasta, cook it until it is al dente. This means it should be firm to the bite. Start by boiling salted water in a large pot. Add your pasta and cook it for 8 to 10 minutes, following the package’s instructions. After cooking, drain the pasta in a colander. Rinse it under cold water. This stops the cooking process and cools it down quickly.
Flavor Enhancements
Want to make your salad heartier? Add protein like grilled chicken or shrimp. These add great flavor and fill you up. You can also toss in more vegetables. Try bell peppers, carrots, or spinach. They add crunch and color.
Presentation Tips
Serving your salad nicely makes it even more appealing. Use a large, shallow bowl to show off those vibrant colors. Garnish with fresh basil leaves. This adds a pop of green and a lovely aroma. You can also sprinkle extra feta cheese on top for a tasty touch.
{{image_4}}
Variations
Ingredient Substitutions
If you want to change up your tricolored pasta salad, try using different ingredients. For feta cheese, you can use goat cheese or mozzarella. Both add a nice creaminess. If you want a dairy-free option, try avocado.
You can also switch up the pasta. While I love tricolored rotini, you can use penne, farfalle, or even whole wheat pasta. Each shape adds its own fun twist and texture to the salad.
Dressing Variations
The dressing can change the whole flavor of your salad. You can try a lemon vinaigrette for a bright taste. A balsamic glaze adds sweetness. You can even use a ranch or Italian dressing for a different flavor.
You can choose between store-bought or homemade dressing. Store-bought is quick and easy, while homemade gives you control over flavors. Making it yourself is a fun way to customize your salad.
Seasonal Adaptations
You can adapt this salad to fit the seasons. In summer, add fresh corn or bell peppers for a crunchy bite. You can also toss in sliced peaches for a sweet touch.
In winter, use hearty vegetables like roasted sweet potatoes or Brussels sprouts. These additions make the salad warm and filling. Each season provides fresh options to keep your salad exciting!
Storage Info
How to Store Leftovers
After enjoying your tricolored pasta salad, store any leftovers in the fridge. Use a clean, airtight container to keep moisture out. This helps the salad stay fresh and tasty. Properly stored, your pasta salad lasts for about 3 to 5 days. Check for any signs of spoilage before eating.
Freezing Options
Can you freeze pasta salad? Yes, you can freeze it if you have extra. However, be aware that the texture may change when thawed. To freeze, place the salad in a freezer-safe container. Make sure to leave some space at the top, as it may expand.
For thawing, put the container in the fridge overnight. This helps keep the texture better. Serve it cold or at room temperature after thawing.
Reheating Guidelines
When should you reheat pasta salad? I recommend serving it cold or at room temperature. If you prefer it warm, do so gently. Use a microwave on low heat and stir often. This helps maintain the texture of the pasta and veggies. Avoid cooking it too long, or it may become mushy.
FAQs
Can I make Tricolored Pasta Salad ahead of time?
Yes, you can make this salad ahead of time. I recommend preparing it a few hours before serving. This allows the flavors to blend well. When you make it early, store it in the fridge. Just remember to cover it tightly to keep it fresh.
What other ingredients can I add to the salad?
You can boost nutrition by adding more veggies. Try bell peppers, carrots, or spinach. Beans like chickpeas or black beans add protein. You can also mix in some grilled chicken or shrimp for extra flavor. Nuts or seeds can add crunch too.
How long does Tricolored Pasta Salad last in the fridge?
Tricolored Pasta Salad lasts about 3 to 5 days in the fridge. Keep it in an airtight container to maintain freshness. If you notice any off smells or changes in texture, it’s best to discard it.
Is Tricolored Pasta Salad gluten-free?
Regular pasta is not gluten-free, but you can use gluten-free pasta. Many brands offer gluten-free options made from rice or corn. This way, everyone can enjoy your tasty salad without worry.
In this blog post, we explored how to create a vibrant tricolored pasta salad. We covered the key ingredients, from rotini to fresh basil. You learned step-by-step instructions for cooking pasta, preparing veggies, and making dressing. I shared tips for enhancing flavor and suggested variations. Proper storage info helps keep your salad fresh.
In summary, enjoy your delicious pasta salad in any season.


![- 6 cups fresh baby spinach, washed and dried - 2 cups strawberries, hulled and sliced - 1/2 red onion, thinly sliced Fresh produce is key in this salad. Spinach gives a nice green base. Strawberries add sweetness and color. Red onion brings a bit of sharpness that balances the flavors. Together, they create a fresh and vibrant mix. - 1 cup pecans, chopped and toasted - 1/2 cup feta cheese, crumbled Nuts and cheese add texture and flavor. Pecans, when toasted, become crunchy and rich. Feta cheese adds a creamy, salty element. This mix makes every bite exciting and satisfying. - 1/4 cup balsamic vinegar - 2 tablespoons honey - 1/4 cup extra virgin olive oil - Salt and pepper to taste Dressings tie the salad together. Balsamic vinegar gives a tangy bite. Honey adds a touch of sweetness. Olive oil brings smoothness. Salt and pepper enhance all the flavors. You can find the Full Recipe for more details. Whisking the Dressing To start, you need to make the dressing. In a small bowl, mix the balsamic vinegar, honey, and olive oil. I like to use a whisk for this. Keep whisking until the mixture is smooth. This dressing adds a sweet and tangy flavor to the salad. After mixing, season it with salt and pepper to your taste. Set the dressing aside for later. Toasting the Pecans Next, let’s toast the pecans. Take a dry skillet and heat it over medium heat. Add the chopped pecans to the skillet. Stir them often. Toast for about 4 to 5 minutes, or until they smell fragrant and look golden brown. This step makes the pecans crunchy and brings out their rich flavor. Once done, remove them from the heat and let them cool. Combining Vegetables and Nuts Now, it’s time to assemble your salad. Grab a large mixing bowl. In the bowl, add the fresh baby spinach, sliced strawberries, and the toasted pecans. Gently mix everything together. This combination gives you a mix of textures and flavors. The spinach is crisp, while the strawberries add sweetness. Adding the Cheese After mixing the veggies and nuts, it’s time for cheese. Take the crumbled feta cheese and gently fold it into the salad. The feta adds a salty flavor that balances the sweetness of the strawberries. Be careful not to break the cheese too much; you want those nice, creamy chunks. Dressing the Salad With everything mixed, it’s time to dress the salad. Drizzle your prepared dressing over the salad. Toss everything gently to coat all the ingredients. Make sure every bite will have that delicious flavor. Serving Suggestions For serving, you can transfer the salad to a large platter or individual bowls. I like to garnish it with extra strawberry slices and a few whole pecans on top. This adds a lovely look. You can also drizzle a little extra balsamic glaze for a special touch. Enjoy your fresh and tasty Strawberry Spinach Pecan Salad! For the complete recipe, check out the [Full Recipe]. Toasting pecans brings out their rich flavor. The heat makes them crunchy and tasty. It only takes about 4-5 minutes. Keep stirring to avoid burning. If you don't have pecans, try walnuts or almonds. These nuts add good taste and texture too. You can change the dressing for new flavors. Try lemon juice or yogurt for a lighter taste. Both add a nice zing. If you want a sweet touch, use maple syrup instead of honey. Balancing the flavors is key. Mix sweet, tangy, and salty for a perfect bite. This salad pairs well with grilled chicken or fish. The fresh flavors work great together. For a nice look, serve it in a big bowl. Garnish with extra strawberries and whole pecans. A drizzle of balsamic glaze adds flair. Make it pretty for your guests! {{image_2}} You can change this salad with different fruits. Try adding blueberries for a sweet twist. Apples also work well, adding crunch and flavor. Seasonal fruits keep the salad fresh and exciting. You can also use different greens. If you want a stronger flavor, try arugula. Kale can add a hearty touch, too. Mixing greens gives your salad more color and texture. Need it gluten-free? This salad is naturally gluten-free, so no worries there. Just check any added dressings for gluten. If you're vegan, swap feta cheese for avocado. It adds creaminess and healthy fats. Use agave syrup instead of honey for the dressing. These simple swaps keep the salad tasty for everyone. For the full recipe, visit the [Full Recipe]. You can store your strawberry spinach pecan salad easily. - Refrigerator Storage: Place any leftover salad in an airtight container. This helps keep it fresh. The salad will stay good for about 1-2 days in the fridge. The strawberries may lose some crunch but will still taste great. - Freezing Considerations: Freezing this salad is not recommended. The spinach and strawberries do not freeze well. They become mushy once thawed. Enjoy this salad soon after making it for the best taste. - Freshness Tips: To keep your salad fresh, add the dressing just before serving. This prevents the greens from wilting. - Shelf Life of Ingredients: Spinach stays fresh for about 5-7 days in the fridge. Strawberries last about 3-7 days, depending on ripeness. Keep pecans in a cool, dry place for up to a month. For a full recipe, check out the complete details. You can prep this salad easily. Start by washing and drying the spinach. Slice the strawberries and red onion. Toast the pecans in advance and store them in an airtight container. For the dressing, mix balsamic vinegar, honey, and olive oil in a jar. Store it in the fridge. When you are ready to serve, combine all the ingredients in a bowl. Add the dressing right before serving to keep everything fresh. This way, you save time and enjoy a quick meal. If you don't like feta cheese, you have options. Try using goat cheese. It has a creamy texture and tangy flavor. Another great option is ricotta cheese, which is milder. You can also use shredded mozzarella for a different taste. For a dairy-free choice, try crumbled tofu. It soaks up the dressing well and adds protein. These swaps keep the salad tasty while fitting your dietary needs. To keep your salad fresh, store it properly. First, keep the spinach and dressing separate until serving. This prevents sogginess. Use a salad spinner to dry the greens well after washing. If you have leftovers, place them in an airtight container. Add a paper towel inside to absorb moisture. This helps maintain crispness. Eat the salad within a day or two for the best taste and texture. In this blog, I shared the key ingredients for a tasty salad, including fresh produce, nuts, and dressings. You learned how to prepare and assemble the salad step-by-step. I also provided tips for toasting pecans and modifying dressings. Variations allow for seasonal ingredients and dietary needs, while storage info helps keep leftovers fresh. Overall, this salad is easy to make and customize. Enjoy experimenting with flavors to create a dish you love!](https://dailydishlab.com/wp-content/uploads/2025/07/c2f62471-05ae-4dd0-b343-fd1b51ab9361-768x768.webp)

![To make Lemon Herb Grilled Shrimp Skewers, you need fresh and simple ingredients. Here’s what you will need: - 1 pound large shrimp, peeled and deveined - 2 tablespoons olive oil - 2 tablespoons fresh lemon juice - Zest of 1 lemon - 3 cloves garlic, minced - 1 tablespoon fresh parsley, chopped - 1 tablespoon fresh basil, chopped - 1 teaspoon dried oregano - Salt and pepper to taste - Lemon wedges and fresh herbs for garnish These ingredients are easy to find. Fresh shrimp is key for a great flavor. The olive oil helps the shrimp stay juicy while grilling. Lemon juice and zest add a bright taste. Garlic, parsley, basil, and oregano bring a nice herb flavor. The salt and pepper help enhance all these wonderful tastes. For garnish, lemon wedges and fresh herbs make your dish look pretty and inviting. You can find the complete Lemon Herb Grilled Shrimp Skewers recipe within this article. Enjoy preparing this delicious dish! To make the marinade, start by grabbing a large bowl. Add the following ingredients: - 2 tablespoons olive oil - 2 tablespoons fresh lemon juice - Zest of 1 lemon - 3 cloves garlic, minced - 1 tablespoon fresh parsley, chopped - 1 tablespoon fresh basil, chopped - 1 teaspoon dried oregano - Salt and pepper to taste Mix all these ingredients well. You want a smooth and uniform blend. This marinade will give the shrimp a bright, fresh flavor that shines through when you grill them. Now, it’s time to add the shrimp. Use 1 pound of large shrimp that are peeled and deveined. Toss the shrimp in the marinade until they are fully coated. Cover the bowl and put it in the fridge. Let it sit for at least 30 minutes. If you have time, marinating for up to 2 hours will enhance the flavor even more. Before grilling, preheat your grill to medium-high heat. If you use wooden skewers, soak them in water for about 30 minutes. This helps prevent them from burning. Next, prepare the skewers. Thread about 5-6 shrimp onto each skewer. Make sure to leave space between them for even cooking. Place the skewers on the grill and cook for 2-3 minutes on each side. The shrimp will turn opaque when they are fully cooked. Be careful not to overcook them, as this can make them dry. Once cooked, take the skewers off the grill and let them rest for a minute. This will help keep them juicy. Serve them with lemon wedges and fresh herbs for a lovely touch. For the complete recipe, check the full recipe section. To know when shrimp are done cooking, watch for their color. Cooked shrimp turn from gray to pink and become opaque. You want them to curl slightly but not tightly. If they curl too much, they may overcook. To keep shrimp juicy, avoid cooking them too long. Cook them for just 2-3 minutes on each side over medium-high heat. The key is to remove them from the grill as soon as they change color. For extra flavor, try adding more herbs or spices. Fresh dill or cilantro can bring a fresh twist. You might also add a pinch of red pepper flakes for heat. Marinating shrimp is crucial for flavor absorption. Let them soak in the marinade for at least 30 minutes. For even bolder taste, marinate for up to 2 hours. Ensure every shrimp gets coated well in the mix. For the full recipe, check the [Full Recipe]. {{image_2}} You can swap shrimp for chicken or tofu. Chicken thighs work great. Cut them into bite-sized pieces. Marinate just like the shrimp. Grill until fully cooked. Tofu gives a nice twist too. Use firm tofu for the best results. Press it first to remove excess water. This helps the tofu soak up all that tasty marinade. Want to spice things up? Add some red pepper flakes or a dash of hot sauce. You can also try different citrus. Lime or orange juice can bring new life to the dish. For a Mediterranean vibe, use olives and feta cheese. Add sun-dried tomatoes for an extra kick. If you lean towards Asian flavors, try soy sauce and sesame oil. These simple changes can make your shrimp skewers a whole new experience. Explore the [Full Recipe] for more ideas and details. To keep your Lemon Herb Grilled Shrimp Skewers fresh, store them in an airtight container. Place a paper towel at the bottom to absorb moisture. This helps to keep the shrimp firm. You can refrigerate them for up to 3 days. If you want to store them for longer, freeze the skewers. Wrap them tightly in plastic wrap and then put them in a freezer bag. This method can keep them fresh for about 2 months. When you’re ready to eat, just thaw them in the fridge overnight. To reheat grilled shrimp skewers, avoid the microwave if possible. It can make the shrimp rubbery. Instead, use a skillet on low heat. Add a splash of olive oil to keep them moist. Heat for about 2-3 minutes, flipping often. You can also reheat them in the oven. Preheat your oven to 350°F (175°C). Place the skewers on a baking sheet and cover with foil. Heat for about 5-7 minutes. This method helps maintain their flavor and juiciness. For more details on how to make these delicious shrimp skewers, check the Full Recipe. Yes, you can still enjoy shrimp skewers without a grill. Use a stovetop grill pan or broiler. Both methods work well to give you that nice char and flavor. If you use a grill pan, heat it over medium-high heat. Lightly oil the pan before adding your skewers. If using a broiler, place the skewers on a baking sheet and keep them close to the heat source. Rotate the skewers halfway through cooking for even results. Fresh shrimp have a clean, briny smell. Look for shrimp that are firm and have a translucent appearance. Their shells should be shiny, not dull or slimy. If the shrimp have black spots or a strong odor, they are likely not fresh. Always check the sell-by date and buy from a trusted source. You can serve Lemon Herb Grilled Shrimp Skewers with various sides. A fresh green salad pairs nicely, adding crunch and brightness. Grilled vegetables, like zucchini and bell peppers, also complement the shrimp's flavor. For a starch, consider serving rice or couscous. These will soak up the delicious marinade and juices. For the complete Lemon Herb Grilled Shrimp Skewers recipe, click [Full Recipe]. This blog post covered everything you need to know for perfect Lemon Herb Grilled Shrimp Skewers. I shared the ingredients, step-by-step instructions, and tips for storing and reheating. Whether you grill or try different proteins, you can make a tasty dish. Remember, the key is to not overcook the shrimp and to experiment with flavors. Enjoy your cooking adventure, and impress your friends and family with your new skills. Happy grilling!](https://dailydishlab.com/wp-content/uploads/2025/07/43bf45d0-0185-44b0-8263-e73ce7d0c6d7-768x768.webp)