Zesty Lemon Chicken Skewers Flavorful Grilling Delight

Grilling season just got better with these Zesty Lemon Chicken Skewers! Juicy chicken marinated in bright lemon, garlic, and herbs brings flavor to your next BBQ. Not only are they easy to make, but they also pack a tasty punch everyone will love. Get ready to impress your friends and family with this vibrant dish that’s perfect for any occasion. Let’s dive into the ingredients and start cooking!
Why I Love This Recipe
- Freshness of Ingredients: The combination of zesty lemon and fresh herbs elevates the flavor of the chicken, making each bite refreshing and exciting.
- Easy Preparation: This recipe requires minimal prep time and the marinating step can be done in advance, making it perfect for busy weeknights or gatherings.
- Versatile Cooking: Whether you grill, broil, or use a grill pan, these skewers adapt well to various cooking methods, allowing for flexibility in the kitchen.
- Great for Entertaining: These skewers are not only delicious but also visually appealing, making them an ideal choice for serving at parties or BBQs.
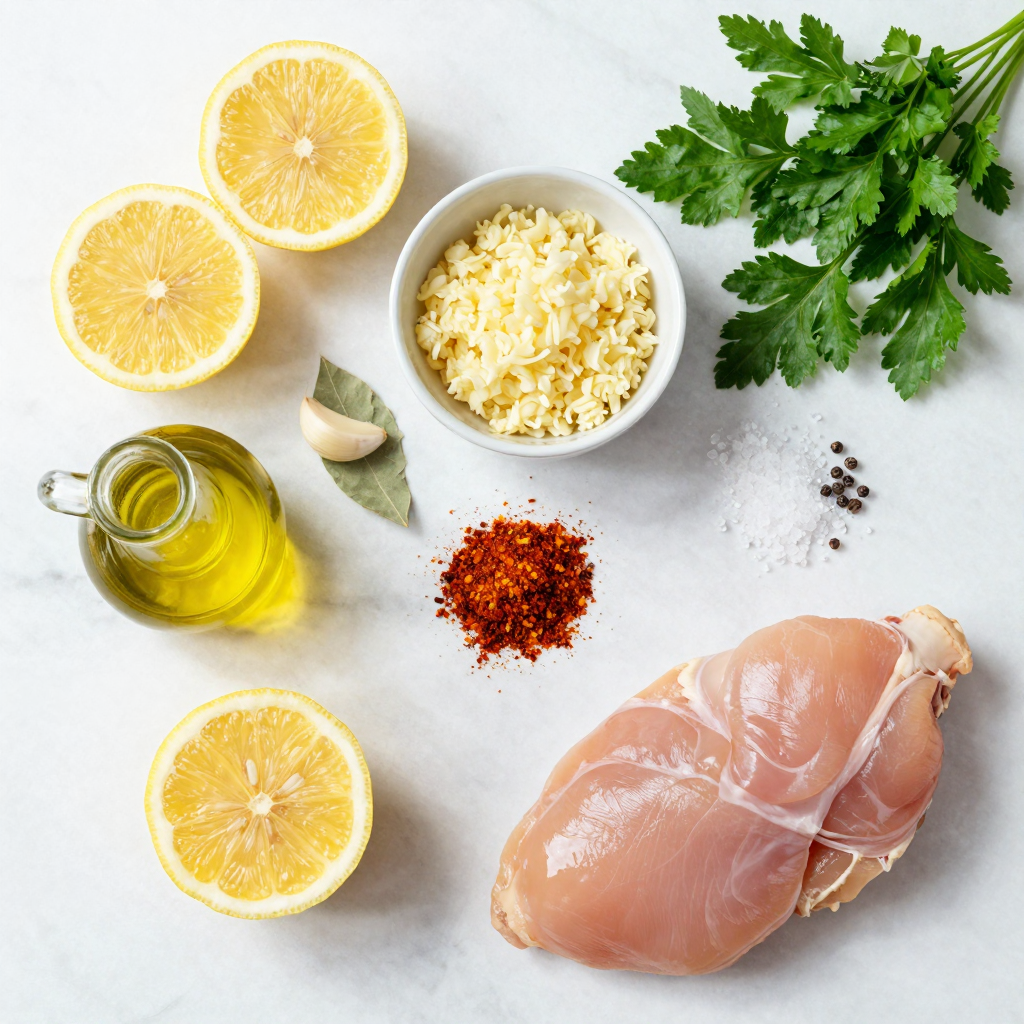
Ingredients
Main Ingredients
- 1 pound boneless, skinless chicken breasts
- 2 lemons (zest and juice)
- 3 tablespoons olive oil
- 2 cloves garlic, minced
- 1 teaspoon dried oregano
- 1 teaspoon smoked paprika
- Salt and pepper to taste
- Fresh parsley for garnish
- Wooden or metal skewers
Optional Ingredients
- Additional spices or herbs (e.g., cumin, thyme)
- Marinade enhancers (e.g., honey, mustard)
In this recipe, the main ingredients bring bright flavors to your chicken skewers. The lemon zest and juice add a fresh zing. Olive oil keeps the chicken juicy. Garlic gives it a nice kick, while oregano and smoked paprika add depth. Don’t forget the salt and pepper to enhance all the flavors.
The optional ingredients can change the skewers to fit your taste. Adding cumin or thyme can create a new flavor profile. Honey can sweeten the marinade, and mustard can add tanginess. Feel free to mix and match these options to make the dish your own.

Step-by-Step Instructions
Preparation of the Marinade
To make the marinade, start by mixing the zest and juice of two lemons in a large bowl. Add three tablespoons of olive oil for richness. Next, include two minced garlic cloves, one teaspoon of dried oregano, and one teaspoon of smoked paprika. Finish with salt and pepper to taste. This mixture will give your chicken a bright, zesty flavor.
Marinating the Chicken
Take one pound of boneless, skinless chicken breasts, and cut them into one-inch cubes. Toss these chicken cubes in the marinade. Make sure each piece is well-coated. Cover the bowl and place it in the refrigerator for at least 30 minutes. This step is key because it allows the chicken to soak up all the flavors.
Grilling the Skewers
Before grilling, preheat your grill or grill pan to medium-high heat. While it heats, thread the marinated chicken onto skewers, leaving space between pieces for even cooking. Grill the skewers for about 10 to 12 minutes. Turn them occasionally to achieve nice grill marks. Use a meat thermometer to check that the chicken reaches an internal temperature of 165°F (75°C). Once cooked, remove the skewers from the grill and let them rest for a few minutes. For a fresh touch, garnish with chopped parsley before serving.
Pro Tips
- Marinate Longer: For even more flavor, marinate the chicken for a few hours or overnight in the refrigerator.
- Grill Temperature: Ensure your grill is properly preheated to avoid sticking and to achieve perfect grill marks.
- Use a Meat Thermometer: For safety and optimal juiciness, always check that your chicken reaches an internal temperature of 165°F (75°C).
- Vegetable Skewers: Add bell peppers, onions, or zucchini to your skewers for a colorful and tasty addition.
Tips & Tricks
Marinating Guidelines
- Ideal marinating time: Marinate your chicken for at least 30 minutes. This helps the chicken soak up all the tasty flavors. For even better results, you can marinate for up to 4 hours.
- How to enhance flavor profiles: Add zest from more lemons for a brighter taste. You can also mix in a bit of honey for sweetness. A splash of soy sauce brings a savory kick.
Grilling Techniques
- Tips for achieving grill marks: Preheat your grill well. This helps the chicken sear quickly and get those nice lines. Place the skewers on the grill and do not move them for the first few minutes.
- How to avoid dry chicken: Use a meat thermometer to check the chicken’s internal temperature. Remove it from the grill when it reaches 165°F. Let it rest for a few minutes; this keeps it juicy.
Presentation Suggestions
- Creative serving ideas: Serve the skewers on a big platter with fresh lettuce. You can also add colorful veggies for a bright look.
- Garnishing recommendations: Sprinkle chopped parsley on top for color. Serve with lemon wedges to let guests add more zest. For a fun touch, add small bowls of dipping sauces.

Variations
Flavor Variations
You can change the taste of your zesty lemon chicken skewers with fun flavors. Adding tropical fruits like pineapple brings sweetness and a fresh twist. The juicy bits of pineapple grill up nicely, pairing well with the lemony chicken. You can also try a yogurt-based marinade. Yogurt adds a creamy texture and tangy flavor, making the chicken super tender. Just mix yogurt with lemon juice, garlic, and your favorite spices for a new take.
Skewering Alternatives
Mix things up by adding vegetables to your skewers. Bell peppers, onions, and zucchini add color and crunch. They grill beautifully and soak up the marinade flavors. You can also switch proteins. Shrimp cooks quickly and pairs well with lemon. If you prefer plant-based options, tofu is a great choice. Just press and marinate it like chicken for tasty results.
Serving Variations
Serve your skewers with sides that balance the meal. Rice or a fresh salad complements the zesty chicken. You can even add a fruit salad for a refreshing touch. If you like meal prep, these skewers are perfect. Grill them ahead of time and store them in the fridge. They make for tasty lunches or easy dinners throughout the week.
Storage Info
Leftover Storage
To keep your Zesty Lemon Chicken Skewers fresh, store them in the fridge. Place them in an airtight container. They will stay good for up to 3 days. If you want to keep them longer, consider freezing.
For freezing, first, let the skewers cool down. Then, wrap them tightly in plastic wrap. After that, place them in a freezer-safe bag. This way, they can last for about 2 months. When ready to eat, thaw them in the fridge overnight.
Reheating Recommendations
Reheating skewers can be tricky. The best way is to use an oven or a grill. Preheat your oven to 350°F (175°C). Place the skewers on a baking sheet and cover them with foil. Heat for about 10-15 minutes.
If you use a grill, warm it up to medium heat. Place the skewers on the grill for a few minutes, turning them often. This method helps keep the chicken moist. Avoid microwaving, as it can make the chicken dry and tough. Enjoy your leftovers just as you did when they were fresh!
FAQs
What can I substitute for chicken?
You can use several tasty alternatives for chicken skewers. Here are some great options:
- Turkey: Use turkey breast cut into cubes.
- Shrimp: Large shrimp works well and cooks quickly.
- Tofu: Firm tofu can soak up the marinade flavor.
- Beef: Cut beef sirloin into bite-sized pieces.
- Pork: Pork tenderloin is another delicious option.
Each of these proteins will pair well with the zesty lemon flavor.
Can I make this recipe ahead of time?
Yes, you can prepare this recipe ahead of time! Here are some tips:
- Marinate the chicken: You can marinate it up to 24 hours before grilling.
- Skewer the chicken: Prepare the skewers and store them in the fridge.
- Prep sides: Chop vegetables or make salads in advance.
- Refrigerate everything: Keep all items covered until you are ready to grill.
Making this ahead saves time and enhances the flavors.
How long should I grill the skewers?
Grilling time varies based on skewer thickness and size. Here’s a quick guide:
- Thin skewer chicken: Grill for about 8-10 minutes.
- Thicker pieces: Aim for 10-12 minutes.
- Check doneness: The chicken should reach 165°F (75°C) internally.
Keep turning the skewers for even cooking and nice grill marks.
This blog post covered a tasty grilled chicken skewers recipe. We explored main ingredients, optional flavors, and step-by-step marinating and grilling instructions. I shared tips to achieve the best flavor and presentation. Remember, you can easily adapt the recipe with different proteins or veggies. Proper storage and reheating methods ensure leftovers stay delicious. Get creative—try new variations to suit your taste! Enjoy grilling and savor every bite of your flavorful meal!

Zesty Lemon Chicken Skewers
Ingredients
1 pound boneless, skinless chicken breasts, cut into 1-inch cubes
2 lemons (zest and juice)
3 tablespoons olive oil
2 cloves garlic, minced
1 teaspoon dried oregano
1 teaspoon smoked paprika
Salt and pepper to taste
Fresh parsley, for garnish
Wooden or metal skewers (if using wooden, soak them in water for at least 30 minutes prior to grilling)
Instructions
In a large bowl, mix the lemon zest, lemon juice, olive oil, minced garlic, oregano, smoked paprika, salt, and pepper to create a marinade.
Add the cubed chicken to the marinade, tossing to coat completely. Cover and refrigerate for at least 30 minutes, allowing the flavors to meld.
Preheat your grill or grill pan over medium-high heat.
Thread the marinated chicken cubes onto the skewers, leaving a little space between each piece for even cooking.
Grill the skewers for about 10-12 minutes, turning occasionally, until the chicken is cooked through and has nice grill marks. Use a meat thermometer to ensure the internal temperature reaches 165°F (75°C).
Once done, remove the skewers from the grill and let them rest for a few minutes.
Garnish with freshly chopped parsley before serving.
Prep Time: 30 minutes | Total Time: 1 hour | Servings: 4
– Presentation Tips: Serve the skewers on a platter lined with fresh lettuce or herbs, and accompany with lemon wedges for an extra zesty touch.

Zesty Lemon Chicken Skewers
Ingredients
- 1 pound boneless, skinless chicken breasts, cut into 1-inch cubes
- 2 lemons zest and juice
- 3 tablespoons olive oil
- 2 cloves garlic, minced
- 1 teaspoon dried oregano
- 1 teaspoon smoked paprika
- to taste salt and pepper
- for garnish fresh parsley
- as needed wooden or metal skewers
Instructions
- In a large bowl, mix the lemon zest, lemon juice, olive oil, minced garlic, oregano, smoked paprika, salt, and pepper to create a marinade.
- Add the cubed chicken to the marinade, tossing to coat completely. Cover and refrigerate for at least 30 minutes, allowing the flavors to meld.
- Preheat your grill or grill pan over medium-high heat.
- Thread the marinated chicken cubes onto the skewers, leaving a little space between each piece for even cooking.
- Grill the skewers for about 10-12 minutes, turning occasionally, until the chicken is cooked through and has nice grill marks. Use a meat thermometer to ensure the internal temperature reaches 165°F (75°C).
- Once done, remove the skewers from the grill and let them rest for a few minutes.
- Garnish with freshly chopped parsley before serving.
- Presentation Tips: Serve the skewers on a platter lined with fresh lettuce or herbs, and accompany with lemon wedges for an extra zesty touch.

![- 1 lb ground beef or turkey - 1 small onion, diced - 2 cloves garlic, minced - 1 packet taco seasoning - 1 cup diced tomatoes (canned or fresh) The base of our Loaded Cheesy Taco Skillet starts with ground beef or turkey. You can choose either, but I prefer ground turkey for a lighter meal. Next, we add a small diced onion and two cloves of minced garlic. These add flavor and aroma to the dish. Taco seasoning gives a rich taste. Don't forget the diced tomatoes! They add moisture and freshness. - 1 cup black beans, drained and rinsed - 1 cup corn (canned or frozen) - 1 cup bell peppers, diced (mix of colors for vibrancy) - 1 ½ cups shredded cheddar cheese - 1 cup sour cream - 2 green onions, sliced (for garnish) - Fresh cilantro, chopped (for garnish) Now, let’s add some color and nutrition! Black beans and corn bring a nice texture. Bell peppers add crunch and sweetness. I love to use a mix of colors for a pop! We need a cheesy topping, so grab some shredded cheddar cheese. It melts beautifully. For serving, sour cream cools the dish, while green onions and fresh cilantro make it look pretty and bright. - Best types of tortilla chips - Ideal accompaniments or side dishes When serving, use sturdy tortilla chips. They hold up well for scooping. Pair this skillet meal with a fresh side salad or some guacamole for extra flavor. You can also add some salsa for a zesty kick. Enjoy this dish with family and friends, and don’t forget to share the Full Recipe! Start with a large skillet over medium heat. Add 1 pound of ground beef or turkey. Cook it until it turns brown, which takes about 5 to 7 minutes. Make sure to break it apart with a spatula as it cooks. This helps it cook evenly. Once the meat is browned, add 1 small diced onion and 2 minced garlic cloves. Sauté these for 3 to 4 minutes. You want the onion to become soft and translucent. This step adds a nice flavor base to your dish. Next, stir in a packet of taco seasoning. Mix in 1 cup of diced tomatoes, 1 cup of black beans (drained and rinsed), 1 cup of corn (canned or frozen), and 1 cup of diced bell peppers. Mix everything well, so the flavors blend. Allow this mixture to simmer for about 5 to 8 minutes. Simmering helps all the flavors meld together, making your dish even tastier. Now, preheat your oven to 350°F (175°C). After simmering, take the skillet off the heat. Sprinkle 1 ½ cups of shredded cheddar cheese evenly over the top. Place the skillet in the oven for about 10 minutes. You want the cheese to melt and become bubbly. Once it's done, let it cool slightly. Then, add dollops of 1 cup of sour cream on top. Finish with sliced green onions and chopped fresh cilantro. Serve with tortilla chips on the side for scooping. For the full recipe, click [Full Recipe]. To keep your meat juicy, don't cook it too long. Ground beef or turkey cooks fast. Stir it often to break it apart. This helps it cook evenly. Use taco seasoning to boost flavor. I love adding extra spices like cumin and paprika. These spices add depth and warmth. A pinch of chili powder can add a nice kick too. Layering is key for a great look. Start with the meat on the bottom. Then, add beans and corn evenly. Top it off with the cheese. When melted, it looks lovely! Colorful garnishes make a big impact. Use bright green cilantro and green onions. A dollop of white sour cream adds contrast. These colors catch the eye and make the dish pop. Tortilla chips are perfect for scooping. Choose sturdy chips to hold the weight. You can also serve some chips on the side for dipping. Portion sizes matter. Aim for ½ to ¾ cup per person. This way, everyone gets enough without waste. Adjust based on your family’s appetite! For the full recipe, check out the Loaded Cheesy Taco Skillet. {{image_2}} You can easily change the protein in this dish. Ground chicken or turkey work well. If you want a meat-free meal, try using black beans or pinto beans. Both options add great texture and flavor. You can also add extra veggies like zucchini or spinach. These swaps keep the meal fresh while still being hearty. For those who like it spicy, add sliced jalapeños or a splash of hot sauce. These ingredients give a nice kick. If you have kids or prefer milder flavors, skip the heat. Instead, you can use sweet bell peppers or a bit of mild salsa. This makes the dish family-friendly while still being tasty. Think about adding spices from other cuisines. You can mix in taco seasoning with chili powder or cumin for a deeper flavor. Want to try something different? Incorporate Italian herbs like oregano and basil. These spices create a fusion twist that surprises the taste buds. You can make it your own by mixing flavors from around the world. Explore the [Full Recipe] for more ideas and details! To store leftovers, let the Loaded Cheesy Taco Skillet cool first. Then, place it in an airtight container. This keeps it fresh for later meals. When reheating, use a microwave or stovetop. Heat it gently to avoid drying it out. You can freeze this dish for future meals. Let it cool completely, then transfer it to a freezer-safe container. Be sure to label it with the date. It will keep well for about three months. For best flavor, eat it within this time frame. In the fridge, your Loaded Cheesy Taco Skillet lasts about three to four days. Look for signs of spoilage, like a sour smell, mold, or change in color. If you see any of these signs, it’s best to toss it out. Enjoy your meal safely! You can serve many tasty sides with this dish. Here are some ideas: - Mexican rice: Fluffy and flavorful, it pairs well with the skillet. - Refried beans: Creamy and rich, they add a nice touch. - Guacamole: Fresh and creamy, it adds a cool contrast. - Simple salad: A mix of greens, tomatoes, and a light dressing works great. - Cornbread: Sweet and soft, it complements the savory flavors. Yes, you can prep Loaded Cheesy Taco Skillet in advance. Here’s how: - Cook the meat: Prepare the ground beef or turkey and let it cool. - Chop veggies: Dice onions, garlic, and peppers ahead of time. - Mix it up: Combine all the ingredients until you’re ready to bake. - Store in the fridge: Keep it in an airtight dish for up to two days. - Bake when ready: Just add cheese and bake before serving. Absolutely! You can make it vegetarian-friendly by swapping a few ingredients: - Use beans: Replace meat with black beans or pinto beans for protein. - Add more veggies: Try zucchini, mushrooms, or spinach for extra flavor. - Use a meat substitute: Choose plant-based ground meat for a similar texture. - Top with cheese: Use your favorite cheese or a plant-based option for a creamy layer. The Loaded Cheesy Taco Skillet is a fun and tasty dish. We explored key ingredients like ground beef, cheese, and fresh veggies, combining them for rich flavor. You can tweak this dish with different proteins and spice levels. Don’t forget tips on storage and serving suggestions for the best experience. Enjoy making this dish at home, impressing friends and family alike. With a few simple steps, you create a crowd-pleaser that’s easy and rewarding. Happy cooking!](https://dailydishlab.com/wp-content/uploads/2025/07/b0f98873-f356-44f9-8ffc-552e70b38ff9-768x768.webp)


