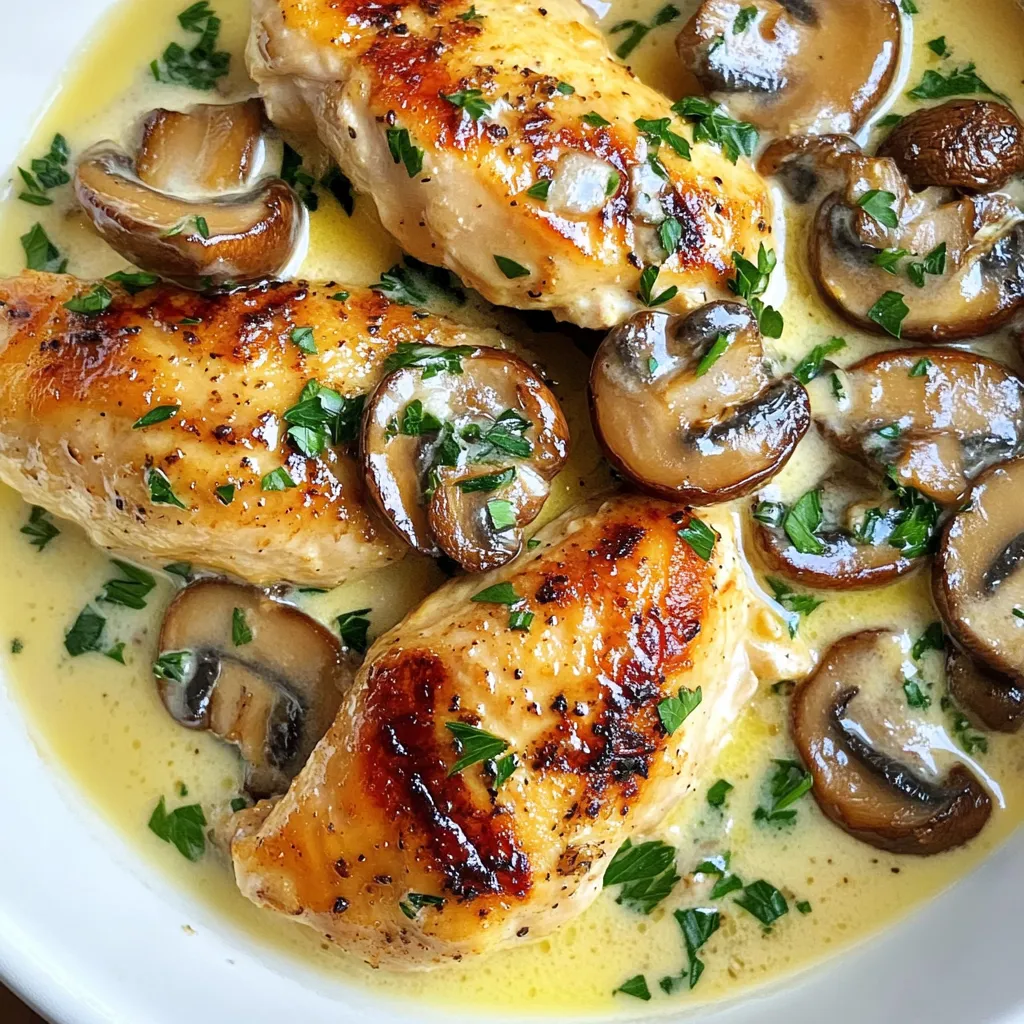
Creamy Garlic Mushroom Chicken Flavorful Dinner Idea


Looking for a delicious dinner that wow’s your taste buds? Try my Creamy Garlic Mushroom Chicken! This dish is rich, tasty, and easy to make. With simple steps and common ingredients, you can create a meal that feels fancy without the fuss. Whether you are cooking for family or friends, this recipe has you covered. Ready to impress? Let’s dive into the details!
Why I Love This Recipe
- Deliciously Creamy: This dish features a rich and velvety sauce made from heavy cream and chicken broth that perfectly complements the savory flavors of the chicken and mushrooms.
- Quick and Easy: Preparation and cooking take only about 30 minutes, making it a perfect weeknight dinner option without sacrificing flavor.
- Versatile Ingredients: The recipe uses simple ingredients that are easy to find, yet it delivers an impressive and gourmet meal.
- Great for Meal Prep: This creamy garlic mushroom chicken can be made ahead and reheated, making it an ideal choice for meal prepping or leftovers.
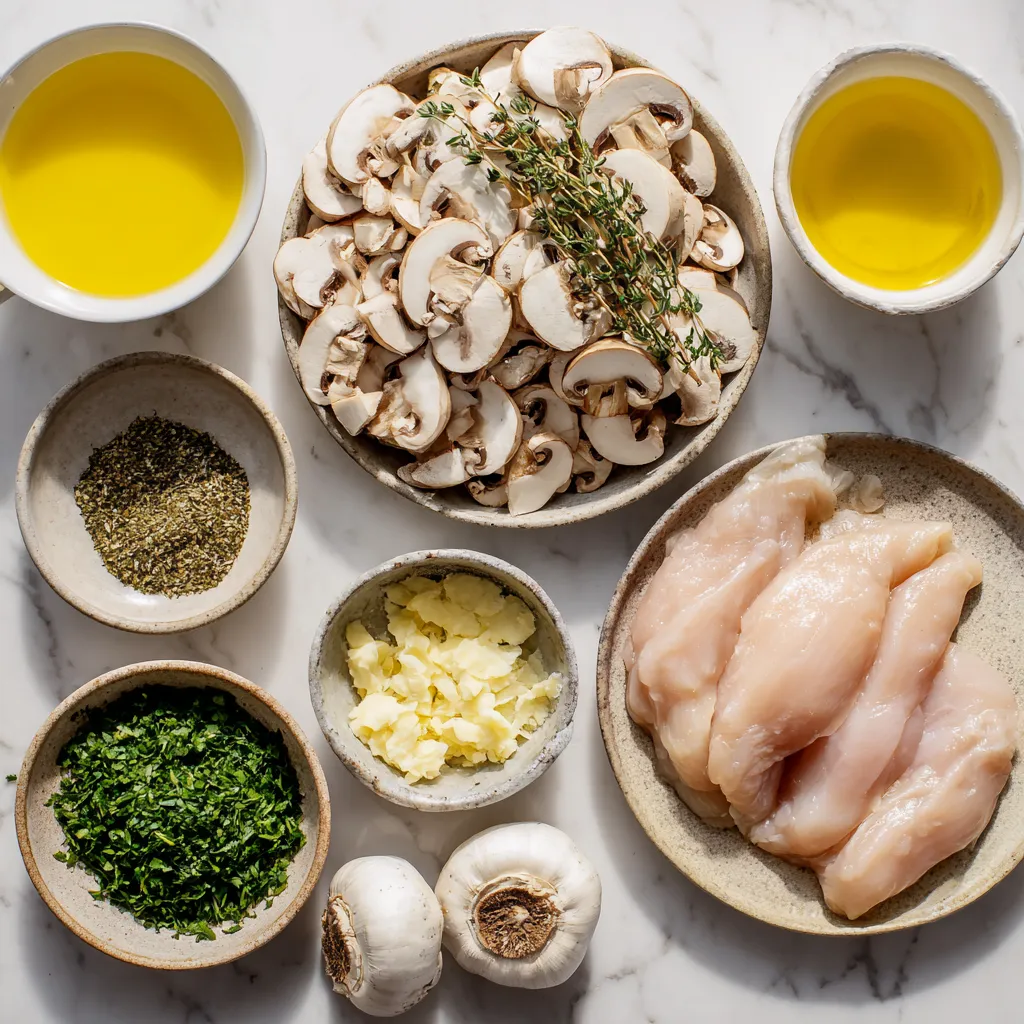
Ingredients
List of Ingredients
- 4 boneless, skinless chicken breasts
- 2 cups fresh mushrooms, sliced (such as cremini or button)
- 4 cloves garlic, minced
- 1 cup heavy cream
- 1 cup chicken broth
- 2 tablespoons olive oil
- 1 teaspoon dried thyme
- 1 teaspoon dried oregano
- Salt and pepper to taste
- Fresh parsley, chopped (for garnish)
Recommended Ingredient Quality
Use fresh, high-quality ingredients for the best flavor. Look for chicken breasts that are firm and pink. Choose mushrooms that are firm and dry. Fresh garlic offers a stronger taste than pre-minced. For cream, select heavy cream over lighter options for a richer sauce. Fresh herbs add bright flavor, but dried herbs work well too.
Possible Ingredient Substitutions
You can swap chicken for turkey or tofu for a lighter option. Use vegetable broth instead of chicken broth for a vegetarian dish. If you can’t find fresh mushrooms, canned mushrooms will work in a pinch. For a lighter sauce, consider using half-and-half instead of heavy cream. If you dislike thyme or oregano, experiment with basil or rosemary.
Step-by-Step Instructions
Preparation Steps Overview
Start by gathering all your ingredients. You will need chicken, mushrooms, garlic, cream, and spices. Make sure everything is ready. This will make cooking easier and more fun.
Cooking the Chicken
First, season the chicken breasts. Use salt, pepper, and half of the dried thyme and oregano. Rub the seasoning on both sides. Next, heat olive oil in a large skillet over medium heat. Add the chicken breasts. Cook for 6-7 minutes on each side. The chicken should turn golden brown. Once cooked, remove the chicken and set it aside.
Making the Creamy Garlic Mushroom Sauce
In the same skillet, add the sliced mushrooms. Sauté them for 5-6 minutes. They should turn golden and soft. Then, add the minced garlic. Cook for 1-2 minutes until it smells great. Pour in the chicken broth. Scrape any bits stuck to the bottom of the skillet. This adds flavor! Lower the heat and stir in the heavy cream, along with the remaining thyme and oregano. Let the sauce simmer for 3-4 minutes. It will thicken and become creamy.
Combining and Serving
Return the chicken to the skillet. Coat it well in the sauce. Let it simmer for another 2-3 minutes to heat through. Taste the sauce and add more salt or pepper if needed. Serve the creamy garlic mushroom chicken hot. Sprinkle fresh parsley on top for a nice touch. Enjoy your meal!
Tips & Tricks
Cooking Tips for Perfect Chicken
To make the chicken juicy, start by seasoning it well. Use salt, pepper, and dried herbs. I like to use thyme and oregano. This adds great taste. Cook the chicken until it is golden brown. Aim for about 6-7 minutes on each side. Use a meat thermometer to check the temperature. The chicken should reach 165°F.
Enhancing the Flavor of the Sauce
To make the sauce more flavorful, sauté the mushrooms until they are golden. This brings out their natural sweetness. When adding garlic, cook it just until fragrant. Then, pour in the chicken broth and scrape the skillet. This lifts the tasty bits stuck to the pan. Finally, stir in the cream slowly. Let it simmer to thicken nicely.
Serving Suggestions and Pairings
This dish pairs well with rice or pasta. The creamy sauce coats these sides perfectly. You can also serve it with a fresh salad. A simple green salad adds a nice crunch. For a special touch, sprinkle fresh parsley on top before serving. It adds color and a burst of flavor.
Pro Tips
- Use Fresh Herbs: Fresh herbs can elevate the flavor of your dish. If you have access to fresh thyme and oregano, substitute them for dried for a more vibrant taste.
- Deglaze the Pan: Scraping up the browned bits from the skillet after cooking the chicken adds depth to the sauce. This technique enhances the overall flavor profile.
- Don’t Overcook the Chicken: To ensure the chicken remains juicy, use a meat thermometer. The internal temperature should reach 165°F (75°C).
- Pair with the Right Sides: Serve this dish with a side of steamed vegetables or creamy mashed potatoes to complement the rich flavors of the creamy sauce.
Variations
Adding Vegetables or Herbs
You can easily add vegetables to your creamy garlic mushroom chicken. Some great choices are spinach, kale, or bell peppers. These veggies add color and nutrition. Simply sauté them with the mushrooms. You can also mix in fresh herbs like basil or thyme. Fresh herbs give the dish a bright flavor. Just chop them and add them to the sauce at the end.
Alternative Protein Options
If you want to switch things up, try different proteins. You can use turkey or pork instead of chicken. For a meatless option, use firm tofu or chickpeas. If you choose tofu, press it first to remove excess water. Cut it into cubes and sauté until golden. This keeps the dish flavorful and satisfying.
Making it Healthier or Lighter
To make this dish lighter, swap heavy cream for low-fat yogurt or coconut milk. This change keeps the creamy texture while cutting calories. You can also reduce the amount of oil used for cooking. Instead of frying, you can bake the chicken. This method allows the chicken to cook without added fats. Both options help maintain flavor without the extra calories.
Storage Info
How to Store Leftovers
To store leftover creamy garlic mushroom chicken, first, let it cool. Place it in an airtight container. Make sure to cover it well to keep it fresh. Store it in the fridge for up to three days. This helps keep the chicken moist and tasty.
Reheating Instructions
When you’re ready to eat the leftovers, take them out of the fridge. You can reheat the chicken on the stove or in the microwave. If using the stove, heat it on low. Add a splash of chicken broth to keep it creamy. Stir it often until it’s hot. In the microwave, cover the dish with a lid. Heat in short bursts, stirring in between. This prevents the chicken from drying out.
Freezing Creamy Garlic Mushroom Chicken
You can also freeze creamy garlic mushroom chicken for later use. First, let it cool completely. Then, put it in a freezer-safe container or bag. Make sure to remove as much air as possible to avoid freezer burn. It can last for up to three months in the freezer. When you’re ready to eat it, thaw it in the fridge overnight. Reheat it as mentioned above for the best taste.
FAQs
Can I use different types of mushrooms?
Yes, you can use different mushrooms. Options like shiitake, portobello, or oyster work well. Each type adds its own taste and texture. For a richer flavor, mix a few types together. This adds depth to the dish. Just remember to slice them evenly so they cook well.
How do I know when the chicken is cooked through?
The chicken is done when its internal temperature reaches 165°F. You can check this with a meat thermometer. If you don’t have one, cut into the chicken. The meat should be white, not pink. Juices should run clear, not red. Cooking time can vary, so always check.
What can I serve with Creamy Garlic Mushroom Chicken?
You can serve this dish with many sides. Try creamy mashed potatoes or rice for a filling meal. Steamed vegetables like green beans or broccoli add color and nutrients. A fresh salad can also balance the meal. Garlic bread pairs nicely, too, soaking up the creamy sauce.
This blog post covered the key ingredients and steps to make Creamy Garlic Mushroom Chicken. I shared tips to ensure perfect chicken and ways to customize your dish.
Remember, using high-quality ingredients will enhance your flavor. Try adding veggies or herbs for extra taste. Store leftovers correctly for best results. Overall, this dish is both delicious and versatile. Enjoy your cooking adventur

Creamy Garlic Mushroom Chicken
Ingredients
- 4 pieces boneless, skinless chicken breasts
- 2 cups fresh mushrooms, sliced
- 4 cloves garlic, minced
- 1 cup heavy cream
- 1 cup chicken broth
- 2 tablespoons olive oil
- 1 teaspoon dried thyme
- 1 teaspoon dried oregano
- to taste salt and pepper
- for garnish fresh parsley, chopped
Instructions
- Begin by seasoning the chicken breasts with salt, pepper, and half of the dried thyme and oregano on both sides.
- In a large skillet, heat the olive oil over medium heat.
- Add the seasoned chicken breasts and cook for about 6-7 minutes on each side, or until the chicken is golden brown and cooked through. Remove the chicken from the skillet and set aside.
- In the same skillet, add the sliced mushrooms. Sauté for 5-6 minutes until they are golden and have released their moisture.
- Add the minced garlic to the skillet and cook for an additional 1-2 minutes, or until fragrant.
- Pour in the chicken broth and scrape up any brown bits from the bottom of the skillet.
- Reduce the heat to low and stir in the heavy cream, remaining thyme, and oregano. Let the sauce simmer for about 3-4 minutes until it thickens slightly.
- Return the chicken to the skillet and coat it in the creamy sauce. Allow it to simmer for an additional 2-3 minutes to heat through.
- Taste and adjust the seasoning with more salt and pepper if needed.
- Serve the creamy garlic mushroom chicken hot, garnished with freshly chopped parsley for added flavor.
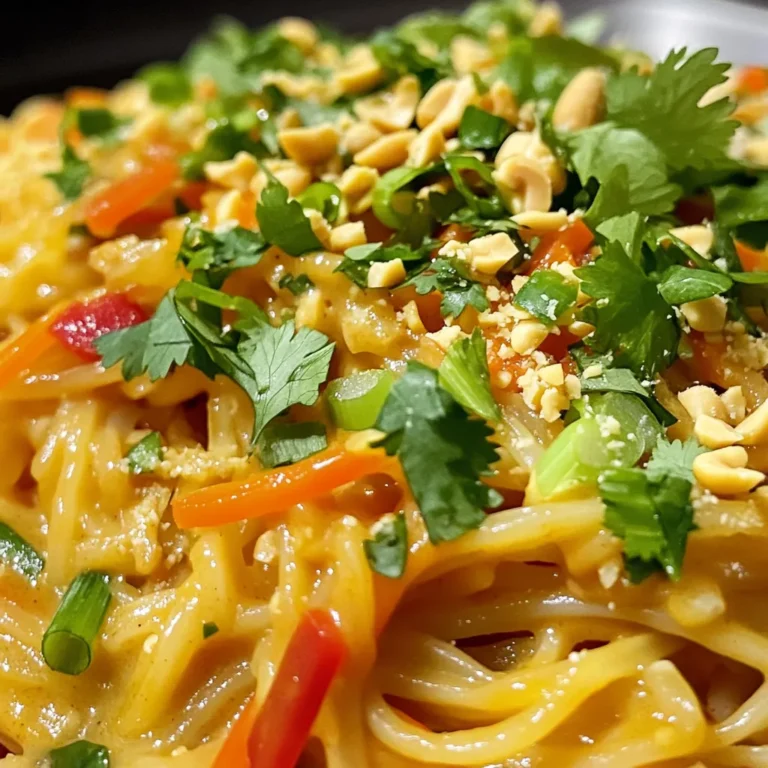
![- 1 pound ziti pasta - 2 tablespoons olive oil - 1 onion, finely chopped - 3 cloves garlic, minced - 1 pound ground beef (or plant-based ground meat) - 1 jar (24 ounces) marinara sauce - 1 can (15 ounces) ricotta cheese - 1 egg - 2 cups shredded mozzarella cheese - 1 cup grated Parmesan cheese - 1 teaspoon Italian seasoning - Salt and pepper to taste - Fresh basil leaves for garnish (optional) For baked ziti, the ingredients are simple but full of flavor. First, you need ziti pasta as your base. I prefer the traditional ziti shape, but penne can work too. Olive oil adds richness and helps in cooking the onion and garlic. Next, the onion and garlic create a savory base for the meat sauce. You can choose ground beef for a classic taste, or use a plant-based option for a lighter meal. Marinara sauce brings the dish together, adding moisture and flavor. Ricotta cheese is a must. It adds creaminess. Mixing it with an egg binds everything together and gives a smooth texture. Mozzarella and Parmesan are essential for that cheesy top that makes baked ziti so appealing. Finally, season with Italian herbs, salt, and pepper. Fresh basil as a garnish adds a pop of color and flavor. If you want the full recipe, just check the section titled Full Recipe. 1. Preheat your oven to 375°F (190°C). This makes sure your dish cooks evenly. 2. Cook the ziti pasta according to package instructions until al dente. Drain the pasta and set it aside. Al dente means it should be firm but not hard. This helps keep the pasta from getting mushy later. 1. In a large skillet, heat the olive oil over medium heat. 2. Add the chopped onion and minced garlic. Sauté them until the onion turns translucent. This step builds flavor and aroma. 3. Next, add the ground beef to the skillet. Cook it until it is browned, breaking it apart with a spatula as it cooks. If there’s extra fat, drain it out. 4. Stir in the marinara sauce and Italian seasoning. Let the sauce simmer for about 5 minutes. This allows the flavors to mingle. Remove it from heat when done. 1. In a large mixing bowl, combine the cooked ziti with the meat sauce. Stir well to coat all the pasta with the sauce. 2. To assemble, spread half of the ziti mixture into a greased 9x13 inch baking dish. 3. Dollop half of the ricotta mixture over the pasta, spreading it gently. 4. Sprinkle half of the shredded mozzarella cheese on top. 5. Add the remaining ziti mixture on top, then dollop with the remaining ricotta. 6. Finally, sprinkle the rest of the mozzarella and Parmesan cheese over everything. 7. Cover the baking dish with aluminum foil and bake for 25 minutes. 8. Remove the foil and bake for an additional 15-20 minutes. Look for bubbly and golden brown cheese. 9. Let the baked ziti cool for about 10 minutes before serving. If you like, garnish with fresh basil leaves for a nice touch. For the full recipe, check out the detailed ingredient list above. Enjoy your delicious, comforting meal! How to avoid overcooked pasta To keep your pasta just right, cook the ziti for 2 minutes less than the package says. This way, the pasta stays firm after baking. Remember, it will cook more in the oven, so don't overdo it! Browning the cheese for extra flavor For a rich taste, broil the dish for the last few minutes. This gives the cheese a nice brown color and a crunchy bite. Just watch it closely so it doesn’t burn. Recommended herbs and spices Add freshness with basil or oregano. A pinch of red pepper flakes can give it a nice kick! Mix these in your meat sauce for a burst of flavor. Suggested cheese alternatives If you want to change things up, try goat cheese or feta instead of ricotta. They add a tangy twist. For mozzarella, fresh mozzarella balls can create a creamy texture and taste. Best sides to accompany baked ziti Serve your baked ziti with a simple green salad. A side of garlic bread goes great too! The crunch and flavors balance the creamy pasta. Pairing with wines and salads A light red wine, like Chianti, pairs well with baked ziti. If you prefer white, a crisp Pinot Grigio is also nice. For salads, a Caesar or caprese salad adds freshness to your meal. For the complete process, check the [Full Recipe]. {{image_2}} If you want a meatless option, try plant-based ground meat. This makes the dish lighter but still tasty. You can use lentils or mushrooms for a hearty feel. If you prefer, you can simply omit the meat. This gives you a delicious vegetarian baked ziti. You still get great flavor from the sauce and cheese. Cheese makes baked ziti special. Using fresh mozzarella gives a creamy and stretchy texture. Shredded mozzarella melts well, too. You can mix both types for extra flavor. Ricotta adds a nice creaminess. Try different ricotta brands or even mix in some herbs for added taste. You can make it your own with these cheese choices. Adding vegetables can boost flavor and nutrition. Spinach, zucchini, or bell peppers are great choices. Just chop them small so they blend well. Sauté them with the onion and garlic to enhance their taste. When adding veggies, balance is key. Use them with the right amount of sauce and cheese. This way, every bite stays flavorful. For more details, check the Full Recipe. To keep baked ziti fresh, cool it first. Then, place it in an airtight container. Glass or plastic containers work well for refrigeration. Make sure to seal the lid tightly to lock in moisture. When you reheat baked ziti, avoid the microwave if you can. Instead, use an oven set to 350°F (175°C). Cover it with foil to keep moisture in. Heat for about 20 minutes. If you want to freeze leftovers, let the ziti cool completely. Place it in freezer-safe containers, leaving space for expansion. Baked ziti lasts about 3 to 5 days in the fridge. If you freeze it, it can last up to 3 months. To ensure best flavor and texture, wrap it well before freezing. How long do I bake baked ziti? I bake baked ziti for about 40 to 45 minutes. First, cover it with foil and bake for 25 minutes. Then, remove the foil and bake for another 15 to 20 minutes. This method helps the cheese get nice and bubbly. Can I prepare baked ziti ahead of time? Yes, you can prepare baked ziti ahead of time. Assemble it the day before and keep it in the fridge. Just make sure to cover it well. Bake it the next day, adding a few extra minutes if it’s cold from the fridge. Gluten-free options for ziti To make a gluten-free baked ziti, use gluten-free ziti pasta. There are many brands available that taste great. Just check the package for cooking directions, as they may vary from regular pasta. Low-carb alternatives For a low-carb version, swap the ziti for spiralized zucchini or cauliflower rice. Both options are tasty and keep the dish light. Just be sure to adjust cooking times as needed. Can I replace ricotta cheese? Yes, you can replace ricotta cheese with cottage cheese or cream cheese. Both give a nice creamy texture. If you want to keep it dairy-free, use tofu blended with a little lemon juice. What to use instead of marinara sauce? If you don’t have marinara sauce, try using a homemade tomato sauce or even pesto. Both options add unique flavors to the dish. Just make sure to season them well for the best taste. [Full Recipe] Baked ziti is a classic dish that brings warmth and joy. It combines pasta, meat, and cheese into one tasty meal. Let me share how to make this comforting dish. - 1 pound ziti pasta - 2 tablespoons olive oil - 1 onion, finely chopped - 3 cloves garlic, minced - 1 pound ground beef (or plant-based ground meat) - 1 jar (24 ounces) marinara sauce - 1 can (15 ounces) ricotta cheese - 1 egg - 2 cups shredded mozzarella cheese - 1 cup grated Parmesan cheese - 1 teaspoon Italian seasoning - Salt and pepper to taste - Fresh basil leaves for garnish (optional) 1. Preheat your oven to 375°F (190°C). This ensures even cooking. 2. Cook the ziti pasta until it is al dente. Drain and set it aside. You want it firm so it holds up in the oven. 3. Heat olive oil in a large skillet over medium heat. Add the chopped onion and garlic. Cook until the onion is soft. 4. Add the ground beef to the skillet. Cook until it turns brown. Break it into small pieces as it cooks. Drain any extra fat if needed. 5. Stir in the marinara sauce and Italian seasoning. Let it simmer for about 5 minutes. This helps blend the flavors. 6. In a bowl, mix the ricotta cheese, egg, salt, and pepper. Stir until smooth. This will give creamy layers. 7. In another large bowl, combine the cooked ziti with the meat sauce. Mix well. Make sure every piece of pasta is coated. 8. Spread half of the ziti mixture into a greased baking dish. Add half of the ricotta mixture on top and sprinkle half of the mozzarella cheese. 9. Layer the rest of the ziti mixture on top. Add the remaining ricotta and sprinkle the rest of the mozzarella and Parmesan cheese. 10. Cover the dish with foil and bake for 25 minutes. This keeps it moist while cooking. 11. Remove the foil and bake for another 15-20 minutes. Look for bubbly and golden cheese on top. 12. Let it cool for about 10 minutes before serving. Garnish with fresh basil leaves if you like. With this recipe, you will create a dish that comforts and delights. Enjoy every cheesy bite! Baked ziti is a hearty dish made with simple ingredients. We covered the essential components, from pasta and sauce to cheese. I shared easy steps for cooking and assembling, plus tips for perfecting your meal. Remember, you can customize baked ziti with proteins and veggies to fit your taste. Don't forget about storage and reheating guidelines for leftovers. Enjoy this dish with friends and family, making each bite memorable!](https://dailydishlab.com/wp-content/uploads/2025/06/2fce1db0-3740-4cc6-8e4e-0aee4d2c952d-768x768.webp)
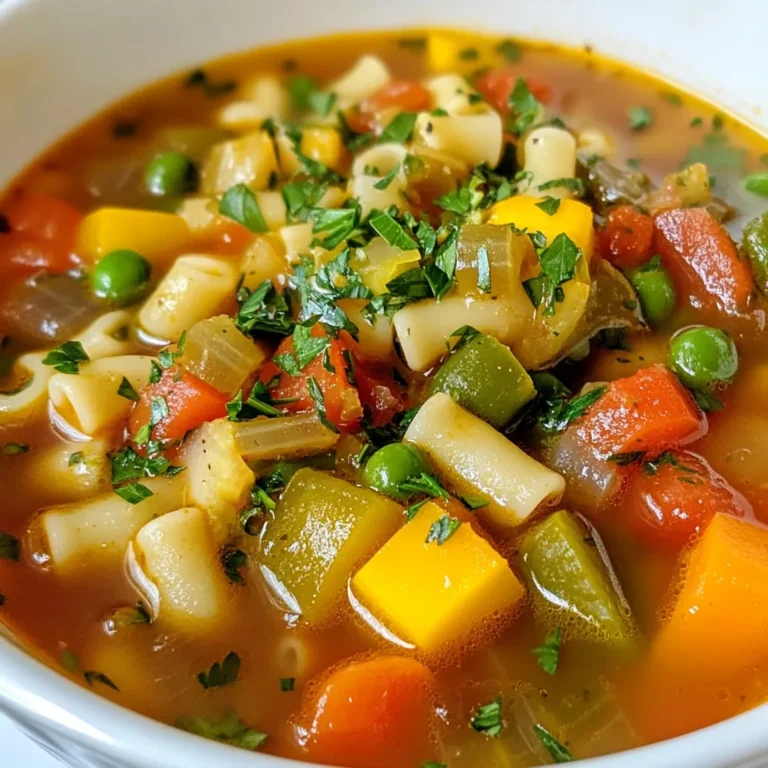
![- 1 pound Italian sausage (spicy or sweet) - 9 oz cheese tortellini (fresh or frozen) - 1 medium onion, finely chopped - 3 cloves garlic, minced (about 1 tablespoon) - 3 medium carrots, diced into small pieces - 2 celery stalks, diced - 6 cups chicken broth (low-sodium for a healthier option) - 1 can (14 oz) diced tomatoes, undrained - 2 cups fresh spinach, roughly chopped - 1 teaspoon Italian seasoning (or to taste) - Salt and pepper to taste - 2 tablespoons olive oil I love using Italian sausage in this soup. You can choose spicy for a bold taste or sweet for a milder flavor. The cheese tortellini adds a nice touch. I prefer fresh tortellini, but frozen works well too. The veggies bring color and taste to the soup. I use onion, garlic, carrots, and celery. These give a lovely base. I always add diced tomatoes and chicken broth. They create a rich, tasty broth. Spinach adds a fresh finish and a pop of green. - Fresh basil leaves - Grated Parmesan cheese Garnishes make this soup special. Fresh basil leaves add a fresh burst of flavor. Grated Parmesan cheese gives a salty finish. You can sprinkle them on top before serving. - Different types of sausage - Additional vegetables (e.g., bell peppers, zucchini) - Seasoning alternatives You can change this soup to fit your taste. Try different sausages for a new twist. Adding bell peppers or zucchini boosts the veggie count. For seasoning, feel free to mix it up. A dash of red pepper flakes can add heat. For the complete instructions, check out the Full Recipe. First, we need to prep our veggies. Start by chopping: - 1 medium onion - 3 medium carrots - 2 celery stalks - 3 cloves garlic Chop the onion and carrots into small pieces. Dice the celery into small bits. For the garlic, mince it finely. Set these aside. Next, let’s prepare the sausage. Remove the casing from 1 pound of Italian sausage. Crumble the sausage into small pieces. This will help it cook evenly. Now, let’s cook! In a large pot, heat 2 tablespoons of olive oil over medium heat. Add the chopped onion, diced carrots, and celery. Sauté these for about 5 minutes. You want them soft, and the onion should look clear. After that, add the minced garlic. Cook for about 1 minute. Keep stirring until the garlic smells great. Next, add the crumbled sausage to the pot. Brown the sausage for 7-8 minutes. Stir it often, so it cooks evenly and gets nice color. Once the sausage is browned, it’s time to add the broth. Pour in 6 cups of chicken broth and 1 can of diced tomatoes (don’t drain them). Add 1 teaspoon of Italian seasoning. Mix everything well and bring it to a boil. When it boils, lower the heat to medium-low. Carefully add 9 ounces of cheese tortellini to the pot. Let it simmer for 5-7 minutes until the tortellini is al dente. Next, gently stir in 2 cups of chopped fresh spinach. Cook until the spinach wilts, which takes about 2 minutes. Taste the soup and season with salt and pepper as you like. Serve this warm in bowls. You can add fresh basil leaves and sprinkle some grated Parmesan cheese on top for extra flavor. For the full recipe, check out the details above! To avoid overcooking the tortellini, add it to the pot only when the soup reaches a boil. This helps keep the pasta firm. Cook the tortellini for about 5 to 7 minutes, just until it's tender but still has a bit of bite. Stir it gently to avoid sticking. To ensure the flavors meld together, let the soup simmer for a few minutes after adding the tortellini. This allows the spices and ingredients to blend nicely. Taste the soup before serving. Adjust salt and pepper to make the flavors pop. Pair your soup with warm, crusty bread for a hearty meal. A simple side salad adds freshness to the table. If you serve a larger group, consider making a double batch. Soup is easy to share, and it tastes even better the next day. For a lighter option, use low-sodium broth. This helps control the salt without losing flavor. Swap out regular sausage for lean sausage or turkey sausage. This small change cuts down on fat while keeping the dish satisfying. {{image_4}} For a spicy kick, you can try spicy sausage tortellini soup. Use spicy Italian sausage instead of sweet. This adds a nice warmth to the dish. You can also add red pepper flakes for more heat. Adjust the amount to your taste. If you want a lighter option, consider a vegetarian tortellini soup. Replace the sausage with mushrooms or lentils for protein. You can use vegetable broth instead of chicken broth. This keeps the soup flavorful and satisfying. Incorporating seasonal vegetables can enhance the soup's taste. In spring, add fresh peas or asparagus. In summer, try zucchini or bell peppers. Fall brings great choices like diced butternut squash or sweet potatoes. In winter, root vegetables add heartiness. For different occasions, you can adjust the soup. For a cozy night, keep it simple. For a festive meal, add a splash of cream. This makes the soup rich and creamy for special gatherings. If you need gluten-free options, look for gluten-free tortellini. Many brands offer great choices. You can also use rice or quinoa instead of tortellini. This keeps the meal filling while meeting dietary needs. For vegan substitutes, swap the sausage for plant-based alternatives. Use vegetable broth and skip the cheese. Adding beans or lentils can boost protein. You still get a hearty soup without animal products. For the full recipe and more cooking tips, check the [Full Recipe]. To store your Sausage Tortellini Soup, first let it cool down. - Place the soup in an airtight container. - Store it in the refrigerator if you plan to eat it soon. The soup stays fresh for about 3 to 4 days in the fridge. If you want to save it for later, freezing is a great option. - Pour the cooled soup into freezer-safe bags or containers. - Make sure to leave some space for expansion. Frozen soup can last for up to 3 months. Reheating the soup properly keeps its flavor intact. - The best ways to reheat are on the stove or in the microwave. - If using the stove, heat it in a pot over medium heat. Stir it often to ensure even heating. - If using a microwave, heat it in short bursts. - Stir in between to avoid hot spots. For storage containers, use glass or BPA-free plastic. These types resist stains and are safe for reheating. The soup lasts about 3 to 4 days in the fridge. To maximize freshness, store it properly. - Keep the soup sealed tightly to prevent air exposure. - This helps avoid spoilage and keeps flavors strong. If you notice any off smell or change in color, it's best to discard it. By following these tips, you can enjoy your Sausage Tortellini Soup even days later. You can swap tortellini for different types of pasta, like penne or shell pasta. Rice is another option. Both will work well in this soup. Just adjust cooking times based on what you choose. Yes, you can make this soup ahead of time. Cook it fully, then cool it down. Store it in an airtight container. Place it in the fridge for up to three days. Reheat it on the stove or microwave when ready to eat. Sausage Tortellini Soup lasts about three to four days in the fridge. To keep it fresh, store it in an airtight container. Check for any signs of spoilage before you eat it. Yes, you can use frozen vegetables in this soup. They are quick and easy. Just add them at the same time as the tortellini. Frozen veggies cook fast, so keep an eye on them. This soup is freezer-friendly! Let it cool completely before freezing. Store it in a freezer-safe container. When ready to eat, thaw it in the fridge overnight. Reheat on the stove or microwave without losing flavor. Enjoy this tasty meal anytime! For the full recipe, check out the link! In this article, we explored how to make a hearty Sausage Tortellini Soup. We covered the key ingredients, including Italian sausage, fresh tortellini, and common vegetables. I shared tips on preparation, cooking, and serving. You also learned about variations for flavor, dietary needs, and storage. Remember, this soup is versatile and simple to make. You can customize it to fit your taste and dietary goals. Enjoy your cooking and the delightful taste of this comforting dish!](https://dailydishlab.com/wp-content/uploads/2025/06/6131aa1e-cc84-4164-90dd-a9e6e2f2c232-768x768.webp)