
Honey Sriracha Turkey Meatballs Savory and Simple Meal


Are you ready to spice up your dinner routine? These Honey Sriracha Turkey Meatballs are a simple and savory treat that perfectly balances heat and sweetness. With just a handful of easy-to-find ingredients, you’ll whip up a dish that pleases everyone at the table. Join me as we journey through each step, from mixing to baking, and discover tips for making this dish your go-to favorite. Let’s get cooking!
Why I Love This Recipe
- Flavorful Fusion: The combination of sweet honey and spicy Sriracha creates a delicious flavor profile that excites the taste buds.
- Healthy Option: Using ground turkey makes these meatballs a leaner alternative to traditional meatballs while still being satisfying.
- Easy to Make: This recipe is quick and requires minimal prep time, making it perfect for weeknight dinners or meal prep.
- Versatile Dish: These meatballs can be served as an appetizer, over rice, or in a salad, making them adaptable to various occasions.
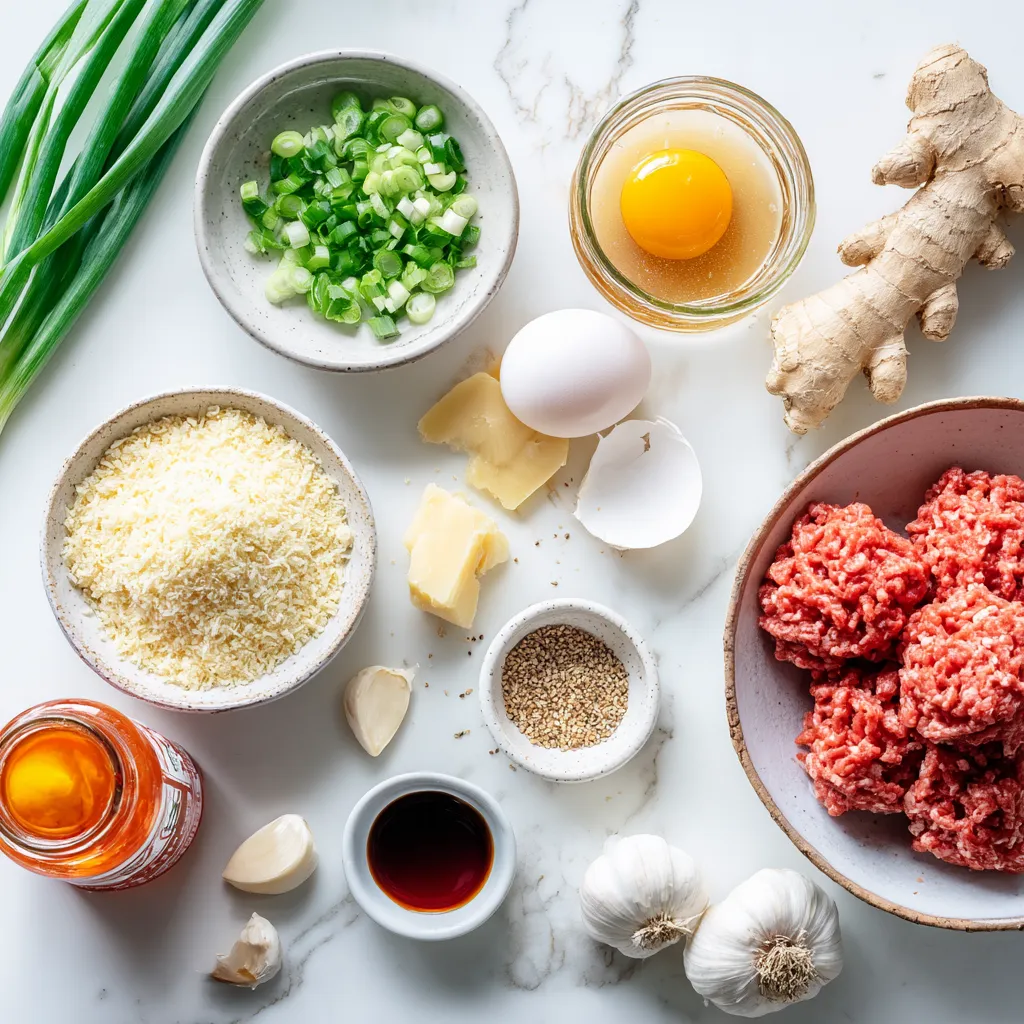
Ingredients
Main Ingredients
- 1 lb ground turkey
- 1/4 cup breadcrumbs
- 1/4 cup grated Parmesan cheese
Seasonings and Flavor Enhancers
- 2 cloves garlic, minced
- 1 tablespoon fresh ginger, minced
- 1/4 teaspoon salt
- 1/4 teaspoon black pepper
- 1/4 cup honey
- 2 tablespoons Sriracha sauce
Optional Ingredients
- 1 tablespoon soy sauce or tamari
- 1 tablespoon rice vinegar
- 1 tablespoon sesame oil
The main ingredients form the base of these meatballs. Ground turkey gives them a light texture. Breadcrumbs help bind the meatballs together, while Parmesan adds a savory kick.
For flavor, garlic and ginger are essential. They bring warmth and depth. Salt and pepper enhance all the tastes, creating a balanced dish. Honey and Sriracha give the meatballs their sweet and spicy character.
Optional ingredients can elevate the dish. Soy sauce or tamari adds umami, while rice vinegar brings brightness. Sesame oil adds a nutty finish. Together, they make a flavor-packed meal.
You can mix and match these ingredients to suit your taste. Feel free to swap in your favorite options. Enjoy creating your own twist on these tasty meatballs!
Step-by-Step Instructions
Preparing the Oven and Baking Sheet
- Preheat the oven to 400°F (200°C).
- Line a baking sheet with parchment paper.
Start by setting your oven to the right temperature. This step helps the meatballs cook evenly. Lining the baking sheet with parchment paper makes cleanup easy and helps prevent sticking.
Mixing the Meatball Ingredients
- Combine all main ingredients in a bowl.
- Avoid overmixing the meat.
In a large bowl, mix ground turkey, breadcrumbs, Parmesan cheese, and chopped green onions. Add the beaten egg, minced garlic, minced ginger, salt, and black pepper. Stir the mixture until just combined. Mixing too much can make the meatballs tough, so be gentle!
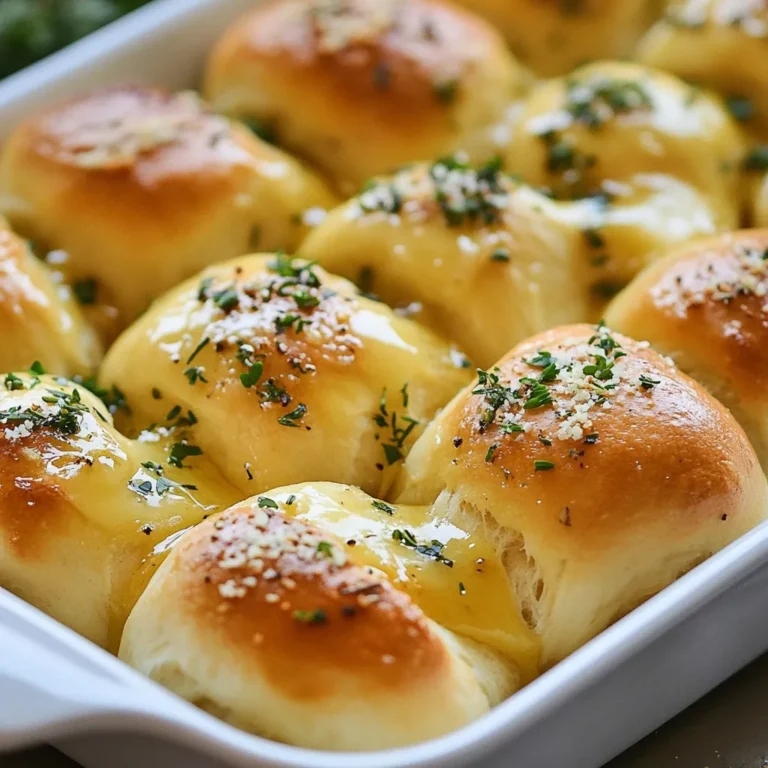
Baking and Glazing the Meatballs
- Shape and place meatballs on the baking sheet.
- Prepare and glaze with honey Sriracha sauce.
- Bake until golden and caramelized.
Form the mixture into 1-inch meatballs and place them on the baking sheet. In a small bowl, whisk together honey, Sriracha, soy sauce, rice vinegar, and sesame oil. Brush this sauce onto the meatballs in the last five minutes of baking. Bake for 15-18 minutes, or until they are golden and reach an internal temperature of 165°F (74°C). The glaze adds a sweet and spicy touch that makes these meatballs special.
Tips & Tricks
Perfecting the Meatball Texture
To keep your meatballs moist, use ground turkey with a bit of fat. This helps with juiciness. You can also add a splash of soy sauce to the mix for extra moisture.
When mixing the meat, don’t overwork it. Combine ingredients just until they blend. If you mix too much, the meatballs can become tough.
Glazing for Optimal Flavor
Timing is key for glazing. Apply the honey Sriracha sauce in the last five minutes of baking. This gives the sauce time to stick and caramelize.
To achieve the perfect caramelization, look for a golden color on your meatballs. This means the sugars in the sauce are doing their magic.
Serving Suggestions
For a great meal, serve your meatballs with steamed rice or a crisp salad. Both pair well and add balance.
Presentation matters too. Arrange the meatballs on a platter with chopped green onions and sesame seeds. Add toothpicks for easy eating. This makes your dish look even more inviting!
Pro Tips
- Fresh Ingredients: Using fresh garlic and ginger will enhance the flavor of the meatballs significantly. Always prefer fresh over pre-minced for the best taste.
- Meatball Size: For even cooking, ensure all meatballs are uniform in size. A 1-inch diameter is ideal for quick baking without drying out.
- Glaze Timing: Applying the glaze during the last few minutes of baking allows it to caramelize properly without burning, giving you a delicious finish.
- Serving Suggestions: Serve these meatballs with a side of steamed rice or a fresh salad to balance the flavors and add texture to your meal.

Variations
Alternative Protein Options
You can swap ground turkey for other meats. Ground chicken works well and is lean. If you prefer beef, use ground beef. For a lighter option, turkey is great. You can also try vegetarian meatballs. Use lentils or chickpeas to create a hearty base. Crushed beans mixed with breadcrumbs make a tasty vegan option.
Flavor Variations
Adjust the heat to match your taste. If you like it spicy, add more Sriracha. For a milder flavor, use less. You can also mix in herbs, like cilantro or parsley. Try adding spices like cumin or paprika for new tastes. Each change adds a unique twist to your meatballs.
Serving Style Variations
You can serve these meatballs in many ways. As appetizers, they are fun on toothpicks. Serve with a dipping sauce for a party. For a main course, pair them with rice or pasta. You can also drizzle extra sauce on top. Try serving them with a fresh salad or veggies for balance.
Storage Info
Refrigeration
To store leftovers, place the meatballs in an airtight container. This keeps them fresh and tasty. You can also cover them with plastic wrap. They will last in the fridge for about 3 to 4 days. Make sure to let them cool before sealing.
Freezing
For freezing, let the meatballs cool completely. Then, place them in a single layer on a baking sheet. Freeze them for about an hour until solid. Once frozen, transfer them to a freezer bag. They will stay good for about 3 months. When reheating frozen meatballs, thaw them in the fridge overnight. Heat them in the oven or microwave until hot.
Meal Prep Suggestions
You can prep these meatballs ahead of time. Form and freeze them for quick meals later. Just bake them straight from the freezer. For easy reheating, warm them with a bit of sauce to keep them moist. This way, you have a delicious meal ready in no time.
FAQs
How long do I bake honey Sriracha turkey meatballs?
Bake the honey Sriracha turkey meatballs for 15 to 18 minutes at 400°F (200°C). This heat helps the meatballs cook evenly and get a nice golden brown color. To ensure they are done, check that the internal temperature reaches 165°F (74°C). A quick tip: keep an eye on them during the last few minutes to avoid burning.
Can I use a different sweetener instead of honey?
Yes, you can use other sweeteners if needed. Maple syrup or agave nectar work well. If you want a sugar-free option, try using monk fruit sweetener or erythritol. Each of these alternatives can add a unique flavor. Just remember that the taste may differ slightly from using honey.
What can I serve with honey Sriracha turkey meatballs?
These meatballs pair well with various sides. Here are a few ideas:
- Steamed rice for a filling meal.
- A fresh salad for a light option.
- Zucchini noodles for a low-carb choice.
- Roasted vegetables for added color and flavor.
You can also serve them as appetizers with toothpicks for easy eating at parties. Enjoy mixing and matching!
In this blog post, we explored making honey Sriracha turkey meatballs. We covered key ingredients like ground turkey and seasonings such as garlic and ginger. You learned how to mix, shape, and bake meatballs to perfection. Using tips, we discussed storage options and creative variations. These meatballs can be a tasty main dish or fun appetizer. Remember, feel free to adjust flavors to match your taste. Enjoy your cooking adventures and serve delicious meals with these easy recipe

Honey Sriracha Turkey Meatballs
Ingredients
- 1 lb ground turkey
- 1/4 cup breadcrumbs
- 1/4 cup grated Parmesan cheese
- 1/4 cup finely chopped green onions
- 1 unit egg, beaten
- 2 cloves garlic, minced
- 1 tablespoon fresh ginger, minced
- 1/4 teaspoon salt
- 1/4 teaspoon black pepper
- 1/4 cup honey
- 2 tablespoons Sriracha sauce
- 1 tablespoon soy sauce (or tamari for gluten-free)
- 1 tablespoon rice vinegar
- 1 tablespoon sesame oil
Instructions
- Preheat your oven to 400°F (200°C) and line a baking sheet with parchment paper.
- In a large bowl, combine ground turkey, breadcrumbs, Parmesan cheese, chopped green onions, beaten egg, minced garlic, minced ginger, salt, and black pepper. Mix until just combined; do not overwork the meat.
- Shape the mixture into 1-inch meatballs and place them on the prepared baking sheet.
- In a small bowl, whisk together honey, Sriracha, soy sauce, rice vinegar, and sesame oil until smooth.
- Bake the meatballs in the preheated oven for 15-18 minutes, or until cooked through and golden brown, reaching an internal temperature of 165°F (74°C).
- In the last 5 minutes of baking, remove the meatballs from the oven and brush them generously with the prepared honey Sriracha sauce. Return them to the oven and continue cooking until the sauce is caramelized.
- Remove from the oven and let the meatballs cool for a couple of minutes. Drizzle any remaining sauce over the top before serving.

![For my Zucchini Quiche Muffins, I use these key ingredients: - 2 medium zucchinis, grated - 4 large eggs - 1 cup milk (dairy or plant-based) - 1 cup all-purpose flour (or whole wheat) - 1 cup shredded cheese (cheddar or feta) - 1/2 teaspoon baking powder - 1/2 teaspoon salt - 1/4 teaspoon black pepper - 1/2 teaspoon garlic powder - 1/4 cup green onions, finely chopped - 1/4 cup bell pepper, finely diced (any color) - Olive oil for greasing muffin tin You can swap out some ingredients for variety. Here are my favorites: - Instead of all-purpose flour, try almond flour for a nutty taste. - Use turkey bacon or cooked sausage for added protein. - If you want a dairy-free option, use nutritional yeast instead of cheese. - For extra greens, add chopped spinach or kale. - You can replace green onions with chives for a milder flavor. These muffins are not just tasty; they are also good for you. Here are some details: - Each muffin has about 120 calories. - They provide a good source of protein from eggs and cheese. - Zucchini adds fiber and vitamins A and C. - These muffins are low in carbs if you choose whole wheat flour. - They make a great snack or meal option for all ages. For the full recipe, check out the detailed instructions and tips! 1. Preheat your oven to 375°F (190°C). Grease a muffin tin with olive oil or use muffin liners. 2. In a large bowl, whisk together four large eggs and one cup of milk. Mix until they are well blended. 3. Grate two medium zucchinis and add them to the egg mixture. If needed, use a sieve to drain excess liquid. This step keeps your muffins from being soggy. 4. Add one cup of all-purpose flour, half a teaspoon of baking powder, and half a teaspoon of salt. Also, include a quarter teaspoon of black pepper and half a teaspoon of garlic powder. Stir gently until just mixed. Don’t overmix; the batter should be a bit lumpy. 5. Fold in one cup of shredded cheese, a quarter cup of chopped green onions, and a quarter cup of diced bell pepper. Mix until everything is evenly distributed. 6. Use a spoon to fill each muffin cup about three-quarters full with the batter. 7. Place the muffin tin in the preheated oven. Bake for 20 to 25 minutes. You want them golden brown on top. 8. About halfway through baking, check on them. This way, you can ensure they rise evenly. 9. To check if the muffins are done, insert a toothpick into the center. If it comes out clean, they are ready. If not, give them a few more minutes. 10. Once baked, let the muffins cool for a few minutes in the tin. Then, transfer them to a wire rack to cool completely. For the full recipe and further details, check the [Full Recipe]. Enjoy these tasty muffins as a snack or a side! To get the best texture in your zucchini quiche muffins, use fresh zucchinis. Grate them finely, and squeeze out any extra water. This keeps the muffins from being soggy. Mix the batter gently. A few lumps are okay; overmixing can make them tough. Use a blend of cheese for more flavor. Cheddar and feta work great together. Store any leftovers in an airtight container. They stay fresh in the fridge for up to three days. For longer storage, freeze them. Place muffins in a freezer bag, and they will last up to three months. Thaw in the fridge overnight before enjoying again. Serve these muffins warm or at room temperature. They pair well with a fresh salad or soup. Top with herbs like parsley for a burst of flavor. You can also sprinkle extra cheese on top before serving. For a fun twist, serve with a dollop of sour cream or yogurt. Enjoy them as a snack, breakfast, or side dish! For the full recipe, check out the detailed instructions above. {{image_2}} You can easily make these muffins vegetarian. Just skip the cheese, or use a plant-based one. Add more veggies like spinach, mushrooms, or kale for a tasty twist. You can even mix in some sun-dried tomatoes for extra color and flavor. This way, you keep the muffins light and fresh! To make these muffins gluten-free, swap the all-purpose flour for a gluten-free blend. Many blends work well in baking. Just make sure to check the labels to avoid any hidden gluten. You can also use almond flour or oat flour for a nutty taste. Both will give you a nice texture. Herbs and spices can make these muffins pop. Try adding thyme, rosemary, or dill for a fragrant touch. You can also mix in a pinch of chili flakes if you like heat. Another idea is to add a sprinkle of smoked paprika for a unique flavor. Don't be afraid to get creative! To keep your zucchini quiche muffins fresh, place them in an airtight container. This helps to keep moisture out. You can store them at room temperature for up to two days. If you want them to last longer, consider the fridge. In the fridge, they can stay fresh for up to a week. Freezing is a great option if you want to save muffins for later. To freeze, first let them cool completely. Then, wrap each muffin tightly in plastic wrap. After that, place them in a freezer bag. Label the bag with the date. You can freeze them for up to three months. When you’re ready to eat, just take out what you need. Reheating zucchini quiche muffins is easy. For the best results, use an oven. Preheat your oven to 350°F (175°C). Place the muffins on a baking sheet. Heat them for about 10-15 minutes. You can also use a microwave. Just heat them for 20-30 seconds. This warms them but may not keep them crisp. Enjoy your muffins warm! For the full recipe, check out the earlier section. Yes, you can use other vegetables! Carrots, spinach, or mushrooms work well. Just remember to chop them small. If you want a burst of flavor, add some sun-dried tomatoes. The key is to keep the total vegetable amount similar to the zucchini. This keeps the muffins tasty and moist. Feel free to mix and match according to what you have at home. It makes cooking fun and creative! Zucchini quiche muffins last about four days in the fridge. To store them, place them in an airtight container. This keeps them fresh and tasty. If you notice any change in smell or texture, it’s best to toss them. You can enjoy them cold or warm them up in the microwave. They make a quick snack or breakfast option! Absolutely! Mini zucchini quiche muffins are a great idea. Use a mini muffin tin instead of a regular one. Just reduce the baking time to about 12-15 minutes. Keep an eye on them, as they cook faster. These bite-sized treats are perfect for parties or snacks. Plus, they are easy to grab and eat on the go. Try making them for your next gathering! For the full recipe, check out the complete instructions above. In this post, we covered how to make delicious zucchini quiche muffins. We explored key ingredients and their substitutions. I shared easy preparation steps and baking tips to ensure perfect results. You learned how to store and reheat your muffins and enjoyed ideas for tasty variations. Embrace these tips to make your own muffin masterpiece. Enjoy experimenting and savor every bite!](https://dailydishlab.com/wp-content/uploads/2025/06/fed823f9-c559-4a2e-ba47-9f1169717efa-768x768.webp)


![- 2 cups fresh strawberries - 4 cups mixed baby greens (spinach, arugula, romaine) - 1/4 cup crumbled goat cheese - 1/4 cup pecans (roughly chopped) - 1/4 cup balsamic glaze - 2 tablespoons olive oil - Salt and pepper to taste - Fresh basil leaves (for garnish) You need ripe strawberries for this salad. They add sweet, juicy flavor. I recommend using a mix of greens. Spinach, arugula, and romaine create a nice crunch. Goat cheese brings tanginess, while pecans add a rich nutty taste. For the dressing, balsamic glaze gives a sweet and tart kick. Olive oil smooths it out. Salt and pepper round it all off. This salad is bright and fresh. It makes a great side dish or light meal. If you want the full recipe, check out the Balsamic Strawberry Delight Salad. First, grab a large salad bowl. You need to combine the mixed baby greens and sliced strawberries. It is best to use fresh greens like spinach, arugula, and romaine. The mix adds great texture and flavor. When you add the greens, make sure they are clean and dry. Then, toss in the sliced strawberries. Their sweet taste pairs well with the greens and adds color. Next, it’s time to sprinkle on the crumbled goat cheese and roughly chopped pecans. The goat cheese adds a creamy touch. The pecans give a nice crunch. These toppings elevate your salad and make it feel special. You can adjust the amount based on your taste. If you love cheese, add more! Now, let’s make the dressing. In a small bowl, whisk together the balsamic glaze, olive oil, salt, and pepper. Start with a few tablespoons of balsamic glaze. It should be sweet and tangy. Then, add olive oil to balance the flavors. Mix until well combined. Drizzle this dressing over the salad and toss gently. Make sure everything is coated nicely. Taste your salad and adjust the seasoning if needed. You can add more salt or pepper. Lastly, garnish with fresh basil leaves for that extra pop of flavor. For the full recipe, check out the Balsamic Strawberry Delight Salad. You can make this salad your own! Here are some great ideas: - Add nuts: Try walnuts or almonds for crunch. - Include fruits: Blueberries or sliced peaches work well. - Choose cheeses: Feta or mozzarella can change the flavor. For greens, I love mixing different types. Here are some good choices: - Spinach for its soft texture. - Arugula for a peppery kick. - Romaine for a nice crunch. The dressing can be adjusted to your taste. If you like it sweeter, add more balsamic glaze. If you want it tangy, increase the olive oil. To store leftover dressing, keep it in a sealed jar in the fridge. It can last up to a week. Just give it a good shake before using it again. Make your salad look great on the plate! Here are some ideas: - Garnish with basil leaves. They add color and flavor. - Use a large, shallow bowl. It shows off the colors well. For serving, try clear glass bowls. They let the bright colors shine through. You can also use wooden boards for a rustic touch. Enjoy your beautifully presented salad! {{image_2}} You can make your salad even better by adding seasonal fruits. Try peaches, blueberries, or even kiwi. These fruits can add sweetness and color. You can also use dried fruits like cranberries or apricots. Dried fruits give a chewy texture and a burst of flavor to each bite. They also add a nice contrast to the fresh greens. Want to make your salad a meal? You can add protein like grilled chicken, shrimp, or tofu. Chicken gives a nice, savory taste. Shrimp adds a light and sweet flavor. For a vegetarian option, tofu works great. You can grill or sauté it for extra flavor. Adding protein makes the salad filling and satisfying. While balsamic glaze is tasty, you can try other dressings too. Homemade vinaigrettes can add a personal touch. Mix olive oil, vinegar, and herbs for a bright flavor. You can also swap dressings based on your diet. If you want something lighter, try a lemon dressing. For creaminess, a yogurt-based dressing works well. The right dressing can change the whole feel of the salad. Explore the [Full Recipe] for more ideas and tips! To keep your Balsamic Strawberry Salad fresh, store it in an airtight container. This helps seal in the flavors and keeps the greens crisp. Always keep the dressing separate until you are ready to eat. This prevents the greens from wilting. The salad stays fresh in the fridge for about 2 days. You cannot freeze this salad as a whole. Freezing will change the texture of the greens and strawberries. However, you can freeze individual components. For instance, you can freeze sliced strawberries. Just wash and slice them first. Place them in a sealed bag or container. When you're ready, thaw them in the fridge overnight. If you add cooked toppings, such as chicken or quinoa, you can reheat them. Warm them in the microwave or a pan on low heat. Do this just before serving. Assemble your salad right before eating to keep it fresh. Toss in the toppings and dressing at the last moment for the best taste. To make balsamic vinaigrette, mix simple ingredients. Start with 1/4 cup of balsamic vinegar. Add 1/2 cup of olive oil for a smooth base. Mix in 1 teaspoon of Dijon mustard for flavor. Then, add salt and pepper to taste. Whisk all ingredients until they blend well. This vinaigrette is perfect for your Balsamic Strawberry Salad. Yes, you can use different cheeses in this salad. Feta cheese adds a salty kick. Blue cheese gives a strong flavor that many enjoy. If you prefer a milder taste, try mozzarella or ricotta. Each cheese brings a unique taste, so feel free to experiment! This salad goes well with many meals. You can serve it with grilled chicken for protein. It also pairs nicely with fish, like salmon or tilapia. For a vegetarian option, try it with quinoa or a grain bowl. These dishes will complement the salad’s fresh and fruity flavors. When selecting strawberries, look for bright red color. They should have a shiny surface and be firm to touch. Check for green caps, as they show freshness. Avoid berries with soft spots or mold. Ripe strawberries taste sweet and juicy, making them perfect for your salad. This Balsamic Strawberry Salad is fresh, simple, and full of flavor. We mixed greens and strawberries, topped them with goat cheese and pecans, and drizzled a tasty balsamic dressing. You can customize it with proteins or other fruits. Remember to store leftovers properly to enjoy later. Making this salad is a fun way to eat healthy. Try it out, and enjoy a delicious meal that feels special without much fuss. Your taste buds will thank you!](https://dailydishlab.com/wp-content/uploads/2025/07/ce13cfb9-b3c1-4343-91ba-f92d3a3b474e-768x768.webp)