
Chocolate Chip Banana Oatmeal Cookies Tasty and Simple
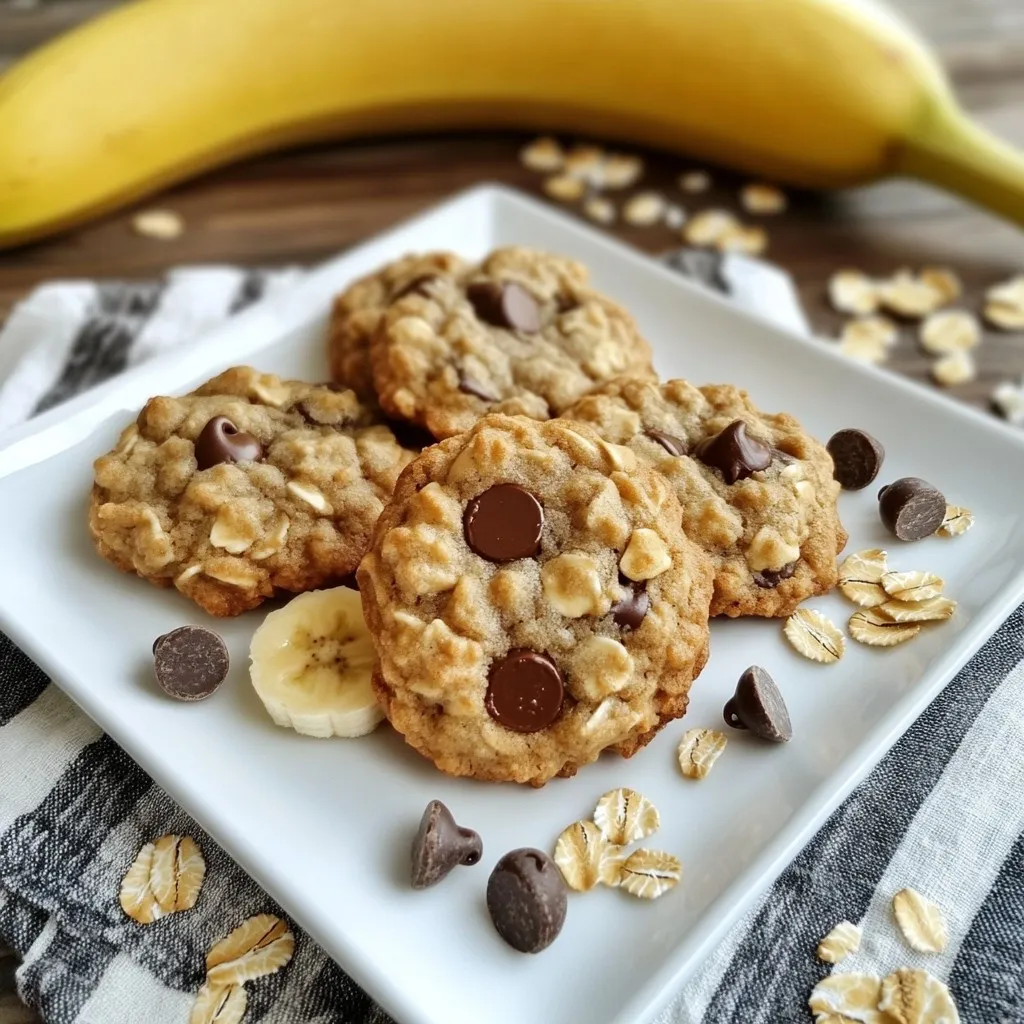

If you love cookies that blend taste with ease, you’re in for a treat! These Chocolate Chip Banana Oatmeal Cookies are not just simple to make, but also deliciously satisfying. Packed with wholesome ingredients, they offer nutrition without sacrificing flavor. In this post, I’ll guide you through every step, share handy tips, and even explore fun variations. Let’s dive in and create the perfect cookie together!
Why I Love This Recipe
- Delicious Flavor Combination: The sweet banana and rich chocolate chips create a perfect harmony that is hard to resist.
- Healthier Ingredients: Using oats and bananas adds fiber and nutrients, making these cookies a guilt-free treat.
- Quick and Easy: This recipe comes together in just 15 minutes of prep time, making it perfect for busy days.
- Customizable: You can easily swap in different nuts or add dried fruit to suit your taste preferences.
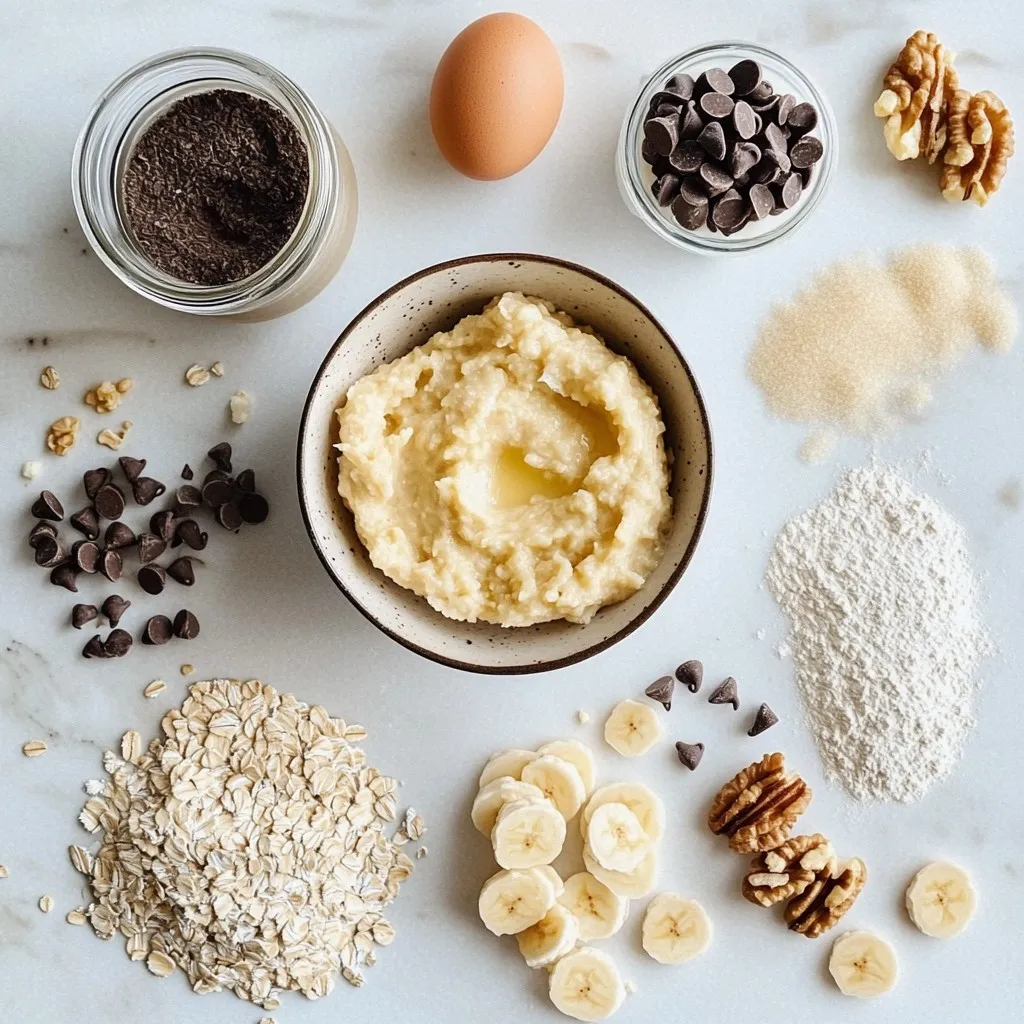
Ingredients
Detailed Ingredients List
To make Chocolate Chip Banana Oatmeal Cookies, you need a few simple items. Here’s what you will need:
- 1 cup mashed ripe bananas (about 2-3 bananas)
- 1/2 cup coconut oil, melted (or unsalted butter)
- 1/2 cup brown sugar, packed
- 1/4 cup granulated sugar
- 1 large egg
- 1 teaspoon vanilla extract
- 1 cup rolled oats
- 1 cup flour (all-purpose or whole wheat)
- 1 teaspoon baking soda
- 1/2 teaspoon salt
- 1 cup semi-sweet chocolate chips
- 1/2 cup chopped walnuts (optional)
Special Notes on Ingredient Substitutions
You can change some ingredients based on what you have. If you don’t have coconut oil, use unsalted butter. You can also use almond flour instead of regular flour for a nutty taste. If you want to cut sugar, try using maple syrup or honey. For a vegan option, replace the egg with flaxseed meal mixed with water.
Health Benefits of Key Ingredients
These cookies have some great health perks. Bananas are full of potassium, which helps your heart. They add natural sweetness and moisture. Oats are rich in fiber, which is good for digestion. They can help you feel full longer. Walnuts, if you use them, add healthy fats and protein. They also have omega-3s, which are good for your brain. Overall, these cookies are a tasty treat that also has some good nutrition.
Step-by-Step Instructions
Preparation Steps for Cookie Dough
To start, gather all your ingredients. You will need:
- 1 cup mashed ripe bananas (about 2-3 bananas)
- 1/2 cup coconut oil, melted (or unsalted butter)
- 1/2 cup brown sugar, packed
- 1/4 cup granulated sugar
- 1 large egg
- 1 teaspoon vanilla extract
- 1 cup rolled oats
- 1 cup flour (all-purpose or whole wheat)
- 1 teaspoon baking soda
- 1/2 teaspoon salt
- 1 cup semi-sweet chocolate chips
- 1/2 cup chopped walnuts (optional)
First, mash your bananas in a big bowl. Use a fork for this. Aim for a smooth texture. Next, add melted coconut oil, brown sugar, and granulated sugar. Mix until creamy. Then, beat in the egg and vanilla extract. Stir until everything blends well.
In another bowl, combine the rolled oats, flour, baking soda, and salt. Mix these dry ingredients together. Slowly add this mix to the banana mix. Stir gently until just combined. Don’t overmix; a few lumps are okay. Finally, fold in the chocolate chips and walnuts if you choose to use them.
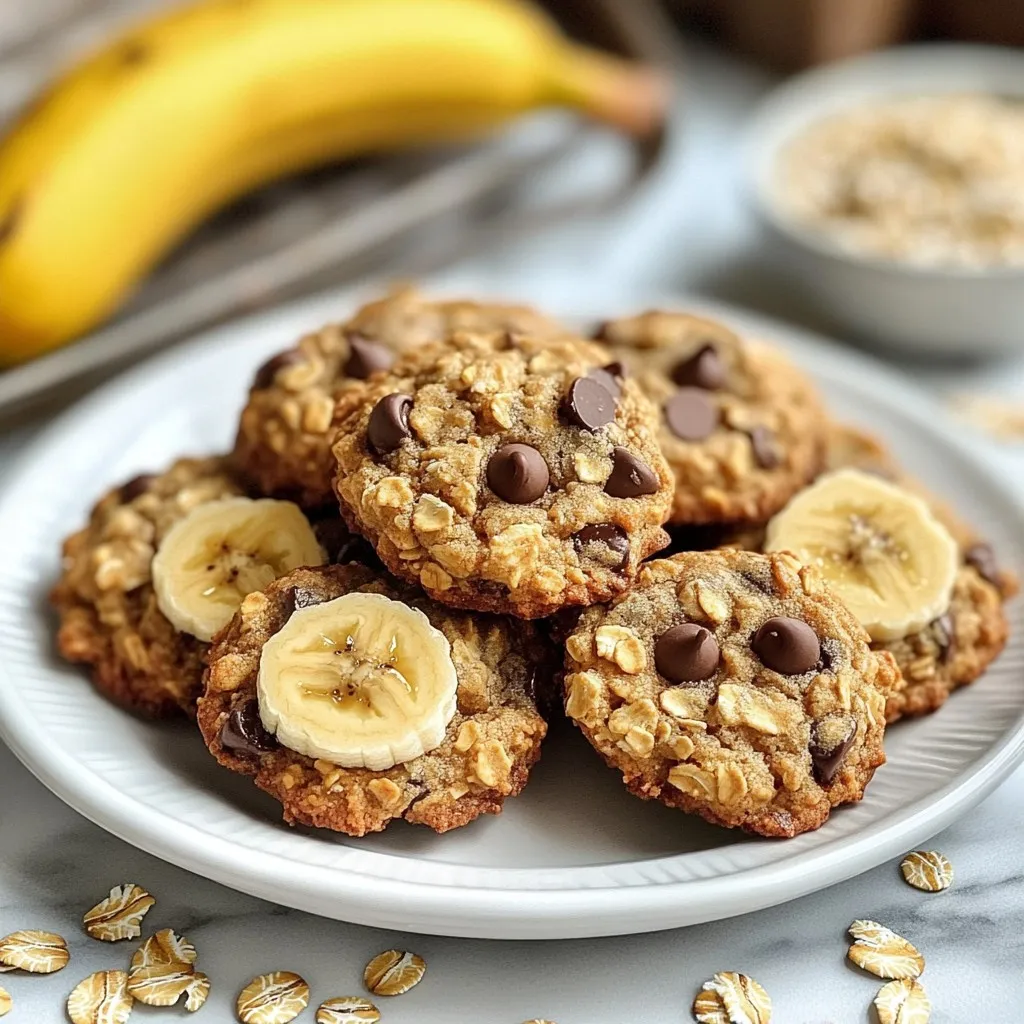
Baking Instructions and Tips
Now it’s time to bake. Preheat your oven to 350°F (175°C). Line a baking sheet with parchment paper. This will help the cookies not stick.
Spoon out the dough onto the sheet. Space them about 2 inches apart. This gives them room to spread. Bake for 10-12 minutes. Look for lightly golden edges. This means they are ready. Once done, take them out and let them cool on the baking sheet for 5 minutes. Then, move them to a wire rack to cool completely.
Achieving the Perfect Cookie Texture
For the best texture, aim for soft and chewy cookies. Use ripe bananas; they add moisture. Don’t overbake them. They will firm up as they cool. If you want a crisp edge, bake a little longer.
If you like a doughier cookie, reduce the baking time by a minute. Remember, every oven is different. Keep an eye on your cookies. For extra chewiness, add a bit more brown sugar. Enjoy the process, and soon you will have delicious chocolate chip banana oatmeal cookies!
Tips & Tricks
How to Store Leftover Cookies
Store your leftover cookies in an airtight container. They stay fresh for about five days. If you want them to last longer, you can refrigerate them. Just remember to let them sit at room temperature for a few minutes before eating. This helps bring back their soft texture.
Tips for Freezing Cookie Dough
Freezing cookie dough is easy. Scoop your dough into balls and place them on a baking sheet. Freeze them for about an hour. Once they are solid, transfer the dough balls into a freezer-safe bag. Label the bag with the date and type of cookie. They last for up to three months. When ready to bake, just pop them in the oven straight from the freezer. You may need to add a minute or two to the baking time.
Enhancing Flavor with Add-ins
You can make these cookies even more special. Here are some fun add-ins to try:
- Chopped nuts: Walnuts add crunch and flavor.
- Dried fruits: Raisins or cranberries give a sweet twist.
- Spices: A pinch of cinnamon or nutmeg can warm up the flavor.
- Nut butter: A scoop of peanut or almond butter can add richness.
Experiment with these ideas to find your favorite mix!
Pro Tips
- Use Ripe Bananas: The riper the bananas, the sweeter and more flavorful your cookies will be. Look for bananas with plenty of brown spots for the best results.
- Chill the Dough: For thicker cookies, chill the dough for about 30 minutes before baking. This helps prevent them from spreading too much in the oven.
- Experiment with Mix-Ins: Feel free to customize your cookies by adding different nuts, dried fruits, or even a sprinkle of cinnamon for extra flavor.
- Storage Tips: Store cookies in an airtight container at room temperature for up to a week or freeze them for longer shelf life. Just make sure to separate layers with parchment paper.
Variations
Alternative Add-ins (Nuts, Dried Fruits, etc.)
You can make these cookies even better by adding fun mix-ins. Try adding chopped nuts like walnuts or pecans. They add a nice crunch and flavor. Dried fruits like raisins or cranberries work well too. These fruits add sweetness and chewiness. You can also use peanut butter chips or white chocolate chips for a twist. Get creative and add what you like!
Making Gluten-Free Options
If you want gluten-free cookies, it’s easy to switch the flour. Use gluten-free flour instead of regular flour. Make sure your oats are certified gluten-free too. This way, you keep the great taste without the gluten. The cookies will still be soft and chewy, just like the classic recipe.
Vegan Adaptation of the Recipe
You can make these cookies vegan with a few simple swaps. First, replace the egg with a flax egg. Mix one tablespoon of ground flaxseed with three tablespoons of water. Let it sit for a few minutes to thicken. Use coconut oil, as it is vegan friendly. Be sure to choose vegan chocolate chips, too. These changes let everyone enjoy this tasty treat!
Storage Info
Optimal Storage Conditions
To keep your Chocolate Chip Banana Oatmeal Cookies fresh, store them in an airtight container. This helps keep moisture in and air out. You can place parchment paper between layers to prevent sticking. Keep the container at room temperature for the best taste. If you live in a warm area, consider the fridge to avoid melting chocolate chips.
Shelf Life of Baked Cookies
When stored properly, these cookies can last up to one week at room temperature. If you refrigerate them, they can last about two weeks. The flavor and texture may change over time, but they will still be tasty. For long-term storage, freeze the cookies. They can last for about three months in the freezer.
How to Revive Stale Cookies
If your cookies become stale, don’t worry! You can easily bring them back to life. Preheat your oven to 300°F (150°C). Place the cookies on a baking sheet and warm them for about 5 minutes. This softens them and revives their yummy taste. Another option is to put a slice of bread in the container with the cookies. The bread will absorb moisture and help the cookies stay soft.
FAQs
Can I use frozen bananas for this recipe?
Yes, you can use frozen bananas. Just make sure to thaw them first. Once thawed, they become mushy. This texture works well in the cookies. If you have frozen ripe bananas, they are perfect for this recipe.
How do I make the cookies softer?
To make these cookies softer, try adding more mashed bananas. You can also reduce the baking time slightly. Bake them until just golden on the edges. This keeps them chewy and moist inside.
What can I substitute for coconut oil?
You can use unsalted butter instead of coconut oil. Melt the butter and mix it in the same way. Other options include vegetable oil or even applesauce for a lighter touch. Each will change the flavor a bit, so choose what you like best.
How do I prevent cookies from spreading too much?
To stop the cookies from spreading, chill the dough for about 30 minutes before baking. This firms up the fat and helps keep the cookies thick. Also, make sure not to overmix the dough when adding the dry ingredients.
This blog post walked you through creating delicious cookies. You learned about key ingredients and their health benefits. We covered how to prepare the dough, bake it just right, and achieve that perfect cookie texture.
Don’t forget the tips on storage and freezing. You also discovered fun variations, like gluten-free and vegan options. Use these ideas to make your cookies unique and tasty. Enjoy your baking journey, and remember that practice leads to perfect cookie
Chocolate Chip Banana Oatmeal Cookies
Ingredients
- 1 cup mashed ripe bananas (about 2-3 bananas)
- 1 2 coconut oil, melted (or unsalted butter)
- 1 2 brown sugar, packed
- 1 4 granulated sugar
- 1 large egg
- 1 teaspoon vanilla extract
- 1 cup rolled oats
- 1 cup flour (all-purpose or whole wheat)
- 1 teaspoon baking soda
- 1 2 salt
- 1 cup semi-sweet chocolate chips
- 1 2 chopped walnuts (optional)
Instructions
- Preheat your oven to 350°F (175°C) and line a baking sheet with parchment paper.
- In a large mixing bowl, combine the mashed bananas, melted coconut oil, brown sugar, and granulated sugar. Mix until smooth.
- Beat in the egg and vanilla extract until well combined.
- In a separate bowl, whisk together the rolled oats, flour, baking soda, and salt.
- Gradually add the dry ingredients to the banana mixture, stirring until just combined.
- Fold in the chocolate chips and chopped walnuts, if using.
- Drop spoonfuls of the dough onto the prepared baking sheet, spacing them about 2 inches apart.
- Bake in the preheated oven for 10-12 minutes or until the edges are lightly golden.
- Remove from the oven and let the cookies cool on the baking sheet for 5 minutes before transferring them to a wire rack to cool completely.

![- 1 cup coconut milk - 1/2 cup chia seeds - 1 ripe mango, diced - 2 tablespoons maple syrup or honey (adjust to taste) - 1 teaspoon vanilla extract - Pinch of salt - Toasted coconut flakes for garnish (optional) - Fresh mint leaves for garnish (optional) Coconut milk offers healthy fats that boost energy. It also helps with digestion. Chia seeds are full of fiber, which aids in digestion and keeps you full longer. Mango is rich in vitamins A and C, which support your immune system and skin. Maple syrup or honey adds natural sweetness and contains antioxidants. Vanilla extract gives flavor and may help reduce stress. Salt enhances taste and can help balance fluids in your body. Toasted coconut flakes add crunch and fiber, while mint adds freshness and aids digestion. If you don't have coconut milk, use almond or oat milk for a different taste. For chia seeds, you can use ground flaxseeds, but the texture will change. Any ripe fruit can replace mango, like bananas or berries, for varied flavors. Maple syrup can be swapped with agave syrup or stevia for a lower-calorie option. If you want a sugar-free choice, skip the sweetener and let the fruit shine. You can use vanilla bean paste instead of extract for a richer flavor. This recipe for Mango Coconut Chia Pudding is simple and packed with flavor. To make Mango Coconut Chia Pudding, start with the coconut milk. In a mixing bowl, combine: - 1 cup coconut milk - 2 tablespoons maple syrup or honey - 1 teaspoon vanilla extract - A pinch of salt Whisk these ingredients until they blend well. Next, add the chia seeds. Gradually whisk in: - 1/2 cup chia seeds This step is key. Make sure the seeds spread evenly in the liquid. Cover the bowl, or move the mix to a container with a lid. Place it in the fridge for at least 4 hours. For best results, leave it overnight. This waiting time lets the chia seeds absorb the coconut milk. After chilling, check the pudding. Stir it well to break up clumps. Now it’s ready for serving! To get the right texture, use fresh chia seeds. Old seeds may not thicken well. If your pudding is too thick, add a bit more coconut milk. For a creamier texture, use full-fat coconut milk. Remember to stir well after chilling. This helps avoid clumps and ensures smoothness. For a beautiful presentation, layer the pudding in clear glasses. Start with a layer of chia pudding, then add: - Diced mango Repeat the layers until the glass is full. Finish with a sprinkle of toasted coconut flakes and fresh mint leaves. This adds color and flavor. Serve it cold for a refreshing treat. For the full recipe, check below! You can make this pudding your own. Here are my favorite tips: - Add spices: A sprinkle of cinnamon or nutmeg can bring warmth. - Mix fruits: Try adding berries or pineapple for a tropical twist. - Change sweeteners: Use agave nectar or stevia instead of maple syrup. - Include nuts: Chopped almonds or walnuts add crunch and nutrition. Watch out for these common errors to get the best pudding: - Not whisking well: Make sure to mix the chia seeds fully into the liquid. - Skipping the chill time: Let the pudding sit for at least four hours. - Using too much liquid: Stick to the recipe for the right balance. - Not stirring before serving: A quick stir helps mix any settled chia seeds. You can boost both flavor and texture with some easy tricks: - Layer with fruit: Diced mango between layers adds freshness and color. - Garnish well: Use toasted coconut and mint leaves for a beautiful finish. - Serve chilled: This pudding tastes best when cold and creamy. - Experiment with toppings: Yogurt, granola, or seeds can add fun textures. For the full recipe, check out the detailed instructions above! {{image_2}} You can change the mango in this pudding for other fruits. Pineapple, kiwi, or passion fruit work great. Each fruit adds its own flavor and texture. You might want to mix in diced fruit before chilling the pudding. This way, each spoonful has a burst of tropical taste. You can also top the pudding with extra fruit for a colorful look. Coconut milk is a star in this recipe. If you want to try something different, use almond or oat milk. Both options are dairy-free and still creamy. Just keep in mind that each milk will change the flavor a bit. If you want a thicker base, add more chia seeds. This will help you achieve that creamy texture you love. Maple syrup or honey gives sweetness to the pudding. If you want a sugar-free option, try stevia or agave syrup. Both are great for adding sweetness without calories. You can also use ripe bananas for natural sweetness. Just mash them well and mix them into the base. This adds a new flavor while keeping the pudding healthy. For the full recipe, you can check the earlier section. Enjoy these fun variations! To keep your mango coconut chia pudding fresh, store it in airtight containers. This helps prevent any unwanted odors or flavors from seeping in. Make sure to place the pudding in the fridge right after it cools. You can also layer it in small jars for easy serving later. Mango coconut chia pudding lasts about 5 days in the fridge. If you want to keep it longer, you can freeze it. Pour the pudding into ice cube trays for easy portions. Just remember to thaw it in the fridge before serving. Do not refreeze after thawing. If your pudding thickens too much in the fridge, simply add a splash of coconut milk. Stir well to achieve your desired consistency. You can also mix in fresh mango pieces for a flavor boost. Enjoy it cold or let it sit at room temperature for a few minutes before digging in. Chia pudding is a simple dish made from chia seeds and liquid. When you mix chia seeds with coconut milk, they absorb the liquid. This makes a thick, creamy texture. To make it, whisk coconut milk, maple syrup, vanilla, and salt. Then, stir in chia seeds. Cover and chill for at least four hours. This lets the seeds swell and form a pudding. Yes, you can use different types of milk. Almond, soy, or oat milk work well. Each type adds its own flavor. Coconut milk gives a rich, tropical taste. Try what you like best to find your favorite! Mango coconut chia pudding lasts about four to five days in the fridge. Store it in an airtight container to keep it fresh. If you notice any changes in smell or texture, it is best to throw it away. Yes, chia pudding is very healthy. Chia seeds are high in fiber and protein. They also contain omega-3 fatty acids. Coconut milk provides good fats and vitamins. This dish is great for breakfast or a snack. To make chia pudding without sugar, skip the sweeteners. Use ripe mango for natural sweetness. You can also add spices like cinnamon or nutmeg for flavor. This makes the pudding tasty without added sugar. Here’s how to make it: - 1 cup coconut milk - 1/2 cup chia seeds - 1 ripe mango, diced - 2 tablespoons maple syrup or honey (adjust to taste) - 1 teaspoon vanilla extract - Pinch of salt - Toasted coconut flakes for garnish (optional) - Fresh mint leaves for garnish (optional) Follow the [Full Recipe] for step-by-step details on how to prepare this delicious treat! Mango coconut chia pudding is simple and fun to make. We explored key ingredients, their health perks, and ways to swap them out. I provided clear steps to prepare the dish and serve it just right. We looked at tips to enhance flavors and avoid common mistakes. You can try tropical fruit variations and find dairy-free options too. Proper storage ensures your pudding stays fresh and tasty. With these insights, you can create a delicious treat that fits your tastes and lifestyle. Enjoy your chia pudding adventure!](https://dailydishlab.com/wp-content/uploads/2025/07/e4ad1822-a4f3-41e3-be5e-fabc0a8bd60a-768x768.webp)