Biscuits and Sausage Gravy Breakfast Pizza Delight

Wake up to a flavor-packed treat with Biscuits and Sausage Gravy Breakfast Pizza Delight! This mouthwatering dish combines crispy biscuit dough with hearty sausage gravy and gooey cheese, making it the perfect start to your day. In this article, I’ll guide you through easy steps, share tips for customizing your pizza, and provide ways to store leftovers. Get ready to amaze your family and friends with this delicious breakfast creation!
Ingredients
To create a mouthwatering biscuits and sausage gravy breakfast pizza, gather these key ingredients:
- 1 can of refrigerated biscuit dough
- 1 pound breakfast sausage
- 1/4 cup all-purpose flour
- 2 cups whole milk
- 1/2 teaspoon garlic powder
- 1/2 teaspoon onion powder
- 1/4 teaspoon freshly cracked black pepper
- 1 1/2 cups shredded sharp cheddar cheese
- 2 large eggs
- Fresh parsley (for garnish)
- Salt, to taste
Each ingredient plays a vital role. The refrigerated biscuit dough forms a soft, flaky crust. Breakfast sausage brings rich flavor and heartiness. Flour and milk create a creamy gravy, while spices add depth. Cheddar cheese gives a savory finish, and eggs provide protein. Fresh parsley adds a pop of color and freshness.Enjoy creating this delightful dish!
Step-by-Step Instructions
Preheat the Oven
- Set the oven to 425°F (220°C). This step is vital for a great crust.
Prepare the Biscuit Dough
- Roll out the biscuit dough on a floured surface. Aim for a large circle that fits your baking sheet.
- Bake the dough for 8-10 minutes. Look for a nice golden brown color.
Cook the Sausage
- Heat a skillet over medium heat. Add the breakfast sausage.
- Break the sausage apart with a spoon. Cook until it’s brown, about 5-7 minutes.
Make the Gravy
- After the sausage is cooked, sprinkle the flour over it. Stir well for one minute.
- Gradually pour in the milk while stirring. This helps avoid lumps.
- Let the mixture simmer and thicken for about 5-7 minutes.
Assemble the Pizza
- Take the biscuit crust out of the oven. Spread the sausage gravy on it, leaving a bit of edge.
- Crack two large eggs onto the gravy. Space them evenly.
Final Baking
- Sprinkle cheese over the eggs and gravy.
- Bake again for 8-10 minutes. Check to ensure the cheese melts and the eggs cook to your liking.Enjoy this tasty twist on breakfast!
Tips & Tricks
Perfecting the Biscuit Crust
To make your biscuit crust perfect, focus on the dough’s texture. Use cold dough for the best rise. When you roll it out, don’t overwork it. This keeps the layers fluffy. Bake at 425°F (220°C) for 8-10 minutes. You want it golden brown and puffed up. Watch closely, as ovens can vary. A perfectly baked crust provides a great base for the toppings.
Sausage Alternatives
If you want to change the sausage, many options exist. You can try turkey sausage for a leaner choice. Chicken sausage adds a nice twist too. For a spicy kick, use chorizo or breakfast sausage with herbs. You can even opt for a plant-based sausage. Each type brings unique flavors and textures to your pizza.
Customizing the Gravy
Making your gravy shine is easy with a few tweaks. Add a dash of hot sauce for heat. Fresh herbs like thyme or rosemary can boost flavor. For a richer taste, try adding cream instead of milk. You can even mix in sautéed mushrooms or spinach for added depth. Experimenting allows you to create a gravy that’s uniquely yours.

Variations
Vegetarian Option
You can make this breakfast pizza vegetarian by swapping the sausage. Use plant-based sausage instead. Look for brands that mimic the taste and texture of pork sausage. You can also use crumbled tofu seasoned with sage, thyme, and paprika. This option keeps the pizza hearty and satisfying without meat.
Cheese Variations
Cheese adds flavor and creaminess to your pizza. While sharp cheddar is great, you can try other types. Use mozzarella for a milder taste. Goat cheese adds tanginess, while pepper jack gives it a spicy kick. Mixing different cheeses can create unique flavor profiles. Experiment to find your favorite blend!
Topping Ideas
Toppings can elevate your pizza. Add fresh spinach or sautéed mushrooms for an earthy flavor. Diced bell peppers or cherry tomatoes bring brightness and color. Crumbled bacon or cooked ham can add extra meatiness. For a fresh finish, sprinkle chives or arugula on top after baking. Get creative and make it your own!
Storage Info
Storing Leftovers
To store any leftovers of biscuits and sausage gravy breakfast pizza, let it cool completely first. Place the pizza in an airtight container. You can keep it in the fridge for up to three days. If you want to save it longer, wrap individual slices in plastic wrap. Then, place them in a freezer-safe bag or container. Properly stored, it can last in the freezer for up to three months. When you are ready to enjoy it again, thaw it overnight in the fridge before reheating.
Reheating Instructions
To reheat your pizza, use the oven for the best results. Preheat your oven to 350°F (175°C). Place the slices on a baking sheet and cover them with foil. This helps keep the pizza moist while it heats. Bake for about 10 to 15 minutes, or until warm. If you want a crispier crust, remove the foil for the last few minutes. You can also reheat it in the microwave, but this may make the crust a bit soggy. Heat for 30 seconds at a time until warm. Enjoy your delicious breakfast pizza again!
FAQs
What can I serve with Biscuits and Sausage Gravy Breakfast Pizza?
You can serve many sides with this pizza. Here are some ideas:
- Fresh fruit salad
- Scrambled eggs
- Crispy bacon
- Roasted potatoes
- A light green salad
These dishes add flavor and balance to your meal. Pairing them helps create a full breakfast experience.
Can I make this recipe ahead of time?
Yes, you can prep parts of this recipe early. Here’s how:
- Cook the sausage and make the gravy. Store them in the fridge for up to two days.
- Roll out the biscuit dough and keep it covered in the fridge overnight.
When ready to cook, just assemble and bake! This saves time on busy mornings.
How do I make it gluten-free?
To make this dish gluten-free, follow these tips:
- Use gluten-free biscuit dough instead of regular.
- Substitute all-purpose flour with a gluten-free flour blend when making gravy.
These swaps ensure you enjoy the same great taste without gluten.
What’s the best way to reheat leftovers?
Reheating leftovers can be simple. Here are my best methods:
- Use the oven: Preheat to 350°F (175°C). Place the pizza on a baking tray and heat for about 10 minutes.
- Use the microwave: Heat a slice on low power for 30-60 seconds.
Both methods keep the pizza tasty and warm.
Can I use a different type of dough?
Yes, you can try different doughs. Here are some options:
- Pizza dough for a thinner crust.
- Crescent roll dough for a flaky texture.
- Homemade biscuit dough for extra flavor.
Experimenting can lead to a delightful new twist!
You now know how to make a tasty Biscuits and Sausage Gravy Breakfast Pizza. We covered the key ingredients, easy steps, and helpful tips. You can customize this dish with different sausages or cheeses. Leftovers? Store them right and reheat wisely. Try this recipe to impress your family or friends. Enjoy every flavorful bite, and make it your own!


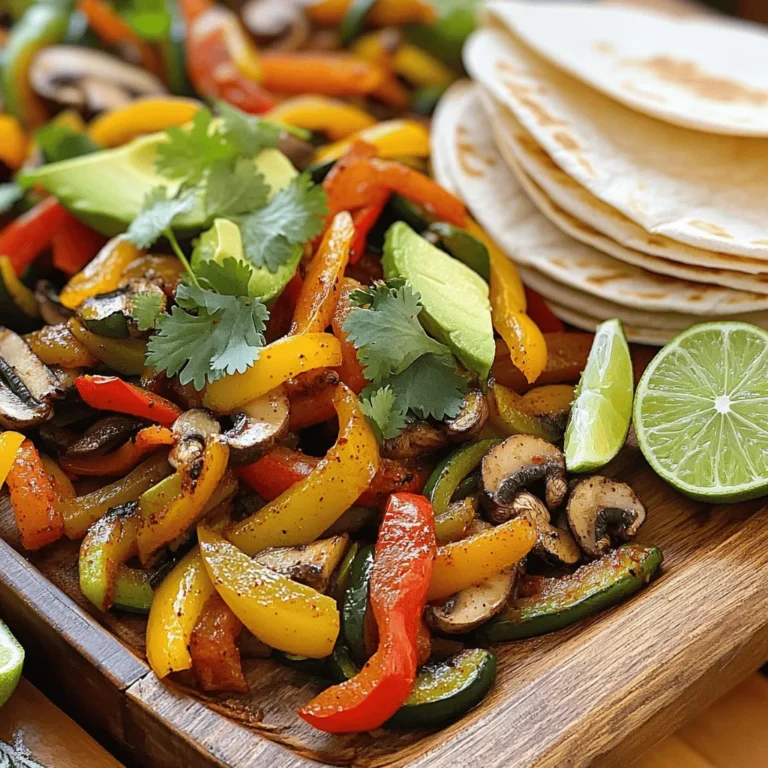
![Here’s what you need for Easy Sheet Pan Salmon Fajitas. Gather these ingredients for a fun and tasty meal: - 1 lb salmon fillet, cut into bite-sized pieces - 2 bell peppers (any color), sliced - 1 medium onion, sliced - 3 tablespoons olive oil - 2 teaspoons chili powder - 1 teaspoon ground cumin - 1 teaspoon garlic powder - 1/2 teaspoon smoked paprika - Salt and pepper to taste - 8 small flour or corn tortillas - Fresh cilantro, for garnish - Lime wedges, for serving These ingredients work together to create a dish that is both simple and full of flavor. The salmon brings a rich taste, while the vegetables add crunch and color. Each spice adds a unique depth, making every bite exciting. You can find the full recipe to guide you through the cooking process. Enjoy crafting this delightful meal! - Preheat your oven to 400°F (200°C). - Line a baking sheet with parchment paper. - In a large bowl, combine sliced bell peppers and onion with 3 tablespoons of olive oil, chili powder, ground cumin, garlic powder, smoked paprika, salt, and pepper. - Toss well to coat the veggies evenly. - Spread the seasoned vegetables on one side of the sheet pan. - Coat salmon pieces with olive oil and place them on the other side of the pan. - Bake everything for 15-20 minutes. Check for doneness to ensure the salmon is cooked through. - Warm the tortillas in a dry skillet or microwave until soft. - Once done, assemble salmon and veggies in the warm tortillas. - Add fresh cilantro and a squeeze of lime juice for extra flavor. You can find the complete instructions in the Full Recipe. Enjoy your cooking! I love to play with flavors. For a zestier kick, add more chili powder. If you prefer a milder taste, reduce it. You can also mix in some lime zest for a fresh twist. For a smoky flavor, increase the smoked paprika. Experiment with spices to find what you love. Cooking time depends on the salmon's thickness. Thicker pieces need a bit more time, while thinner ones cook faster. Check your salmon at 15 minutes. If it flakes easily with a fork, it's done! Different ovens heat unevenly, so keep an eye on your dish. If your oven runs hot, reduce the time slightly. These salmon fajitas shine with simple sides. A fresh avocado salad pairs well. You can also serve with black beans or corn on the side. For dips, try a creamy avocado sauce or salsa. A cold drink, like lemonade or iced tea, complements the meal perfectly. Enjoy your colorful, tasty dish! {{image_2}} You can switch salmon for chicken or tofu. Chicken works well because it absorbs flavors nicely. Cut chicken into small pieces like the salmon. Cook it for about 20-25 minutes. Tofu is a great choice for a plant-based option. Press it to remove extra water, then cut it into cubes. Bake it for 15-20 minutes too. Both options are tasty and keep the dish simple. Feel free to add more veggies for fun and flavor. Zucchini, corn, or mushrooms are great choices. Slice zucchini into thin rounds and add it to the mix. Corn can bring a sweet crunch. You can chop mushrooms and toss them in for extra depth. Mixing different vegetables keeps every bite exciting. Don’t be shy to use what you like! Want it spicier? Add more chili powder or fresh jalapeños. You can sprinkle red pepper flakes for an extra kick. If you prefer it milder, use less chili powder. You can also add more lime juice to balance the heat. Adjusting spice levels makes this dish fun for everyone. Your taste buds will thank you! For the complete recipe, check out the [Full Recipe]. To store your leftover salmon fajitas, first let them cool. This step helps keep the food fresh. Use an airtight container for best results. You can separate the salmon, veggies, and tortillas or store them together. If you store them together, the tortillas may get soggy. I recommend using glass containers or heavy-duty plastic bags. When you reheat salmon fajitas, you want to keep them moist. The best method is to use the oven. Preheat your oven to 350°F (175°C). Place the salmon and veggies on a baking sheet. Cover them with foil to trap moisture. Heat for about 10-15 minutes. You can also use a skillet over medium heat. Just add a splash of water to help steam them. If you prefer the microwave, use a microwave-safe dish. Cover it with a damp paper towel. Heat in short bursts, checking often. Freezing salmon fajitas is simple. Pack the leftovers in airtight containers or freezer bags. Remove as much air as possible. They can last up to three months in the freezer. When ready to eat, thaw them in the fridge overnight. Reheat them as mentioned above. This keeps the flavor and texture nice. You’ll have a quick meal ready to go! For the full recipe, visit the section above. Yes, you can prep ahead. Chop the veggies and salmon in advance. Store them in the fridge. You can mix the spices and keep them in a small jar. This way, you save time when cooking. Just remember to bake everything fresh for the best taste. Salmon fajitas pair well with many sides. Here are some tasty options: - Rice or quinoa for a filling base - Black beans for extra protein - A fresh salad with lime dressing - Guacamole for a creamy touch - Chips for a crunchy contrast You can easily lighten up this dish. Try these tips: - Use less oil when roasting the veggies - Add more vegetables like zucchini or corn - Choose whole wheat tortillas for more fiber - Skip the cheese or use a low-fat option - Serve with a side of steamed veggies To reheat salmon fajitas, use a skillet. Warm it over medium heat. Add the salmon and veggies, and cover with a lid. This keeps them moist. You can also use the microwave. Heat in short bursts to avoid drying them out. Just remember, fresh is always best! This recipe highlights the joy of making salmon fajitas. You learned about the key ingredients, step-by-step instructions, and helpful tips. I shared ideas for variations and storage. Remember, you can customize flavors and spices to suit your taste. Whether you enjoy it with chicken, tofu, or extra veggies, it’s all about creating a meal you love. Use these pointers to enjoy cooking and eating. Your salmon fajitas can be a hit at every meal. Cooking should be fun and tasty!](https://dailydishlab.com/wp-content/uploads/2025/07/cbf1539a-7436-4928-932a-7fda2b4117aa-768x768.webp)