Spicy Garlic Shrimp Tacos Quick and Flavorful Dish
. In this post, we explored how to make spicy garlic shrimp tacos. We covered key ingredients like shrimp, garlic, and spices. I shared step-by-step instructions for marinating, cooking, and assembling the tacos. We also discussed tips for perfect shrimp and different tortilla options. You can customize these tacos to your taste or use other proteins too. Don’t forget to check out the full recipe for quick reference. Enjoy creating and sharing this tasty meal with friends and family!](https://dailydishlab.com/wp-content/uploads/2025/06/f3f63153-6df6-4664-b699-490f731c66b6.webp)
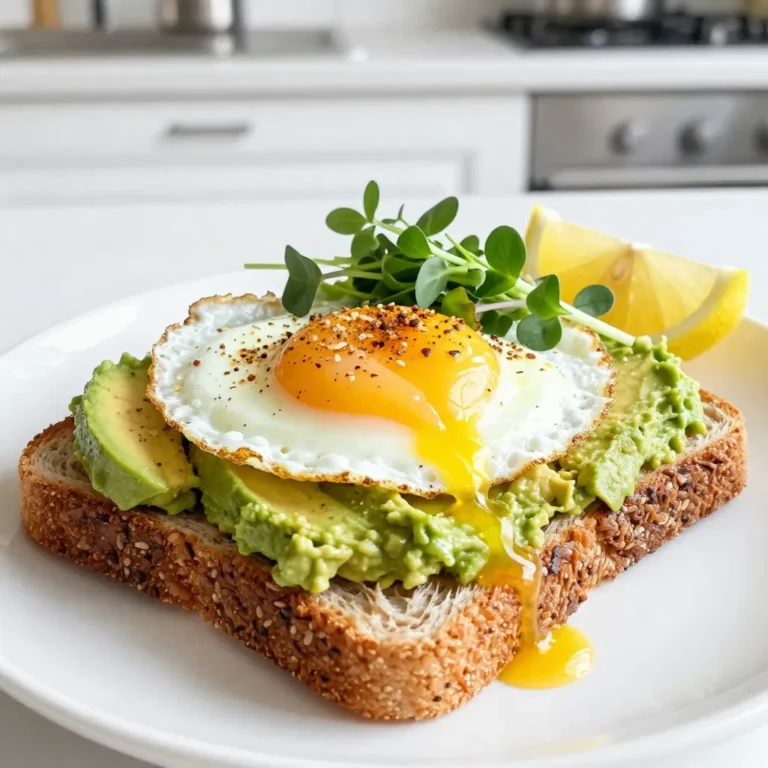
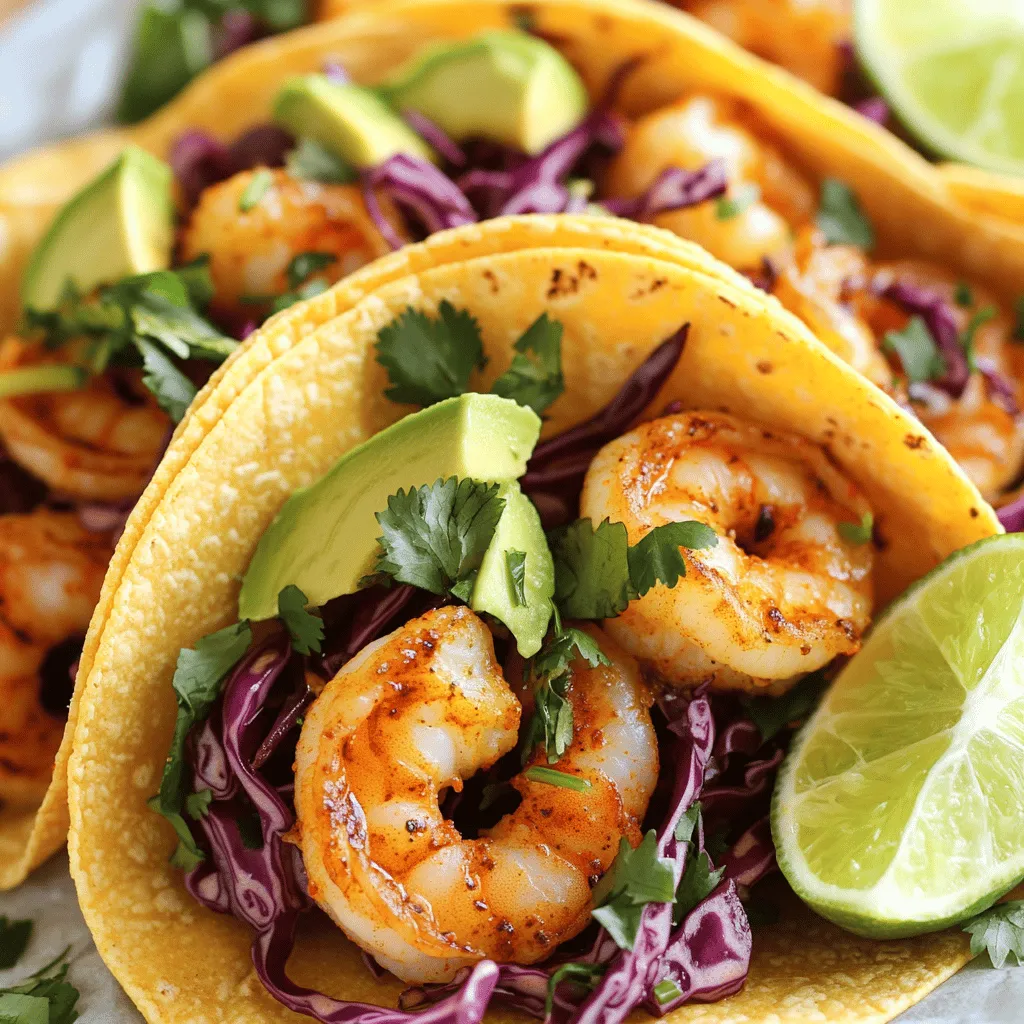
Are you ready to spice up your dinner routine? My Spicy Garlic Shrimp Tacos are quick, tasty, and perfect for any day of the week. With juicy shrimp, fresh veggies, and zesty flavor, you’ll crave every bite. This dish takes just minutes to make, and I’ll share tips to ensure each taco is a hit. Let’s dive into the easy steps and ingredients to create this flavor-packed meal!
Why I Love This Recipe
- Bold Flavors: The combination of spices and garlic creates a mouthwatering explosion of flavors that elevate these tacos to another level.
- Quick and Easy: This recipe is perfect for busy weeknights, taking only 45 minutes from start to finish.
- Fresh Ingredients: With vibrant toppings like avocado and cabbage, these tacos are not only delicious but also nutritious.
- Customizable: You can easily adjust the spice level or add your favorite toppings to make these tacos your own.
Ingredients
Main Ingredients for Spicy Garlic Shrimp Tacos
- 1 lb large shrimp, peeled and deveined
- 4 cloves garlic, minced
- 2 tablespoons olive oil
The main ingredients make this dish shine. Fresh, large shrimp are the star of the show. You want them peeled and deveined for easy eating. Minced garlic adds a bold flavor that mixes well with the shrimp. Use high-quality olive oil to help everything cook nicely.
Spices and Seasonings
- 1 teaspoon smoked paprika
- 1 teaspoon cayenne pepper (adjust to taste)
- 1 teaspoon cumin
Spices bring the heat and depth to your tacos. Smoked paprika gives a hint of smokiness. Cayenne pepper can be adjusted to your spice level. If you like it mild, use less. Cumin adds warmth and earthiness that pairs well with shrimp.
Fresh Ingredients
- Zest and juice of 1 lime
- 1 cup red cabbage, shredded
- 1 avocado, sliced
- Fresh cilantro, for garnish
- Lime wedges, for serving
Fresh ingredients keep your tacos vibrant. The lime zest and juice brighten the dish and add zing. Shredded red cabbage adds crunch and color. Sliced avocado brings creaminess that balances the heat. Fresh cilantro adds a pop of herb flavor, making each bite fresh. Serve with lime wedges to squeeze over the top.

Step-by-Step Instructions
Marinating the Shrimp
To start, you need to marinate the shrimp. Grab a medium bowl and combine the shrimp, minced garlic, and olive oil. Then, add the spices: smoked paprika, cayenne pepper, and cumin. Next, zest and juice the lime. Don’t forget to add salt and pepper. Toss everything together until the shrimp are nicely coated. Let the shrimp marinate for 15 to 30 minutes. This step helps the shrimp soak in all the great flavors.
Cooking the Shrimp
Now, it’s time to cook the shrimp. Heat a skillet over medium-high heat. Once hot, add the marinated shrimp. Cook for about 2 to 3 minutes on each side. You want them to turn pink and opaque. Be careful not to overcook them. Overcooked shrimp can turn tough and chewy.
Preparing the Tortillas
While your shrimp cooks, prepare the tortillas. You can warm them in a skillet or microwave. Make sure the tortillas are pliable and heated through. This step makes it easier to fold the tacos later.
Assembling the Tacos
Now comes the fun part—assembling the tacos! Take each tortilla and layer some shredded cabbage on top. Then, add the cooked spicy shrimp. Top it off with slices of avocado and a sprinkle of fresh cilantro. This adds great color and flavor to your tacos.
Serving Suggestions
To serve, squeeze some fresh lime juice over the tacos. This adds a zesty kick! Serve them immediately with extra lime wedges on the side for those who want more. Enjoy your flavorful Spicy Garlic Shrimp Tacos!
Pro Tips
- Marination Time: Allow the shrimp to marinate for at least 30 minutes for deeper flavor penetration.
- Heat Control: Adjust the cayenne pepper according to your spice tolerance; start with less if you’re unsure.
- Perfectly Cooked Shrimp: Cook shrimp just until they are pink and opaque; overcooking can make them tough.
- Tortilla Choice: Use warm corn tortillas for a traditional flavor, or flour tortillas for a softer texture.
Tips & Tricks
Perfecting the Shrimp
To avoid overcooking shrimp, watch the color closely. When they turn pink and opaque, they are done. This usually takes 2-3 minutes on each side. If you cook them too long, they become tough. A quick tip: marinate the shrimp for 15-30 minutes. This time helps the flavors blend well. It makes the shrimp more tasty!
Tortilla Options
When choosing tortillas, corn and flour both have their perks. Corn tortillas are gluten-free and have a nice texture. On the other hand, flour tortillas are soft and chewy. Both work well for these tacos. To keep your tortillas warm, wrap them in a clean kitchen towel. You can also place them in a covered dish. This way, they stay warm until serving.
Customizing Your Tacos
For added flavor, consider these toppings. Shredded cheese, diced tomatoes, and jalapeños are great choices. You can also try fresh salsa or a creamy sauce. For dips, guacamole pairs well with the shrimp. It adds a creamy touch that you will love. Don’t forget to serve lime wedges on the side. They give a nice zing to your tacos.
Variations
Alternative Proteins
You can swap shrimp for other proteins. Chicken works well with the same spices. Simply cube and marinate it like shrimp. Tofu is a great choice for a vegetarian option. Use firm tofu, cut it into cubes, and marinate it. You can also grill veggies like bell peppers and zucchini for a tasty plant-based taco.
Flavor Adjustments
Not everyone loves heat. To reduce spiciness, cut the cayenne pepper in half. You can also add a bit of honey to balance the heat. If you want to try new flavors, consider adding spices like chili powder or coriander. Each brings a unique twist to your dish.
Serving Styles
Tacos are classic, but taco bowls are fun too. Just use a bowl instead of a tortilla. You can layer rice and beans at the bottom. Then, add the shrimp, cabbage, and toppings. This gives you a hearty meal. You can also serve the tacos with sides like black beans or cilantro lime rice. They complement the flavors well.
Storage Info
Storing Cooked Tacos
To store leftover tacos, wrap them tightly in foil or plastic wrap. This keeps them fresh. If you have leftover shrimp, place it in an airtight container. Keep it in the fridge for up to two days. For best results, store each taco component separately. This way, the tortillas stay soft, and the shrimp keeps its flavor.
Reheating Tips
When reheating shrimp tacos, use a skillet over low heat. This helps to warm the shrimp without drying them out. For the tortillas, heat them in a dry skillet for about 30 seconds on each side. This keeps them soft and tasty. Avoid using the microwave if possible, as it can make the tortillas tough.
Freezing Instructions
Yes, you can freeze cooked shrimp. Place it in a freezer-safe bag, removing as much air as possible. Shrimp can be frozen for up to three months. To thaw, move the shrimp to the fridge overnight. For tacos, wrap the tortillas tightly and freeze them too. When ready to eat, thaw them and warm them up in a skillet.
FAQs
What type of shrimp is best for tacos?
I recommend using large shrimp for tacos. They hold up well and offer great texture. Look for shrimp that are fresh or frozen and peeled. Quality matters. Wild-caught shrimp often have better flavor than farmed. To ensure quality, buy shrimp that smells clean and briny, not fishy.
Can I make Spicy Garlic Shrimp Tacos ahead of time?
Yes, you can! To prepare in advance, marinate the shrimp a few hours ahead. Store them in the fridge until you are ready to cook. Cooked shrimp can stay fresh in the fridge for about two days. For best taste, don’t assemble the tacos until you are ready to eat.
What sides pair well with shrimp tacos?
A few tasty sides complement shrimp tacos perfectly. Here are my favorites:
- Mexican street corn (elote)
- Black bean salad
- Avocado salad
- Chips with salsa or guacamole
These sides add flavor and balance to your meal.
In this post, we explored how to make spicy garlic shrimp tacos. We covered key ingredients like shrimp, garlic, and spices. I shared step-by-step instructions for marinating, cooking, and assembling the tacos. We also discussed tips for perfect shrimp and different tortilla options. You can customize these tacos to your taste or use other proteins too.Enjoy creating and sharing this tasty meal with friends and family!
. In this post, we explored how to make spicy garlic shrimp tacos. We covered key ingredients like shrimp, garlic, and spices. I shared step-by-step instructions for marinating, cooking, and assembling the tacos. We also discussed tips for perfect shrimp and different tortilla options. You can customize these tacos to your taste or use other proteins too. Don’t forget to check out the full recipe for quick reference. Enjoy creating and sharing this tasty meal with friends and family!](https://dailydishlab.com/wp-content/uploads/2025/06/f3f63153-6df6-4664-b699-490f731c66b6-300x300.webp)
Spicy Garlic Shrimp Tacos
Ingredients
1 lb large shrimp, peeled and deveined
4 cloves garlic, minced
2 tablespoons olive oil
1 teaspoon smoked paprika
1 teaspoon cayenne pepper (adjust to taste)
1 teaspoon cumin
Zest and juice of 1 lime
Salt and pepper to taste
8 small corn or flour tortillas
1 cup red cabbage, shredded
1 avocado, sliced
Fresh cilantro, for garnish
Lime wedges, for serving
Instructions
Marinate the Shrimp: In a medium bowl, combine the shrimp, minced garlic, olive oil, smoked paprika, cayenne pepper, cumin, lime zest, lime juice, salt, and pepper. Toss until the shrimp are evenly coated. Let the mixture marinate for 15-30 minutes at room temperature to allow the flavors to meld.
Cook the Shrimp: In a large skillet over medium-high heat, add the marinated shrimp. Cook for about 2-3 minutes on each side until they are pink and opaque. Be careful not to overcook them!
Warm the Tortillas: While the shrimp are cooking, warm the tortillas in a separate skillet or microwave until they are pliable and heated through.
Assemble the Tacos: On each tortilla, layer some shredded cabbage, followed by the cooked spicy shrimp. Top with avocado slices and a sprinkle of fresh cilantro.
Serve: Squeeze lime juice over the tacos and serve immediately with extra lime wedges on the side.
Prep Time: 15 mins | Total Time: 45 mins | Servings: 4
Spicy Garlic Shrimp Tacos
Ingredients
- 1 lb large shrimp, peeled and deveined
- 4 cloves garlic, minced
- 2 tablespoons olive oil
- 1 teaspoon smoked paprika
- 1 teaspoon cayenne pepper
- 1 teaspoon cumin
- 1 lime zest and juice
- to taste salt and pepper
- 8 small corn or flour tortillas
- 1 cup red cabbage, shredded
- 1 whole avocado, sliced
- fresh cilantro, for garnish
- lime wedges, for serving
Instructions
- In a medium bowl, combine the shrimp, minced garlic, olive oil, smoked paprika, cayenne pepper, cumin, lime zest, lime juice, salt, and pepper. Toss until the shrimp are evenly coated. Let the mixture marinate for 15-30 minutes at room temperature to allow the flavors to meld.
- In a large skillet over medium-high heat, add the marinated shrimp. Cook for about 2-3 minutes on each side until they are pink and opaque. Be careful not to overcook them!
- While the shrimp are cooking, warm the tortillas in a separate skillet or microwave until they are pliable and heated through.
- On each tortilla, layer some shredded cabbage, followed by the cooked spicy shrimp. Top with avocado slices and a sprinkle of fresh cilantro.
- Squeeze lime juice over the tacos and serve immediately with extra lime wedges on the side.
![To make the perfect cheesesteak, you need a few key ingredients: - 1 lb ribeye steak, thinly sliced against the grain - 4 slices provolone cheese or Cheez Whiz - 4 fresh hoagie rolls Ribeye steak is great because it has a lot of flavor. Thin slices help it cook fast. Provolone cheese adds a nice, creamy texture. Cheez Whiz gives a fun twist. The hoagie rolls hold all the goodness together. You can make your cheesesteak even better with some optional ingredients: - Bell peppers (red or green) - Sliced jalapeños - Seasonings and spices Bell peppers add sweetness and color. Sliced jalapeños bring heat and spice. You can also add spices like garlic powder and pepper for extra flavor. Feel free to mix and match these ingredients. This way, you can create a cheesesteak that fits your taste! For the full recipe, check out the Ultimate Cheesesteak Sandwich. - Preheat the skillet: Start by heating a large skillet over medium-high heat. Add 2 tablespoons of olive oil. Let it heat until it shimmers. - Season the ribeye steak: Take 1 pound of ribeye steak and slice it thinly against the grain. In a bowl, mix salt, freshly ground pepper, and 1 teaspoon of garlic powder. Coat the beef evenly with this mixture. - Sauté onions and bell peppers: Add 1 large thinly sliced onion and 1 bell pepper to the hot skillet. Cook for 3-4 minutes. Stir until they soften and smell great. - Combine steak with vegetables: Push the veggies to one side of the skillet. Add the seasoned ribeye to the other side. Cook for 5-7 minutes. Stir it now and then until the beef is browned to your liking. - Melt the provolone cheese: Once the steak is cooked, mix it with the veggies. Place 4 slices of provolone cheese on top. Cover the skillet with a lid for 2 minutes to melt the cheese nicely. - Toasting the hoagie rolls: While the cheese melts, toast 4 fresh hoagie rolls in another skillet or toaster. Aim for a golden and crisp finish for added texture. Now you are ready to build your ultimate cheesesteak sandwich! Follow the [Full Recipe] for complete details. To make a great cheesesteak, start with ribeye steak. - How to slice ribeye against the grain: Look at the meat. The grain shows the direction of the fibers. Slice against the grain. This method makes the meat tender and easy to chew. - Choose the right thickness: Aim for slices about 1/8 inch thick. Thinner slices cook fast and soak up flavors. Getting the right flavor makes your cheesesteak special. - Importance of skillet temperature: Preheat your skillet over medium-high heat. A hot skillet sears the steak. This gives a nice crust and locks in juices. - Tips for achieving desired steak doneness: Cook steak for 5-7 minutes. Stir occasionally to avoid burning. Use a meat thermometer if you want to be precise. Aim for 130°F for medium-rare. Pair your cheesesteak with great sides to enhance the meal. - Best side dishes to pair: Crispy fries are classic. A fresh salad adds crunch and brightness. You can also try onion rings for a fun twist. - Quick condiment ideas: Serve with ketchup or hot sauce for extra flavor. Pickles add a nice crunch, too. Sliced jalapeños give a spicy kick. Follow these tips to elevate your ultimate cheesesteak. For detailed steps, check the Full Recipe. {{image_4}} For a classic cheesesteak, use provolone cheese or Cheez Whiz. Both melt well and add rich flavor. However, if you want to elevate your sandwich, try gourmet cheeses like sharp cheddar or creamy gouda. These options give you a unique twist. You can also add truffle oil or sautéed mushrooms for deeper taste. You can enjoy a cheesesteak without meat. Use portobello mushrooms or seitan as a meat substitute. Both add great texture and flavor. For cheese, try plant-based options like cashew cheese or vegan mozzarella. These substitutes melt nicely and taste amazing. The most famous cheesesteaks come from Philadelphia. They focus on thinly sliced ribeye with cheese on a soft roll. However, other regions have their spins. In Chicago, you might see giardiniera added for a spicy kick. In Texas, barbecue sauces give a sweet and smoky flavor. Each style brings its own unique toppings and spices, showcasing local tastes. For more about making your own cheesesteak, check out the Full Recipe. To keep your cheesesteak fresh, follow these steps: - Store leftovers in the fridge. Let them cool first. - Use airtight containers. Glass or plastic containers work well. - Separate layers with parchment paper. This prevents sogginess. Place your leftover cheesesteak in the fridge. It will stay good for 3 to 4 days. If you have extra filling, store it separately from the rolls. This keeps the bread fresh. Reheat your cheesesteak to bring back its flavor. Here’s how: - Use a skillet. Heat it over medium heat. Add a bit of oil. - Place the sandwich in the skillet. Cover it with a lid. This helps the cheese melt. - Heat for 5-7 minutes. Flip halfway to warm both sides. You can also use the microwave, but be careful. It can make the bread chewy. To keep the taste and texture, the skillet is best. Enjoy your delicious ultimate cheesesteak! For the full recipe, check out the complete instructions. The best cut for a cheesesteak is ribeye. Its marbling gives great flavor and tenderness. You can also use sirloin or flank steak, but ribeye is my top choice. Always slice against the grain for the best bite. This makes it easier to chew and helps keep the flavors locked in. You can skip the cheese and still have a tasty sandwich. Try adding toppings like sautéed mushrooms, avocado, or spicy mustard. Use roasted red peppers for a sweet flavor boost. You can also add fresh herbs, like basil or cilantro, for extra freshness. These alternatives keep your sandwich tasty and fun. To find great cheesesteaks, ask locals for their favorites. Check out food blogs or review sites for tips. Look for places that use fresh ingredients and have a good reputation. You can also explore food festivals or markets. These spots often showcase local chefs who make amazing cheesesteaks. Yes, you can freeze cheesesteak sandwiches! Wrap them tightly in plastic wrap or foil. Place them in an airtight container or freezer bag to prevent freezer burn. They can last up to three months in the freezer. When you're ready to eat, thaw in the fridge and reheat in the oven for the best taste. This guide has covered all you need to make the ultimate cheesesteak sandwich. From selecting the right ribeye steak and cheese to perfecting your cooking technique, you’re now equipped to create a tasty meal. Remember to customize your sandwich with your favorite ingredients and remember storage tips for leftovers. Enjoy exploring different styles and variations. Making a great cheesesteak can be fun and rewarding. Now, you can impress friends and family with your delicious creations. Happy cooking!](https://dailydishlab.com/wp-content/uploads/2025/06/698132e8-5117-44f3-910b-a554f39a5b8a-768x768.webp)
![For this dish, you need 1 lb (450g) of chicken breast. Slice it thinly to ensure even cooking. The chicken takes on great flavor during marination, so choose fresh, high-quality meat. 1 cup of dill pickle juice gives the chicken a tangy kick. It helps tenderize the meat and adds a unique taste. The vegetables bring color and crunch to your stir fry. You will use: - 2 cups mixed bell peppers (red, yellow, green), sliced - 1 cup snap peas, trimmed - 1 medium red onion, sliced These veggies not only add nutrition but also make the dish visually appealing. You can also mix in other favorites if you want. To enhance flavor, you need: - 2 tablespoons ranch seasoning mix for that creamy, herby taste. - 1 tablespoon olive oil for cooking the chicken and veggies. - Salt and pepper to taste, adjusting to your preference. These seasonings bring everything together. The ranch seasoning adds a fun twist to the dish. For the full recipe, check [Full Recipe]. Start by slicing 1 pound of chicken breast into thin strips. Place the chicken in a bowl. Pour 1 cup of dill pickle juice over the chicken. This juice adds a tangy flavor that makes the dish special. Cover the bowl and let the chicken marinate for at least 30 minutes. This step helps the chicken absorb all the yummy flavors. After marinating, take the chicken out of the pickle juice. Sprinkle 2 tablespoons of ranch seasoning mix evenly on the chicken. Mix well to coat each piece. Next, heat 1 tablespoon of olive oil in a large skillet over medium-high heat. Add the seasoned chicken to the skillet. Cook for about 5 to 7 minutes. Stir occasionally until the chicken turns golden brown and is cooked all the way through. Once done, remove the chicken from the skillet and set it aside. In the same skillet, add 1 medium sliced red onion. Cook for about 2 minutes until it starts to soften. Then, toss in 2 cups of mixed bell peppers and 1 cup of snap peas. Stir frequently for about 5 minutes. You want the veggies to be tender yet crisp. After that, add 2 cloves of minced garlic and cook for another minute. This makes the kitchen smell amazing! Return the cooked chicken to the skillet. Toss everything together well. Season with salt and pepper to taste. For serving, plate the stir fry over cooked rice or quinoa. Garnish with 1 tablespoon of fresh dill for a pop of color and flavor. You can drizzle extra pickle juice on top for a tangy finish. Enjoy this delightful meal that’s sure to impress! For the complete details, check the Full Recipe. Marinating chicken adds flavor and tenderness. Use dill pickle juice for a tangy kick. Let the chicken soak for at least 30 minutes, but longer is better. This helps the meat absorb all the tasty flavors. If you have time, marinate it overnight in the fridge. Make sure to cover the bowl to keep it fresh. For this stir fry, a large skillet or wok works best. The wide surface lets you cook the chicken and veggies evenly. A wooden spoon or spatula helps mix the food without scratching the pan. Make sure your skillet is hot before adding the chicken. This keeps the meat juicy and prevents sticking. A good cutting board and sharp knife are also key for slicing the veggies. Presentation makes meals more enjoyable. Serve the stir fry in a large bowl to show off the colors. Drizzle extra pickle juice on top for a zesty finish. Add fresh dill as a garnish for a pop of green. For a fun touch, place pickles on the side. This adds crunch and makes the dish look inviting. For the full recipe, check out the Pickle Ranch Chicken and Veggie Stir Fry. {{image_2}} You can switch out chicken for other proteins. Turkey works well. Tofu is great for a plant-based choice. Shrimp adds a nice touch too. Just remember to adjust the cooking time. Each protein brings its own flavor. You can keep the marinade the same for all options. Feel free to mix up the veggies. Broccoli or zucchini can add a new twist. Carrots add crunch and color. You can even use frozen veggies for quick prep. Just thaw them before cooking. This stir fry is flexible, so use what you have. Each veggie will give a different taste and look. Want to change the taste? Try adding different sauces. Soy sauce can add saltiness. Teriyaki gives a sweet twist. You could even use curry paste for a spicy kick. Adding fresh herbs like basil or cilantro can brighten it up. Don't be afraid to experiment! Your taste buds will thank you. For the full recipe, check the section above. After a tasty meal, let the leftovers cool. Place them in an airtight container. Make sure to store them in the fridge. They will stay fresh for up to three days. Label the container with the date. This helps keep track of when to eat them. To reheat, you can use a microwave or a skillet. If using a microwave, place the stir fry in a bowl. Heat it for one to two minutes. Stir halfway through to ensure even warming. If using a skillet, add a splash of water and heat on medium for about five minutes. This keeps the dish moist and tasty. If you want to save some for later, freezing is a great option. Place the cooled stir fry in a freezer-safe container. Make sure to leave some space at the top for expansion. It can last up to three months in the freezer. When you're ready to eat, thaw it overnight in the fridge before reheating. Enjoy your Pickle Ranch Chicken and Veggie Stir Fry even after some time! For the full recipe, check the earlier sections. You can add red pepper flakes to the chicken. Start with a pinch and taste. If you want more heat, add a bit more. You can also use spicy pickles instead of dill pickles. Another option is to add sriracha or hot sauce to the stir fry. These steps will give you a nice kick without changing the dish too much. Yes, you can use other pickles. Bread and butter pickles add a sweet twist. You might also try garlic dill pickles for extra flavor. Different pickles can change the taste, so have fun experimenting. Find the type that best fits your taste buds. Don't hesitate to mix and match! This dish pairs well with cooked rice or quinoa. You can also serve it with a fresh salad on the side. If you like, add crusty bread to soak up the juices. For a lighter option, consider steamed broccoli or a veggie platter. The choice is yours! For the full recipe, check out the complete instructions above. This blog post covered the key ingredients and steps to make a tasty dish. You learned how to marinate chicken, cook it well, and sauté fresh vegetables. We also shared helpful tips for cooking and presenting your meal. If you want to switch things up, you can try different proteins or veggies. Finally, we discussed how to store and reheat your leftovers. With this knowledge, you can create a delicious meal that everyone will enjoy. Happy cooking!](https://dailydishlab.com/wp-content/uploads/2025/07/35ffaebc-1afd-4444-a271-9af343d73620-768x768.webp)