Caprese Chicken Skillet Flavorful Meal in One Pan
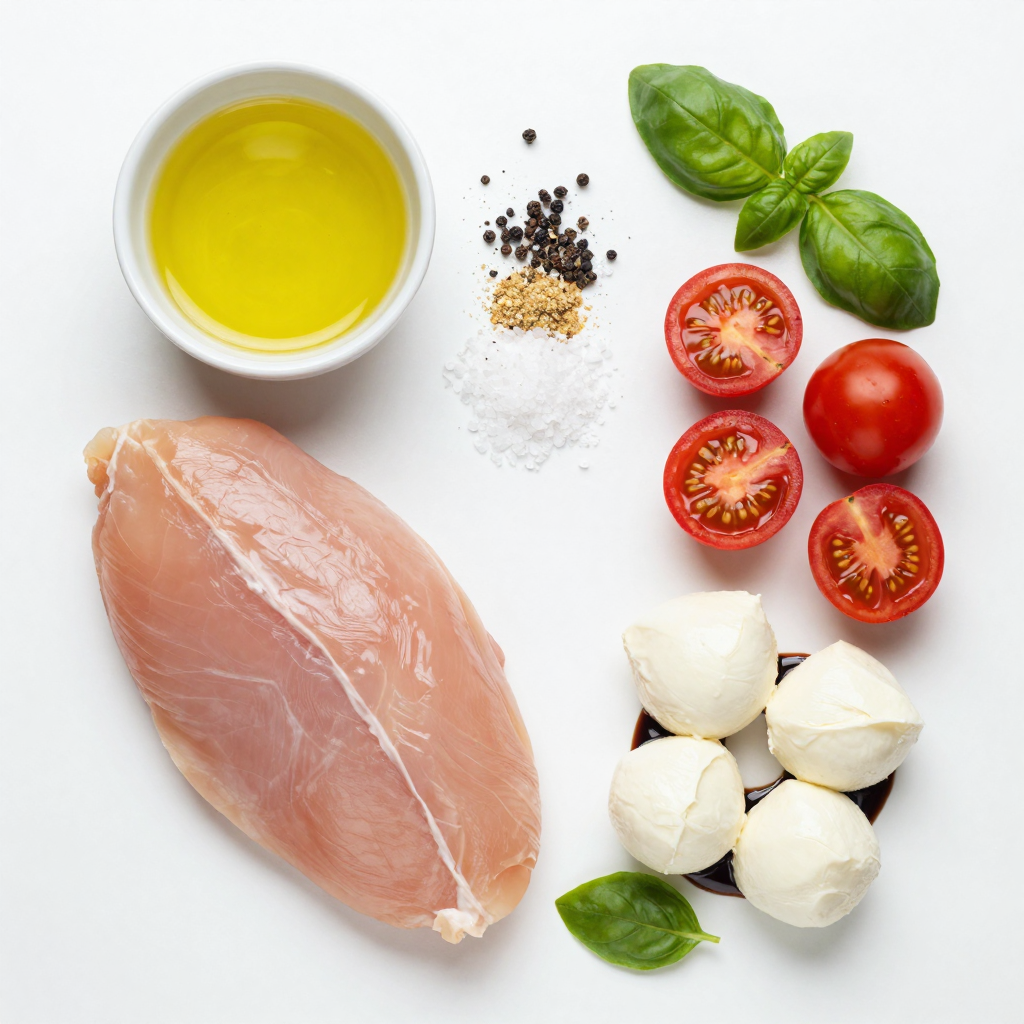
![- 2 boneless, skinless chicken breasts - 1 tablespoon olive oil - Salt and pepper to taste - 1 teaspoon garlic powder - 1 cup cherry tomatoes, halved - 1 cup fresh mozzarella balls, halved - 1 teaspoon balsamic glaze - 1/4 cup fresh basil leaves, chopped For the Caprese Chicken Skillet, I focus on fresh and simple flavors. The chicken breasts are the star. I use boneless and skinless for quick cooking. Season them well with salt, pepper, and garlic powder. This simple mix adds great taste. Next, I use cherry tomatoes. Their sweetness pairs so well with the chicken. Halving them helps them cook faster and release juice. Fresh mozzarella balls are a must. When they melt, they create a creamy layer over the chicken. Finally, I finish with balsamic glaze and fresh basil. These add a burst of flavor and freshness. - Additional herbs (e.g., oregano or thyme) - Vegetables (e.g., bell peppers or onions) You can customize this dish with extra herbs. Oregano or thyme can add a nice touch. If you want more veggies, bell peppers or onions work great. They add color and more flavor. - Large skillet - Meat thermometer - Cutting board and knife To make this dish, I recommend a large skillet. It gives enough space for everything to cook evenly. A meat thermometer helps ensure the chicken is cooked through. A cutting board and knife are essential for chopping tomatoes and basil. For the full recipe and more details, check out the [Full Recipe]. First, I season the chicken breasts. I sprinkle salt, pepper, and garlic powder on both sides. This simple step adds great flavor to the chicken. Next, I heat olive oil in a large skillet over medium heat. When the oil is hot, I add the seasoned chicken breasts. I sear them for about 6-7 minutes on each side. The goal is to get them golden brown and fully cooked. I check the internal temperature; it should reach 165°F (75°C). Once cooked, I remove the chicken and set it aside. In the same skillet, I add the halved cherry tomatoes. I sauté them for about 3-4 minutes. This softens the tomatoes and helps them release their juices. The aroma fills the kitchen, making my mouth water! Now it's time to put it all together. I lower the heat and return the chicken to the skillet. I top each chicken breast with the halved mozzarella balls. Then, I cover the skillet for about 2-3 minutes. This allows the cheese to melt perfectly over the chicken. Finally, I drizzle balsamic glaze over the chicken and tomatoes. I sprinkle fresh basil on top for a burst of flavor. The dish is now ready to serve! I plate it right from the skillet for a rustic look. The melted mozzarella stretches as I cut into the chicken. It looks and tastes amazing! You can find the full recipe for Caprese Chicken Skillet to follow along easily! To get the best chicken texture, use a meat thermometer. Cook the chicken until it hits 165°F (75°C). This ensures it's juicy and safe to eat. If you want to avoid overcooked chicken, don’t rush the cooking. Sear chicken for about 6-7 minutes on each side. If the chicken looks golden brown, it’s likely ready. Using fresh herbs makes a big difference. Fresh basil adds a bright taste. Dried herbs can work, but they lack that punch. For the balsamic glaze, choose a high-quality brand. A good glaze is thick and sweet. It adds a rich flavor that ties all the ingredients together. Serve the dish straight from the skillet for a cozy feel. It looks great and keeps the food warm. For extra visual appeal, sprinkle more fresh basil on top. You can also drizzle more balsamic glaze around the plate. This adds color and makes your meal look gourmet. Check out the Full Recipe for more details. {{image_2}} You can swap chicken for turkey or shrimp in this dish. Turkey works well as a leaner option. It absorbs the flavors nicely and cooks fast. Shrimp adds a fun twist. They cook quickly too. Just sauté them in olive oil until they turn pink. Both options bring a new taste to the skillet. If you prefer a meatless meal, make a Caprese Skillet without meat. Instead of chicken, use hearty vegetables. Zucchini, eggplant, or bell peppers can work great. Sauté them until tender. You still get that fresh taste with tomatoes and mozzarella. This option is just as colorful and delicious. Adding Italian seasoning or chili flakes can boost the flavor. Italian seasoning brings herbs like oregano and basil together. Just a teaspoon adds depth to the dish. If you like heat, sprinkle chili flakes on top. This extra kick makes every bite exciting. You can mix and match these ideas to suit your taste. For the full recipe, check out the detailed instructions. To store leftovers, let the Caprese Chicken cool first. Place it in an airtight container. You can keep it in the fridge for up to three days. When you're ready to eat, just take it out and reheat. If you want to freeze the dish, cut it into smaller pieces. Use a freezer-safe container or bag. Make sure to remove as much air as possible. You can freeze it for up to three months. When you want to eat it, let it thaw overnight in the fridge. To reheat, use a skillet over medium heat. Add a splash of water to prevent dryness. Cover it with a lid to keep the moisture in. You can also use the microwave, but it may not keep the cheese as nice. Heat in short bursts until hot. Enjoy your meal just like the first time! You can prep this meal in advance. Start by cooking the chicken and tomatoes. Cool them down and store in an airtight container. Keep in the fridge for up to three days. When you are ready to eat, just reheat in a skillet. Add fresh mozzarella and basil last to keep them fresh. Yes, you can switch up the cheese! Try using goat cheese for a tangy flavor. Feta also works well if you like a crumbly texture. For a creamy taste, you can use ricotta. Each cheese adds a unique twist to your dish. This dish is delicious on its own, but you can add sides. Serve with a simple green salad for freshness. Garlic bread pairs nicely if you want something hearty. You could also try it with roasted vegetables for extra flavor. Access the full recipe for Caprese Chicken Skillet! In this post, I covered how to make a delicious Caprese Chicken Skillet. We explored essential ingredients like chicken, tomatoes, and mozzarella, along with optional add-ons and cooking tips. I shared steps for cooking the chicken and veggies to perfection and suggested storage tips. Remember, you can swap meats or make it vegetarian for variety. This dish is not just tasty but easy to prepare and customize. Now, gather your ingredients, try the recipe, and enjoy every bite!](https://dailydishlab.com/wp-content/uploads/2025/06/81b82b43-9289-48a9-b4c0-455fdfb47d4f.webp)
Looking for a quick and tasty dinner? This Caprese Chicken Skillet is your answer! In just one pan, you’ll create a flavorful meal packed with juicy chicken, fresh tomatoes, and creamy mozzarella. Perfect for busy weeknights, I’ll guide you step-by-step to make this dish shine. Plus, I’ll share tips to enhance the taste and options for variations. Let’s dive into this simple yet delicious recipe that will impress everyone!
Why I Love This Recipe
- Fresh Ingredients: This dish showcases vibrant cherry tomatoes and aromatic basil, bringing a burst of freshness to each bite.
- Quick and Easy: With a total preparation time of just 30 minutes, this recipe is perfect for a weeknight dinner.
- One-Pan Wonder: Cooking everything in a single skillet means less cleanup and more time to enjoy your meal.
- Melty Mozzarella: The gooey mozzarella adds a delicious creaminess that elevates the entire dish.
Ingredients
Essential Ingredients for Caprese Chicken Skillet
- 2 boneless, skinless chicken breasts
- 1 tablespoon olive oil
- Salt and pepper to taste
- 1 teaspoon garlic powder
- 1 cup cherry tomatoes, halved
- 1 cup fresh mozzarella balls, halved
- 1 teaspoon balsamic glaze
- 1/4 cup fresh basil leaves, chopped
For the Caprese Chicken Skillet, I focus on fresh and simple flavors. The chicken breasts are the star. I use boneless and skinless for quick cooking. Season them well with salt, pepper, and garlic powder. This simple mix adds great taste.
Next, I use cherry tomatoes. Their sweetness pairs so well with the chicken. Halving them helps them cook faster and release juice. Fresh mozzarella balls are a must. When they melt, they create a creamy layer over the chicken. Finally, I finish with balsamic glaze and fresh basil. These add a burst of flavor and freshness.
Optional Add-ons
- Additional herbs (e.g., oregano or thyme)
- Vegetables (e.g., bell peppers or onions)
You can customize this dish with extra herbs. Oregano or thyme can add a nice touch. If you want more veggies, bell peppers or onions work great. They add color and more flavor.
Suggested Equipment
- Large skillet
- Meat thermometer
- Cutting board and knife
To make this dish, I recommend a large skillet. It gives enough space for everything to cook evenly. A meat thermometer helps ensure the chicken is cooked through. A cutting board and knife are essential for chopping tomatoes and basil.
Step-by-Step Instructions
Preparing the Chicken
First, I season the chicken breasts. I sprinkle salt, pepper, and garlic powder on both sides. This simple step adds great flavor to the chicken.
Next, I heat olive oil in a large skillet over medium heat. When the oil is hot, I add the seasoned chicken breasts. I sear them for about 6-7 minutes on each side. The goal is to get them golden brown and fully cooked. I check the internal temperature; it should reach 165°F (75°C). Once cooked, I remove the chicken and set it aside.
Cooking the Vegetables
In the same skillet, I add the halved cherry tomatoes. I sauté them for about 3-4 minutes. This softens the tomatoes and helps them release their juices. The aroma fills the kitchen, making my mouth water!
Finishing the Dish
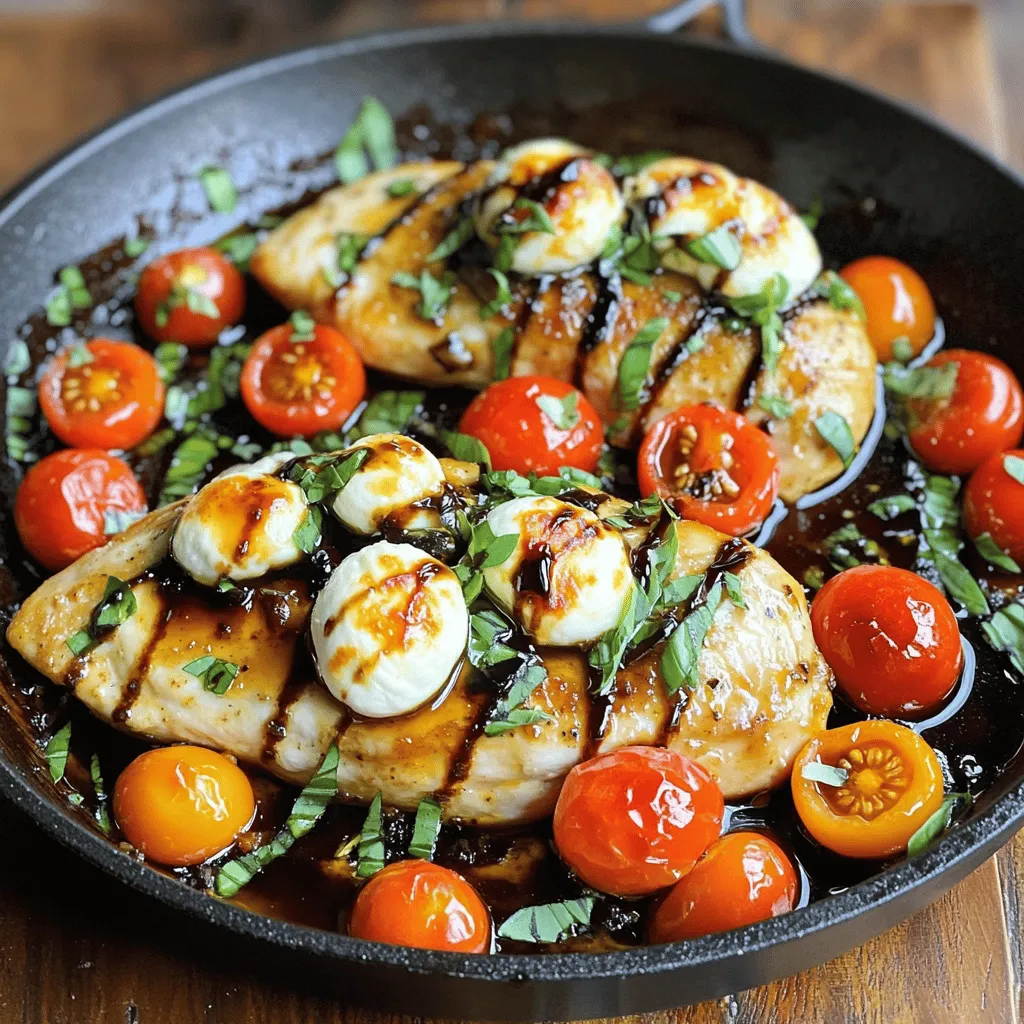
Now it’s time to put it all together. I lower the heat and return the chicken to the skillet. I top each chicken breast with the halved mozzarella balls. Then, I cover the skillet for about 2-3 minutes. This allows the cheese to melt perfectly over the chicken.
Finally, I drizzle balsamic glaze over the chicken and tomatoes. I sprinkle fresh basil on top for a burst of flavor. The dish is now ready to serve! I plate it right from the skillet for a rustic look. The melted mozzarella stretches as I cut into the chicken. It looks and tastes amazing!
Pro Tips
- Rest the Chicken: After cooking, let the chicken rest for a few minutes before slicing. This helps retain the juices, making the chicken more tender and flavorful.
- Use Fresh Basil: For the best flavor, always use fresh basil instead of dried. It adds a vibrant aroma and enhances the overall taste of the dish.
- Customize the Cheese: Feel free to experiment with different types of cheese, like goat cheese or provolone, for a unique twist on the classic Caprese flavor.
- Serve with Sides: This dish pairs wonderfully with a side of garlic bread or a fresh green salad to create a well-rounded meal.
Tips & Tricks
Perfecting the Cooking Time
To get the best chicken texture, use a meat thermometer. Cook the chicken until it hits 165°F (75°C). This ensures it’s juicy and safe to eat. If you want to avoid overcooked chicken, don’t rush the cooking. Sear chicken for about 6-7 minutes on each side. If the chicken looks golden brown, it’s likely ready.
Enhancing Flavor
Using fresh herbs makes a big difference. Fresh basil adds a bright taste. Dried herbs can work, but they lack that punch. For the balsamic glaze, choose a high-quality brand. A good glaze is thick and sweet. It adds a rich flavor that ties all the ingredients together.
Presentation Tips
Serve the dish straight from the skillet for a cozy feel. It looks great and keeps the food warm. For extra visual appeal, sprinkle more fresh basil on top. You can also drizzle more balsamic glaze around the plate. This adds color and makes your meal look gourmet.
Variations
Different Meats
You can swap chicken for turkey or shrimp in this dish. Turkey works well as a leaner option. It absorbs the flavors nicely and cooks fast. Shrimp adds a fun twist. They cook quickly too. Just sauté them in olive oil until they turn pink. Both options bring a new taste to the skillet.
Vegetarian Option
If you prefer a meatless meal, make a Caprese Skillet without meat. Instead of chicken, use hearty vegetables. Zucchini, eggplant, or bell peppers can work great. Sauté them until tender. You still get that fresh taste with tomatoes and mozzarella. This option is just as colorful and delicious.
Flavor Infusions
Adding Italian seasoning or chili flakes can boost the flavor. Italian seasoning brings herbs like oregano and basil together. Just a teaspoon adds depth to the dish. If you like heat, sprinkle chili flakes on top. This extra kick makes every bite exciting. You can mix and match these ideas to suit your taste.
Storage Info
Refrigeration
To store leftovers, let the Caprese Chicken cool first. Place it in an airtight container. You can keep it in the fridge for up to three days. When you’re ready to eat, just take it out and reheat.
Freezing Tips
If you want to freeze the dish, cut it into smaller pieces. Use a freezer-safe container or bag. Make sure to remove as much air as possible. You can freeze it for up to three months. When you want to eat it, let it thaw overnight in the fridge.
Reheating Instructions
To reheat, use a skillet over medium heat. Add a splash of water to prevent dryness. Cover it with a lid to keep the moisture in. You can also use the microwave, but it may not keep the cheese as nice. Heat in short bursts until hot. Enjoy your meal just like the first time!
FAQs
How can I make Caprese Chicken Skillet ahead of time?
You can prep this meal in advance. Start by cooking the chicken and tomatoes. Cool them down and store in an airtight container. Keep in the fridge for up to three days. When you are ready to eat, just reheat in a skillet. Add fresh mozzarella and basil last to keep them fresh.
Can I use another type of cheese?
Yes, you can switch up the cheese! Try using goat cheese for a tangy flavor. Feta also works well if you like a crumbly texture. For a creamy taste, you can use ricotta. Each cheese adds a unique twist to your dish.
What to serve with Caprese Chicken Skillet?
This dish is delicious on its own, but you can add sides. Serve with a simple green salad for freshness. Garlic bread pairs nicely if you want something hearty. You could also try it with roasted vegetables for extra flavor.
In this post, I covered how to make a delicious Caprese Chicken Skillet. We explored essential ingredients like chicken, tomatoes, and mozzarella, along with optional add-ons and cooking tips. I shared steps for cooking the chicken and veggies to perfection and suggested storage tips. Remember, you can swap meats or make it vegetarian for variety. This dish is not just tasty but easy to prepare and customize. Now, gather your ingredients, try the recipe, and enjoy every bite!
![- 2 boneless, skinless chicken breasts - 1 tablespoon olive oil - Salt and pepper to taste - 1 teaspoon garlic powder - 1 cup cherry tomatoes, halved - 1 cup fresh mozzarella balls, halved - 1 teaspoon balsamic glaze - 1/4 cup fresh basil leaves, chopped For the Caprese Chicken Skillet, I focus on fresh and simple flavors. The chicken breasts are the star. I use boneless and skinless for quick cooking. Season them well with salt, pepper, and garlic powder. This simple mix adds great taste. Next, I use cherry tomatoes. Their sweetness pairs so well with the chicken. Halving them helps them cook faster and release juice. Fresh mozzarella balls are a must. When they melt, they create a creamy layer over the chicken. Finally, I finish with balsamic glaze and fresh basil. These add a burst of flavor and freshness. - Additional herbs (e.g., oregano or thyme) - Vegetables (e.g., bell peppers or onions) You can customize this dish with extra herbs. Oregano or thyme can add a nice touch. If you want more veggies, bell peppers or onions work great. They add color and more flavor. - Large skillet - Meat thermometer - Cutting board and knife To make this dish, I recommend a large skillet. It gives enough space for everything to cook evenly. A meat thermometer helps ensure the chicken is cooked through. A cutting board and knife are essential for chopping tomatoes and basil. For the full recipe and more details, check out the [Full Recipe]. First, I season the chicken breasts. I sprinkle salt, pepper, and garlic powder on both sides. This simple step adds great flavor to the chicken. Next, I heat olive oil in a large skillet over medium heat. When the oil is hot, I add the seasoned chicken breasts. I sear them for about 6-7 minutes on each side. The goal is to get them golden brown and fully cooked. I check the internal temperature; it should reach 165°F (75°C). Once cooked, I remove the chicken and set it aside. In the same skillet, I add the halved cherry tomatoes. I sauté them for about 3-4 minutes. This softens the tomatoes and helps them release their juices. The aroma fills the kitchen, making my mouth water! Now it's time to put it all together. I lower the heat and return the chicken to the skillet. I top each chicken breast with the halved mozzarella balls. Then, I cover the skillet for about 2-3 minutes. This allows the cheese to melt perfectly over the chicken. Finally, I drizzle balsamic glaze over the chicken and tomatoes. I sprinkle fresh basil on top for a burst of flavor. The dish is now ready to serve! I plate it right from the skillet for a rustic look. The melted mozzarella stretches as I cut into the chicken. It looks and tastes amazing! You can find the full recipe for Caprese Chicken Skillet to follow along easily! To get the best chicken texture, use a meat thermometer. Cook the chicken until it hits 165°F (75°C). This ensures it's juicy and safe to eat. If you want to avoid overcooked chicken, don’t rush the cooking. Sear chicken for about 6-7 minutes on each side. If the chicken looks golden brown, it’s likely ready. Using fresh herbs makes a big difference. Fresh basil adds a bright taste. Dried herbs can work, but they lack that punch. For the balsamic glaze, choose a high-quality brand. A good glaze is thick and sweet. It adds a rich flavor that ties all the ingredients together. Serve the dish straight from the skillet for a cozy feel. It looks great and keeps the food warm. For extra visual appeal, sprinkle more fresh basil on top. You can also drizzle more balsamic glaze around the plate. This adds color and makes your meal look gourmet. Check out the Full Recipe for more details. {{image_2}} You can swap chicken for turkey or shrimp in this dish. Turkey works well as a leaner option. It absorbs the flavors nicely and cooks fast. Shrimp adds a fun twist. They cook quickly too. Just sauté them in olive oil until they turn pink. Both options bring a new taste to the skillet. If you prefer a meatless meal, make a Caprese Skillet without meat. Instead of chicken, use hearty vegetables. Zucchini, eggplant, or bell peppers can work great. Sauté them until tender. You still get that fresh taste with tomatoes and mozzarella. This option is just as colorful and delicious. Adding Italian seasoning or chili flakes can boost the flavor. Italian seasoning brings herbs like oregano and basil together. Just a teaspoon adds depth to the dish. If you like heat, sprinkle chili flakes on top. This extra kick makes every bite exciting. You can mix and match these ideas to suit your taste. For the full recipe, check out the detailed instructions. To store leftovers, let the Caprese Chicken cool first. Place it in an airtight container. You can keep it in the fridge for up to three days. When you're ready to eat, just take it out and reheat. If you want to freeze the dish, cut it into smaller pieces. Use a freezer-safe container or bag. Make sure to remove as much air as possible. You can freeze it for up to three months. When you want to eat it, let it thaw overnight in the fridge. To reheat, use a skillet over medium heat. Add a splash of water to prevent dryness. Cover it with a lid to keep the moisture in. You can also use the microwave, but it may not keep the cheese as nice. Heat in short bursts until hot. Enjoy your meal just like the first time! You can prep this meal in advance. Start by cooking the chicken and tomatoes. Cool them down and store in an airtight container. Keep in the fridge for up to three days. When you are ready to eat, just reheat in a skillet. Add fresh mozzarella and basil last to keep them fresh. Yes, you can switch up the cheese! Try using goat cheese for a tangy flavor. Feta also works well if you like a crumbly texture. For a creamy taste, you can use ricotta. Each cheese adds a unique twist to your dish. This dish is delicious on its own, but you can add sides. Serve with a simple green salad for freshness. Garlic bread pairs nicely if you want something hearty. You could also try it with roasted vegetables for extra flavor. Access the full recipe for Caprese Chicken Skillet! In this post, I covered how to make a delicious Caprese Chicken Skillet. We explored essential ingredients like chicken, tomatoes, and mozzarella, along with optional add-ons and cooking tips. I shared steps for cooking the chicken and veggies to perfection and suggested storage tips. Remember, you can swap meats or make it vegetarian for variety. This dish is not just tasty but easy to prepare and customize. Now, gather your ingredients, try the recipe, and enjoy every bite!](https://dailydishlab.com/wp-content/uploads/2025/06/81b82b43-9289-48a9-b4c0-455fdfb47d4f-300x300.webp)
Caprese Chicken Skillet
Ingredients
2 boneless, skinless chicken breasts
1 tablespoon olive oil
Salt and pepper to taste
1 teaspoon garlic powder
1 cup cherry tomatoes, halved
1 cup fresh mozzarella balls, halved
1 teaspoon balsamic glaze
1/4 cup fresh basil leaves, chopped
Instructions
Start by seasoning both sides of the chicken breasts with salt, pepper, and garlic powder.
In a large skillet, heat the olive oil over medium heat. Once hot, add the chicken breasts and sear for about 6-7 minutes on each side until cooked through and golden brown. The internal temperature should reach 165°F (75°C).
Once the chicken is cooked, remove it from the skillet and set aside on a plate.
In the same skillet, add the halved cherry tomatoes. Sauté for about 3-4 minutes until they start to soften and release their juices.
Lower the heat and return the chicken to the skillet. Top each chicken breast with the halved mozzarella balls. Cover the skillet with a lid briefly to allow the cheese to melt, about 2-3 minutes.
Drizzle balsamic glaze over the chicken and tomatoes. Sprinkle the chopped basil on top as a fresh finishing touch.
Serve immediately on plates, allowing the melted mozzarella to stretch as you cut into the chicken.
Prep Time: 10 minutes | Total Time: 30 minutes | Servings: 2
– Presentation Tips: Serve the dish directly from the skillet for a rustic look, garnished with extra basil leaves and a fresh drizzle of balsamic glaze around the plate for added color.
Caprese Chicken Skillet
Ingredients
- 2 pieces boneless, skinless chicken breasts
- 1 tablespoon olive oil
- to taste Salt and pepper
- 1 teaspoon garlic powder
- 1 cup cherry tomatoes, halved
- 1 cup fresh mozzarella balls, halved
- 1 teaspoon balsamic glaze
- 0.25 cup fresh basil leaves, chopped
Instructions
- Start by seasoning both sides of the chicken breasts with salt, pepper, and garlic powder.
- In a large skillet, heat the olive oil over medium heat. Once hot, add the chicken breasts and sear for about 6-7 minutes on each side until cooked through and golden brown. The internal temperature should reach 165°F (75°C).
- Once the chicken is cooked, remove it from the skillet and set aside on a plate.
- In the same skillet, add the halved cherry tomatoes. Sauté for about 3-4 minutes until they start to soften and release their juices.
- Lower the heat and return the chicken to the skillet. Top each chicken breast with the halved mozzarella balls. Cover the skillet with a lid briefly to allow the cheese to melt, about 2-3 minutes.
- Drizzle balsamic glaze over the chicken and tomatoes. Sprinkle the chopped basil on top as a fresh finishing touch.
- Serve immediately on plates, allowing the melted mozzarella to stretch as you cut into the chicken.
![To make a tasty one-pot vegetable soup, gather these fresh ingredients: - 1 tablespoon olive oil - 1 medium onion, diced - 3 cloves garlic, minced - 2 medium carrots, sliced - 2 celery stalks, chopped - 1 bell pepper, diced (any color) - 1 medium zucchini, diced - 1 cup green beans, trimmed and cut into 1-inch pieces - 1 cup diced tomatoes (canned or fresh) - 4 cups vegetable broth - 1 teaspoon dried thyme - 1 teaspoon dried basil - Salt and pepper to taste - 1 cup kale or spinach, chopped - Juice of 1 lemon Using fresh ingredients makes a big difference in flavor and nutrition. Fresh vegetables add crunch and bright taste. They also keep the soup light and vibrant. However, canned ingredients can save time and still taste good. For instance, canned tomatoes are great in this soup. They are sweet and ready to use. If you choose canned, look for low-sodium options to keep it healthy. Seasonings bring the soup to life. I recommend using dried thyme and basil for a warm, earthy flavor. They blend well with the vegetables. You can also try adding a bay leaf while it cooks. It gives the soup a lovely aroma. For a kick, add a pinch of red pepper flakes. Fresh herbs like parsley or cilantro at the end will add a pop of color and freshness. Adjust the salt and pepper to make it suit your taste. For the full recipe, follow the instructions provided to create this delightful dish. You start by gathering your ingredients. This makes the cooking process easier. Here’s what you need: - 1 tablespoon olive oil - 1 medium onion, diced - 3 cloves garlic, minced - 2 medium carrots, sliced - 2 celery stalks, chopped - 1 bell pepper, diced (any color) - 1 medium zucchini, diced - 1 cup green beans, trimmed and cut into 1-inch pieces - 1 cup diced tomatoes (canned or fresh) - 4 cups vegetable broth - 1 teaspoon dried thyme - 1 teaspoon dried basil - Salt and pepper to taste - 1 cup kale or spinach, chopped - Juice of 1 lemon Once you have everything, chop the veggies into bite-sized pieces. This helps them cook evenly. Heat the olive oil in a large pot over medium heat. Add the diced onion and sauté it for about 5 minutes. You want it soft and clear. Then, add the minced garlic and cook for another minute. This gives the soup a nice aroma. Next, toss in the sliced carrots, chopped celery, and diced bell pepper. Cook these for about 5 minutes. Stir occasionally so they don’t stick. Now, add in the diced zucchini and green beans. Mix well, followed by the diced tomatoes. Pour in the vegetable broth. Then, add the dried thyme, dried basil, salt, and pepper. Bring the mixture to a boil. Once it's boiling, lower the heat to let it simmer. Cook for about 20 minutes, or until all the veggies are soft. Finally, stir in the chopped kale or spinach and the lemon juice. Let them wilt for 2-3 minutes, then taste. Adjust the seasoning if needed. Make sure to keep the heat at medium while cooking the onions. This helps them soften without burning. When you add the broth, watch for the boil. Reducing heat after boiling is key. For the best taste, let the soup simmer. This gives the flavors time to blend. If you want a thicker soup, you can mash some of the veggies with a fork. Enjoy your hearty garden vegetable bliss soup! Check the [Full Recipe] for more details. To make a great one-pot vegetable soup, always use fresh veggies. They boost flavor and nutrition. Start with a good base. Sauté your onion and garlic in olive oil first. This step builds a rich flavor. Be sure to chop your vegetables evenly. This helps them cook at the same rate. Add herbs like thyme and basil early. They release their best flavors when heated. For a bright finish, squeeze fresh lemon juice at the end. One common mistake is not cutting vegetables the same size. This can lead to uneven cooking. Another mistake is adding too much salt at once. Start with a little and taste as you go. Don’t rush the simmering step. Let the soup cook low and slow. This brings out the best flavors. Lastly, avoid overcooking the greens. Add them last, so they stay bright and vibrant. If your soup is too bland, add more herbs or a splash of vinegar. This can brighten the flavors. If it’s too thick, stir in more vegetable broth or water. For a richer taste, add a dash of soy sauce or Worcestershire sauce. If you accidentally add too much salt, toss in a few potato chunks. They absorb excess salt while cooking. Finally, if the soup is too watery, let it simmer uncovered for a bit longer. This helps thicken it up nicely. {{image_2}} You can easily change this soup to suit your taste. Start by picking your favorite veggies. If you love spinach, add more of it. If you want a bit of heat, toss in some chili flakes. You can also try different herbs. Instead of thyme and basil, use parsley or oregano. Each choice adds a unique flavor. Do you have veggies at home that you need to use? Feel free to swap them! For example, if you have sweet potatoes, they work great instead of carrots. If you don't have green beans, try peas or corn. You can even use frozen veggies if fresh ones aren’t available. Just use the same amount for best results. This recipe is already vegan and gluten-free, making it easy for many diets. If you want to add protein, beans or lentils are great choices. Just make sure to cook them until soft. For a heartier soup, you can add gluten-free pasta. Just cook it separately and stir it in at the end. It’s all about making this soup fit your needs. For the full recipe, check out the Hearty Garden Vegetable Bliss Soup. After making this soup, let it cool before storing. Use an airtight container. This keeps the soup fresh. You can store it in the fridge for up to four days. If you want to enjoy it later, freezing is the way to go. To reheat, pour the soup into a pot. Heat it over medium heat. Stir it often for even warming. You can also use the microwave. Just place it in a microwave-safe bowl and heat for 2 to 3 minutes. Stir halfway through to make sure it heats evenly. For long-term storage, freeze the soup in portions. Use freezer-safe bags or containers. Leave some space at the top, as liquids expand when frozen. The soup can last up to three months in the freezer. When you’re ready to eat, thaw it in the fridge overnight before reheating. This keeps the flavors fresh and tasty. If you follow these tips, your soup will stay delicious! Check out the Full Recipe for more details. The cooking time for this soup is about 40 minutes. You spend 15 minutes prepping the ingredients. Then, the soup simmers for 20 minutes after boiling. This makes a tasty meal fast! Yes, you can add protein to your soup. Try adding cooked beans or lentils. You can also mix in cooked chicken or tofu. These options make the soup more filling and nutritious. To thicken your vegetable soup, blend some of it. Use an immersion blender or a regular blender. You can also add a few more diced potatoes. They cook down and help thicken the soup. Definitely! Frozen vegetables are a great choice. They are just as healthy and save time. Add them straight to the pot with the broth. You won’t need to thaw them first. Store leftovers in an airtight container. Refrigerate them for up to three days. For longer storage, freeze the soup. It can last up to three months in the freezer. You can add fresh herbs like parsley or cilantro. Dried herbs like oregano and rosemary work well too. Just remember to adjust the amount based on what you like. Yes, this soup is kid-friendly! It has tasty veggies and a mild flavor. You can even let kids pick their favorite vegetables to add. Yes, you can make the soup ahead of time. It tastes even better after a day in the fridge. Just reheat it before serving, and you’re good to go! For the full recipe, check out the Hearty Garden Vegetable Bliss Soup. This blog post covered how to make a great one-pot vegetable soup. We discussed ingredients, cooking steps, and tips to ensure success. I shared ways to customize the recipe, store leftovers, and answer common questions. Now, you have all the tools to make your perfect soup. Enjoy each warm bowl and feel free to experiment with flavors. Keep these tips handy, and soon, you'll create a dish everyone will love.](https://dailydishlab.com/wp-content/uploads/2025/06/881b00bc-e7c1-4e5c-8041-f5936b3db67e-768x768.webp)
![- 1 pound gnocchi (store-bought or homemade) - 1 cup cherry tomatoes, halved - 1 zucchini, sliced into half-moons - 1 bell pepper (red or yellow), chopped - 1 cup broccoli florets - 2 tablespoons olive oil - 2 cloves garlic, minced - 1 teaspoon Italian seasoning - Salt and pepper to taste - 1/4 cup grated Parmesan cheese (optional) - Fresh basil leaves for garnish To make Easy Sheet Pan Gnocchi Primavera, gather these simple ingredients. Start with gnocchi, which you can find at any store. The cherry tomatoes add sweetness. Zucchini and bell pepper give texture and color. Broccoli adds a crunch, balancing the dish. For seasoning, olive oil helps cook the veggies and gnocchi. Garlic brings a bold flavor. Italian seasoning adds a classic taste. Salt and pepper enhance all the flavors. Don’t forget the Parmesan cheese for creaminess! Fresh basil leaves make a lovely garnish. Once you have all your ingredients, you’re ready to create a delicious meal! For the complete recipe, check out the [Full Recipe]. - Step 1: Preheat your oven to 425°F (220°C). This helps cook the gnocchi right. - Step 2: Combine gnocchi, cherry tomatoes, zucchini, bell pepper, and broccoli on a baking sheet. Make sure they mix well for even cooking. - Step 3: Drizzle olive oil and add minced garlic, Italian seasoning, salt, and pepper. This adds great flavor to the dish. - Step 4: Toss and spread everything evenly on the baking sheet. This helps all the ingredients cook at the same time. - Step 5: Roast for 20-25 minutes, stirring halfway through. This step ensures a nice golden color. - Step 6: Sprinkle with Parmesan cheese and garnish with basil before serving. This makes your dish look and taste amazing. Follow these steps closely for a delicious Easy Sheet Pan Gnocchi Primavera. For the full recipe, check out the section above. - Cook gnocchi until golden brown and vegetables are tender. This adds great flavor. - Use parchment paper for easier cleanup. It saves time and keeps your pan clean. - Add red pepper flakes for heat. It gives a nice kick to the dish. - Try different herbs like thyme or rosemary for varied flavor. Fresh herbs can brighten your meal. - Serve directly from the sheet pan for a casual meal. This makes for easy serving and a fun vibe. - Pair with a side salad for a balanced dinner. A light salad complements the warm gnocchi well. For the complete details, check out the Full Recipe. {{image_2}} You can change up the veggies based on your taste. Try replacing the broccoli with asparagus or green beans. These veggies add crunch and flavor. For more greens, toss in baby spinach or kale. They cook down nicely and boost nutrition. Want more protein? You can add cooked chicken, shrimp, or tofu. These ingredients make the dish heartier. If you prefer a vegetarian option, mix in cannellini beans. They are creamy and fill you up. If you want a healthier twist, consider using cauliflower gnocchi. Whole wheat gnocchi is another great option. If gnocchi is not available, try other types of dumplings. They can add a fun new taste to your meal. For the full recipe, check out the Easy Sheet Pan Gnocchi Primavera. To store leftovers, place them in an airtight container. This keeps them fresh. You can keep them in the fridge for up to three days. If you want to save them longer, freeze portions. Use freezer-safe bags or containers. Label them with the date. They can last up to three months in the freezer. To reheat gnocchi, use the oven for best texture. Preheat the oven to 350°F (175°C). Place the gnocchi on a baking sheet. Heat for about 10-15 minutes. Stir halfway through to warm evenly. If you use a microwave, put the gnocchi in a bowl. Heat for 1-2 minutes, stirring once. Be careful not to overheat, as it can change the texture. For easy weeknight meals, prepare ingredients in advance. Chop vegetables and store them in the fridge. You can also cook the gnocchi ahead of time. Keep sauces and garnishes separate to keep them fresh. This way, you can mix and match ingredients as needed. Use these tips to enjoy quick meals all week. If you want to see the full recipe, check the link. Can I use frozen gnocchi for this recipe? Yes, you can use frozen gnocchi. Just toss them straight on the sheet pan. They will cook well and taste great. No need to thaw them first. How can I make this vegan-friendly? To make this dish vegan, skip the Parmesan cheese. You can use nutritional yeast for a cheesy flavor. Also, check that your gnocchi is egg-free. What’s the best way to tell when the vegetables are done? The best way is to check their color and texture. They should be bright and tender, but not mushy. You can poke them with a fork to test. Can I add more vegetables or change the quantities? Absolutely! Feel free to add more veggies like carrots or mushrooms. Just remember to keep the total amount similar so everything cooks evenly. What can I serve with Easy Sheet Pan Gnocchi Primavera? This dish goes well with a fresh salad. You can also serve garlic bread or a light soup. They add flavors and make the meal more filling. How do I store leftovers for the next day? To store leftovers, place them in an airtight container. Keep them in the fridge for up to three days. Reheat in the oven or microwave before serving. This recipe shows how to make a simple sheet pan gnocchi dish. We covered all the main ingredients, seasonings, and step-by-step cooking directions to ensure success. Remember to customize your meal with different veggies, proteins, or gnocchi types. After a quick roast, you can have a delicious dinner ready. Keep it fresh with storage tips for leftovers. Enjoy your cooking and make this dish your own. Each bite is packed with flavor and fun. Happy cooking!](https://dailydishlab.com/wp-content/uploads/2025/07/51139aef-520e-4271-91ea-5c6754dfc759-768x768.webp)