Pumpkin Spice Latte Pudding Cups Simple and Scrumptious

If you love fall flavors and sweet treats, you’re in for a treat! I’m here to share my simple and scrumptious recipe for Pumpkin Spice Latte Pudding Cups. You’ll get a perfect blend of pumpkin and coffee in this light dessert. With easy steps and few ingredients, you can bring autumn to your table. Get ready to impress your friends and family with this delightful dish! Let’s dive in!
Why I Love This Recipe
- Comforting Flavor: This pudding captures the warm, cozy flavors of fall, making it the perfect treat for any autumn gathering.
- Easy to Make: With simple ingredients and straightforward steps, this recipe is perfect for both novice and experienced cooks.
- Customizable Toppings: You can personalize each pudding cup with your favorite toppings, adding a fun twist to every serving.
- Perfect for Entertaining: These pudding cups not only taste delicious but also look beautiful, making them an impressive dessert option for guests.
Ingredients
List of Ingredients for Pumpkin Spice Latte Pudding Cups
To make these tasty pudding cups, gather these ingredients:
- 1 cup pumpkin puree
- 2 cups milk (or almond milk)
- 1/2 cup heavy cream
- 1/2 cup granulated sugar
- 1/4 cup cornstarch
- 1 teaspoon pumpkin pie spice
- 1 teaspoon vanilla extract
- 1/4 cup strong brewed coffee, cooled
- Whipped cream for topping
- Crushed graham crackers for garnish
- Ground cinnamon for dusting
Substitutions for Dairy Ingredients
If you want to make this recipe dairy-free, use almond milk instead of regular milk. You can also swap heavy cream with coconut cream. This option gives a nice creaminess and a hint of coconut flavor. If you don’t like almond milk, you can use oat milk or any nut milk you prefer.
Recommended Quality of Coffee
The coffee in this recipe is key for flavor. Use strong brewed coffee for the best taste. A medium to dark roast works well. If you want to try something new, use espresso for an extra kick. Make sure it cools down before mixing it into the pudding. This keeps the pudding from getting too warm and affects its texture.

Step-by-Step Instructions
Detailed Instructions for Making the Pudding
To make pumpkin spice latte pudding cups, follow these steps:
1. Start by taking a medium saucepan. Whisk together sugar, cornstarch, and pumpkin pie spice over medium heat.
2. Gradually add the milk and heavy cream. Whisk this mix well to avoid lumps.
3. Keep cooking the mixture over medium heat. Stir frequently until it thickens and bubbles, about 5-7 minutes.
4. Once thickened, remove the pot from the heat. Stir in pumpkin puree, vanilla extract, and cooled coffee. Make sure it is smooth and well mixed.
5. Pour the pudding into cups or glasses.
6. Cover with plastic wrap and chill for at least 2 hours to set.
7. After chilling, top each pudding cup with whipped cream, some crushed graham crackers, and a sprinkle of ground cinnamon.
Cooking Times and Heat Levels
Cook the pudding over medium heat to avoid burning. This method gives you control over the thickening process.
- Prep Time: 15 minutes
- Cook Time: 5-7 minutes
- Chill Time: 2 hours
This timing is key for a rich, creamy texture.
Tips for Achieving the Perfect Consistency
For the best pudding, keep these tips in mind:
- Whisk continuously while cooking to prevent lumps.
- If the pudding seems too thick, you can add a bit more milk.
- Cool the coffee before adding; hot coffee can change the pudding’s texture.
- Chill the pudding well to ensure it sets properly.
These steps will help you create the perfect pumpkin spice latte pudding cups every time!
Pro Tips
- Use Fresh Pumpkin Puree: For the best flavor, use homemade pumpkin puree instead of canned. Simply roast fresh pumpkins, scoop out the flesh, and blend until smooth.
- Chill the Coffee: Make sure your brewed coffee is cooled before adding it to the pudding mixture. This prevents the heat from affecting the texture of the pudding.
- Experiment with Milk Alternatives: If you’re looking for a dairy-free option, almond or oat milk works wonderfully in this recipe without sacrificing creaminess.
- Presentation is Key: Layer the pudding in clear cups to showcase the beautiful colors and textures. A drizzle of caramel on top can add an extra touch of elegance.
Tips & Tricks
Common Mistakes to Avoid When Making Pudding
One big mistake is not whisking enough. You must whisk the sugar, cornstarch, and pumpkin pie spice well. This helps mix the dry ingredients. Another error is cooking it too fast. Keep the heat medium to avoid burning. Stir often to keep it smooth. If it gets lumpy, you might not mix well. Always blend the milk and cream slowly to avoid lumps.
Best Practices for Whipping Cream
Start with cold cream and a cold bowl. This helps the cream whip better. Use a hand mixer or stand mixer for best results. Beat until soft peaks form. Don’t overbeat it, or it will turn to butter. If you want sweetened cream, add sugar while whipping. A touch of vanilla can also add flavor.
Garnishing Ideas for Stunning Presentation
For a pretty touch, use clear glasses. Layer the pudding so you can see the colors. Top with fluffy whipped cream and crushed graham crackers. A sprinkle of ground cinnamon adds beauty and flavor. You can even drizzle some caramel sauce for a sweet finish. These simple steps will make your pudding cups look amazing!

Variations
Dairy-Free or Vegan Alternatives
You can easily make this recipe dairy-free or vegan. Use almond milk instead of regular milk. Swap heavy cream for coconut cream. These options keep the rich texture. They also add a nice twist to the flavor. You’ll still enjoy the same creamy goodness.
Seasonal Twists: Adding Flavor Variations
Want to change things up? Try adding different spices. Nutmeg or allspice can bring a new flavor. You can also mix in some caramel sauce. This adds a sweet touch. For a chocolate twist, use cocoa powder. These small changes can turn your pudding cups into something special for each season.
Additional Toppings and Mix-Ins
Toppings can make your pudding cups shine. Whipped cream is a classic favorite. You can also sprinkle crushed graham crackers on top. This gives a nice crunch. For extra fun, add chocolate shavings or toasted nuts. A drizzle of caramel or chocolate sauce can make them irresistible. Feel free to get creative!
Storage Info
How to Properly Store Pudding Cups
To keep your Pumpkin Spice Latte Pudding Cups fresh, store them in the fridge. Use an airtight container or cover each cup with plastic wrap. This keeps the flavors strong and prevents the pudding from absorbing other smells in the fridge. Make sure you cool the pudding completely before sealing it.
Shelf Life of Pumpkin Spice Latte Pudding Cups
These pudding cups can last up to five days in the fridge. After that, they may lose their taste or texture. If you notice any off smells or changes, it’s best to toss them out. Always check before enjoying leftovers.
Freezing Instructions for Long-Term Storage
You can freeze these pudding cups for up to three months. Use freezer-safe containers or freezer bags. Just remember to leave some space for expansion. When ready to eat, thaw them in the fridge overnight. Give them a good stir before serving to bring back the creamy texture.
FAQs
Can I make Pumpkin Spice Latte Pudding Cups in advance?
Yes, you can make these pudding cups ahead of time. I often prepare them the night before a gathering. This gives the pudding time to set well in the fridge. Just cover them tightly with plastic wrap. They will stay fresh for up to three days. This makes them perfect for busy days or special events.
What can I use instead of pumpkin puree?
If you don’t have pumpkin puree, use sweet potato puree or butternut squash. These options work well and keep the flavor rich. You can also try apple sauce for a fruity twist. Just remember, the taste will change slightly, but it will still be good.
How can I adjust the sweetness of the pudding?
To adjust the sweetness, simply add more or less sugar. You can start with half the amount and taste as you go. If you want it sweeter, add sugar a little at a time. You can also use maple syrup or honey for a natural touch. Just make sure to mix well to combine.
You now know how to make Pumpkin Spice Latte Pudding Cups step-by-step. We covered key ingredients, helpful tips, and variations to suit your taste. Remember to choose quality coffee for the best flavor. Avoid common mistakes for a smooth pudding. With proper storage, you can enjoy these treats for days. Trust me, these cups are a delicious way to celebrate the season. Get creative and have fun with toppings! Happy cooking!

Pumpkin Spice Latte Pudding Cups
Ingredients
1 cup pumpkin puree
2 cups milk (or almond milk)
1/2 cup heavy cream
1/2 cup granulated sugar
1/4 cup cornstarch
1 teaspoon pumpkin pie spice
1 teaspoon vanilla extract
1/4 cup strong brewed coffee, cooled
Whipped cream for topping
Crushed graham crackers for garnish
Ground cinnamon for dusting
Instructions
In a medium saucepan, whisk together the sugar, cornstarch, and pumpkin pie spice over medium heat.
Gradually blend in the milk and heavy cream, whisking continuously to avoid lumps.
Cook the mixture over medium heat, stirring frequently, until it thickens and begins to bubble (about 5-7 minutes).
Remove the saucepan from heat, and mix in the pumpkin puree, vanilla extract, and cooled coffee until smooth and well combined.
Pour the pudding mixture into individual cups or glasses.
Cover with plastic wrap and refrigerate for at least 2 hours to set.
Once set, top each pudding cup with whipped cream, a sprinkle of crushed graham crackers, and a dusting of ground cinnamon.
Prep Time: 15 minutes | Total Time: 2 hours 15 minutes | Servings: 4
– Presentation Tips: Layer the cups in a clear glass for a beautiful display and consider adding a sprinkle of pumpkin pie spice on top for an eye-catching finish.
Pumpkin Spice Latte Pudding Cups
Ingredients
- 1 cup pumpkin puree
- 2 cups milk (or almond milk)
- 1/2 cup heavy cream
- 1/2 cup granulated sugar
- 1/4 cup cornstarch
- 1 teaspoon pumpkin pie spice
- 1 teaspoon vanilla extract
- 1/4 cup strong brewed coffee, cooled
- to taste Whipped cream for topping
- to taste Crushed graham crackers for garnish
- to taste Ground cinnamon for dusting
Instructions
- In a medium saucepan, whisk together the sugar, cornstarch, and pumpkin pie spice over medium heat.
- Gradually blend in the milk and heavy cream, whisking continuously to avoid lumps.
- Cook the mixture over medium heat, stirring frequently, until it thickens and begins to bubble (about 5-7 minutes).
- Remove the saucepan from heat, and mix in the pumpkin puree, vanilla extract, and cooled coffee until smooth and well combined.
- Pour the pudding mixture into individual cups or glasses.
- Cover with plastic wrap and refrigerate for at least 2 hours to set.
- Once set, top each pudding cup with whipped cream, a sprinkle of crushed graham crackers, and a dusting of ground cinnamon.
![- 1 cup rolled oats - 1/2 cup almond butter (or any nut butter of choice) - 1/4 cup honey or maple syrup These key ingredients form the base of your energy bites. Rolled oats provide fiber and texture. Almond butter gives healthy fats and protein. Honey or maple syrup adds natural sweetness. - 1/4 cup mini chocolate chips - 1/4 cup ground flaxseed - 1/4 cup shredded coconut (unsweetened) Mini chocolate chips add a delightful burst of flavor. Ground flaxseed boosts nutrition with omega-3s. Shredded coconut gives a chewy texture and tropical taste. - 1 tsp vanilla extract - 1/2 tsp cinnamon - A pinch of salt Vanilla extract enhances the overall flavor. Cinnamon adds warmth and depth. A pinch of salt balances the sweetness and brings all the flavors together. For the complete guide on making these bites, check out the [Full Recipe]. To start, gather your ingredients. For the dry mix, you need rolled oats, ground flaxseed, shredded coconut, and cinnamon. In a medium bowl, combine these dry ingredients. Mix them well so they blend nicely. Next, let's make the wet mix. In a separate bowl, add almond butter, honey (or maple syrup), vanilla extract, and a pinch of salt. Stir until it becomes smooth and creamy. This step is key for a good flavor. Now, pour the wet mix into the dry mix. Stir until you combine everything. You want all the dry ingredients to be coated with the wet mix. Finally, gently fold in mini chocolate chips. This adds a sweet delight to every bite. Now it’s time to shape your energy bites. Take about one tablespoon of the mixture. Roll it between your hands to form a ball. Make sure they are about the same size for even bites. Repeat this process until you use all the mixture. Place each ball on a parchment-lined baking sheet. This helps them not stick and makes clean-up easy. Keep them spaced out a bit to avoid sticking together. After shaping, place the baking sheet in the fridge. Let the energy bites chill for at least 30 minutes. This helps them firm up and hold their shape. Once chilled, store the bites in an airtight container. Keep them in the fridge for up to one week. Enjoy these tasty snacks whenever you need a quick energy boost, and don’t forget to check out the Full Recipe for more details! To boost the flavor of your energy bites, add spices like nutmeg or ginger. They give a warm kick. You can also try different extracts, like almond or coconut, for a unique taste. If you like it sweeter, adjust the honey or maple syrup. Just add a little at a time to find your perfect sweetness. For a better texture, focus on the consistency of your mixture. If it's too dry, add a touch more nut butter or honey. For crunchier bites, mix in chopped nuts or seeds. If you prefer them chewier, reduce the baking time slightly. This makes them softer and more enjoyable. Use a medium bowl for mixing your ingredients. A spatula works well for combining everything. To store your energy bites, an airtight container is best. It keeps them fresh longer. You can also use parchment paper to prevent sticking when chilling them in the fridge. For the full recipe, check out the [Full Recipe]. {{image_2}} You can easily make these energy bites fit your diet. For gluten-free options, use certified gluten-free oats. This way, you avoid any gluten while still enjoying a tasty snack. If you want vegan alternatives, swap honey for maple syrup. Both options keep the bites sweet and delicious. You can add fun flavors to your energy bites. Try mixing in dried fruits like raisins or cranberries. These add chewiness and natural sweetness. Nuts such as almonds or walnuts also work well. They add crunch and healthy fats. You can also experiment with different types of chocolate. Use dark, milk, or even white chocolate chips. Each type brings its own unique taste. Get creative with nut butters! While almond butter is great, you can try peanut butter or cashew butter. Each brings a different flavor and texture. You can also incorporate protein powder for a boost. This makes the bites even more filling and nutritious. Adjust the wet ingredients slightly if you add protein powder to keep the right texture. Feel free to explore these variations. They can help you make the perfect chocolate chip energy bites just for you. Check out the Full Recipe for the basic mix, then let your imagination lead the way! To keep your chocolate chip energy bites fresh, store them in an airtight container. Glass or plastic containers work well. Place them in the fridge to maintain their texture and taste. They can last up to one week when stored properly. You can freeze energy bites for longer storage. To freeze, place them in a single layer on a baking sheet. Once frozen, transfer them to a freezer-safe bag. This method prevents them from sticking together. When you want to eat them, take out a few bites and let them thaw in the fridge. This process takes about an hour. In the fridge, these bites last about one week. After that, they may lose flavor and texture. Watch for signs of spoilage, like an off smell or changes in color. If you see or smell anything unusual, it's best to toss them. Enjoy your homemade snacks while they’re fresh! Chocolate chip energy bites can last up to one week in the fridge. Store them in an airtight container for the best freshness. If you freeze them, they can last for about three months. Just thaw them in the fridge when you're ready to enjoy. Yes, you can easily substitute ingredients in this recipe. If you don't like almond butter, feel free to use peanut butter or sunflower seed butter. You can swap honey for maple syrup if you prefer a vegan option. The mini chocolate chips can also be replaced with dried fruits or nuts. Absolutely! These energy bites are a great snack for kids. They are tasty, healthy, and easy to make. You can even involve your kids in the preparation. They will love rolling the bites into balls. Just ensure there are no allergies to the ingredients used. Yes, making these energy bites in advance is a smart idea. You can prepare a batch at the start of the week. This way, you have quick snacks ready for busy days. Just store them in the fridge or freeze some for later use. Chocolate chip energy bites offer many nutritional benefits. They contain rolled oats, which provide fiber for digestion. Almond butter adds healthy fats and protein. Flaxseed is rich in omega-3 fatty acids, promoting heart health. Plus, the little bit of chocolate makes them a treat! These chocolate chip energy bites are simple to make and full of good stuff. You can enjoy them as snacks or quick breakfast bites. Let’s dive into what makes these little treats so special. - Rolled oats: They give a hearty base and provide fiber. - Almond butter (or nut butter alternatives): This adds creaminess and healthy fats. - Honey or maple syrup: Sweeteners that bring flavor and stickiness. - Mini chocolate chips: They add sweetness and a fun texture. - Ground flaxseed: This boosts nutrition and adds omega-3s. - Unsweetened shredded coconut: It gives a nice chewiness. - Vanilla extract: This enhances the flavor and warms the bites. - Cinnamon: It adds spice and depth. - Salt: Just a pinch balances all the flavors. In this recipe, we blend all these ingredients to create something delicious. You can find the [Full Recipe] at the start of this article. It only takes about 10 minutes to mix, and then just chill for 30 minutes. You’ll have about 12 bites ready to enjoy! Feel free to switch it up with your favorite nut butter or add different mix-ins. The options are endless! These chocolate chip energy bites are simple to make and full of flavor. We covered key ingredients like oats and nut butter. I shared tips on making them crunchier or chewier, and variations for different diets. Remember to store them in an airtight container for the best taste. You can enjoy these bites anytime you need a quick snack. Making them yourself lets you control the ingredients and flavors. Healthy snacks can be easy and delicious, so try these energy bites today!](https://dailydishlab.com/wp-content/uploads/2025/07/ee6487bc-f560-4f96-a21c-d76d52703957-768x768.webp)
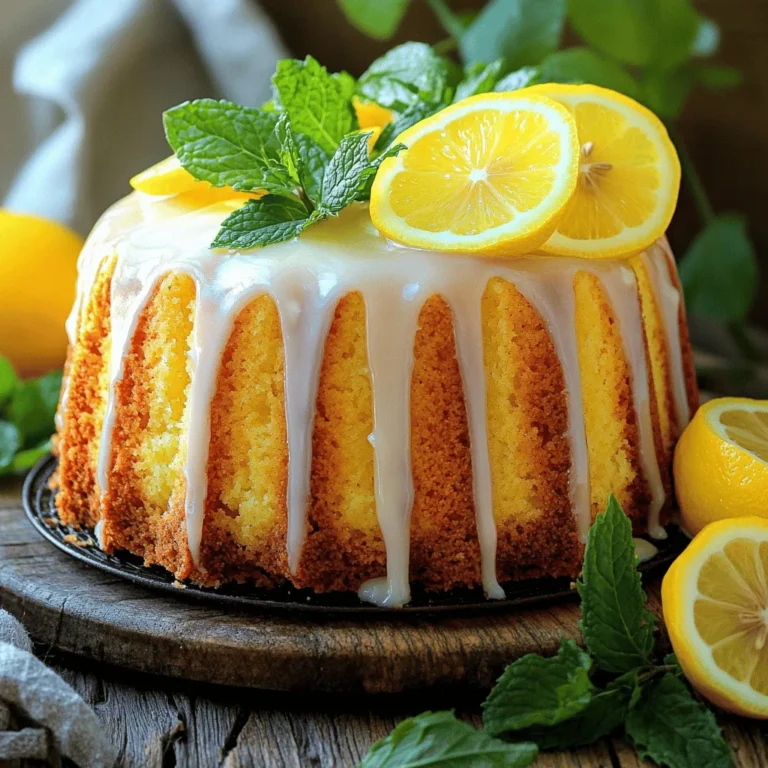
![- 1 ½ cups all-purpose flour - 1 teaspoon baking powder - ½ teaspoon baking soda - ½ teaspoon salt - 1 cup unsalted butter, softened - 1 cup granulated sugar - 3 large eggs - 1 tablespoon lemon zest - 2 tablespoons lemon juice - 1 teaspoon vanilla extract - 1 cup fresh blueberries - Optional: 1 cup powdered sugar for glaze - Optional: 2 tablespoons lemon juice for glaze To create a Lemon Blueberry Pound Cake, you need some simple ingredients. The base combines flour, sugar, and butter for a rich texture. The eggs add moisture and help the cake rise. Lemon zest and juice give the cake its bright, fresh flavor. Fresh blueberries burst in your mouth with every bite. If you want to add a glaze, powdered sugar and more lemon juice make it shine. This cake is not just tasty; it looks great too! You can serve it on a nice plate with berries on top. - Calories per serving: Approximately 300 - Key nutrients: - Carbs: 40g - Fats: 15g - Proteins: 3g Knowing the nutritional facts helps you enjoy this treat wisely. Each slice has about 300 calories. It has a good mix of carbs for energy, some fats for flavor, and a bit of protein. This cake can fit well into a balanced diet. For the full recipe, check the [Full Recipe]. - Preheating the oven: Start by preheating your oven to 350°F (175°C). This helps the cake bake evenly. - Greasing the loaf pan: Next, grease and flour a 9x5-inch loaf pan. This step keeps the cake from sticking to the pan. - Creaming butter and sugar: In a large bowl, beat 1 cup of softened unsalted butter with 1 cup of granulated sugar. Use an electric mixer on medium speed for about 3-4 minutes. The mix should look light and fluffy. - Adding eggs and flavorings: Add 3 large eggs one at a time, mixing well after each. Then, stir in 1 tablespoon of lemon zest, 2 tablespoons of lemon juice, and 1 teaspoon of vanilla extract until combined. - Incorporating dry ingredients: In a separate bowl, whisk together 1 ½ cups of all-purpose flour, 1 teaspoon of baking powder, ½ teaspoon of baking soda, and ½ teaspoon of salt. Gradually add this mix to the wet ingredients. Mix until just combined to keep your cake light. - Folding in blueberries: Carefully fold in 1 cup of fresh blueberries with a rubber spatula. Make sure to spread them evenly throughout the batter. - Baking time and test for doneness: Pour the batter into your prepared loaf pan. Bake for 55-65 minutes. You will know it’s done when a toothpick inserted in the center comes out clean. For detailed instructions, check out the Full Recipe. - How to avoid overmixing: When you mix the batter, do it gently. After you add the dry ingredients, mix just until you see no more flour. Overmixing can make the cake tough. It’s okay if there are a few small lumps. - Ensuring even baking: Make sure your oven is at the right temperature. An oven thermometer can help with this. Place the cake in the center of the oven. This spot helps it bake evenly. Rotate the pan halfway through baking to avoid any hot spots. - Presentation ideas: The key to a great presentation is color. Serve the cake on a bright platter. Add fresh blueberries and mint leaves on top for a pop of color. You can also dust it with powdered sugar for a sweet touch. - Pairing with beverages: This lemon blueberry pound cake pairs well with tea or lemonade. The tartness of the lemon and sweetness of the blueberries complement these drinks perfectly. You can also serve it with a scoop of vanilla ice cream for an extra treat. - Dense cake: If your cake turns out dense, check your measurements. Too much butter or flour can cause this. Also, make sure you cream the butter and sugar well. This step adds air to the batter. - Sunken centers: A sunken center can happen if the oven is too hot. It can also happen if the batter is too heavy. To fix this, avoid adding too many blueberries. They make the batter heavy. Make sure to bake the cake long enough until a toothpick comes out clean. {{image_2}} You can make this lemon blueberry pound cake even more fun by adding other fruits. Raspberries and strawberries work great. They add a nice tartness that pairs well with lemon. You can also try different citrus zest. Lime or orange zest gives a fresh twist to the cake. Each fruit brings its own charm and flavor. If you need gluten-free options, use a 1-to-1 gluten-free flour blend. This swap will keep the cake tender and moist. For egg substitutions, consider using applesauce or flaxseed meal. One egg can be replaced with ¼ cup of applesauce or 1 tablespoon of flaxseed mixed with 2.5 tablespoons of water. These options work well in keeping the cake light and delicious. If you want to make mini loaves or muffins, adjust your baking time. Mini loaves take about 30-40 minutes, while muffins bake for 18-20 minutes. Check for doneness by inserting a toothpick in the center. This will help you get perfect little treats for any occasion. Enjoy the fun of sharing in smaller portions! You can store your lemon blueberry pound cake in two ways: at room temperature or in the fridge. If you keep it at room temperature, wrap it in plastic wrap. This keeps it moist and fresh. Make sure to place it in a cool, dry spot. Storing it this way works well for up to three days. If you want it to last longer, put it in the fridge. This will help it stay fresh for about a week. Just remember, cold air can dry out the cake. So, be sure to wrap it well. Freezing slices is a great option if you want to save some cake for later. First, let the cake cool completely. Then cut it into slices. Wrap each slice tightly in plastic wrap. After that, place the wrapped slices in a freezer bag. This way, they won’t stick together. You can freeze them for up to three months. When you want a slice, take it out and let it thaw. Simply leave it on the counter for a few hours or overnight in the fridge. Your lemon blueberry pound cake stays fresh for a while. If stored properly, it can last up to a week in the fridge. At room temperature, it stays good for about three days. Look for signs of spoilage. If the cake looks dry or has a strange smell, it’s best to throw it out. Also, any mold is a clear sign it’s time to say goodbye. Enjoy every bite while it’s fresh! To keep your pound cake moist, you can follow these tips: - Use fresh ingredients. - Measure flour correctly. Too much can dry the cake. - Avoid overbaking. Keep a close eye on baking time. - Wrap the cake in plastic wrap when cool. This helps lock in moisture. Yes, you can use frozen blueberries. They work well in this recipe. However, frozen blueberries may change the cake's texture. They can make the batter a little wetter. You might see some color bleed, turning the batter slightly blue. This won't affect the taste, and the cake will still be delicious! To check if your cake is done, insert a toothpick into the center. If it comes out clean or with just a few crumbs, the cake is ready. If it has wet batter on it, bake for a few more minutes. Be careful not to overbake, as this can dry out the cake. Yes, you can make this pound cake ahead of time. Bake it a day or two before serving. Just wrap it well to keep it fresh. You can serve it at room temperature. If you want, you can even freeze it for later. Just make sure to thaw it overnight in the fridge. Making a lemon glaze is simple. Here’s how: - Mix 1 cup of powdered sugar with 2 tablespoons of lemon juice. - Stir until smooth. - Drizzle it over the cooled pound cake for a sweet and tangy finish. This glaze adds a lovely shine and extra flavor. You now know how to make a delicious lemon blueberry pound cake. We covered key ingredients, step-by-step instructions, and helpful tips. Remember to avoid overmixing and adjust baking times for mini loaves. Consider flavor variations and storage advice for the best results. With these simple steps, you can bake an amazing treat that everyone will love. Enjoy the baking process and share your creation with others!](https://dailydishlab.com/wp-content/uploads/2025/07/b06ae976-d76d-41cd-a559-ecf5622799d5-768x768.webp)