
Garlic Herb Roasted Mushrooms Flavorful Side Dish
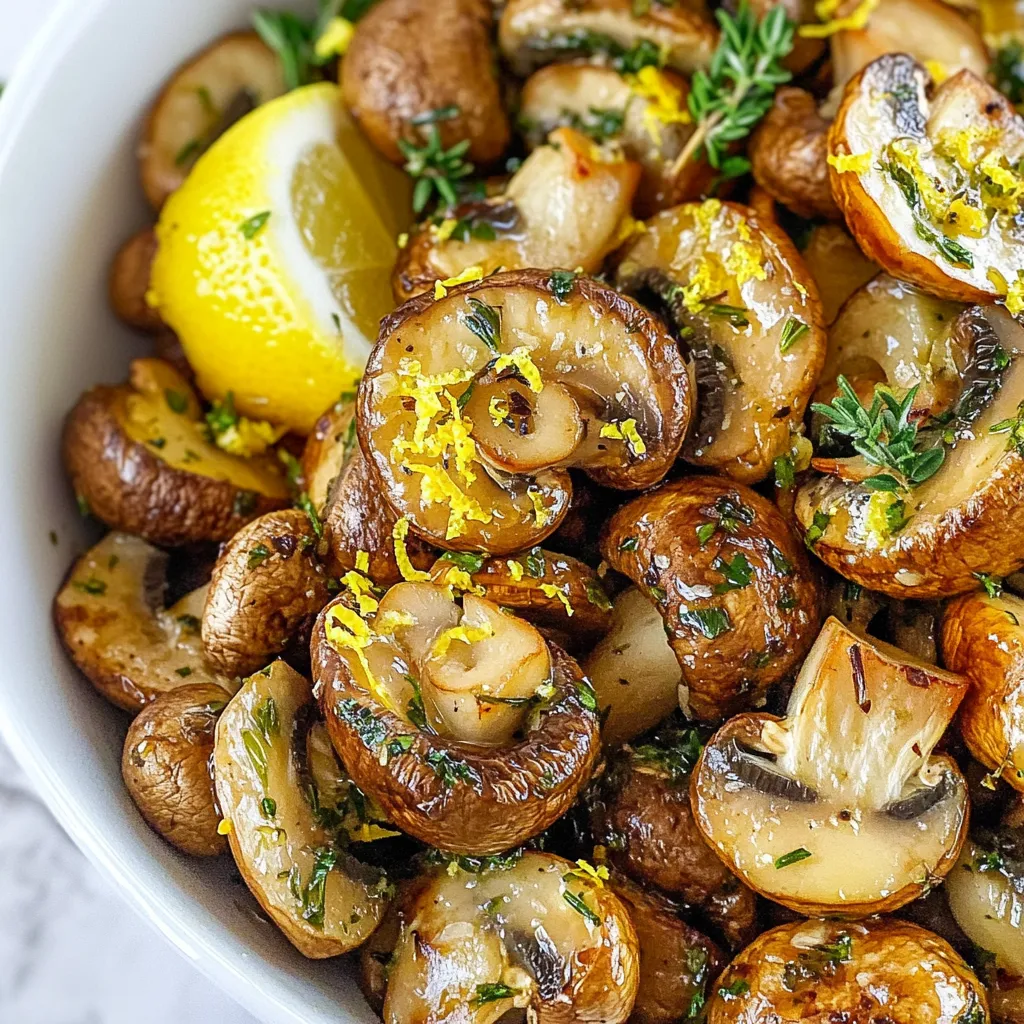
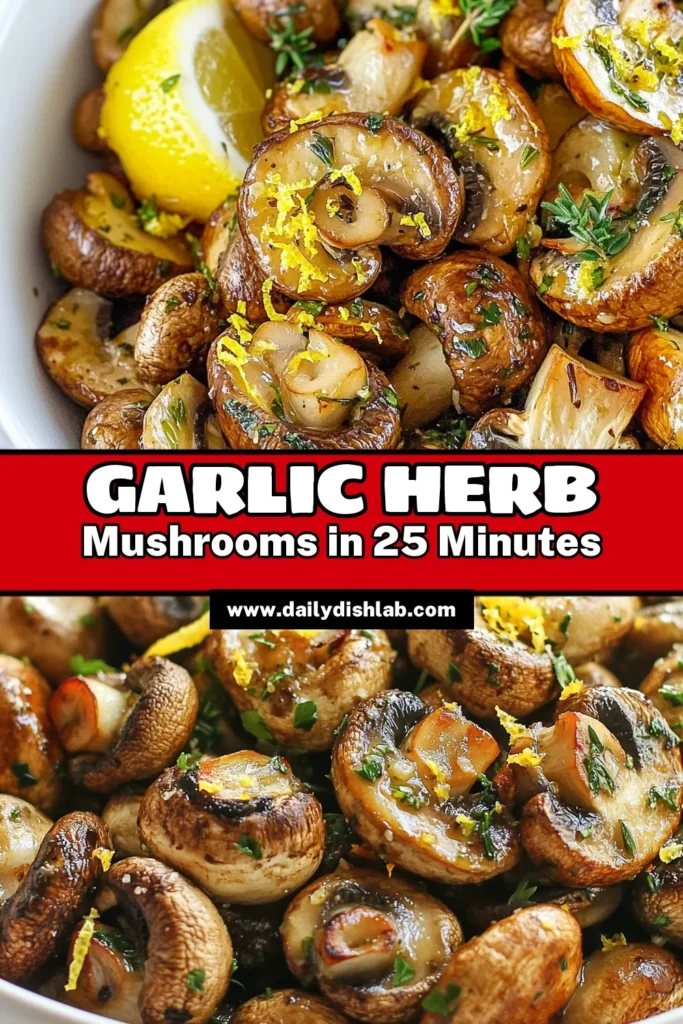
Garlic Herb Roasted Mushrooms are not just a side dish; they’re a flavor packed delight! Imagine biting into tender mushrooms infused with garlic and fresh herbs. It’s the perfect way to elevate any meal. In this guide, I’ll share the simple steps, tips, and tricks to make these tasty treats. Let’s dive in and turn your kitchen into a culinary haven with this easy recipe!
Why I Love This Recipe
- Delicious Flavor Combination: The mix of garlic, herbs, and lemon zest creates a mouthwatering flavor that enhances the natural umami of the mushrooms.
- Healthy and Nutritious: Mushrooms are low in calories and high in nutrients, making this dish a guilt-free addition to any meal.
- Easy to Prepare: With just a few simple steps and minimal prep time, this recipe is perfect for busy weeknights or last-minute gatherings.
- Versatile Side Dish: These roasted mushrooms pair well with a variety of main courses, from grilled meats to pasta dishes, making them a great go-to side.
Ingredients
List of Required Ingredients
- 1 pound mixed mushrooms (cremini, shiitake, and oyster), cleaned and halved
- 4 tablespoons olive oil
- 4 cloves garlic, minced
- 1 tablespoon fresh rosemary, chopped
- 1 tablespoon fresh thyme leaves
- 1 teaspoon paprika
- Salt and pepper to taste
- Zest of 1 lemon
- Fresh parsley, chopped (for garnish)
Garlic Herb Roasted Mushrooms are simple yet full of flavor. You can find mixed mushrooms like cremini, shiitake, and oyster at your local store. These mushrooms give a nice mix of taste and texture.
I use four tablespoons of olive oil to coat the mushrooms. Olive oil adds richness and helps the spices stick. The garlic, minced finely, brings a strong flavor that pairs well with the herbs.
For herbs, I like to use fresh rosemary and thyme. One tablespoon of each adds a lovely aroma and taste. Paprika adds a hint of smokiness. Don’t forget salt and pepper to enhance the flavors!
Finally, I zest one lemon to add a bright touch. It lifts the dish and balances the earthy flavors. Chopped fresh parsley makes a nice garnish, adding a pop of color.
Gather all these ingredients, and you are ready to create a delicious side dish!

Step-by-Step Instructions
Preheat and Prepare
- Preheat your oven to 425°F (220°C).
- Grab a large mixing bowl for the mushrooms.
Combine Ingredients
- In the mixing bowl, add 1 pound of halved mixed mushrooms.
- Pour in 4 tablespoons of olive oil.
- Add 4 cloves of minced garlic, 1 tablespoon of chopped rosemary, and 1 tablespoon of thyme leaves.
- Sprinkle in 1 teaspoon of paprika, plus salt and pepper to taste.
- Toss everything together. Make sure every mushroom gets a nice coat of oil and seasoning.
Roasting the Mushrooms
- Spread the mushroom mix in a single layer on a baking sheet lined with parchment paper.
- Roast them in the oven for 20-25 minutes.
- Stir the mushrooms halfway through. This helps them cook evenly.
- When done, take them out and sprinkle on the zest of 1 lemon for a bright flavor.
- Toss gently before serving. Enjoy your flavorful side dish!
Tips & Tricks
Selecting the Best Mushrooms
- Look for mushrooms that are firm and dry.
- Fresh mushrooms have a pleasant smell.
- For great flavor, use cremini, shiitake, and oyster mushrooms.
Cremini mushrooms are rich and earthy. Shiitake mushrooms add a deep flavor. Oyster mushrooms are delicate and slightly sweet. Mixing these types gives your dish a unique taste and texture.
Enhancing Flavor
- Try adding herbs like basil or oregano.
- A pinch of red pepper flakes adds heat.
- Lemon zest brightens up the dish.
Using lemon zest balances the savory flavors. It gives a fresh pop that lifts the mushrooms. This helps to create a well-rounded taste that excites your palate.
Cooking Techniques
- Always spread mushrooms in a single layer on the baking sheet.
- This allows for even cooking and browning.
- Mushroom sizes vary, so adjust your cooking time.
Smaller mushrooms cook faster than larger ones. Check them at the 15-minute mark. If they are not golden yet, give them a few more minutes. This ensures each bite is perfectly roasted and tender.
Pro Tips
- Choose Fresh Mushrooms: Always opt for fresh mushrooms with a firm texture and vibrant color for the best flavor and presentation.
- Customize the Herbs: Feel free to experiment with different herbs like basil or oregano to suit your taste preferences.
- Don’t Overcrowd the Pan: Ensure the mushrooms are spread out in a single layer to allow for even roasting and caramelization.
- Use High-Quality Olive Oil: A good quality extra virgin olive oil enhances the flavor of the mushrooms, so choose one that you enjoy.

Variations
Different Mushroom Combinations
You can use many types of mushrooms for this dish. I love mixing cremini, shiitake, and oyster mushrooms. Each type adds a unique flavor. You can also try wild mushrooms, like chanterelles or morels, for a fun twist. Experimenting with different types lets you discover new tastes. It’s a great way to keep this dish exciting.
Flavor Profiles
Want to spice things up? Add chili flakes for some heat. Just a pinch can make a big difference! If you like sweet flavors, drizzle balsamic vinegar on the mushrooms before roasting. This adds a nice touch of sweetness. You can mix and match these flavors to create your perfect dish.
Serving Suggestions
Garlic herb roasted mushrooms pair well with many foods. Serve them alongside grilled chicken or fish for a complete meal. They also work great on top of grains like quinoa or rice. You can even use them in salads for added flavor. This dish is versatile and can fit any meal.
Storage Info
How to Store Leftovers
To keep your garlic herb roasted mushrooms fresh, choose the right container. Glass containers work well, as they seal tightly. You can also use plastic containers. Make sure to let the mushrooms cool before sealing them.
Store the mushrooms in the fridge for up to three days. If you want to keep them longer, freezing is a good option. Place them in an airtight bag or container. They can last for up to three months in the freezer.
Reheating Advice
When reheating, you want to keep the texture and flavor. The best method is to use an oven or a skillet. Preheat your oven to 350°F (175°C) and spread the mushrooms on a baking sheet. Heat for about 10 minutes. This helps them stay crispy.
If using a skillet, heat it over medium heat. Add a splash of olive oil and sauté the mushrooms for about five minutes. This warms them nicely while keeping their taste. Avoid the microwave if you can, as it may make them soggy.
FAQs
Can I use dried herbs instead of fresh?
Yes, you can use dried herbs. They have a stronger flavor. Use about one-third the amount. For instance, if the recipe calls for one tablespoon of fresh rosemary, use one teaspoon of dried. Dried herbs work well when fresh is not available. But fresh herbs give a brighter taste.
What are the best mushrooms for roasting?
Cremini, shiitake, and oyster mushrooms are ideal. They roast well and have great flavors. Cremini mushrooms are firm and have a rich taste. Shiitake mushrooms add a nice earthy note. Oyster mushrooms are tender and cook quickly. Always choose mushrooms that look fresh and firm. Avoid mushrooms that are slimy or darkened.
How long will the mushrooms stay fresh in the fridge?
Mushrooms last about five to seven days in the fridge. Store them in a paper bag. This keeps them dry and fresh. Avoid sealing them in plastic. Plastic traps moisture and makes them spoil faster. If you notice any dark spots, clean them off quickly.
To sum it up, we explored how to choose and roast diverse mushrooms. You learned about key ingredients, from the best types of mushrooms to spices and herbs. I shared tips to elevate their taste and how to store leftovers. Remember, experimenting is key! Enjoy your roasted mushrooms as a tasty side or topping, and don’t hesitate to mix flavors. Simple steps yield amazing results. Now, grab your mushrooms and get cookin

Garlic Herb Roasted Mushrooms
Ingredients
- 1 pound mixed mushrooms (cremini, shiitake, and oyster), cleaned and halved
- 4 tablespoons olive oil
- 4 cloves garlic, minced
- 1 tablespoon fresh rosemary, chopped
- 1 tablespoon fresh thyme leaves
- 1 teaspoon paprika
- to taste salt
- to taste pepper
- 1 zest lemon
- for garnish fresh parsley, chopped
Instructions
- Preheat your oven to 425°F (220°C).
- In a large mixing bowl, combine the halved mushrooms, olive oil, minced garlic, rosemary, thyme, paprika, salt, and pepper. Toss everything together until the mushrooms are evenly coated.
- Spread the mushroom mixture in a single layer on a baking sheet lined with parchment paper.
- Roast the mushrooms in the preheated oven for about 20-25 minutes, stirring halfway through, until they are golden brown and tender.
- Remove the mushrooms from the oven and sprinkle with lemon zest for a fresh pop of flavor.
- Toss the mushrooms gently and transfer them to a serving dish.
- Garnish with chopped fresh parsley before serving.
![- 2 cups fresh strawberries - 4 cups mixed baby greens (spinach, arugula, romaine) - 1/4 cup crumbled goat cheese - 1/4 cup pecans (roughly chopped) - 1/4 cup balsamic glaze - 2 tablespoons olive oil - Salt and pepper to taste - Fresh basil leaves (for garnish) You need ripe strawberries for this salad. They add sweet, juicy flavor. I recommend using a mix of greens. Spinach, arugula, and romaine create a nice crunch. Goat cheese brings tanginess, while pecans add a rich nutty taste. For the dressing, balsamic glaze gives a sweet and tart kick. Olive oil smooths it out. Salt and pepper round it all off. This salad is bright and fresh. It makes a great side dish or light meal. If you want the full recipe, check out the Balsamic Strawberry Delight Salad. First, grab a large salad bowl. You need to combine the mixed baby greens and sliced strawberries. It is best to use fresh greens like spinach, arugula, and romaine. The mix adds great texture and flavor. When you add the greens, make sure they are clean and dry. Then, toss in the sliced strawberries. Their sweet taste pairs well with the greens and adds color. Next, it’s time to sprinkle on the crumbled goat cheese and roughly chopped pecans. The goat cheese adds a creamy touch. The pecans give a nice crunch. These toppings elevate your salad and make it feel special. You can adjust the amount based on your taste. If you love cheese, add more! Now, let’s make the dressing. In a small bowl, whisk together the balsamic glaze, olive oil, salt, and pepper. Start with a few tablespoons of balsamic glaze. It should be sweet and tangy. Then, add olive oil to balance the flavors. Mix until well combined. Drizzle this dressing over the salad and toss gently. Make sure everything is coated nicely. Taste your salad and adjust the seasoning if needed. You can add more salt or pepper. Lastly, garnish with fresh basil leaves for that extra pop of flavor. For the full recipe, check out the Balsamic Strawberry Delight Salad. You can make this salad your own! Here are some great ideas: - Add nuts: Try walnuts or almonds for crunch. - Include fruits: Blueberries or sliced peaches work well. - Choose cheeses: Feta or mozzarella can change the flavor. For greens, I love mixing different types. Here are some good choices: - Spinach for its soft texture. - Arugula for a peppery kick. - Romaine for a nice crunch. The dressing can be adjusted to your taste. If you like it sweeter, add more balsamic glaze. If you want it tangy, increase the olive oil. To store leftover dressing, keep it in a sealed jar in the fridge. It can last up to a week. Just give it a good shake before using it again. Make your salad look great on the plate! Here are some ideas: - Garnish with basil leaves. They add color and flavor. - Use a large, shallow bowl. It shows off the colors well. For serving, try clear glass bowls. They let the bright colors shine through. You can also use wooden boards for a rustic touch. Enjoy your beautifully presented salad! {{image_2}} You can make your salad even better by adding seasonal fruits. Try peaches, blueberries, or even kiwi. These fruits can add sweetness and color. You can also use dried fruits like cranberries or apricots. Dried fruits give a chewy texture and a burst of flavor to each bite. They also add a nice contrast to the fresh greens. Want to make your salad a meal? You can add protein like grilled chicken, shrimp, or tofu. Chicken gives a nice, savory taste. Shrimp adds a light and sweet flavor. For a vegetarian option, tofu works great. You can grill or sauté it for extra flavor. Adding protein makes the salad filling and satisfying. While balsamic glaze is tasty, you can try other dressings too. Homemade vinaigrettes can add a personal touch. Mix olive oil, vinegar, and herbs for a bright flavor. You can also swap dressings based on your diet. If you want something lighter, try a lemon dressing. For creaminess, a yogurt-based dressing works well. The right dressing can change the whole feel of the salad. Explore the [Full Recipe] for more ideas and tips! To keep your Balsamic Strawberry Salad fresh, store it in an airtight container. This helps seal in the flavors and keeps the greens crisp. Always keep the dressing separate until you are ready to eat. This prevents the greens from wilting. The salad stays fresh in the fridge for about 2 days. You cannot freeze this salad as a whole. Freezing will change the texture of the greens and strawberries. However, you can freeze individual components. For instance, you can freeze sliced strawberries. Just wash and slice them first. Place them in a sealed bag or container. When you're ready, thaw them in the fridge overnight. If you add cooked toppings, such as chicken or quinoa, you can reheat them. Warm them in the microwave or a pan on low heat. Do this just before serving. Assemble your salad right before eating to keep it fresh. Toss in the toppings and dressing at the last moment for the best taste. To make balsamic vinaigrette, mix simple ingredients. Start with 1/4 cup of balsamic vinegar. Add 1/2 cup of olive oil for a smooth base. Mix in 1 teaspoon of Dijon mustard for flavor. Then, add salt and pepper to taste. Whisk all ingredients until they blend well. This vinaigrette is perfect for your Balsamic Strawberry Salad. Yes, you can use different cheeses in this salad. Feta cheese adds a salty kick. Blue cheese gives a strong flavor that many enjoy. If you prefer a milder taste, try mozzarella or ricotta. Each cheese brings a unique taste, so feel free to experiment! This salad goes well with many meals. You can serve it with grilled chicken for protein. It also pairs nicely with fish, like salmon or tilapia. For a vegetarian option, try it with quinoa or a grain bowl. These dishes will complement the salad’s fresh and fruity flavors. When selecting strawberries, look for bright red color. They should have a shiny surface and be firm to touch. Check for green caps, as they show freshness. Avoid berries with soft spots or mold. Ripe strawberries taste sweet and juicy, making them perfect for your salad. This Balsamic Strawberry Salad is fresh, simple, and full of flavor. We mixed greens and strawberries, topped them with goat cheese and pecans, and drizzled a tasty balsamic dressing. You can customize it with proteins or other fruits. Remember to store leftovers properly to enjoy later. Making this salad is a fun way to eat healthy. Try it out, and enjoy a delicious meal that feels special without much fuss. Your taste buds will thank you!](https://dailydishlab.com/wp-content/uploads/2025/07/ce13cfb9-b3c1-4343-91ba-f92d3a3b474e-768x768.webp)


![To make a delicious classic macaroni salad, you need simple, fresh ingredients. Here’s what you will need: - 2 cups elbow macaroni - 1 cup creamy mayonnaise - 2 tablespoons apple cider vinegar - 1 tablespoon Dijon mustard - 1 teaspoon granulated sugar - 1 cup celery, finely diced - 1 cup red bell pepper, diced - 1/2 cup red onion, finely chopped - 1 cup frozen peas, thawed - Salt and freshly cracked black pepper, to taste - Fresh parsley or chives, chopped, for garnish These ingredients create a salad that is both creamy and crunchy. The elbow macaroni serves as the base, while the veggies add color and texture. The dressing blends everything together, making each bite flavorful. When preparing the salad, always use fresh ingredients for the best taste. You can find the full recipe in the article. To cook the elbow macaroni, start with a large pot. Fill it with enough water to cover the pasta. Add a big pinch of salt to the water. Bring it to a rolling boil. Once boiling, pour in the macaroni. Cook it for about 8 to 10 minutes. You want it to be al dente, which means it should still have a little bite. When it's ready, drain it in a colander. Rinse it under cold water to stop the cooking. Let it cool completely. For the dressing, you need a few simple ingredients. Gather 1 cup of creamy mayonnaise, 2 tablespoons of apple cider vinegar, 1 tablespoon of Dijon mustard, and 1 teaspoon of granulated sugar. In a large bowl, whisk these together. Mix until it is smooth and creamy. Make sure there are no lumps left. This dressing adds the perfect flavor to your salad. Now it's time to combine everything. First, add the cooled macaroni to the bowl with the dressing. Then, fold in the veggies gently. Use 1 cup of finely diced celery, 1 cup of diced red bell pepper, ½ cup of finely chopped red onion, and 1 cup of thawed peas. Be careful not to mash the pasta. You want all the ingredients to be evenly coated with the dressing. Taste the salad to check the seasoning. Add salt and freshly cracked black pepper as needed. Mix it again to make sure every bite is tasty. Next, cover the bowl with plastic wrap or a lid. Put it in the refrigerator for at least 1 hour. This chilling time helps the flavors blend together. When it's ready, give it a gentle stir and adjust any seasoning if needed. Serve it in a big bowl or in individual portions. A sprinkle of fresh parsley or chives on top makes it look great. For the full recipe, check out the details above! Overcooking the macaroni is a mistake many people make. It turns mushy and loses its bite. Aim for al dente, which means firm but cooked. Follow the package time closely, usually about 8-10 minutes. Rinse it under cold water right after cooking to stop the heat. Not seasoning enough is another common error. A dash of salt makes a big difference. Taste your salad while mixing. Add salt and pepper slowly until you find the right level. To boost flavor, consider adding fresh herbs. Chopped dill, parsley, or chives add a nice touch. You could also try a sprinkle of paprika or garlic powder for extra zest. Chilling your salad is key. It allows the flavors to blend together. Let it sit in the fridge for at least one hour. The longer you chill, the better it tastes. Macaroni salad pairs well with grilled meats. It complements burgers, hot dogs, or barbecued chicken perfectly. You can also serve it with fresh veggies, chips, or fruit. For presentation, use a large, colorful bowl. You can garnish with extra herbs or slices of bell pepper on top. This makes the salad look as good as it tastes. Enjoy your beautiful dish! {{image_4}} You can easily change the classic macaroni salad by using different ingredients. One great swap is to replace mayonnaise with Greek yogurt. This makes the salad lighter and adds a nice tang. Greek yogurt also packs in protein, making your salad more filling. You can also add protein like chicken or tuna. This simple change makes it a full meal. Just shred cooked chicken or mix in canned tuna. You’ll have a hearty dish that everyone will love. To give your salad a new twist, try different flavors. For a Mediterranean twist, add olives and feta cheese. This adds a briny flavor that pairs well with the creamy dressing. The feta also gives a nice texture contrast. If you like spice, try adding jalapeños. This will give your salad a kick that may surprise your guests. You can adjust the amount based on how spicy you want it. If you need gluten-free options, use gluten-free macaroni. Many brands offer pasta made from rice or quinoa. These work great and taste delicious in the salad. For a vegan option, replace the mayo with a vegan dressing. You can find many great recipes online or in stores. This way, everyone can enjoy your macaroni salad without worry. For the full recipe, check out the [Full Recipe]. To keep your macaroni salad fresh, use an airtight container. Glass or plastic containers with tight lids work best. Avoid leaving it uncovered in the fridge. Covering it keeps out odors and maintains flavor. Store the salad in the fridge right after serving. The cool temperature slows spoilage. It's best to eat it within a few days for optimal taste. Classic macaroni salad usually lasts for about 3 to 5 days in the fridge. Make sure to check for signs of spoilage. If you see mold or an off smell, it’s best to discard it. Also, if the salad looks dry or the texture changes, it may not be safe to eat. Always trust your senses when assessing food safety. Reheating macaroni salad is usually not necessary. This dish is best served cold. If you have leftovers, you can enjoy them straight from the fridge. If you want to refresh the salad, add a bit more dressing. Stir it well to mix in the new dressing. This will help bring back some of the creaminess. Enjoy your classic macaroni salad with a burst of flavor! Yes, you can make macaroni salad ahead of time. It tastes better when chilled. I recommend chilling it for at least one hour. If you have more time, chilling overnight will enhance the flavors even more. If you want a creamy texture without mayonnaise, try Greek yogurt. It adds creaminess and a bit of tang. You can also use avocado or a mix of sour cream and mustard. These options are tasty and healthy. To make your macaroni salad creamier, add more mayonnaise or yogurt. Mixing in a little pasta water can also help. If you prefer a richer taste, consider adding a splash of heavy cream. Each of these tips can really boost the creaminess. Yes, it is safe to eat leftover macaroni salad if stored properly. Keep it in an airtight container in the fridge. It should be eaten within three to five days. Always check for any signs of spoilage before eating. This article explored making a classic macaroni salad, from ingredients to storage. Remember, cooking the macaroni al dente and chilling the salad enhance flavors. Avoid common mistakes like overcooking and under-seasoning. Variations, like using yogurt or adding protein, can create new tastes. Proper storage ensures your salad stays fresh. With these tips, you can enjoy a delicious macaroni salad any time. Now, it’s your turn to make it and impress your friends and family!](https://dailydishlab.com/wp-content/uploads/2025/06/3a7d09ad-1a72-4428-9717-30c1895d693b-768x768.webp)