

Looking for a tasty snack that’s easy to make? Honey BBQ Cauliflower Wings are the answer! These crispy bites satisfy your cravings without the guilt. This guide will walk you through the simple steps and tasty ingredients needed to make your new favorite snack. Whether you’re vegan or just a fan of delicious food, you’ll love how these wings turn out. Let’s dive into making this dish that everyone will enjoy!
Why I Love This Recipe
- Healthy Alternative: These cauliflower wings are a guilt-free option that satisfies your cravings without compromising on flavor.
- Easy to Make: This recipe requires minimal ingredients and simple steps, making it perfect for both beginners and seasoned cooks.
- Versatile Flavor: The sweet honey BBQ sauce pairs perfectly with the smokiness of the spices, offering a delightful twist on traditional wings.
- Great for Sharing: These wings are a crowd-pleaser, making them ideal for parties, game days, or any gathering with friends and family.
Ingredients
Main Ingredients
– 1 large head of cauliflower, cut into bite-sized florets
– 1 cup all-purpose flour
– 1 cup almond milk (or any non-dairy milk)
Seasonings and Sauces
– 1 teaspoon garlic powder
– 1 teaspoon onion powder
– 1 teaspoon smoked paprika
– ½ teaspoon salt
– ½ teaspoon black pepper
– 1 cup BBQ sauce (preferably a sweet variety)
– ¼ cup honey
Garnishing
– Fresh parsley, chopped (for garnish)
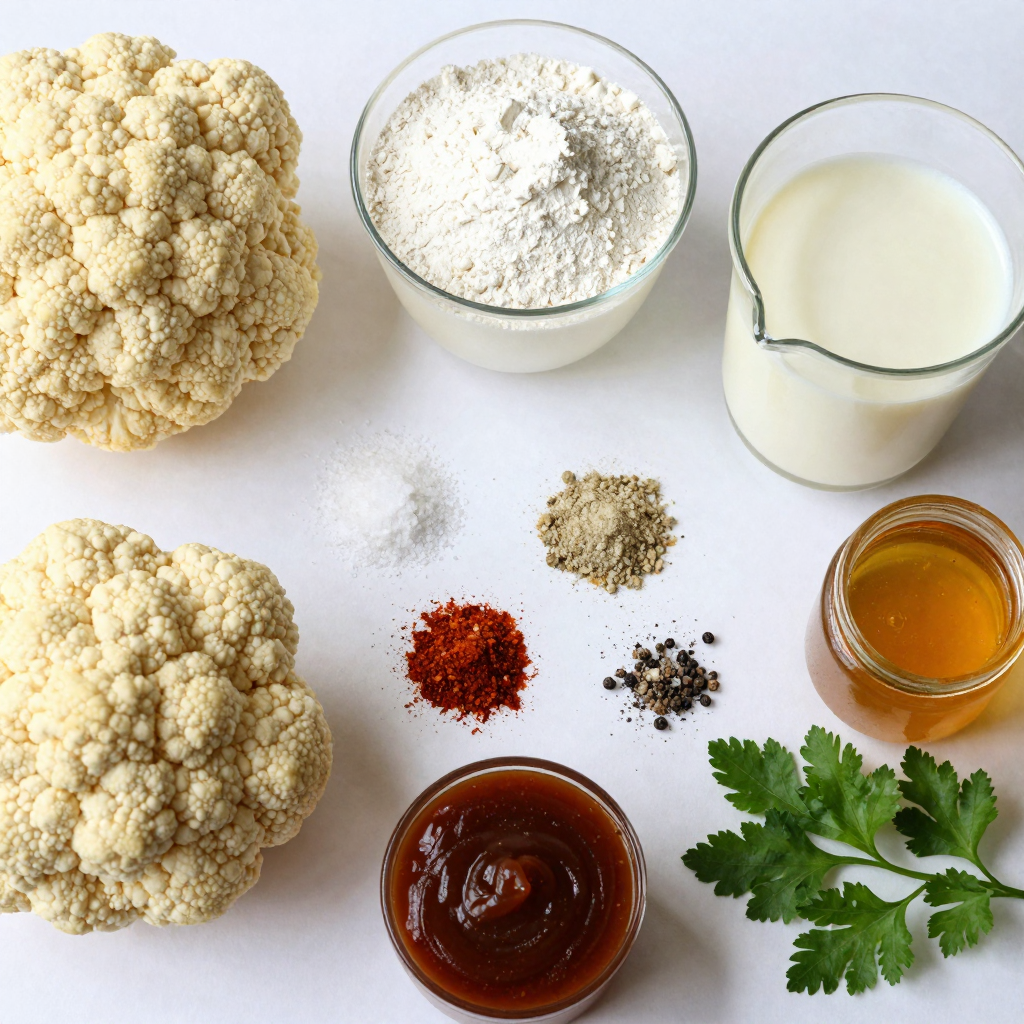
To make honey BBQ cauliflower wings, you need simple but tasty ingredients. The main star is the cauliflower. Choose a large head for the best results. It gives a nice, meaty texture.
Next, we need flour and almond milk for the batter. The flour helps create a crispy coating. The almond milk makes it smooth and easy to dip the florets.
For flavor, we add garlic powder, onion powder, smoked paprika, salt, and black pepper. Each spice brings its unique taste. The sweet BBQ sauce and honey mix together to create the perfect sauce. They add a rich flavor that makes the wings shine.
Finally, we use fresh parsley to add color and a fresh touch. This combination of ingredients makes a snack that is both crispy and delicious.
Step-by-Step Instructions
Prepping the Oven and Ingredients
First, preheat your oven to 425°F (220°C). This step is key for getting the cauliflower wings crispy. Line a baking sheet with parchment paper. This will help the wings not stick and make cleanup easy.
Creating the Batter
In a mixing bowl, whisk together these dry ingredients:
– 1 cup all-purpose flour
– 1 teaspoon garlic powder
– 1 teaspoon onion powder
– 1 teaspoon smoked paprika
– ½ teaspoon salt
– ½ teaspoon black pepper
Next, add 1 cup of almond milk to the dry mix. Stir until you have a smooth batter. This batter will coat the cauliflower and give it a nice crunch.
Coating and Baking Cauliflower
Now, dip each cauliflower floret into the batter. Make sure to coat each piece well. Shake off any extra batter and place them on the baking sheet in a single layer. Bake in the preheated oven for 25 minutes. Flip the florets halfway through. This helps them brown evenly and become crispy.
Preparing the Honey BBQ Sauce
While the cauliflower bakes, heat your sauce. In a small saucepan, combine 1 cup of BBQ sauce and ¼ cup of honey. Heat over medium heat for about 5 minutes. Stir it often until it thickens a bit. This sauce adds sweet and tangy flavor to the wings.
Final Baking Steps
Once the cauliflower is golden and crispy, take it out of the oven. Toss the baked cauliflower in the honey BBQ sauce. Make sure every piece gets a good coat. Return the wings to the baking sheet and bake them for an extra 10 minutes. This step caramelizes the sauce and makes it sticky.
Pro Tips
- Coating Consistency: Ensure the batter is thick enough to adhere to the cauliflower but not too thick that it clumps. Adjust the almond milk as needed for the right consistency.
- Flipping for Even Crispiness: Flip the cauliflower wings halfway through baking to ensure they cook evenly and develop a nice crispy texture on all sides.
- Honey BBQ Sauce Variation: Feel free to experiment with different BBQ sauce flavors or add spices like cayenne pepper to the sauce for an extra kick.
- Serving Suggestions: Serve the wings with a side of ranch or blue cheese dressing for dipping, and pair with fresh vegetable sticks for a complete snack.
Tips & Tricks
Perfecting the Cauliflower Wings
To make your cauliflower wings extra crispy, follow these simple steps. First, use a large head of cauliflower. Cut it into bite-sized florets, making sure they are even in size. This helps them cook uniformly.
Next, for the batter, aim for a thick consistency. A thicker batter clings better to the florets. If your batter seems too thin, add a bit more flour until you reach the right thickness. You want it to coat the florets well without dripping off.
One more tip: bake the cauliflower in a single layer. This lets hot air circulate evenly, giving you that crunchy texture.
Serving Suggestions
When it comes to serving, presentation matters! Place the honey BBQ cauliflower wings on a large platter. Line the platter with fresh parsley for a pop of color. This not only looks nice but adds a fresh taste too.
For dipping, serve a small bowl of extra BBQ sauce on the side. You can also add colorful veggie sticks like carrots and celery. They add crunch and freshness, making your dish even more inviting.
Flavor Enhancements
Want to spice things up? You can change the BBQ sauce to your taste. Try adding a pinch of cayenne pepper or smoked chipotle for heat.
You can also experiment with toppings. Chopped green onions or sesame seeds add great texture and flavor. For a twist, drizzle some ranch or blue cheese dressing over the wings just before serving. These small changes can make your honey BBQ cauliflower wings even more exciting!Enjoy making this tasty snack!
Variations
Dietary Adaptations
If you want to make this dish vegan, you can swap the batter. Use chickpea flour instead of all-purpose flour. It works well and gives a nice flavor. For the sauce, choose a vegan BBQ sauce. These changes keep the taste great while making it plant-based. If you need a gluten-free option, try almond flour. It gives a nice crunch and keeps the wings light.
Flavor Profiles
Don’t hesitate to play with different BBQ sauces. A spicy BBQ sauce can add a kick to your wings. You can also mix hot sauce into your BBQ sauce for more heat. If you prefer something sweeter, try a honey-infused BBQ sauce. This creates a delightful balance of flavors.
Cooking Techniques
For a lighter version, consider air-frying your cauliflower wings. This method gives you crispiness without much oil. Simply coat the florets as you would for baking, then place them in an air fryer. Cook them at 400°F for about 15 minutes, shaking the basket halfway through. Another great method is grilling. Grilling adds a smoky flavor that enhances the wings. Just coat the cauliflower and grill them over medium heat until they are tender and slightly charred.Enjoy your cooking adventure!
Storage Info
Refrigeration
To store leftover honey BBQ cauliflower wings, place them in an airtight container. Make sure they cool down first. Store them in the fridge for up to three days. When you want to eat them, take them out and let them sit at room temperature for a few minutes. This helps keep some of the crispiness.
Reheating Instructions
To reheat your wings and keep them crispy, use an oven or an air fryer. Preheat the oven to 375°F (190°C). Spread the wings on a baking sheet in a single layer. Bake for about 10-15 minutes until hot and crispy. If using an air fryer, set it to 350°F (175°C) and heat for about 5-7 minutes. This way, they stay crunchy and tasty.
Freezing Directions
To freeze honey BBQ cauliflower wings, first, let them cool completely. Place them in a single layer on a baking sheet and freeze for 1-2 hours. Once frozen, move them to a freezer bag. They can last for up to three months. When ready to eat, thaw them in the fridge overnight. Reheat them using the instructions above for the best results.
FAQs
How long can I store honey BBQ cauliflower wings in the fridge?
You can store honey BBQ cauliflower wings in the fridge for about 3 to 5 days. Make sure to place them in an airtight container. This keeps them fresh and tasty. If you plan to eat them later, let them cool before storing. This helps prevent moisture.
Can I make this recipe ahead of time?
Yes, you can prepare this recipe ahead of time. You can coat the cauliflower in the batter and bake it earlier in the day. After baking, let the wings cool down completely. Store them in the fridge until you are ready to serve. You can reheat them in the oven or air fryer to keep them crispy.
What to serve with honey BBQ cauliflower wings?
These wings pair well with many sides. Here are some great options:
– Fresh veggie sticks like carrots and celery
– Creamy ranch or blue cheese dressing for dipping
– A refreshing salad to balance the flavors
– Sweet potato fries for extra crunch
– Corn on the cob for a fun side
These sides add color and flavor to your plate!
This blog post shared a tasty recipe for honey BBQ cauliflower wings. We discussed the key ingredients, step-by-step instructions, and tips for perfecting your dish. You learned about variations, storage tips, and answers to common questions.
Try these wings for a great snack or meal. They are easy to make and delicious. Enjoy experimenting with flavors and serving them your way. Your friends will love them, and you’ll impress everyone with this simple recipe.


