Go Back
- 1 lb large shrimp, peeled and deveined - 1 red bell pepper, sliced - 1 yellow bell pepper, sliced - 1 red onion, sliced These main ingredients form the base of your sheet-pan honey garlic shrimp fajitas. The shrimp bring a sweet and tender bite, while the bell peppers and onion add crunch and color. - 3 tablespoons honey - 2 tablespoons soy sauce - 3 cloves garlic, minced This honey garlic sauce is the star of the dish. The honey adds a sweet touch, and the soy sauce gives it depth. Garlic brings in a warm, savory note, making each bite a flavor explosion. - 2 tablespoons olive oil - 1 tablespoon chili powder - 1 teaspoon cumin - 1 teaspoon paprika - Fresh cilantro for garnish - Tortillas for serving The olive oil helps to cook the shrimp and veggies evenly. Chili powder, cumin, and paprika add a nice kick. Fresh cilantro gives a bright finish, and tortillas are perfect for wrapping up all the tasty goodness. - Preheat the oven to 400°F (200°C). - Peel and devein one pound of large shrimp. - Slice one red bell pepper and one yellow bell pepper. - Slice one red onion. First, I love to get my oven ready. Preheating it to 400°F makes sure the shrimp cooks fast. While the oven heats, I prepare the shrimp and veggies. I peel and devein the shrimp, which takes only a few minutes. Slicing the bell peppers and onion is simple. I aim for thin pieces to cook evenly. - Whisk together honey, soy sauce, garlic, olive oil, and spices. For the honey garlic sauce, I grab a small bowl. I add three tablespoons of honey and two tablespoons of soy sauce. Then, I mince three cloves of garlic and toss them in. Next, I pour in two tablespoons of olive oil. I use one tablespoon of chili powder, one teaspoon of cumin, and one teaspoon of paprika. I sprinkle in some salt and pepper. I whisk everything until it blends well. This sauce adds great flavor to the shrimp and veggies. - Arrange shrimp and vegetables. - Pour sauce over the mixture and coat evenly. - Bake and monitor cooking time. On a large sheet pan, I lay out the shrimp with the sliced peppers and onion. I spread them in a single layer. Then, I take the honey garlic sauce and pour it over the shrimp and veggies. I make sure every piece gets coated well. Now, it’s time to bake. I slide the pan into the oven and set a timer for 12-15 minutes. I check to see if the shrimp turns pink and the veggies get soft. Once they are done, I pull the pan out. This dish smells amazing and is ready to eat! To achieve perfectly cooked shrimp, keep a close eye on the time. Bake them for 12 to 15 minutes. When they turn pink and opaque, they are done. Overcooking makes them tough. If you find your vegetables soggy, try cutting them thicker. This helps them stay crisp. Also, don’t overcrowd the pan. Give everything space to roast nicely. For the best tortillas, choose soft flour tortillas. They wrap well and hold the filling. Corn tortillas add a nice flavor, too. Warm them in a skillet for a few seconds before serving. Pair your fajitas with fresh salsa or guacamole. A side of rice or beans works well, too. For drinks, try a light beer or a citrusy margarita. For even cooking, use a heavy-duty sheet pan. A non-stick option helps with easy cleanup. Ensure the pan is large enough for all the ingredients. Gather simple utensils, like a whisk for the sauce and a spatula for mixing. A good knife makes slicing the veggies quick and easy. A large cutting board helps with prep. {{image_2}} You can swap the shrimp for chicken or tofu. Chicken gives a hearty bite, while tofu adds a nice texture. Both work well with the honey garlic sauce. For veggies, try zucchini or corn. Zucchini adds a fresh crunch, and corn gives a sweet pop. Feel free to mix and match until you find your favorite combo. Want more heat? Add jalapeños or a splash of hot sauce. They can kick up the spice level nicely. Fresh herbs like cilantro or parsley can brighten the dish. Just chop them and sprinkle them on top before serving. They add a burst of flavor that pairs well with the honey garlic sauce. If you need gluten-free options, use tamari instead of soy sauce. It tastes just as great in the sauce. For a vegan version, swap the shrimp for chickpeas. They soak up the sauce well and add protein. These changes keep the dish tasty while meeting your dietary needs. To store leftovers, let your shrimp fajitas cool down first. Place them in an airtight container. This keeps the flavors fresh and tasty. Use a container that seals well. I recommend glass or BPA-free plastic. These containers work best for keeping food safe. When you want to reheat shrimp fajitas, use the oven or a skillet. For the oven, set it to 350°F (175°C). Spread the fajitas on a baking sheet. Heat for about 10 minutes. Check that the shrimp are hot. If you use a skillet, warm it over medium heat. Stir gently to keep the shrimp from sticking. This method helps keep the shrimp juicy. To freeze shrimp fajitas, first let them cool completely. Place them in freezer-safe bags. Remove as much air as possible. This helps prevent freezer burn. You can freeze the honey garlic sauce separately. Just store it in a small container. This way, you can use it for another meal later. Shrimp fajitas last about three days in the fridge. To store them, let them cool first. Place them in an airtight container. This keeps them fresh and safe to eat later. If you want to keep them longer, consider freezing them. They can last up to two months in the freezer. Just make sure you use freezer-safe bags or containers. Yes, you can make the honey garlic sauce ahead of time. This saves you time when cooking. Store the sauce in a sealed container in the fridge. It will stay fresh for about a week. You can also freeze it if you want to keep it for longer. Just thaw it before using. Several sides pair well with shrimp fajitas. Here are some suggestions: - Mexican rice - Refried beans - Guacamole - Salsa - Corn salad These sides add flavor and texture to your meal. Enjoy them with your fajitas for a complete dining experience. This blog post covered how to make delicious shrimp fajitas with a honey garlic sauce. We discussed key ingredients like shrimp, bell peppers, and red onion, plus the steps to prepare everything. Tips for perfect cooking, serving ideas, and variations made it easy to adapt the dish. In closing, these shrimp fajitas are simple yet packed with flavor. You can tailor them to fit your taste or diet. Enjoy your cooking journey!

Sheet-Pan Honey Garlic Shrimp Fajitas

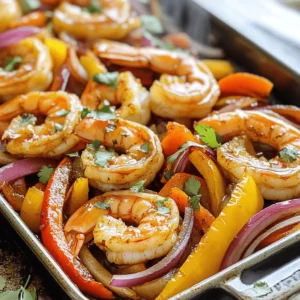
Whip up a delicious meal in no time with these Sheet-Pan Honey Garlic Shrimp Fajitas! This quick recipe combines juicy shrimp and colorful veggies tossed in a sweet and savory honey garlic sauce, all baked to perfection on one pan. Perfect for busy nights, this dish is as easy to make as it is to enjoy. Click through to explore the full recipe and impress your family with this mouthwatering feast!

Ingredients
  

1 lb large shrimp, peeled and deveined

1 red bell pepper, sliced

1 yellow bell pepper, sliced

1 red onion, sliced

3 tablespoons honey

2 tablespoons soy sauce

3 cloves garlic, minced

2 tablespoons olive oil

1 tablespoon chili powder

1 teaspoon cumin

1 teaspoon paprika

Salt and pepper, to taste

Fresh cilantro, for garnish

Tortillas, for serving

Instructions
 

Preheat your oven to 400°F (200°C).

    In a small bowl, whisk together honey, soy sauce, minced garlic, olive oil, chili powder, cumin, paprika, salt, and pepper until well combined.

      On a large sheet pan, arrange the shrimp, sliced red and yellow bell peppers, and sliced red onion in a single layer.

        Pour the honey garlic mixture over the shrimp and vegetables, ensuring everything is coated evenly.

          Bake in the preheated oven for about 12-15 minutes, or until the shrimp are pink and cooked through, and the vegetables are tender and slightly charred.

            Remove from the oven and let cool slightly before serving.

              Warm the tortillas in a dry skillet or microwave.

                Serve the shrimp and veggies in the tortillas and garnish with fresh cilantro.

                  Prep Time: 10 minutes | Total Time: 25 minutes | Servings: 4