Air Fryer Buffalo Cauliflower Tacos Tasty and Quick Meal

Ready to spice up your dinner with a fun twist? My Air Fryer Buffalo Cauliflower Tacos are not just tasty, but they’re quick to make, too! Perfect for busy nights, these tacos pack a punch of flavor and crunch. With simple ingredients and easy steps, you’ll delight in every bite. Join me as I share how to make this scrumptious meal that even the pickiest eaters will love!
Why I Love This Recipe
- Delicious Flavor: The combination of spicy buffalo sauce and crispy cauliflower creates an irresistible flavor explosion.
- Healthy Alternative: These tacos provide a nutritious twist on traditional tacos, making them a guilt-free option.
- Quick & Easy: With a total prep and cooking time of just 30 minutes, these tacos are perfect for busy weeknights.
- Customizable Toppings: You can easily add your favorite toppings, making each taco a unique creation!
Ingredients
Main Ingredients for Air Fryer Buffalo Cauliflower Tacos
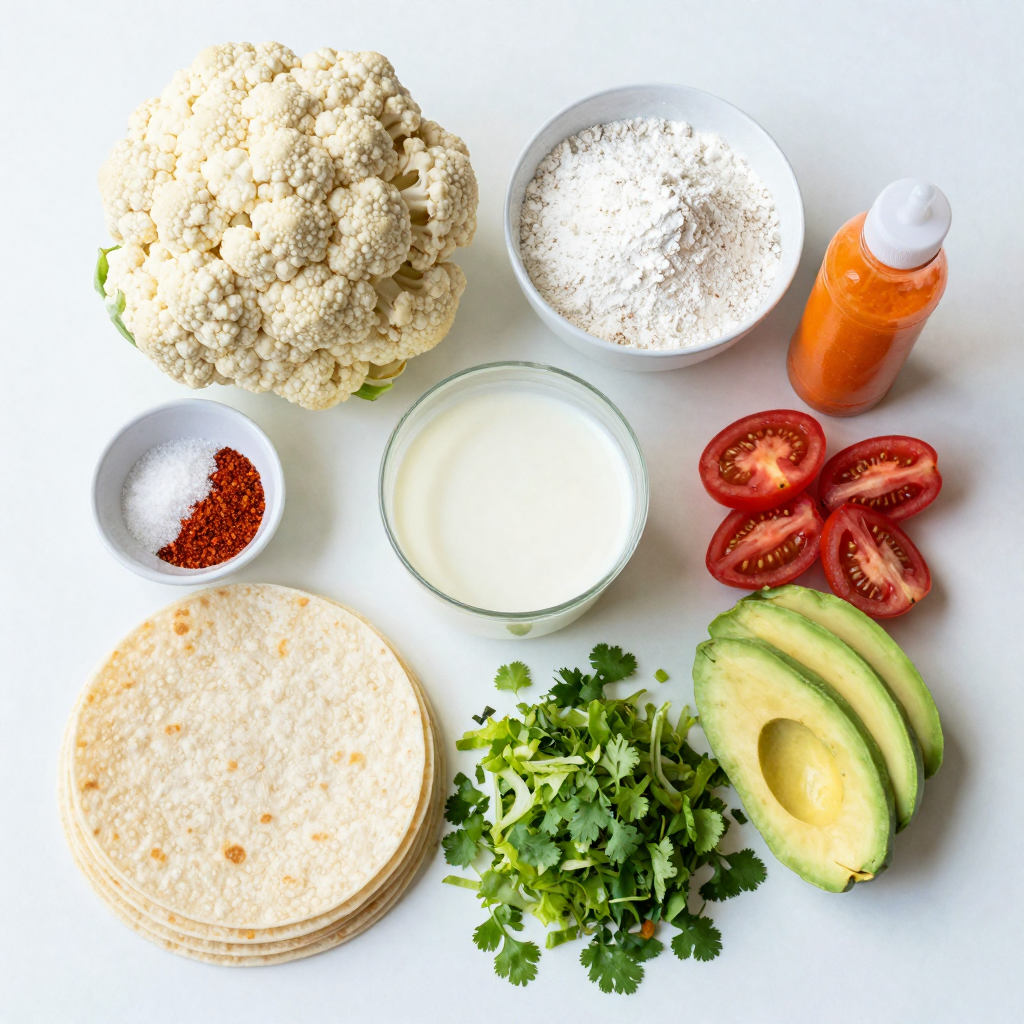
- 1 large head of cauliflower, cut into bite-sized florets
- 1 cup all-purpose flour
- 1 teaspoon garlic powder
- 1 teaspoon onion powder
- 1 teaspoon paprika
- 1/2 teaspoon salt
- 1 cup buttermilk (or a dairy-free milk alternative with 1 tablespoon of vinegar)
- 1 cup buffalo sauce
- 8 small corn or flour tortillas
To make these tacos, start with fresh cauliflower. When you cut it, try to make the pieces even. This helps them cook well in the air fryer.
Optional Ingredients for Toppings
- 1 cup shredded lettuce
- 1 avocado, sliced
- 1/2 cup diced tomatoes
- 1/4 cup fresh cilantro, chopped
- Optional: ranch dressing for drizzling
These toppings add great flavor and texture. You can mix and match them to suit your taste. Fresh cilantro gives a nice herbal note, while avocado adds creaminess.
Suggested Alternatives for Dietary Preferences
- For gluten-free tacos, use gluten-free flour.
- For dairy-free options, stick with plant-based milk and skip the buttermilk.
If you want a vegan version, just leave out the dairy products. The tacos still taste great and are healthy, too! You can customize this recipe to fit your needs easily.

Step-by-Step Instructions
Prepping the Cauliflower
Start by cutting the cauliflower into bite-sized florets. A large head works best. In a bowl, mix flour, garlic powder, onion powder, paprika, and salt. Whisk these dry ingredients together until they blend well. In another bowl, pour in the buttermilk. This will help the flour stick. Dip each cauliflower piece into the buttermilk, then coat it well with the flour mix. Make sure every piece is covered for a crunchy texture.
Cooking in the Air Fryer
Preheat your air fryer to 400°F (200°C). This step ensures even cooking. Place the coated cauliflower in the air fryer basket. Arrange them in a single layer, leaving space between pieces. Cook for 12-15 minutes. Shake the basket halfway through. This helps them crisp up nicely. When done, toss the cauliflower in a bowl with buffalo sauce. Make sure each piece gets a good coating of that spicy goodness.
Assembling the Tacos
While the cauliflower cooks, warm the tortillas in a dry skillet. Heat them for about 30 seconds on each side. This makes them soft and easy to fold. To build your tacos, lay a good amount of buffalo cauliflower on each tortilla. Add shredded lettuce, avocado slices, diced tomatoes, and fresh cilantro on top. If you like extra flavor, drizzle some ranch dressing over everything. Enjoy your tasty meal right away!
Pro Tips
- Use Fresh Cauliflower: For the best flavor and texture, choose a fresh head of cauliflower that feels firm and has tightly packed florets.
- Customize the Heat: Adjust the amount of buffalo sauce to your preferred level of spiciness. You can also mix in some honey for a sweet touch.
- Warm Tortillas Properly: Warming the tortillas helps prevent them from cracking. You can wrap them in a damp paper towel and microwave for 15-20 seconds if you prefer.
- Garnish Creatively: Experiment with different toppings like sliced jalapeños, crumbled feta, or pickled red onions for an extra flavor boost.
Tips & Tricks
Achieving Perfectly Crispy Cauliflower
To get your cauliflower crispy, follow these steps. First, make sure each floret is well coated in buttermilk and flour. This helps create a crunchy crust. Shake off any excess flour before placing them in the air fryer. Space the florets apart in the basket. This allows hot air to circulate and crisp them up nicely. It’s also important to shake the basket halfway through cooking. This ensures all sides crisp evenly.
Recommended Cooking Times and Temperatures
I recommend preheating your air fryer to 400°F (200°C). Cook the cauliflower for 12 to 15 minutes. The exact time depends on your air fryer model. Check for a golden brown color and crispy texture. If you like it extra crispy, you can add a few more minutes. Just watch closely to prevent burning.
Suggested Pairings and Sides
These tacos pair well with a few simple sides. Consider serving them with a fresh salad or some corn on the cob. You can also add a side of guacamole or chips. If you want a creamy touch, ranch dressing works great. Fresh fruit, like watermelon or mango, adds a sweet contrast. These combinations enhance the meal and make it even more enjoyable.

Variations
Different Sauces to Try
You can change the sauce to suit your taste. Instead of buffalo sauce, try BBQ sauce for a sweet twist. Sriracha mixed with mayo gives a spicy kick. You can even use a creamy chipotle sauce for a smoky flavor. Each sauce brings its own personality to the dish.
Alternative Toppings for Flavor
Toppings can make your tacos shine. Instead of just lettuce, add some crunchy cabbage for more texture. Pickled onions add a tangy zest. You can also try sliced jalapeños for heat or crumbled feta for creaminess. Consider adding mango salsa for a fruity touch.
Vegan and Gluten-Free Options
You can easily make these tacos vegan and gluten-free. Use chickpea flour instead of all-purpose flour for the coating. Swap buttermilk with a plant-based milk mixed with vinegar. For gluten-free tortillas, look for corn or rice-based options. These changes keep the flavors while meeting dietary needs.
Storage Info
How to Store Leftover Tacos
Store leftover tacos in an airtight container. Keep them in the fridge for up to three days. If you have extra buffalo cauliflower, store it separately. This keeps the tacos fresh. Place any toppings in small containers. This helps maintain their crunch and flavor.
Reheating Instructions for Best Results
To reheat the tacos, use your air fryer for best results. Set it to 350°F (175°C). Heat them for about five minutes. This will keep the tortillas crisp. If you heat in a microwave, they may get soggy. If using a microwave, heat for 30 seconds, then check. You may need to heat a bit longer.
Freezing Cauliflower for Later Use
You can freeze buffalo cauliflower for later. First, let it cool completely. Then, place it in a freezer-safe bag or container. Remove as much air as possible. This helps prevent freezer burn. You can freeze it for up to three months. To use, thaw in the fridge overnight and reheat as needed.
FAQs
Can I use frozen cauliflower instead?
Yes, you can use frozen cauliflower. Just make sure to thaw and dry it well. Frozen cauliflower may have more moisture. This can make it less crispy. If you choose frozen, adjust cooking time. Check for crispiness before serving.
How can I make these tacos spicier?
To add more heat, use extra buffalo sauce. You can also mix in hot sauce. For a kick, add diced jalapeños or chili flakes. Another option is to use spicy seasoning in the flour mix. Adjust heat to fit your taste.
What other vegetables can be used in this recipe?
You can try using broccoli or zucchini. These veggies can also work well. Bell peppers add color and sweetness. You might even use mushrooms for a different texture. Just cut them into bite-sized pieces to ensure even cooking.
You learned how to make tasty Air Fryer Buffalo Cauliflower Tacos. We covered key ingredients and optional toppings to suit your taste. I shared steps for prepping, cooking, and assembling your tacos. Tips on getting crispy cauliflower and perfect cooking times were included.
Try different sauces or toppings to mix things up. You can store leftovers easily and still enjoy them later. Remember, cooking can be fun and flexible. Now, it’s your turn to make these delicious tacos!

Air Fryer Buffalo Cauliflower Tacos
Ingredients
1 large head of cauliflower, cut into bite-sized florets
1 cup all-purpose flour
1 teaspoon garlic powder
1 teaspoon onion powder
1 teaspoon paprika
1/2 teaspoon salt
1 cup buttermilk (or a dairy-free milk alternative with 1 tablespoon of vinegar)
1 cup buffalo sauce
8 small corn or flour tortillas
1 cup shredded lettuce
1 avocado, sliced
1/2 cup diced tomatoes
1/4 cup fresh cilantro, chopped
Optional: ranch dressing for drizzling
Instructions
Preheat your air fryer to 400°F (200°C).
In a mixing bowl, combine the flour, garlic powder, onion powder, paprika, and salt. Whisk until well combined.
In a separate bowl, pour in the buttermilk. Dip each cauliflower floret into the buttermilk, then into the flour mixture, ensuring each piece is well coated.
Arrange the coated cauliflower in batches in the air fryer basket in a single layer, allowing for some space between pieces for optimal cooking.
Cook for 12-15 minutes, shaking the basket halfway through, until the cauliflower is crispy and golden brown.
Once cooked, carefully toss the cauliflower in a bowl with buffalo sauce until evenly coated.
While the cauliflower is cooking, warm the tortillas in a dry skillet for about 30 seconds on each side until pliable.
To assemble the tacos, place a generous amount of buffalo cauliflower on each tortilla, then top with shredded lettuce, avocado slices, diced tomatoes, and chopped cilantro.
If desired, drizzle some ranch dressing over the tacos for an extra flavor boost.
Serve immediately and enjoy!
Prep Time: 15 minutes | Total Time: 30 minutes | Servings: 4

Air Fryer Buffalo Cauliflower Tacos
Ingredients
- 1 large head cauliflower, cut into bite-sized florets
- 1 cup all-purpose flour
- 1 teaspoon garlic powder
- 1 teaspoon onion powder
- 1 teaspoon paprika
- 1/2 teaspoon salt
- 1 cup buttermilk (or a dairy-free milk alternative with 1 tablespoon of vinegar)
- 1 cup buffalo sauce
- 8 small corn or flour tortillas
- 1 cup shredded lettuce
- 1 whole avocado, sliced
- 1/2 cup diced tomatoes
- 1/4 cup fresh cilantro, chopped
Instructions
- Preheat your air fryer to 400°F (200°C).
- In a mixing bowl, combine the flour, garlic powder, onion powder, paprika, and salt. Whisk until well combined.
- In a separate bowl, pour in the buttermilk. Dip each cauliflower floret into the buttermilk, then into the flour mixture, ensuring each piece is well coated.
- Arrange the coated cauliflower in batches in the air fryer basket in a single layer, allowing for some space between pieces for optimal cooking.
- Cook for 12-15 minutes, shaking the basket halfway through, until the cauliflower is crispy and golden brown.
- Once cooked, carefully toss the cauliflower in a bowl with buffalo sauce until evenly coated.
- While the cauliflower is cooking, warm the tortillas in a dry skillet for about 30 seconds on each side until pliable.
- To assemble the tacos, place a generous amount of buffalo cauliflower on each tortilla, then top with shredded lettuce, avocado slices, diced tomatoes, and chopped cilantro.
- If desired, drizzle some ranch dressing over the tacos for an extra flavor boost.
- Serve immediately and enjoy!

![To make the savory Southwest quinoa salad, gather these fresh and vibrant ingredients. Each one plays a crucial role in flavor and texture. - Quinoa and Broth - 1 cup quinoa, rinsed - 2 cups vegetable broth or water - Vegetables and Beans - 1 cup black beans, rinsed and drained - 1 cup corn (fresh or frozen) - 1 red bell pepper, diced - 1 small red onion, finely chopped - 1 avocado, diced - 1/4 cup fresh cilantro, chopped - Dressing Elements - 1 lime, juiced - 3 tablespoons olive oil - 1 teaspoon cumin - 1/2 teaspoon smoked paprika - Salt and pepper to taste These ingredients come together to create a colorful and nutritious salad. The quinoa offers protein and fiber, while the beans and vegetables add crunch and flavor. Using vegetable broth instead of water enhances the taste of the quinoa. The lime juice and spices in the dressing provide a zesty kick. For the full recipe, check out the [Full Recipe]. Preparing the Cooking Liquid Start by rinsing 1 cup of quinoa under cold water. This step removes the bitter coating called saponin. Next, combine the rinsed quinoa with 2 cups of vegetable broth or water in a medium saucepan. This liquid adds flavor and helps the quinoa cook well. Simmering the Quinoa Bring the mixture to a boil over high heat. Once it boils, reduce the heat to low. Cover the saucepan and let it simmer for about 15 minutes. You will know it is ready when the quinoa is fluffy and the liquid is absorbed. Cooling the Quinoa After cooking, remove the saucepan from heat. Let the quinoa cool for a few minutes. This cooling step is important before combining it with the other salad ingredients. Combining the Vegetables and Beans In a large mixing bowl, add 1 cup of black beans (rinsed and drained), 1 cup of corn (fresh or frozen), 1 diced red bell pepper, 1 finely chopped small red onion, and 1 diced avocado. Stir these ingredients together well. Fluffing the Quinoa Once the quinoa has cooled, fluff it with a fork. This makes it light and airy. Add the fluffed quinoa to the large bowl with the vegetables and beans. Adding the Dressing In a small bowl, whisk together the juice of 1 lime, 3 tablespoons of olive oil, 1 teaspoon of cumin, and 1/2 teaspoon of smoked paprika. Season with salt and pepper to taste. Pour this dressing over the quinoa and vegetable mixture. Toss everything together gently until it is well combined. Incorporating Cilantro Chop 1/4 cup of fresh cilantro and stir it into the salad. This herb adds freshness and bright flavor. Adjusting Seasoning Taste the salad and adjust the seasoning if needed. You can add more salt, pepper, or lime juice to suit your taste. Presentation Tips Serve the salad chilled or at room temperature. You can present it in a large bowl with lime wedges on the side. For an appealing look, garnish with extra cilantro leaves and a sprinkle of smoked paprika on top. For the full recipe, check out the details above. Enjoy your delicious Southwest Quinoa Salad! Rinsing Techniques Rinsing quinoa is key. It removes the bitter coating called saponin. Use a fine mesh strainer to rinse the quinoa under cold water. Swirl it around for about 30 seconds. This step makes a big difference in taste. Cooking Time Suggestions Cook quinoa carefully. Bring your broth or water to a boil first. Then, reduce the heat and cover it. Let it simmer for about 15 minutes. Once the liquid is absorbed, fluff it with a fork. This gives you light and fluffy grains. Additional Seasoning Options You can boost flavor easily. Try adding garlic powder or chili powder for a kick. Fresh herbs like dill or parsley can also enhance taste. Adjust the salt and pepper as needed. Recommended Serving Suggestions Serve the salad cold or at room temperature. I love adding lime wedges for a fresh burst. You can also top it with extra cilantro or avocado slices. This makes your dish look even better and taste divine. For the full recipe, check out the details above. {{image_2}} You can boost your salad with extra proteins. Tofu, chickpeas, or tempeh work great. These options add texture and flavor. You can also use nuts like almonds or walnuts. They bring a nice crunch and healthy fats. Feel free to swap in other veggies to fit your taste. Zucchini, cherry tomatoes, or spinach can add freshness. You can even try roasted sweet potatoes for a sweet twist. Mixing colors makes the salad pop and look inviting. To turn up the heat, add diced jalapeños or a splash of hot sauce. This spicy kick adds depth and excitement. You can also use chili powder or cayenne pepper in the dressing for a fiery flavor. For a Mediterranean twist, replace the cilantro with fresh parsley. You can add feta cheese for creaminess. Toss in olives or artichoke hearts for extra flavor. This variation gives a fresh taste that brightens the classic recipe. Try these variations to keep your Southwest quinoa salad exciting. Discover new flavors while enjoying a healthy meal! For more ideas, check out the Full Recipe. Refrigeration Tips After making your Southwest Quinoa Salad, let it cool if it’s warm. Place it in an airtight container. It lasts in the fridge for up to five days. To keep it fresh, avoid adding avocado until you serve it. This prevents browning. Freezing Instructions You can freeze the salad, but some ingredients may change. For best results, freeze the quinoa and beans separately. Use a freezer-safe container and label it with the date. It can last for about three months in the freezer. Thaw overnight in the fridge before using. Best Methods for Reheating When reheating, avoid the microwave if possible. Instead, warm it on the stove over low heat. Add a splash of water or broth to keep it moist. Stir gently until heated through. If using the microwave, heat in short bursts, stirring in between. Recipe Reuses This salad is versatile. You can add it to wraps or tacos for a meal. Mix it into soups or grain bowls for extra nutrition. It also makes a great topping for baked potatoes or a side dish for grilled meats. Quinoa is a small, round seed that cooks like a grain. It comes in many colors, like white, red, and black. Quinoa is a complete protein. This means it has all nine essential amino acids. Each cup of cooked quinoa has about 8 grams of protein. It is also high in fiber, iron, and magnesium. These nutrients help with digestion and energy levels. Using quinoa in salads adds a nice texture. It makes the salad filling and nutritious. Plus, quinoa absorbs flavors well, making it perfect for dressings and spices. Yes, you can make this salad ahead of time! It stores well in the fridge for up to 3 days. When preparing for meal prep, cool the salad first. Place it in an airtight container. This keeps it fresh and safe to eat. If you want to add avocado, do this right before serving. This keeps it from browning and losing flavor. This salad pairs nicely with many dishes. You can enjoy it with grilled chicken or shrimp. It also goes well with tacos or burritos. Complementary flavors include lime, cilantro, and spicy peppers. These flavors enhance the taste of the salad. For a balanced meal, serve it with a light soup or a fresh fruit salad. For the full recipe, check out the Southwest Quinoa Salad section above. This blog post shares how to make a tasty Southwest Quinoa Salad. We covered the main ingredients, like quinoa, veggies, and dressing. I guided you through cooking, mixing, and perfecting the salad. Tips for flavor and texture help you create the best dish. With options for variations and storage advice, you can enjoy this salad anytime. Remember, meal prep helps save time. Try this recipe to delight your taste buds and impress your friends!](https://dailydishlab.com/wp-content/uploads/2025/07/3ab8b3fd-78de-4e54-929d-2e7840f55583-768x768.webp)


