

If you crave sweet treats that are quick and easy to make, you’re in for a treat! My Air Fryer Cinnamon Sugar Donut Holes are delightful, light, and oh-so-yummy. With simple ingredients and easy steps, you can whip up a batch in no time. Perfect for breakfast or snack time, this recipe will surely impress! Let’s dive into making these delicious donut holes that you won’t be able to resist.
Why I Love This Recipe
- Quick and Easy: This recipe takes only 20 minutes from start to finish, making it perfect for a last-minute treat.
- Healthier Option: Using yogurt and air frying reduces the calories compared to traditional fried donuts.
- Deliciously Sweet: The cinnamon sugar coating adds the perfect touch of sweetness and warmth to each bite.
- Customizable: Feel free to experiment with different flavors or toppings to make these donut holes your own!
Ingredients
List of Ingredients
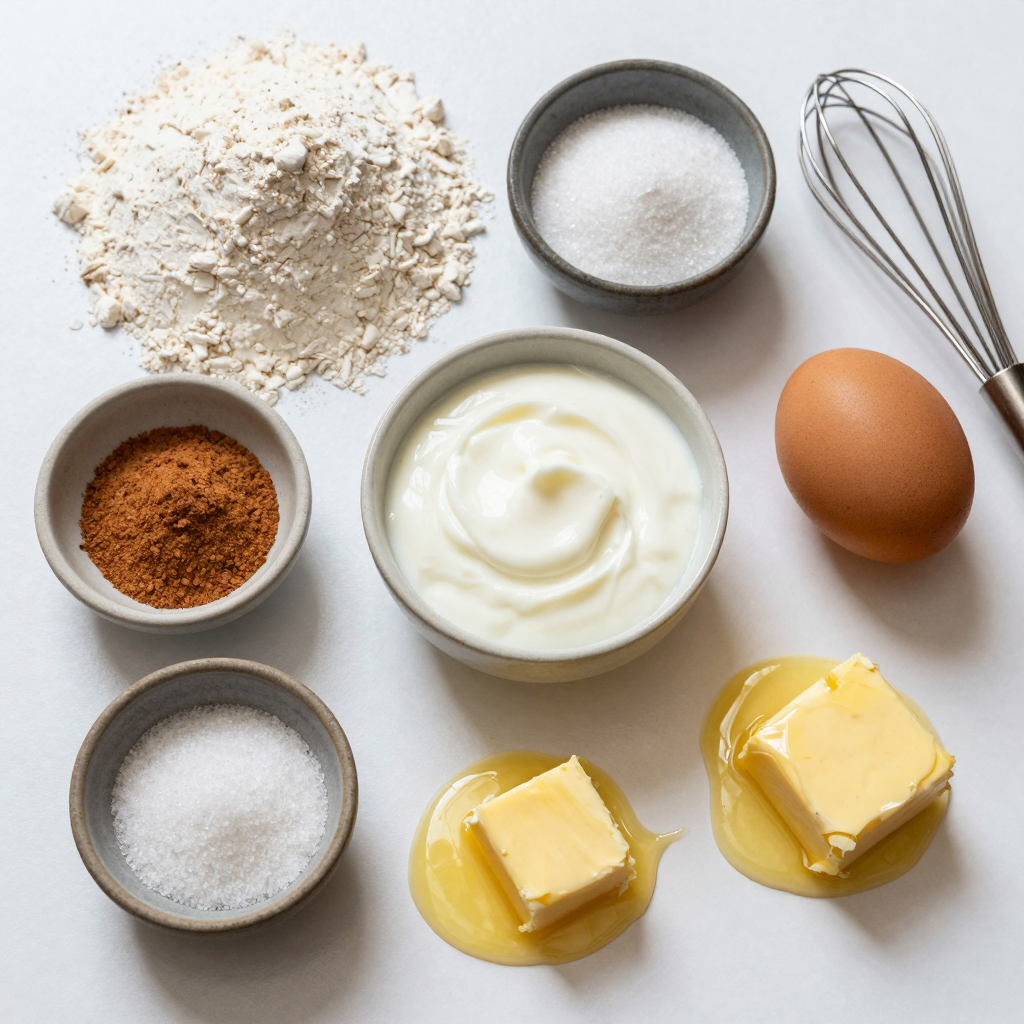
– 1 cup all-purpose flour
– 1/4 cup granulated sugar
– 1 tsp baking powder
– 1/2 tsp baking soda
– 1/4 tsp salt
– 1/2 tsp ground cinnamon
– 1/4 cup plain yogurt
– 1 large egg
– 2 tbsp melted butter
– 1 tsp vanilla extract
– Additional sugar and cinnamon for coating
Gathering the right ingredients is key to making delicious air fryer cinnamon sugar donut holes. Start with one cup of all-purpose flour. This gives the donut holes a nice base. Next, take a quarter cup of granulated sugar. This sweetens the dough perfectly. You will also need a teaspoon of baking powder and half a teaspoon of baking soda. These help the donut holes rise and stay fluffy.
Add a quarter teaspoon of salt to enhance the flavors. Then, grab half a teaspoon of ground cinnamon. This gives them that warm, cozy taste. For moisture, use a quarter cup of plain yogurt. It makes the dough soft and tender. You will also need one large egg. This acts as a binder for the dough.
Next, melt two tablespoons of butter. This adds richness and flavor. Finally, use one teaspoon of vanilla extract for an extra layer of taste. You will also need some extra sugar and cinnamon for coating the donut holes. This adds a sweet and crunchy finish that everyone loves.
With these ingredients, you are ready to create delightful treats. They are perfect for breakfast, snacks, or dessert. Enjoy the process and get ready for a fun baking adventure!
Step-by-Step Instructions
Preparation of Dry Ingredients
First, grab a large bowl. In it, whisk together these dry ingredients:
– 1 cup all-purpose flour
– 1/4 cup granulated sugar
– 1 tsp baking powder
– 1/2 tsp baking soda
– 1/4 tsp salt
– 1/2 tsp ground cinnamon
Make sure everything mixes well. This helps the donut holes rise and taste great.
Mixing Wet Ingredients
Next, take a separate bowl. Combine the following wet ingredients:
– 1/4 cup plain yogurt
– 1 large egg
– 2 tbsp melted butter
– 1 tsp vanilla extract
Mix until smooth. This mixture adds moisture and flavor to your donut holes.
Combining Ingredients
Now, pour the wet mix into the dry mix. Stir carefully until just combined. A few lumps are okay. Don’t overmix; this keeps the donut holes soft.
Then, use a small cookie scoop or your hands. Form the dough into small balls, about 1 inch in size. This is where you create your donut holes!
Air Frying Process
Before you air fry, preheat your air fryer. Set it to 350°F (175°C) for about 5 minutes.
Once preheated, lightly grease the air fryer basket with cooking spray. Place the donut holes in a single layer. Make sure they don’t touch.
Now, air fry the donut holes for 6-8 minutes. They should turn golden brown and be fully cooked. You might need to fry them in batches for best results.
Coating with Cinnamon Sugar
While the donut holes fry, prepare your cinnamon sugar coating. In a bowl, mix:
– 1/4 cup granulated sugar
– 1 tsp ground cinnamon
When the donut holes finish cooking, remove them from the air fryer. Toss them in the cinnamon sugar mixture. Ensure every donut hole gets coated well.
Let them cool slightly before you dig in! Enjoy your sweet treat.
Pro Tips
- Use Fresh Ingredients: Ensure that your baking powder and baking soda are fresh for optimal rise and texture in your donut holes.
- Don’t Overmix: Mix the wet and dry ingredients until just combined to keep your donut holes light and fluffy. A few lumps are perfectly fine!
- Adjust Cooking Time: Depending on your air fryer model, you may need to adjust the cooking time slightly. Keep an eye on them for that perfect golden color!
- Experiment with Coatings: Try different coatings like powdered sugar or chocolate drizzle for a fun twist on the classic cinnamon sugar topping.
Tips & Tricks
Achieving Perfect Donut Holes
To make great donut holes, the dough must be just right. You want it soft but not too sticky. Mix your dry ingredients well. Then, combine them with the wet ingredients until just mixed. Don’t overmix; lumps are okay.
For cooking, preheat your air fryer to 350°F (175°C). This step matters. It helps the donut holes cook evenly. Cook them for 6-8 minutes. Check for a golden brown color. If they are not ready, add a minute or two.
Presentation and Serving Suggestions
When serving, think about fun ideas. A colorful bowl makes it look great. You can also use a tiered stand for a fancy touch. For extra delight, drizzle with glaze or serve with chocolate sauce. Both add flavor and fun. Enjoy your donut holes warm for the best taste!
Variations
Flavor Additions
You can make these donut holes even more fun. Adding chocolate chips gives a sweet twist. Just mix in about 1/2 cup of chips after combining your dough. Nuts like chopped walnuts or pecans add crunch, too. You can also play with flavored extracts. Almond or maple extract can change the taste. Just use about a teaspoon. This way, every bite surprises you!
Sugar Coating Alternatives
Try using different spices in your sugar mix. For a warm flavor, add nutmeg along with the cinnamon. Pumpkin spice also works great, especially during fall. Mix a teaspoon of your chosen spice with the sugar. This gives your donut holes a unique twist. It’s a simple change that makes a big difference!
Dietary Modifications
You can make these donut holes fit special diets easily. To make them gluten-free, use almond flour or a gluten-free blend. The texture will change, but they will still be tasty! For dairy-free options, swap yogurt for a plant-based yogurt. Check the consistency; it should be thick but smooth. With these swaps, everyone can enjoy these tasty treats!
Storage Info
Storing Leftover Donut Holes
To keep your donut holes fresh, store them in an airtight container. You can keep them in the fridge for up to 3 days. If you want to save them longer, freeze them. Place the cooled donut holes in a freezer-safe bag. They will last for about 2 months in the freezer. When you want to enjoy them again, just take out what you need.
Reheating Recommendations
To reheat donut holes, use your air fryer. Set it to 350°F (175°C) and heat them for 3-4 minutes. This method keeps them soft and warm. You can also use a microwave, but it may make them a bit chewy. If you prefer a crispy texture, stick with the air fryer. Enjoy your tasty treat!
FAQs
Can I use almond flour instead of all-purpose flour?
Yes, you can use almond flour, but the texture will change. Almond flour makes the donut holes denser. You might need to adjust the liquid. Start with less yogurt and add more if needed.
How long do the donut holes stay fresh?
These donut holes stay fresh for about two days at room temperature. To keep them longer, store them in an airtight container. You can also refrigerate them for up to a week.
Can I make these donut holes ahead of time?
Yes, you can make the dough ahead of time. Shape the donut holes and refrigerate them. Just remember to cook them the same day for the best taste.
Is it possible to use another type of yogurt?
Absolutely! You can use Greek yogurt or a dairy-free yogurt. Just keep in mind that this may change the flavor slightly. The texture should remain similar.
What air fryer temperature works best for these donut holes?
A temperature of 350°F (175°C) works best. This allows the donut holes to cook evenly and become golden brown. Cooking them at this temperature ensures a soft inside with a crisp outside.
These air-fried donut holes are simple and delicious. We explored key ingredients, prep steps, and cooking tips. You learned how to make perfect donut holes with unique flavors. Plus, we covered storage and reheating for fresh bites later. Enjoy experimenting with your favorite add-ins or toppings. With these easy steps, you can impress family and friends. Dive into this tasty treat that’s fun to make and share!


