Air Fryer Crispy Falafel Bites Flavorful Snack Recipe

Looking for a tasty snack that’s easy to make? Try my Air Fryer Crispy Falafel Bites! Packed with flavor and a perfect crunch, these bites are great for any occasion. I will guide you through simple steps to create the ideal falafel, plus share tips to ensure they’re crispy every time. Whether you’re a falafel fan or trying it for the first time, this recipe is a hit. Let’s dive in and start cooking!
Why I Love This Recipe
- Healthy and Wholesome: These falafel bites are made from dried chickpeas and fresh herbs, making them a nutritious snack or meal option.
- Quick and Easy: With just a few simple steps and a short cooking time, you can have delicious falafel ready in no time.
- Versatile Serving Options: These crispy bites can be paired with various dips and salads, allowing for endless flavor combinations.
- Air Fryer Convenience: Using an air fryer means you can enjoy crispy falafel without the excess oil, making it a healthier cooking method.
Ingredients
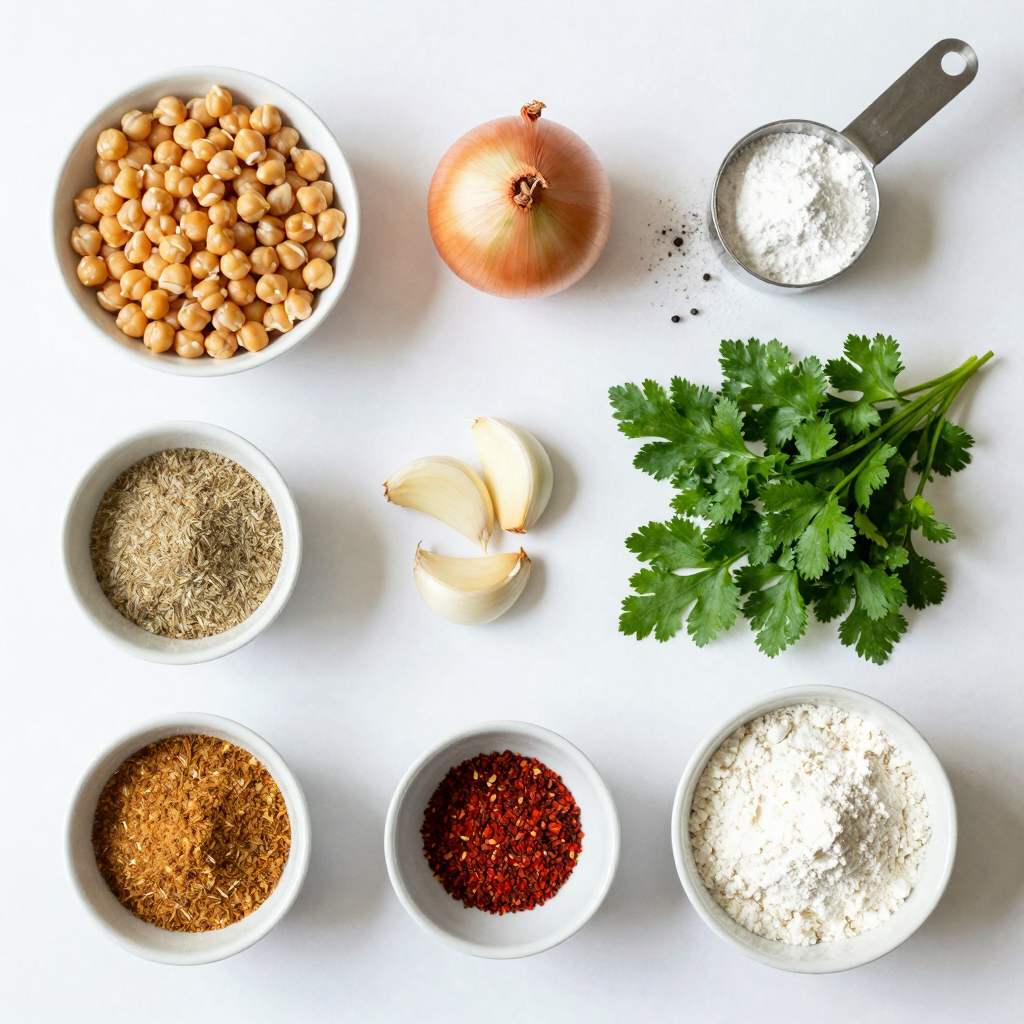
List of Required Ingredients
To make these crispy falafel bites, gather these simple ingredients:
- 1 cup dried chickpeas (soaked overnight)
- 1 small onion, roughly chopped
- 3 cloves garlic, minced
- 1/4 cup fresh parsley, chopped
- 1/4 cup fresh cilantro, chopped
- 1 tsp ground cumin
- 1 tsp ground coriander
- 1/2 tsp baking powder
- 1/2 tsp salt
- 1/2 tsp black pepper
- 1/4 tsp cayenne pepper (optional)
- 3-4 tablespoons flour (optional, for binding)
- Olive oil spray
Ingredient Substitutions
You can swap some ingredients if needed. Here are a few ideas:
- Use canned chickpeas instead of dried. Rinse them well.
- Green onions can replace the onion. They add a mild flavor.
- If you lack fresh herbs, dried parsley or cilantro can work. Use less since dried herbs are stronger.
- For a gluten-free option, try chickpea flour instead of regular flour.
Tips for Choosing Fresh Ingredients
Choosing the right ingredients makes a big difference. Here’s how to pick the best:
- Chickpeas: Look for dried chickpeas with no cracks or holes. They should feel firm.
- Herbs: Fresh parsley and cilantro should be bright green, not wilted. Smell them; they should have a strong aroma.
- Onions and Garlic: Choose firm, dry onions. Garlic should be firm and have no soft spots.
- Spices: Check the expiration dates. Fresh spices give the best flavor.

Step-by-Step Instructions
Preparing the Chickpeas
Start by draining and rinsing the soaked chickpeas. Make sure they are dry. Wet chickpeas can make the falafel mushy. If they are too wet, they won’t hold together well when cooked.
Blending the Ingredients
In your food processor, add the dry chickpeas, chopped onion, and minced garlic. Next, toss in the fresh parsley and cilantro. Then, sprinkle in the ground cumin, ground coriander, baking powder, salt, black pepper, and cayenne pepper if you like heat. Pulse the mix until it is coarsely blended. It should not be smooth; a bit of texture is key.
Shaping the Falafel Bites
Transfer the mixture to a bowl. If the mix seems wet, add flour little by little until it holds together. Use your hands to form small balls or patties, about 1-2 inches wide. Place them on a parchment-lined plate or tray. This step is fun and lets you shape them as you like!
Cooking in the Air Fryer
Preheat your air fryer to 360°F (180°C) for about 5 minutes. Lightly spray the falafel bites with olive oil. Place them in a single layer in the air fryer basket. If your air fryer is small, you may need to cook in batches. Air fry for 12-15 minutes, shaking the basket halfway through. The bites should turn golden brown and crispy. After cooking, let them cool for a moment before serving.
Pro Tips
- Soaking is Key: Make sure to soak your chickpeas overnight to ensure they soften properly for blending.
- Don’t Overprocess: Pulse the mixture until coarsely blended to maintain a nice texture in your falafel bites.
- Adjust for Moisture: If your mixture is too wet, add flour little by little to achieve the right consistency for shaping.
- Batch Cooking: Air fry in batches to avoid overcrowding the basket, ensuring each falafel bite gets crispy and golden.
Tips & Tricks
Achieving a Crispy Texture
To make your falafel bites crispy, start with dry chickpeas. Soaking them overnight helps, but drying is key. After blending, do not puree the mixture. It should stay coarse for texture. Lightly spray the falafel with olive oil before air frying. This step helps them crisp up nicely. Make sure to shake the basket halfway through cooking. This ensures even browning.
Common Mistakes to Avoid
One common mistake is using canned chickpeas. They add too much moisture. Always soak and dry your chickpeas for the best results. Another mistake is not checking the mixture’s consistency. If it feels too wet, add flour gradually. Lastly, avoid overcrowding the air fryer. Cook in batches for a better outcome.
Best Practices for Cooking with an Air Fryer
Preheat your air fryer for even cooking. Set it to 360°F (180°C) for about 5 minutes. This helps your falafel cook properly from the start. Use parchment paper to line your basket. It makes cleanup easier and keeps the bites from sticking. Always shake the basket during cooking. This helps all sides get crispy and golden brown.

Variations
Spicy Falafel: Adding Heat
If you love a kick, add more cayenne pepper. Start with 1/2 teaspoon. You can also mix in chopped jalapeños or crushed red pepper flakes. These additions will give your falafel a nice spicy flavor. Adjust the heat to match your taste.
Vegan and Gluten-Free Modifications
This recipe is naturally vegan. To make it gluten-free, use gluten-free flour instead of regular flour. Check your flour labels to ensure they are safe. You can also replace the flour with ground oats, which work well too. These swaps keep your falafel bites delicious and safe for all diets.
Flavor Boosts: Herbs and Spices
Want more flavor? Consider adding more herbs. Fresh dill or mint can enhance the taste. Try a teaspoon of smoked paprika for a deeper flavor. You can also mix in a pinch of nutmeg for warmth. Customizing with herbs and spices can turn a simple falafel into a unique treat.
Storage Info
How to Store Leftover Falafel Bites
To store leftover falafel bites, let them cool completely first. Place them in an airtight container. You can keep them in the fridge for up to four days. If you want to keep them longer, freezing is a great option.
Reheating Tips for Optimal Crispiness
When you reheat falafel bites, use the air fryer for the best results. Set your air fryer to 350°F (175°C). Heat them for about 5 to 7 minutes. This method restores their crispy texture. Avoid using the microwave, as it can make them soggy.
Freezing Options for Meal Prep
If you want to freeze falafel, shape them first but do not cook them. Place the raw bites on a baking sheet lined with parchment paper. Freeze them for 1 to 2 hours until firm. Then transfer them to a freezer bag. They can last for up to three months. When ready to eat, cook them directly from frozen, adding a few extra minutes to the cooking time.
FAQs
Can I use canned chickpeas instead of dried?
Yes, you can use canned chickpeas. They are already cooked, so rinse them well. Drain and dry them before using. Canned chickpeas may make the falafel softer, so adjust the flour if needed.
How do I know when falafel are done cooking?
You know falafel are done when they are golden brown and crispy. Check them at 12 minutes. If they need more time, air fry for a few more minutes. Shake the basket halfway for even cooking.
What dips pair well with falafel bites?
Falafel bites go well with several dips. Try tahini sauce, hummus, or yogurt dip. You can also add a squeeze of lemon for extra zest. Fresh veggies like cucumbers and carrots are great on the side too.
Can I bake the falafel bites instead of air frying?
Yes, you can bake the falafel. Preheat your oven to 400°F (200°C). Place the falafel on a baking sheet. Bake for 20-25 minutes, flipping halfway through. They may not be as crispy as air-fried falafel, but they’ll still taste great!
This guide covers everything you need to make tasty falafel bites. We shared essential ingredients, tips for picking fresh ones, and steps for preparation. You learned how to blend and shape your falafel, then cook them in an air fryer for a crispy finish.
Remember to avoid common mistakes and explore fun variations like spicy or gluten-free options. Store leftovers properly and reheat for best results. With these tips, you can enjoy homemade falafel any time. Now, get cooking and enjoy your flavorful reward!

Air Fryer Crispy Falafel Bites
Ingredients
1 cup dried chickpeas (soaked overnight)
1 small onion, roughly chopped
3 cloves garlic, minced
1/4 cup fresh parsley, chopped
1/4 cup fresh cilantro, chopped
1 tsp ground cumin
1 tsp ground coriander
1/2 tsp baking powder
1/2 tsp salt
1/2 tsp black pepper
1/4 tsp cayenne pepper (optional)
3-4 tablespoons flour (optional, for binding)
Olive oil spray
Instructions
Prepare Chickpeas: Drain and rinse the soaked chickpeas well. Ensure they are completely dry for better texture.
Blend Ingredients: In a food processor, combine the chickpeas, chopped onion, minced garlic, parsley, cilantro, cumin, coriander, baking powder, salt, black pepper, and cayenne pepper. Pulse until the mixture is coarsely blended but not pureed.
Check Consistency: Transfer the mixture to a mixing bowl. If it feels too wet, gradually add flour until it holds together well without being overly sticky.
Shape the Bites: Using your hands, form small balls or patties (about 1-2 inches in diameter) from the mixture and place them on a parchment-lined plate or tray.
Preheat Air Fryer: Preheat your air fryer to 360°F (180°C) for about 5 minutes.
Spray with Olive Oil: Lightly spray the falafel bites with olive oil to help them crisp up during cooking.
Air Fry Falafel: Place the falafel bites in a single layer in the air fryer basket. Depending on the size of your air fryer, you may need to do this in batches. Air fry for 12-15 minutes, shaking the basket halfway through for even cooking. The falafel should be golden brown and crispy.
Serve: Remove the falafel bites from the air fryer and let them cool slightly before serving.
Prep Time: 10 minutes | Total Time: 30 minutes | Servings: 4
– Serving Suggestions: Serve these crispy falafel bites with tahini sauce, hummus, or a yogurt dip, garnished with extra parsley and lemon wedges for a fresh touch. For a vibrant salad, pair them with mixed greens, tomatoes, and cucumbers.

Air Fryer Crispy Falafel Bites
Ingredients
- 1 cup dried chickpeas (soaked overnight)
- 1 small onion, roughly chopped
- 3 cloves garlic, minced
- 0.25 cup fresh parsley, chopped
- 0.25 cup fresh cilantro, chopped
- 1 tsp ground cumin
- 1 tsp ground coriander
- 0.5 tsp baking powder
- 0.5 tsp salt
- 0.5 tsp black pepper
- 0.25 tsp cayenne pepper (optional)
- 3 tbsp flour (optional, for binding)
- as needed Olive oil spray
Instructions
- Drain and rinse the soaked chickpeas well. Ensure they are completely dry for better texture.
- In a food processor, combine the chickpeas, chopped onion, minced garlic, parsley, cilantro, cumin, coriander, baking powder, salt, black pepper, and cayenne pepper. Pulse until the mixture is coarsely blended but not pureed.
- Transfer the mixture to a mixing bowl. If it feels too wet, gradually add flour until it holds together well without being overly sticky.
- Using your hands, form small balls or patties (about 1-2 inches in diameter) from the mixture and place them on a parchment-lined plate or tray.
- Preheat your air fryer to 360°F (180°C) for about 5 minutes.
- Lightly spray the falafel bites with olive oil to help them crisp up during cooking.
- Place the falafel bites in a single layer in the air fryer basket. Depending on the size of your air fryer, you may need to do this in batches. Air fry for 12-15 minutes, shaking the basket halfway through for even cooking. The falafel should be golden brown and crispy.
- Remove the falafel bites from the air fryer and let them cool slightly before serving.
- Serve these crispy falafel bites with tahini sauce, hummus, or a yogurt dip, garnished with extra parsley and lemon wedges for a fresh touch. For a vibrant salad, pair them with mixed greens, tomatoes, and cucumbers.


![For my Zucchini Quiche Muffins, I use these key ingredients: - 2 medium zucchinis, grated - 4 large eggs - 1 cup milk (dairy or plant-based) - 1 cup all-purpose flour (or whole wheat) - 1 cup shredded cheese (cheddar or feta) - 1/2 teaspoon baking powder - 1/2 teaspoon salt - 1/4 teaspoon black pepper - 1/2 teaspoon garlic powder - 1/4 cup green onions, finely chopped - 1/4 cup bell pepper, finely diced (any color) - Olive oil for greasing muffin tin You can swap out some ingredients for variety. Here are my favorites: - Instead of all-purpose flour, try almond flour for a nutty taste. - Use turkey bacon or cooked sausage for added protein. - If you want a dairy-free option, use nutritional yeast instead of cheese. - For extra greens, add chopped spinach or kale. - You can replace green onions with chives for a milder flavor. These muffins are not just tasty; they are also good for you. Here are some details: - Each muffin has about 120 calories. - They provide a good source of protein from eggs and cheese. - Zucchini adds fiber and vitamins A and C. - These muffins are low in carbs if you choose whole wheat flour. - They make a great snack or meal option for all ages. For the full recipe, check out the detailed instructions and tips! 1. Preheat your oven to 375°F (190°C). Grease a muffin tin with olive oil or use muffin liners. 2. In a large bowl, whisk together four large eggs and one cup of milk. Mix until they are well blended. 3. Grate two medium zucchinis and add them to the egg mixture. If needed, use a sieve to drain excess liquid. This step keeps your muffins from being soggy. 4. Add one cup of all-purpose flour, half a teaspoon of baking powder, and half a teaspoon of salt. Also, include a quarter teaspoon of black pepper and half a teaspoon of garlic powder. Stir gently until just mixed. Don’t overmix; the batter should be a bit lumpy. 5. Fold in one cup of shredded cheese, a quarter cup of chopped green onions, and a quarter cup of diced bell pepper. Mix until everything is evenly distributed. 6. Use a spoon to fill each muffin cup about three-quarters full with the batter. 7. Place the muffin tin in the preheated oven. Bake for 20 to 25 minutes. You want them golden brown on top. 8. About halfway through baking, check on them. This way, you can ensure they rise evenly. 9. To check if the muffins are done, insert a toothpick into the center. If it comes out clean, they are ready. If not, give them a few more minutes. 10. Once baked, let the muffins cool for a few minutes in the tin. Then, transfer them to a wire rack to cool completely. For the full recipe and further details, check the [Full Recipe]. Enjoy these tasty muffins as a snack or a side! To get the best texture in your zucchini quiche muffins, use fresh zucchinis. Grate them finely, and squeeze out any extra water. This keeps the muffins from being soggy. Mix the batter gently. A few lumps are okay; overmixing can make them tough. Use a blend of cheese for more flavor. Cheddar and feta work great together. Store any leftovers in an airtight container. They stay fresh in the fridge for up to three days. For longer storage, freeze them. Place muffins in a freezer bag, and they will last up to three months. Thaw in the fridge overnight before enjoying again. Serve these muffins warm or at room temperature. They pair well with a fresh salad or soup. Top with herbs like parsley for a burst of flavor. You can also sprinkle extra cheese on top before serving. For a fun twist, serve with a dollop of sour cream or yogurt. Enjoy them as a snack, breakfast, or side dish! For the full recipe, check out the detailed instructions above. {{image_2}} You can easily make these muffins vegetarian. Just skip the cheese, or use a plant-based one. Add more veggies like spinach, mushrooms, or kale for a tasty twist. You can even mix in some sun-dried tomatoes for extra color and flavor. This way, you keep the muffins light and fresh! To make these muffins gluten-free, swap the all-purpose flour for a gluten-free blend. Many blends work well in baking. Just make sure to check the labels to avoid any hidden gluten. You can also use almond flour or oat flour for a nutty taste. Both will give you a nice texture. Herbs and spices can make these muffins pop. Try adding thyme, rosemary, or dill for a fragrant touch. You can also mix in a pinch of chili flakes if you like heat. Another idea is to add a sprinkle of smoked paprika for a unique flavor. Don't be afraid to get creative! To keep your zucchini quiche muffins fresh, place them in an airtight container. This helps to keep moisture out. You can store them at room temperature for up to two days. If you want them to last longer, consider the fridge. In the fridge, they can stay fresh for up to a week. Freezing is a great option if you want to save muffins for later. To freeze, first let them cool completely. Then, wrap each muffin tightly in plastic wrap. After that, place them in a freezer bag. Label the bag with the date. You can freeze them for up to three months. When you’re ready to eat, just take out what you need. Reheating zucchini quiche muffins is easy. For the best results, use an oven. Preheat your oven to 350°F (175°C). Place the muffins on a baking sheet. Heat them for about 10-15 minutes. You can also use a microwave. Just heat them for 20-30 seconds. This warms them but may not keep them crisp. Enjoy your muffins warm! For the full recipe, check out the earlier section. Yes, you can use other vegetables! Carrots, spinach, or mushrooms work well. Just remember to chop them small. If you want a burst of flavor, add some sun-dried tomatoes. The key is to keep the total vegetable amount similar to the zucchini. This keeps the muffins tasty and moist. Feel free to mix and match according to what you have at home. It makes cooking fun and creative! Zucchini quiche muffins last about four days in the fridge. To store them, place them in an airtight container. This keeps them fresh and tasty. If you notice any change in smell or texture, it’s best to toss them. You can enjoy them cold or warm them up in the microwave. They make a quick snack or breakfast option! Absolutely! Mini zucchini quiche muffins are a great idea. Use a mini muffin tin instead of a regular one. Just reduce the baking time to about 12-15 minutes. Keep an eye on them, as they cook faster. These bite-sized treats are perfect for parties or snacks. Plus, they are easy to grab and eat on the go. Try making them for your next gathering! For the full recipe, check out the complete instructions above. In this post, we covered how to make delicious zucchini quiche muffins. We explored key ingredients and their substitutions. I shared easy preparation steps and baking tips to ensure perfect results. You learned how to store and reheat your muffins and enjoyed ideas for tasty variations. Embrace these tips to make your own muffin masterpiece. Enjoy experimenting and savor every bite!](https://dailydishlab.com/wp-content/uploads/2025/06/fed823f9-c559-4a2e-ba47-9f1169717efa-768x768.webp)


![- 1 pound ground beef (or turkey) - 1/2 cup breadcrumbs (plain or seasoned) - 1/4 cup grated Parmesan cheese - 1/4 cup finely chopped onion - 1 egg - 2 cloves garlic, minced The main ingredients for honey garlic slow cooker meatballs are simple yet flavorful. Ground beef or turkey serves as a great base, giving the meatballs a hearty texture. I like to use breadcrumbs to hold everything together while adding a nice crunch. Adding grated Parmesan cheese gives the meatballs a savory kick. Finely chopped onion and minced garlic infuse rich flavors that blend perfectly. Finally, one egg binds all these ingredients and keeps the meatballs moist. - 1/3 cup honey - 1/4 cup soy sauce (or tamari for gluten-free) - 1 tablespoon apple cider vinegar - 1 teaspoon ground ginger - 1/4 teaspoon black pepper For the sauce, honey is the star. Its sweetness balances well with the salty soy sauce. You can use tamari if you want a gluten-free option. A splash of apple cider vinegar adds a tangy note, while ground ginger brings warmth and depth. Just a sprinkle of black pepper rounds out the flavors nicely. - Chopped green onions - Sesame seeds Garnishes can elevate your dish. Chopped green onions add a fresh crunch, while sesame seeds give a nice nutty flavor. You can add these right before serving for a beautiful finish. For the full recipe, refer to [Full Recipe]. - Combine the main ingredients in a bowl. Mix 1 pound of ground beef or turkey, 1/2 cup of breadcrumbs, 1/4 cup of grated Parmesan cheese, 1/4 cup of finely chopped onion, 1 egg, and 2 minced garlic cloves. - Form the mixture into small meatballs, about 1 inch in diameter. Set them aside on a plate. - In a separate bowl, whisk together the sauce ingredients. Mix 1/3 cup of honey, 1/4 cup of soy sauce, 1 tablespoon of apple cider vinegar, 1 teaspoon of ground ginger, and 1/4 teaspoon of black pepper. - Place the meatballs in the slow cooker. Arrange them in a single layer for even cooking. - Pour the honey garlic sauce over the meatballs. Make sure they are well coated. - Cook on low for 4-5 hours or on high for 2-3 hours. Check that the meatballs are cooked through and tender. - After cooking, gently stir the meatballs. Let them soak up the sauce for about 10 minutes before serving. - Garnish with chopped green onions and sesame seeds if you want. Enjoy these tasty bites! For the full recipe, check out the detailed instructions. To make great honey garlic meatballs, start by ensuring even cooking. This means forming your meatballs to the same size. Aim for about one inch in diameter. This way, they cook at the same rate. If you make them too big, they may not cook through. For cooking time, I recommend using low heat for about 4 to 5 hours. If you are short on time, use high heat for 2 to 3 hours. Either way, check the meatballs near the end. They should be tender and fully cooked. You can also use a meat thermometer to check for doneness. The internal temperature should reach 165°F. Honey garlic meatballs shine with simple sides. Serve them with steamed rice, noodles, or even a fresh salad. These pair well with the sweet and savory flavors of the meatballs. For presentation, arrange the meatballs on a large platter. Drizzle extra sauce over them for a glossy look. Sprinkle chopped green onions and sesame seeds on top. This adds color and a fresh crunch. When making meatballs, some issues may pop up. If your meatballs fall apart, it could be too much moisture. Ensure you use the right amount of breadcrumbs. Another common problem is dry meatballs. This can happen if you overcook them. Always check your cooking time and temperature. If they seem dry, serve them with more sauce to help. These tips can guide you through making perfect honey garlic slow cooker meatballs. For the full recipe, check back to the main section. {{image_2}} You can easily switch the meat you use. Ground turkey works well instead of beef. If you want a plant-based option, use lentils or chickpeas. Both are tasty and healthy. When it comes to breadcrumbs, you can use gluten-free options. Look for gluten-free bread or crushed rice crackers. This swap keeps the dish friendly for those with gluten issues. To boost the taste, think about adding spices. A pinch of red pepper flakes gives a nice kick. Fresh herbs like basil or cilantro can add a fresh twist. You can also adjust the sweetness. If you want it less sweet, cut back on the honey. To add saltiness, consider a splash more soy sauce. Each of these changes can make your dish unique. You don’t have to use a slow cooker for this recipe. You can bake the meatballs in the oven. Just preheat it to 400°F. Place the meatballs on a baking sheet. Bake for about 20 minutes until they are golden brown. For stovetop cooking, heat a skillet over medium heat. Brown the meatballs on all sides. Then add the sauce and simmer until cooked through. Each method brings a different texture and flavor to the dish. Remember, you can find the full recipe in the earlier section. To store leftover meatballs, place them in an airtight container. Make sure to cover them well. This keeps the meatballs fresh and tasty. You can store them in the fridge for up to 4 days. If you want to enjoy them later, freezing may be a better choice. For the best results, freeze meatballs in a single layer on a baking sheet. Once they are frozen, place them in a freezer bag. This helps prevent them from sticking together. You can freeze them for up to 3 months. When you're ready to eat, thaw the meatballs in the fridge overnight. Reheat them in the slow cooker or microwave until hot. Preparing ahead is a great way to save time. You can mix and form the meatballs a day in advance. Just store them in the fridge until you're ready to cook. Portioning is also key. Consider making small bags with the right amount for meals. This makes it easy for quick dinners during busy days. For a delightful meal, try the Full Recipe for Honey Garlic Slow Cooker Meatballs. You can tell meatballs are done by checking their internal temperature. Use a meat thermometer. The safe temperature for ground meat is 165°F (74°C). Insert the thermometer into the center of a meatball. If it reads 165°F, they are ready to eat. If not, cook them a bit longer. Yes, you can prepare honey garlic meatballs in advance. Mix the meatball ingredients and form them into balls. Place them in the fridge for up to 24 hours before cooking. You can also freeze them for later. Just thaw them in the fridge overnight before cooking. This saves time on busy days. Definitely! You can swap ground beef for turkey or a plant-based option. For gluten-free diets, use gluten-free breadcrumbs and tamari instead of soy sauce. If you prefer less sugar, reduce the amount of honey or use a sugar-free substitute. There are many options to fit your needs. Honey garlic meatballs pair well with various side dishes. Here are some great options: - Steamed rice or quinoa - Roasted vegetables - Noodles, like rice or soba - A fresh green salad - Mashed potatoes These sides complement the sweet and savory flavors of the meatballs. Enjoy mixing and matching to find your favorite combination! For the complete recipe, check the Full Recipe section. This blog post covered how to make juicy honey garlic meatballs. We explored the main ingredients, including ground beef and Parmesan cheese. Then, we discussed the sauce, which combines honey and soy sauce, and provided cooking tips. Plus, we shared variations and storage tips for leftovers. Whether you follow the recipe or make your own tweaks, you can enjoy delicious meatballs. Now, it's your turn to try this easy dish and share it with your loved ones!](https://dailydishlab.com/wp-content/uploads/2025/07/f340aba1-8a32-460a-95c5-e4b0f40aca57-768x768.webp)