Air Fryer Everything Bagel Chicken Flavorful Delight

Craving a dish that bursts with flavor and crunch? Look no further than Air Fryer Everything Bagel Chicken! This easy recipe combines juicy chicken with the bold taste of everything bagel seasoning for a delightful meal. I’ll guide you step-by-step through prepping, cooking, and serving this tasty dish. Ready to elevate your dinner game? Let’s dive in and whip up this crispy, savory delight!
Why I Love This Recipe
- Flavor Explosion: The combination of everything bagel seasoning and the creamy Greek yogurt creates a deliciously unique flavor profile that elevates the chicken.
- Healthy Twist: Using Greek yogurt instead of heavy sauces makes this dish lighter while still keeping it moist and tender.
- Quick & Easy: This recipe is perfect for a weeknight dinner, taking only 35 minutes from start to finish.
- Versatile Dish: Serve it with a side salad, on a bun, or sliced over a grain bowl for a variety of meals throughout the week.
Ingredients
Required Ingredients
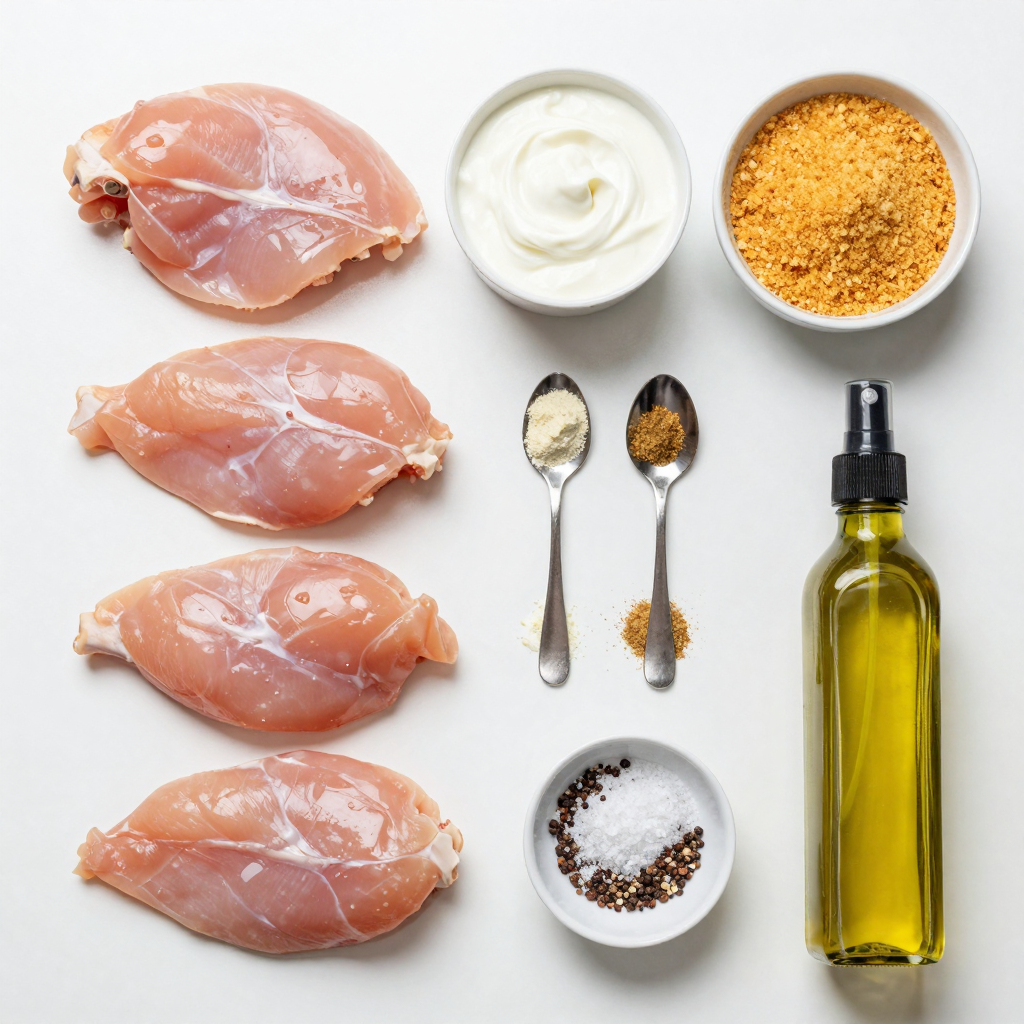
- 4 boneless, skinless chicken breasts
- 1 cup plain Greek yogurt
- ½ cup breadcrumbs (panko preferred for crunch)
- 3 tablespoons everything bagel seasoning
- 1 teaspoon garlic powder
- 1 teaspoon onion powder
- Salt and pepper to taste
- Olive oil spray
Optional Ingredients
- Fresh herbs for garnish
- Side dish suggestions (mixed greens, light salad)
The key to this dish is using simple, fresh ingredients. Each one plays a big role in flavor. The chicken breasts give a nice base. The Greek yogurt adds creaminess and helps keep the chicken juicy. Panko breadcrumbs make the crust crispy. Everything bagel seasoning brings a fun and tasty twist.
You can feel free to play with the optional ingredients. Fresh herbs not only taste great but also look pretty. A light salad or mixed greens makes a nice side. This way, you can create a full meal that’s not just tasty, but also colorful and appealing.
When you gather your ingredients, make sure they are fresh. This step sets the stage for a yummy dish. Trust me, the better the ingredients, the better your chicken will taste.

Step-by-Step Instructions
Prepping the Chicken
To start, you need to marinate the chicken in a yogurt mixture. This gives it flavor and keeps it moist. In a medium bowl, mix 1 cup of plain Greek yogurt with 1 teaspoon of garlic powder, 1 teaspoon of onion powder, salt, and pepper. Stir well to combine.
Next, place 4 boneless, skinless chicken breasts in the bowl. Make sure each piece is covered in the marinade. Let the chicken sit for at least 15 minutes. If you have time, you can marinate it for up to 2 hours in the fridge.
While the chicken marinates, prepare the breadcrumb coating. In a separate bowl, mix ½ cup of breadcrumbs with 3 tablespoons of everything bagel seasoning. This will add a great crunch and flavor to your chicken.
Air Frying Process
Now, it’s time to air fry the chicken. First, preheat your air fryer to 375°F (190°C). This step is key for even cooking.
After preheating, remove each chicken breast from the marinade. Let any extra marinade drip off. Roll the chicken in the breadcrumb mixture until fully coated. Place the chicken breasts in a single layer in the air fryer basket.
Spray the tops lightly with olive oil spray. This helps them get crispy. Air fry the chicken for 15-18 minutes. You want the internal temperature to reach 165°F (75°C). Remember to flip the chicken halfway through cooking for even browning.
Serving Suggestions
Once the chicken is done, let it rest for 5 minutes before slicing. This keeps the juices inside. For presentation, slice the chicken and serve it on a platter.
Garnish with fresh herbs like parsley or chives. A sprinkle of extra everything bagel seasoning adds a nice touch. Pair it with a side of mixed greens or a light salad for a tasty meal. Enjoy your flavorful delight!
Pro Tips
- Marinating Time: For the best flavor and tenderness, allow the chicken to marinate for at least 2 hours in the refrigerator.
- Perfect Coating: Use panko breadcrumbs for an extra crispy texture. Ensure the chicken is well-coated to achieve the best crunch.
- Check Doneness: Always use a meat thermometer to confirm the internal temperature reaches 165°F (75°C) for safe consumption.
- Resting Period: Let the chicken rest for 5 minutes after cooking to allow the juices to redistribute for a juicier bite.
Tips & Tricks
Perfecting the Marinade
To get the best flavor, marinate your chicken for at least 15 minutes. If you can, let it sit for up to 2 hours in the fridge. This gives the yogurt time to soak in. You can adjust spice levels by adding more garlic or onion powder. If you want it spicier, try adding a dash of cayenne pepper.
Air Fryer Tips
Always check for doneness using a meat thermometer. The chicken should reach 165°F (75°C). This ensures it’s safe to eat. For crispy results, lightly spray the chicken with olive oil before cooking. This helps the breading get that golden crunch we all love.
Flavor Enhancements
You can customize the flavor by using different seasonings. Try adding paprika for a smoky taste or Italian herbs for a fresh twist. If you want extra crunch, substitute the breadcrumbs with crushed nuts. Serve your chicken with dips like ranch or honey mustard. These add a fun kick to each bite.

Variations
Different Protein Options
You can switch up the chicken in this recipe. Turkey works great. It stays juicy and cooks well in the air fryer. Pork is another tasty choice. Just make sure to use pork chops or tenderloin for the best results.
If you’re looking for vegetarian options, try tofu or seitan. Tofu soaks up flavors really well and gives a great texture. Just press it first to remove excess water. Seitan is chewy and makes a good meat substitute.
Flavor Profile Changes
Want to shake things up? Add herbs like dill or thyme to your coating. These herbs bring fresh flavors that pair well with the everything bagel seasoning. You can also mix in some red pepper flakes for heat. This adds a spicy kick that makes the dish more exciting.
Serving Style Alternatives
How about serving this in a fun way? You can make a bagel sandwich with your favorite toppings. Try cream cheese, lettuce, and tomatoes for a classic combo.
For a lighter meal, serve the chicken over a salad. Mixed greens, cucumber, and a light vinaigrette work well. This gives you a healthy option that still tastes great.
Storage Info
Refrigeration Guidelines
The chicken lasts about 3 to 4 days in the fridge. Store it in an airtight container. Before reheating, slice the chicken. This helps it warm evenly. You can use a microwave or a skillet to reheat. Heat it gently until warm to keep it juicy.
Freezing Instructions
You can freeze the chicken before or after cooking. If freezing raw, marinate and coat it first. Wrap it tightly in plastic wrap, then place it in a freezer bag. For cooked chicken, let it cool, then slice and store. To defrost, place it in the fridge overnight or use the microwave. Avoid letting it sit out at room temperature.
Meal Prep Suggestions
To save time, prep the chicken ahead. Marinate it a day before cooking. You can also coat it and freeze it. Use glass or plastic containers with lids for storage. Label each container with the date. This way, you’ll know when to use it. Enjoy the ease of having a tasty meal ready to go!
FAQs
How can I make this recipe gluten-free?
To make this recipe gluten-free, switch the breadcrumbs. Use gluten-free breadcrumbs or crushed gluten-free crackers. You can find these in most stores. Be sure to check the label for any hidden gluten. This simple swap keeps the crunch while making it safe for those with gluten sensitivity.
What if I don’t have an air fryer?
If you don’t have an air fryer, you can bake the chicken in your oven. Preheat your oven to 400°F (200°C). Place the coated chicken on a baking sheet lined with parchment paper. Bake for about 20-25 minutes, flipping halfway. Look for a golden crust and ensure the chicken reaches 165°F (75°C) inside. The oven method gives a nice result too.
Can I use frozen chicken?
Yes, you can use frozen chicken. However, you must adjust the cooking time. If using frozen breasts, increase cooking time to about 25-30 minutes. Ensure the chicken reaches the safe temperature of 165°F (75°C) before serving. If possible, thaw the chicken first for better marinating.
This recipe combines simple ingredients for a tasty air-fried chicken. We explored the necessary steps, from marinating to perfecting the crust. I offered tips for customization and storage, ensuring you can enjoy it later. Remember, you can easily adjust the flavors or proteins to suit your taste. With these guidelines, you can create a delightful dish that fits various diets. Enjoy your cooking adventure and the delicious meals ahead!

Air Fryer Everything Bagel Chicken
Ingredients
4 boneless, skinless chicken breasts
1 cup plain Greek yogurt
½ cup breadcrumbs (panko preferred for crunch)
3 tablespoons everything bagel seasoning
1 teaspoon garlic powder
1 teaspoon onion powder
Salt and pepper to taste
Olive oil spray
Instructions
Preheat your air fryer to 375°F (190°C).
In a medium bowl, combine the Greek yogurt, garlic powder, onion powder, salt, and pepper. Mix well to create a marinade.
Place the chicken breasts in the marinade, ensuring they are evenly coated. Let them marinate for at least 15 minutes (or up to 2 hours in the refrigerator for deeper flavor).
In a separate bowl, mix the breadcrumbs with 2 tablespoons of everything bagel seasoning.
Remove each chicken breast from the marinade, allowing any excess to drip off. Roll the chicken in the breadcrumb mixture until fully coated.
Place the coated chicken breasts in the air fryer basket in a single layer. Lightly spray the tops with olive oil spray to promote crispiness.
Air fry the chicken at 375°F (190°C) for 15-18 minutes, or until the chicken is thoroughly cooked and the internal temperature reaches 165°F (75°C). Flip the chicken halfway through for even cooking.
Once cooked, remove the chicken from the air fryer and let it rest for 5 minutes before slicing.
Prep Time: 15 min | Total Time: 35 min | Servings: 4
– Presentation Tips: Serve the chicken sliced on a platter, garnished with fresh herbs like parsley or chives, and a sprinkle of extra everything bagel seasoning for added appeal. Pair with a side of mixed greens or a light salad for a complete meal.

Air Fryer Everything Bagel Chicken
Ingredients
- 4 pieces boneless, skinless chicken breasts
- 1 cup plain Greek yogurt
- 0.5 cup breadcrumbs (panko preferred for crunch)
- 3 tablespoons everything bagel seasoning
- 1 teaspoon garlic powder
- 1 teaspoon onion powder
- to taste salt and pepper
- as needed olive oil spray
Instructions
- Preheat your air fryer to 375°F (190°C).
- In a medium bowl, combine the Greek yogurt, garlic powder, onion powder, salt, and pepper. Mix well to create a marinade.
- Place the chicken breasts in the marinade, ensuring they are evenly coated. Let them marinate for at least 15 minutes (or up to 2 hours in the refrigerator for deeper flavor).
- In a separate bowl, mix the breadcrumbs with 2 tablespoons of everything bagel seasoning.
- Remove each chicken breast from the marinade, allowing any excess to drip off. Roll the chicken in the breadcrumb mixture until fully coated.
- Place the coated chicken breasts in the air fryer basket in a single layer. Lightly spray the tops with olive oil spray to promote crispiness.
- Air fry the chicken at 375°F (190°C) for 15-18 minutes, or until the chicken is thoroughly cooked and the internal temperature reaches 165°F (75°C). Flip the chicken halfway through for even cooking.
- Once cooked, remove the chicken from the air fryer and let it rest for 5 minutes before slicing.
- Prep Time: 15 min | Total Time: 35 min | Servings: 4
- Presentation Tips: Serve the chicken sliced on a platter, garnished with fresh herbs like parsley or chives, and a sprinkle of extra everything bagel seasoning for added appeal. Pair with a side of mixed greens or a light salad for a complete meal.


![For a hearty bowl of Classic Chicken Tortilla Soup, gather the following: - 1 pound boneless, skinless chicken breasts - 1 tablespoon olive oil - 1 medium onion, chopped - 2 cloves garlic, minced - 1 red bell pepper, diced - 1 can (14.5 ounces) diced tomatoes - 4 cups chicken broth - 1 can (4 ounces) diced green chilies - 1 tablespoon ground cumin - 1 teaspoon smoked paprika - Salt and pepper to taste - 1 cup corn kernels (fresh, frozen, or canned) - 1 lime, juiced - Fresh cilantro, chopped for garnish - Tortilla strips (store-bought or homemade) - Avocado, sliced for serving (optional) - Shredded cheese (Mexican blend or cheddar, optional) Using fresh ingredients can really boost the flavor. I recommend choosing chicken breasts that are plump and firm. When picking your onion, look for one that feels heavy for its size. Opt for garlic with tight, dry skins for the best taste. For spices, always check the date on the label. Fresh spices make a big difference. When it comes to tomatoes, use diced ones in juice, not the ones in sauce. The broth should be low-sodium to control the salt level. If you prefer a richer flavor, use homemade chicken broth. You can elevate your soup with a few tasty garnishes. Fresh avocado adds creaminess. A sprinkle of shredded cheese gives a nice touch. Crispy tortilla strips add crunch and fun. Lastly, do not skip the cilantro; it brightens up the dish. You can also serve it with lime wedges for an extra zing! For a twist, consider adding sliced jalapeños for heat or black beans for more depth. Each addition creates a unique take on this classic dish. To see the full recipe, check out the complete instructions. To start, heat 1 tablespoon of olive oil in a large pot over medium heat. Once it warms, add 1 chopped onion. Sauté the onion for about 5 minutes until it softens. Then, stir in 2 minced garlic cloves and 1 diced red bell pepper. Cook for another 3 minutes until you smell the garlic. Next, add 1 pound of boneless, skinless chicken breasts to the pot. Season the chicken with salt, pepper, 1 tablespoon of ground cumin, and 1 teaspoon of smoked paprika. Cook the chicken for 2-3 minutes, stirring often. After that, pour in 1 can of diced tomatoes, 4 cups of chicken broth, and 1 can of diced green chilies. Stir well, and bring the mixture to a gentle boil. Once it boils, reduce the heat and let it simmer for 20 minutes. This cooks the chicken fully. Once done, take the chicken out of the pot. Let it cool for a bit. Use two forks to shred the chicken into bite-sized pieces. Return the shredded chicken back to the soup. Now, stir in 1 cup of corn kernels and the juice of 1 lime. Taste the soup and adjust the salt and pepper as needed. Let it simmer for 5 more minutes. Start by prepping ingredients first. Chop the onion and red bell pepper before cooking. This saves time and keeps you organized. While the chicken simmers, you can clean up your workspace. This makes cooking feel less chaotic. Also, use a timer for each step, so you stay on track. Lastly, make sure you have all your ingredients ready before you start. This way, you avoid last-minute searching. Shredding chicken can feel tricky, but I have a simple way. First, let the chicken cool after you take it out of the pot. This makes it easier to handle. Use two forks to pull the chicken apart. Hold one fork in each hand. Use the first fork to hold the chicken in place. With the second fork, pull the chicken apart into strips. If you have a stand mixer, you can use it too! Just place the cooked chicken in the bowl and use the paddle attachment. Turn it on low for a few seconds, and watch the chicken shred easily. This method saves time and gives you perfect shreds for your soup! To boost the taste of your soup, try these ideas: - Add a splash of lime juice. It brightens the flavors. - Use fresh herbs like cilantro or oregano. They add depth. - Consider roasted peppers for a smoky touch. They enhance the flavor. - Top your soup with crumbled queso fresco. It adds creaminess. - Spice it up with jalapeños or hot sauce. This adds heat. Many home cooks make a few common errors. Here’s how to avoid them: - Don’t skip the sauté step. It builds flavor in the base. - Be careful not to overcook the chicken. It should be juicy and tender. - Avoid using low-quality broth. Good broth makes a big difference. - Don’t forget to taste as you cook. Adjust seasonings early on. - Skip the tortilla strips at the end. They add a nice crunch. Having the right tools makes cooking easier. Here’s what you need: - A large pot or Dutch oven for cooking. - A sharp knife for chopping. - A cutting board for prep work. - Two forks for shredding chicken. - Ladles for serving soup. For more details, check the [Full Recipe]. {{image_2}} You can make a great vegetarian or vegan tortilla soup. Swap the chicken with hearty beans like black or pinto beans. Use vegetable broth instead of chicken broth for the base. Add more veggies, like zucchini or carrots, to boost flavor and texture. You can use tofu or tempeh for protein. Top your soup with avocado and tortilla strips for crunch. This version remains rich and satisfying. If you love heat, try my spicy version. Add sliced jalapeños or serrano peppers to the pot when you cook the onions. Use a spicier salsa instead of diced tomatoes. You can also add a few dashes of hot sauce right before serving. This will give a nice kick to your soup. Adjust the spice level to your liking, but remember to taste as you go! You can switch ingredients to create a regional twist. For a Southwest flair, add roasted corn or poblano peppers. If you want a Mexican touch, try using hominy instead of corn. Swap fresh cilantro for epazote for a unique flavor. Each change gives your soup a new taste. Let yourself explore and enjoy the cooking process. For the full recipe, check out the detailed instructions above! To keep your chicken tortilla soup fresh, store it in an airtight container. This helps lock in flavor and moisture. Allow the soup to cool to room temperature before sealing the container. It keeps well in the fridge for about 3 to 4 days. Make sure to label the container with the date. This way, you know when it was made. If you want to save your soup for later, freezing is a great option. First, allow the soup to cool completely. Pour the soup into freezer-safe bags or containers. Leave some space at the top, as liquids expand when frozen. The soup stays good for about 2 to 3 months in the freezer. When you’re ready to enjoy it again, simply thaw it overnight in the fridge. When reheating, do so gently to keep the soup tasty. Pour the soup into a pot over medium heat. Stir often to help it heat evenly. If it seems thick, add a bit of chicken broth or water to loosen it up. You can also reheat individual portions in the microwave. Just remember to stir halfway through for even heating. For more details on making this delicious dish, check out the Full Recipe. To make Classic Chicken Tortilla Soup gluten-free, you need to swap out the tortilla strips. Use gluten-free tortilla chips instead. You can also make homemade strips using gluten-free tortillas. Just cut them into strips and bake until crispy. Always check your canned ingredients, like broth and tomatoes, for gluten-free labels. For storing leftover soup, let it cool first. Then, place it in an airtight container. You can store it in the fridge for up to three days. If you want to keep it longer, freeze the soup. Use freezer-safe containers and leave some space for expansion. When you’re ready to eat, just thaw and reheat. Yes, using rotisserie chicken is a great shortcut! It saves time and adds flavor. Just shred the chicken and add it after the soup simmers. This method gives you a tasty dish without much effort. You can still follow the rest of the recipe as usual. For the full recipe, check the details above. This article covered all you need for making chicken tortilla soup. We talked about essential ingredients and their quality. You learned step-by-step instructions and helpful cooking tips. I shared tricks to avoid common mistakes and suggestions for equipment. We explored tasty variations and smart storage methods. Now, you can confidently create a flavorful soup. Enjoy your cooking journey and make it your own!](https://dailydishlab.com/wp-content/uploads/2025/07/be748eb7-43aa-4443-8b13-5155a2eb28e7-768x768.webp)

