Air Fryer Falafel Tasty and Easy Chickpea Snack

Are you craving a tasty snack that’s easy to make? Look no further than air fryer falafel! This crispy, delicious treat is packed with flavor and perfect for any occasion. With just a few simple ingredients, you can whip up this chickpea delight in no time. Join me as I share the step-by-step method to create the best air fryer falafel, along with tips and tricks. Get ready to enjoy a new favorite!
Why I Love This Recipe
- Healthy and Nutritious: These air fryer falafels are packed with protein and fiber from chickpeas, making them a wholesome choice for any meal.
- Crispy Texture: The air fryer gives these falafels a delightful crispiness on the outside while keeping them soft and tender on the inside.
- Quick and Easy: This recipe is straightforward and can be made in about 30 minutes, perfect for a quick weeknight dinner.
- Versatile Serving Options: These falafels can be enjoyed in pita bread, on salads, or with dips like tahini or tzatziki, adding variety to your meals.
Ingredients
List of Ingredients
- 1 cup dried chickpeas (soaked overnight)
- 1 small onion, roughly chopped
- 2 cloves garlic, minced
- 1/4 cup fresh parsley, roughly chopped
- 1/4 cup fresh cilantro, roughly chopped
- 1 teaspoon ground cumin
- 1 teaspoon ground coriander
- 1/2 teaspoon salt
- 1/2 teaspoon black pepper
- 1/2 teaspoon baking powder
- 2 tablespoons flour (chickpea flour for gluten-free)
- Olive oil spray
Each ingredient plays a role in making falafel tasty. Dried chickpeas give a great base. Soaking them overnight helps soften them. This makes blending easier and gives a nice texture.
Onion and garlic add flavor. They make the falafel taste fresh and bright. Fresh parsley and cilantro give a herbal touch. They also add color to your dish.
Cumin and coriander bring warmth and depth. These spices are key in Middle Eastern dishes. Salt and black pepper enhance all the flavors. Baking powder helps the falafel stay light and airy.
Flour binds everything together. You can use chickpea flour to keep it gluten-free. Finally, olive oil spray helps achieve that crispy outer layer we all love.
These ingredients combine to create a delicious and healthy snack. You will enjoy making and eating these falafel!

Step-by-Step Instructions
Preparing the Chickpeas
First, drain and rinse the soaked chickpeas well. Rinsing removes any grit and helps with texture. This step is key for a good falafel.
Blending the Mixture
Next, combine all your ingredients in a food processor. Add the soaked chickpeas, onion, garlic, parsley, cilantro, cumin, coriander, salt, pepper, baking powder, and flour. Blend until the mixture is mostly smooth but still has some texture. This gives the falafel a nice bite.
Shaping the Falafel
Now, transfer the mixture to a bowl. With wet hands, form small balls or patties. Aim for about 1 to 1.5 inches in diameter. This size cooks well and stays juicy inside.
Preheating the Air Fryer
Before cooking, preheat your air fryer to 375°F (190°C). Preheating helps the falafel cook evenly and get crispy.
Cooking in the Air Fryer
Lightly spray the falafel balls with olive oil on all sides. Place them in the air fryer basket in a single layer. Avoid overcrowding. Cook for 12 to 15 minutes, flipping halfway through. Look for a golden and crispy outside.
Serving Suggestions
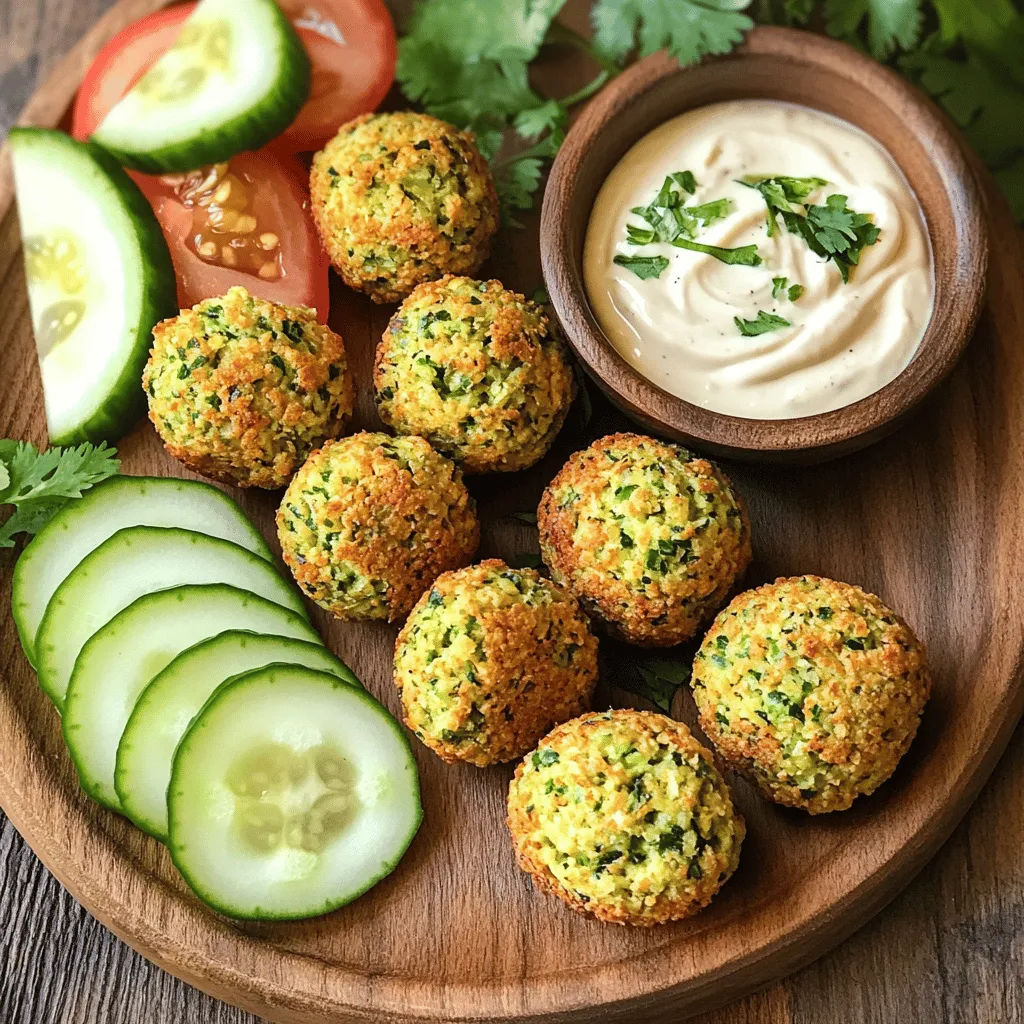
Once cooked, remove the falafel from the air fryer. Let them cool slightly before serving. Serve with tahini sauce or tzatziki. You can also add fresh herbs or cucumber and tomato slices for a pop of color. Enjoy these crispy bites in pita or on a salad!
Pro Tips
- Soak Chickpeas Properly: Ensure chickpeas are soaked for at least 8 hours to achieve the best texture and flavor in your falafel.
- Customize Herbs: Feel free to mix different herbs like mint or dill alongside parsley and cilantro for a unique flavor profile.
- Test Mixture Consistency: If your falafel mixture is too wet, add a bit more flour. The mixture should hold together but not be sticky.
- Keeping Falafel Warm: If cooking in batches, keep the cooked falafel warm in a low oven (around 200°F) while you finish frying the rest.
Tips & Tricks
Achieving the Perfect Crispy Texture
To get that nice crunch, use olive oil spray. This helps the falafel brown well. A light coat of oil makes a big difference in texture. Also, make sure you place the falafel in a single layer in the air fryer. If they touch, they can steam instead of crisp. You want those golden edges!
Soaking Chickpeas
Soaking dried chickpeas overnight has many benefits. It softens them and helps them blend better. This step makes your falafel smooth and easy to shape. If you don’t have time, you can use canned chickpeas. Just drain and rinse them well. However, they might not give the same texture as dried ones.
Common Mistakes to Avoid
One mistake is over-blending the mixture. You want it to be smooth but still have some texture. If it’s too smooth, your falafel won’t hold together well. Another mistake is crowding the air fryer basket. This can lead to uneven cooking. Always cook in batches if needed!

Variations
Adding Different Herbs and Spices
You can make your falafel special by adding herbs and spices. Fresh mint gives a bright taste. Dill adds a nice touch too. Other great choices include basil, oregano, or even a pinch of cayenne for heat. Experimenting with these flavors can take your falafel to a new level. Get creative! Try mixing in roasted garlic or lemon zest for extra zing.
Making Gluten-Free Falafel
If you need gluten-free falafel, use chickpea flour instead of regular flour. It works great and keeps the falafel tasty. Almond flour is another option. Just make sure to check your flour for hidden gluten. Gluten-free falafel still gets crispy in the air fryer. Your friends won’t even notice the difference!
Vegan Variations
Falafel is naturally vegan, but check your ingredients. Make sure any flour or spices are vegan-friendly. If you want a richer flavor, add tahini to the mix. This helps keep the falafel moist. Serve with a tahini sauce for a perfect pairing. You can enjoy this dish without any animal products.
Storage Info
Refrigerating Leftover Falafel
To store your leftover falafel, place them in an airtight container. Keep the container in the fridge. This helps to keep them fresh for up to four days. If you want to keep them longer, consider freezing them instead. Just make sure to let them cool completely before you store them. This will help prevent sogginess.
Freezing Instructions
Freezing falafel is simple and great for meal prep. First, let the cooked falafel cool down. Then, arrange them in a single layer on a baking sheet. This helps them freeze without sticking together. Once frozen, transfer them to a freezer bag. Squeeze out the air and seal tightly. You can freeze them for up to three months. Label the bag with the date for easy tracking.
Reheating Falafel
To reheat falafel and keep them crispy, use your air fryer again. Preheat your air fryer to 350°F (175°C). Place the falafel in a single layer and heat for about 5-7 minutes. This method helps restore their crunchiness. You can also use an oven, but the air fryer works best for texture. Enjoy your tasty snack!
FAQs
Can I use canned chickpeas instead of dried?
Yes, you can use canned chickpeas. They are quick and easy. However, the texture will change. Canned chickpeas are softer, which may lead to mushy falafel. Dried chickpeas give a firmer bite and better flavor. If you use canned chickpeas, drain and rinse them well. You might also want to reduce the blending time. This helps keep some texture in your falafel.
How do I make falafel without an air fryer?
You can fry falafel in oil on the stove. Heat about two inches of oil in a pan. Once the oil is hot, gently place the falafel balls into the pan. Fry them for about 3-4 minutes on each side until they turn golden brown. You can also bake them in the oven. Preheat your oven to 375°F (190°C). Place the falafel on a baking sheet and bake for 20-25 minutes, flipping halfway. Both methods yield delicious falafel!
What to serve with falafel?
Falafel pairs well with many tasty sides. Try serving them with pita bread, fresh vegetables, or a salad. You can also add sauces like tahini, tzatziki, or hummus. These sauces add creaminess and flavor. Sliced cucumbers, tomatoes, and pickled onions make great toppings too. Get creative with your sides to make it a fun meal!
Can I make falafel ahead of time?
Yes, you can prepare falafel in advance. Shape the falafel balls and store them in the fridge for up to a day. If you want to keep them longer, freeze the uncooked falafel. Place them on a tray to freeze, then transfer to a bag. When ready to cook, no need to thaw. Just air fry them straight from the freezer. This makes meal prep easy and quick!
You now know how to make crispy falafel from scratch. We covered the key ingredients, step-by-step instructions, and helpful tips. You can customize your falafel with herbs and flour options. Storing leftovers and reheating them correctly helps keep the flavor.
Enjoy your falafel with various sides or sauces. I hope this dish becomes a favorite in your kitchen. It’s tasty, healthy, and fun to make.

Air Fryer Falafel
Ingredients
1 cup dried chickpeas (soaked overnight)
1 small onion, roughly chopped
2 cloves garlic, minced
1/4 cup fresh parsley, roughly chopped
1/4 cup fresh cilantro, roughly chopped
1 teaspoon ground cumin
1 teaspoon ground coriander
1/2 teaspoon salt
1/2 teaspoon black pepper
1/2 teaspoon baking powder
2 tablespoons flour (chickpea flour for gluten-free)
Olive oil spray
Instructions
Prepare Chickpeas: Drain and rinse the soaked chickpeas well before adding them to a food processor.
Blend Ingredients: In the food processor along with the chickpeas, add the chopped onion, minced garlic, parsley, cilantro, cumin, coriander, salt, pepper, baking powder, and flour. Blend until the mixture is mostly smooth but still has some texture (similar to a coarse paste).
Shape Falafel: Transfer the falafel mixture to a bowl. Using wet hands, form small balls or patties (about 1-1.5 inches in diameter). Place them on a plate.
Preheat Air Fryer: Preheat your air fryer to 375°F (190°C) for about 5 minutes.
Cooking: Lightly spray the falafel balls with olive oil on all sides. Place them in the air fryer basket in a single layer, making sure they are not overcrowded. You may need to cook in batches.
Air Fry: Cook for 12-15 minutes, flipping halfway through the cooking time to ensure even browning. They should be golden and crispy on the outside.
Serve: Once done, remove from the air fryer and let them cool slightly before serving.
Prep Time: 15 min | Total Time: 30 min | Servings: 4
– Presentation Tips: Serve the falafel with a side of tahini sauce or tzatziki, and garnish with fresh herbs or slices of cucumber and tomato for a vibrant presentation. Enjoy in pita bread or on a salad for a wholesome meal!

Air Fryer Falafel
Ingredients
- 1 cup dried chickpeas (soaked overnight)
- 1 small onion, roughly chopped
- 2 cloves garlic, minced
- 1/4 cup fresh parsley, roughly chopped
- 1/4 cup fresh cilantro, roughly chopped
- 1 teaspoon ground cumin
- 1 teaspoon ground coriander
- 1/2 teaspoon salt
- 1/2 teaspoon black pepper
- 1/2 teaspoon baking powder
- 2 tablespoons flour (chickpea flour for gluten-free)
- 1 spray Olive oil
Instructions
- Drain and rinse the soaked chickpeas well before adding them to a food processor.
- In the food processor along with the chickpeas, add the chopped onion, minced garlic, parsley, cilantro, cumin, coriander, salt, pepper, baking powder, and flour. Blend until the mixture is mostly smooth but still has some texture (similar to a coarse paste).
- Transfer the falafel mixture to a bowl. Using wet hands, form small balls or patties (about 1-1.5 inches in diameter). Place them on a plate.
- Preheat your air fryer to 375°F (190°C) for about 5 minutes.
- Lightly spray the falafel balls with olive oil on all sides. Place them in the air fryer basket in a single layer, making sure they are not overcrowded. You may need to cook in batches.
- Cook for 12-15 minutes, flipping halfway through the cooking time to ensure even browning. They should be golden and crispy on the outside.
- Once done, remove from the air fryer and let them cool slightly before serving.

![- 1 can (15 oz) chickpeas, drained and rinsed - 4 cloves of garlic, roasted - 1/4 cup tahini - 2 tablespoons lemon juice - 2 tablespoons olive oil (plus extra for drizzling) - 1/2 teaspoon ground cumin - Salt, to taste - Water, as needed for desired consistency These core ingredients create the base of your roasted garlic hummus. The chickpeas offer a creamy texture and protein. Roasted garlic brings a sweet, mellow flavor that warms the dish. Tahini adds a nutty element, while olive oil gives richness. Lemon juice brightens the flavor, and cumin adds depth. - Fresh parsley - Paprika - Additional olive oil drizzle Garnishes elevate your hummus. Fresh parsley adds a nice color and freshness. Paprika offers a hint of smokiness and a pop of color. A drizzle of olive oil not only makes it look great, but it enhances the flavor too. For the full recipe, visit [Full Recipe]. Roasting the garlic First, preheat your oven to 400°F (200°C). Take four cloves of garlic. Wrap them in aluminum foil. Roast the garlic for about 20-25 minutes. It should be soft and fragrant. Let it cool a bit before you touch it. Preparing chickpeas Grab one can of chickpeas. Drain the chickpeas and rinse them well under cold water. This step helps remove extra sodium and gives a better taste. Now, you’re ready to blend! Combining all ingredients in a food processor In your food processor, combine the roasted garlic, chickpeas, tahini, lemon juice, olive oil, and ground cumin. Add a pinch of salt too. This mix will create that rich, creamy texture we love. Achieving the desired consistency Blend the mixture until smooth. If it looks too thick, add water one tablespoon at a time. Keep blending until you reach that perfect hummus consistency. Taste it and adjust the seasoning if needed. Presentation tips Scoop the hummus into a serving bowl. Drizzle a bit of olive oil on top. Sprinkle paprika and some fresh parsley for color. This makes it look great! Pairing ideas Serve your hummus with warm pita bread, fresh veggies, or crunchy crackers. It also goes well with grilled meats or as a dip for a party. Enjoy your tasty creation! For the full recipe, check out the [Full Recipe]. To get the best roasted garlic flavor, I recommend roasting at 400°F (200°C) for 20-25 minutes. This time and heat bring out a sweet, mellow taste. The garlic should feel soft when you squeeze it. Using regional garlic varieties can also help. Each type has its own unique flavor. Local garlic often tastes fresher and can add a nice twist to your hummus. The thickness of your hummus can change based on your preference. If it's too thick, add water slowly, one tablespoon at a time. Blend well after each addition until you reach the right texture. If you want to avoid using water, try adding olive oil or lemon juice. These ingredients can help adjust the thickness while also enhancing the flavor. To make your hummus even better, consider adding spices like smoked paprika or cayenne pepper. These can give a nice kick to your dish. Incorporating fresh herbs can also elevate the taste. Parsley and cilantro work well, adding color and flavor. Experiment with different herbs to find your favorite mix. For the full recipe, check out the [Full Recipe]. {{image_2}} You can easily switch up the flavors in roasted garlic hummus. One popular option is spicy roasted garlic hummus. To make it, add a pinch of cayenne pepper or some chopped jalapeños. This gives your hummus a nice kick. Another great choice is herbed roasted garlic hummus. You can mix in fresh herbs like basil or cilantro. This adds a fresh taste and vibrant color to your dip. Sometimes you might want to change a few ingredients. For a lighter option, try low-fat tahini. You can find brands that reduce fat but still keep great flavor. If you need a chickpea substitute, consider using white beans or lentils. They blend well and give a similar creamy texture. When it comes to serving, think outside the box! Vegetable dippers like carrots, celery, or bell pepper strips are excellent. They add crunch and freshness to each bite. You can also serve hummus with crackers or pita bread. Both options are great for scooping. Plus, they complement the rich flavors of the hummus. For the full recipe, check out the detailed instructions above. To keep your roasted garlic hummus fresh, use airtight containers. Glass jars work well. They seal tightly and prevent air from getting in. Plastic containers are also good but make sure they are BPA-free. In the fridge, your hummus will stay fresh for about five to seven days. Always check for any off smells or changes in color before eating. If it looks or smells funny, it's best to toss it. You can freeze hummus for later use. To do this, scoop it into a freezer-safe container. Leave some space at the top. Hummus expands as it freezes. When you want to use it, move the container to the fridge. Let it thaw overnight. For quick thawing, you can also place it in warm water for about 30 minutes. After thawing, stir it well. You may need to add a bit of water to get the right consistency. Enjoy your hummus again! For more details on making this delicious dish, check the Full Recipe. Roasted garlic hummus is a smooth dip made from chickpeas and roasted garlic. It has a rich, savory flavor that is both nutty and creamy. The roasted garlic adds a sweet and mellow taste, making it a favorite among many. You can enjoy it as a snack, spread, or party appetizer. Store roasted garlic hummus in the fridge for up to five days. Look for signs of spoilage such as an off smell or mold. If you see either, it’s best to toss it. Yes, you can make roasted garlic hummus ahead of time. Prepare it two to three days before your event. Store it in an airtight container in the fridge to keep it fresh. You can find roasted garlic hummus at most grocery stores. Look in the deli section or refrigerated aisle. Brands like Sabra and Tribe often carry this flavor. For fresh options, check your local farmer's market. For a homemade option, try my Full Recipe for roasted garlic hummus. Roasted garlic hummus is simple and fun to make. You need key ingredients like chickpeas, roasted garlic, and tahini. Follow our easy steps to blend them into a creamy dip. Feel free to try different flavors or pair it with veggies or crackers. Store any leftovers properly to keep them fresh. This hummus is versatile and can spice up any meal. I hope you're excited to make your own tasty hummus at home. Enjoy experimenting with different flavors!](https://dailydishlab.com/wp-content/uploads/2025/06/d9475f29-a73b-4d87-94b9-fefa292024dd-768x768.webp)


![- 1 can (15 oz) chickpeas, drained and rinsed - 1/4 cup fresh parsley, chopped - 1/4 cup fresh cilantro, chopped - 1/2 small onion, roughly chopped - 2 cloves garlic, minced - 1 tsp ground cumin - 1 tsp ground coriander - 1/2 tsp baking powder - 1/4 cup all-purpose flour (or chickpea flour for gluten-free) - Salt and pepper to taste - 3 tablespoons olive oil - Optional: tahini sauce for serving Gathering your ingredients is the first step to making easy baked falafel. Chickpeas are the base of this dish. They provide protein and fiber. Fresh parsley and cilantro add bright flavor. The onion and garlic bring warmth and depth. Ground cumin and coriander give that classic falafel taste. Baking powder helps the falafel puff up a bit. Flour binds everything together. You can use all-purpose flour or chickpea flour if you want a gluten-free option. Don't forget to season with salt and pepper. This is key to enhancing the flavors. Finally, olive oil gives that crispy texture when baking. If you like, serve your falafel with tahini sauce for a creamy dip. Follow this full recipe to make sure you get it just right. - Preheat your oven to 375°F (190°C). Line a baking sheet with parchment paper. - In a food processor, combine the chickpeas, parsley, cilantro, onion, and garlic. Pulse it a few times until mixed, but keep some texture. - Add the cumin, coriander, baking powder, flour, salt, and pepper to the food processor. Pulse until just mixed. Scrape the sides as needed. The mix should hold but feel slightly crumbly. - Shape the mixture into small balls, about the size of a golf ball. Place them on the baking sheet. Gently flatten them with your hand. - Drizzle the falafel with olive oil. This helps them crisp up while baking. - Bake for 25-30 minutes, flipping halfway through. They should turn golden brown and feel crispy. - Let them cool slightly before serving. Enjoy your crunchy and flavorful baked falafel! For the complete details, check the Full Recipe. To get the best texture for your falafel, avoid overprocessing the mixture. When you blend the chickpeas and herbs, pulse it gently. You want a coarse blend, not a smooth paste. This keeps it light and fluffy. Also, determine the perfect falafel size. Aim for small balls about the size of a golf ball. This size helps them cook evenly and stay crispy. When you shape them, ensure they are not too compact. They need some air to become crunchy. You can enhance the flavor by experimenting with spices. In addition to cumin and coriander, try adding smoked paprika or cayenne pepper. These spices can kick up the taste and make your falafel stand out. Incorporate additional herbs for more depth. Fresh dill or mint adds a nice twist. Just chop them fine and mix them in. This will brighten the flavor and make your dish even more delightful. For the full recipe, check out the complete guide to making crispy baked falafel. {{image_2}} You can easily adapt baked falafel to fit different diets. For a gluten-free option, swap out the all-purpose flour for chickpea flour. This change keeps the falafel tasty and safe for those with gluten sensitivities. Just use the same amount of chickpea flour as the recipe calls for. If you're looking for vegan variations, you're in luck! The base of this recipe is already vegan. Just ensure you serve it with plant-based sauces like tahini. You can also add extra veggies to your falafel mix for added nutrients. Want to give your falafel a kick? Try making spicy baked falafel. Add a chopped jalapeño or a pinch of cayenne pepper to the mix. This addition gives the falafel a nice heat that pairs well with cooling sauces. For a Mediterranean-style twist, consider adding sun-dried tomatoes to your falafel mixture. This will give your falafel a tangy flavor that is delightful. You can chop them up and mix them in with the other ingredients. These variations help you explore different tastes while keeping the recipe simple. Try them out and see which ones you like best! For the full recipe, refer to the earlier sections. To keep your baked falafel fresh, store them in the fridge. Place them in an airtight container. They last up to four days this way. Make sure they cool completely before sealing. This prevents moisture buildup. For longer storage, you can freeze them. Wrap each falafel in plastic wrap. Then, place them in a freezer bag. They can stay in the freezer for up to three months. When it’s time to enjoy your falafel again, you have two good options: the oven or the microwave. The oven keeps them crispy. Preheat the oven to 350°F (175°C). Place the falafel on a baking sheet and heat for about 10-15 minutes. For a quick meal, use the microwave. Just remember, this method can make them softer. To keep them crispy, try reheating in a skillet. This adds a nice crunch back to the outside. Enjoy your crunchy falafel again! For the full recipe, check out the [Full Recipe]. How to make falafel from scratch? To make falafel from scratch, you need key ingredients. Start with a can of chickpeas. Rinse and drain them well. Then, blend the chickpeas with herbs like parsley and cilantro. Add onion, garlic, and spices for flavor. Mix in some flour and baking powder to help the falafel hold together. Shape the mixture into balls or patties, and bake them until crispy. Can I bake falafel without oil? You can bake falafel without oil, but it may not be as crispy. Oil helps create that crunchy texture. If you want to skip oil, form the falafel and bake them as is. Keep an eye on them, as they may need a little longer to brown. What to serve with baked falafel? Baked falafel pairs well with many things. You can serve them in warm pita bread. Add fresh veggies like lettuce, tomatoes, and cucumber. Drizzle tahini sauce or yogurt on top for added flavor. You can also enjoy them on a salad or with a side of hummus. Why are my falafel falling apart? Falafel may fall apart for a few reasons. If the mixture is too wet, they won’t hold shape. Be sure to drain the chickpeas well. Using enough flour helps bind the mixture. Also, do not overprocess it in the food processor. Keep some texture for better structure. How do I know when falafel is done baking? You can tell if falafel is done by its color and texture. They should be golden brown and crispy on the outside. If they feel firm to the touch, they are likely done. Bake for 25-30 minutes, flipping halfway through for even cooking. You now have a clear guide to making delicious falafel. We covered ingredients, step-by-step instructions, and helpful tips. Whether you prefer gluten-free or spicy versions, there’s an option for you. Store your falafel safely and reheat it right to keep it crisp. Enjoy your homemade falafel as a tasty snack or meal. With these tips, you can make perfect falafel every time. Now, it's time to get cooking and share your creations!](https://dailydishlab.com/wp-content/uploads/2025/07/105e670d-6b88-46d5-acd9-26b7b59cff64-768x768.webp)

![- 2 ripe avocados - 1 cup cherry tomatoes, halved - 1 cup fresh mozzarella balls, drained - 1/4 cup fresh basil leaves, chopped - 2 tablespoons balsamic glaze - 1 tablespoon extra virgin olive oil - Salt and pepper to taste Choosing ripe avocados To pick ripe avocados, look for ones that yield slightly to gentle pressure. They should feel soft but not mushy. Dark green or almost black skin often indicates ripeness. Selecting high-quality mozzarella When picking mozzarella, choose fresh balls packed in water for best taste. They should be creamy and slightly springy to the touch. Avoid dry or crumbly options. Best tomatoes for freshness Select plump cherry tomatoes that shine and feel firm. They should have a sweet smell. Avoid any with wrinkles or blemishes for the freshest results. You need a few tools for this recipe: - A sharp knife - A cutting board - A mixing bowl - A spoon - A serving plate When cutting avocados, safety is key. Always cut away from your body. Make sure you hold the avocado steady. Use a sharp knife to slice easily through the skin. First, cut each avocado in half and remove the pit. If you want more space for stuffing, scoop out a little flesh. Be careful not to break the skin. Next, take your mixing bowl. Combine the halved cherry tomatoes, mozzarella balls, and chopped basil. Now, drizzle the balsamic glaze and olive oil over the mix. Add salt and pepper to taste. Toss everything gently until coated. Then, spoon the mixture into each avocado half. Fill them generously; it makes a nice presentation. For a finishing touch, drizzle a little extra balsamic glaze on top. This adds a nice shine and flavor. To serve, place your stuffed avocados on a colorful plate. This makes the dish pop! For added flair, garnish with extra basil leaves. A sprinkle of cracked black pepper also enhances the look and taste. Enjoy this healthy and flavorful delight! For the full recipe, check out the details above. When making Caprese stuffed avocados, avoid these common mistakes: - Over-mashing the avocado: You want the avocado to be creamy but still chunky. If you mash it too much, the texture will not hold up. - Using unripe ingredients: Always choose ripe avocados and fresh tomatoes. Unripe avocados can ruin the dish. To make your Caprese stuffed avocados even better, try these tips: - Additional spices and herbs: Add a pinch of garlic powder or crushed red pepper for a kick. Fresh oregano can also complement the flavors well. - Variations with cheese types: Instead of mozzarella, try feta or goat cheese for a different flavor profile. Each cheese brings its own texture and taste. Pair your Caprese stuffed avocados with these ideas: - Best pairings as side dishes: Serve with a light salad or crusty bread. These will balance the richness of the avocado. - Ideal occasions for serving: This dish works great for summer picnics, brunches, or casual dinners. The bright colors and fresh flavors make it a showstopper. Remember, you can find the full recipe for Caprese stuffed avocados [here]. {{image_2}} You can change up the cheese or protein in your Caprese stuffed avocados. For cheese, try feta or goat cheese. Both add a nice twist to the dish. If you want extra protein, consider adding grilled chicken or chickpeas. These swaps keep the meal tasty and fun. If you run out of balsamic glaze, you can use a mix of vinegar and honey. This gives you a sweet and tangy flavor. You can also try lemon juice for a fresher taste. These alternatives work well and keep your dish exciting. Making this dish gluten-free is easy. All the ingredients are naturally gluten-free. Just make sure any add-ins you choose are also gluten-free. If you want a vegan version, swap mozzarella for a vegan cheese. You can also use tofu for extra protein. To lower calories, skip the cheese or use less. You can also reduce oil and glaze. This keeps the taste without too many calories. Enjoy your healthy meal without losing flavor. To give your Caprese stuffed avocados an Italian flair, add sun-dried tomatoes or prosciutto. These ingredients bring rich flavors that fit perfectly with the original recipe. For a Mediterranean twist, add olives or artichokes. These ingredients make your dish even more vibrant. You can also use herbs like oregano or thyme for added depth. Each variation keeps your meal fresh and packed with flavor. For the full recipe, check out Caprese Stuffed Avocados. To store leftover stuffed avocados, place them in an airtight container. This keeps them fresh longer. It's best to eat them within a day. If you have extra filling, store it in a small bowl. Cover it tightly with plastic wrap. This keeps the mixture fresh for a few days. For the best taste, eat the filling within three days. Can you freeze stuffed avocados? I recommend not freezing them. The texture of the avocado changes when frozen. However, you can freeze the filling. To do this, place it in a freezer-safe bag. Squeeze out the air before sealing. It can last up to three months in the freezer. When you're ready to eat, thaw it in the fridge overnight. How long can leftovers last? Stuffed avocados are best enjoyed fresh. If stored properly, they last about a day. The filling can last longer, about three days in the fridge. Look for signs of spoilage. If you see mold or an off smell, discard it. Fresh ingredients like tomatoes can spoil quickly, so check them often. To find the best avocados, look for a few signs. First, gently squeeze the avocado in your palm. It should feel slightly soft but not mushy. Next, check the skin color. A dark green or black skin often means it's ripe. Finally, look at the stem. If it comes off easily and reveals green underneath, the avocado is ready. Yes, you can prepare some parts in advance. Chop the tomatoes and basil and mix them with mozzarella. Store this mix in the fridge. Cut the avocados just before serving. This keeps them fresh and tasty. You can also make the balsamic glaze in advance and store it in a jar. To stop avocados from turning brown, use lemon or lime juice. Brush the juice on the cut sides. If your avocado is already brown, you can scoop out the brown part. The green flesh underneath is still good to eat. Store any leftovers in an airtight container to slow down oxidation. This blog post covered a delicious stuffed avocado recipe, highlighting key ingredients, tips for freshness, and easy steps. I shared tricks to enhance flavor, avoid common mistakes, and offered variations for everyone. Remember, using ripe ingredients makes a big difference. You can also adjust the recipe to fit your diet or taste. Enjoy experimenting with this fresh and healthy dish in your kitchen! Embrace the joy of cooking while making something tasty and fun. Happy cooking!](https://dailydishlab.com/wp-content/uploads/2025/06/7cc9200a-b80e-4e13-a62f-626088c82c0b-768x768.webp)