

Are you ready to indulge in a tasty vegan treat? Air Fryer Honey Garlic Tofu Nuggets pack big flavor in every bite. This easy recipe combines crispy tofu and a sweet, savory sauce. I’ll guide you through simple steps to perfect these bites, plus share tips on variations and storage. Whether you’re a tofu newbie or a veggie lover, you’ll want to make these nuggets again and again!
Why I Love This Recipe
- Delicious Flavor Combination: The blend of honey, garlic, and ginger creates a mouthwatering taste that satisfies any craving.
- Crispy Texture: The cornstarch coating ensures that the tofu nuggets come out perfectly crispy in the air fryer, making them irresistible.
- Healthy Alternative: These tofu nuggets are a nutritious option, packed with protein and lower in calories compared to traditional fried snacks.
- Quick and Easy: This recipe can be prepared in just 45 minutes, making it a simple yet impressive dish for busy weeknights.
Ingredients
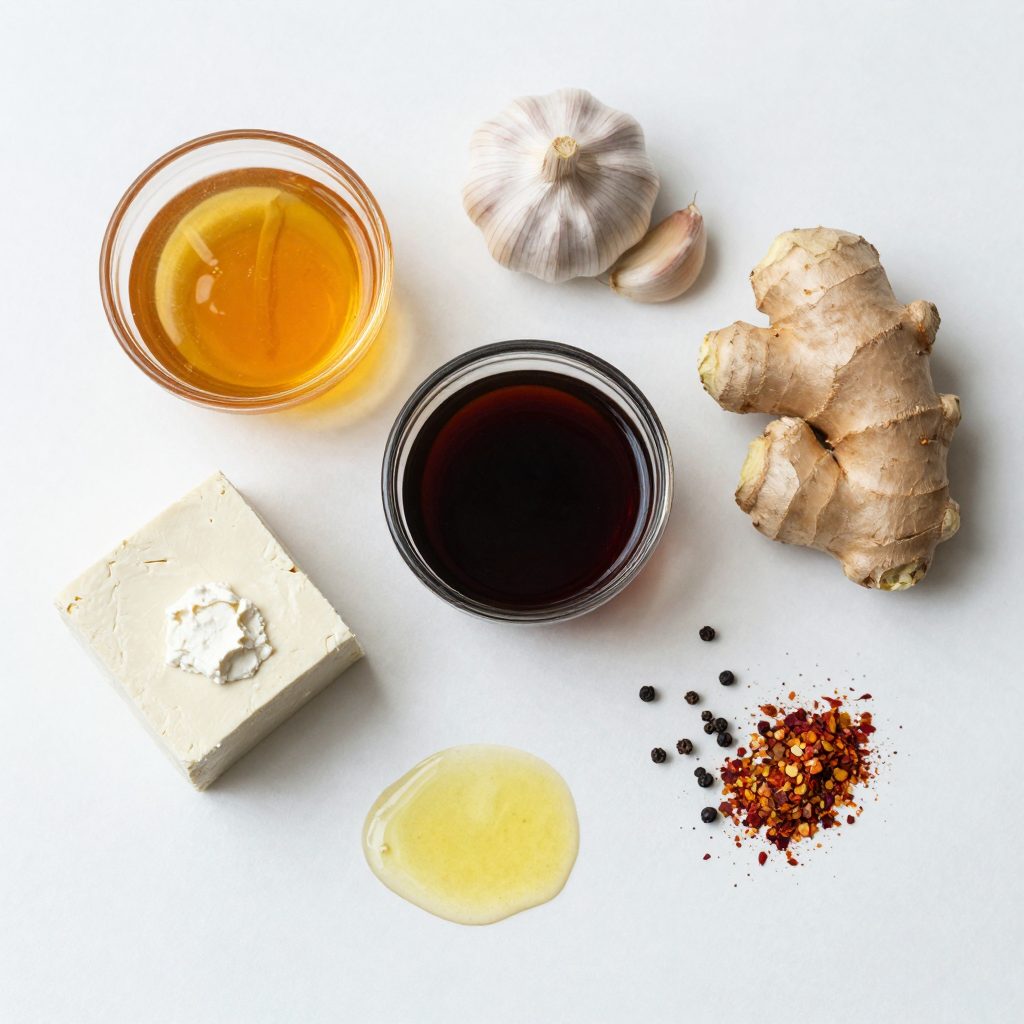
Main Ingredients
– 1 block (14 oz) firm tofu, drained and pressed
– 1/4 cup honey (or agave syrup for a vegan option)
– 3 tablespoons soy sauce
– 3 cloves garlic, minced
– 1 tablespoon grated ginger
– 2 tablespoons cornstarch
– 1 teaspoon sesame oil
– 1/2 teaspoon black pepper
– 1/4 teaspoon red pepper flakes (optional for spice)
– Cooking spray (for the air fryer)
The main ingredients make the base of your dish. Tofu is your protein. Honey or agave gives sweetness. Soy sauce adds saltiness. Garlic and ginger bring wonderful flavors. Cornstarch will help create a nice crunch.
Optional Ingredients for Variation
You can mix things up with these options. Consider adding chopped green onions for freshness. Sesame seeds can give a nice crunch and look. A splash of lime juice can add brightness.
Recommended Dipping Sauces
These sauces pair well with your nuggets. Sweet chili sauce adds a spicy kick. Soy sauce with a hint of lime is refreshing. You can also try sriracha for a hot touch. Each sauce will enhance your tasty vegan treat.
Step-by-Step Instructions
Preparing the Tofu
Start with a block of firm tofu. Drain it well and press it to remove excess water. This step is key to getting a great texture. Next, cut the pressed tofu into bite-sized nuggets. Aim for pieces that are about one inch. This size helps them cook evenly. After cutting, pat the nuggets dry with a paper towel. This removes any leftover moisture and helps them crisp up.
Creating the Marinade
In a medium bowl, combine the following:
– 1/4 cup honey (or agave syrup for vegan)
– 3 tablespoons soy sauce
– 3 cloves garlic, minced
– 1 tablespoon grated ginger
– 1 teaspoon sesame oil
– 1/2 teaspoon black pepper
– 1/4 teaspoon red pepper flakes (optional for spice)
Mix all ingredients well. The honey or agave gives sweetness. The soy sauce adds saltiness, while garlic and ginger bring freshness. This marinade is full of flavor and makes the tofu taste amazing.
Air Frying Instructions
Once the tofu is marinated, it’s time to coat it with cornstarch. Sprinkle 2 tablespoons of cornstarch over the tofu nuggets. Toss gently until each piece is evenly coated. This step is important for achieving that crispy outside.
Next, preheat your air fryer to 375°F (190°C). This usually takes about five minutes. Lightly spray the air fryer basket with cooking spray. This helps prevent sticking. Place the tofu nuggets in a single layer in the basket. If you have a lot, cook in batches to avoid crowding.
Air fry the nuggets for 12-15 minutes. Flip them halfway through to ensure even cooking. You want them to be golden and crispy when done. Once finished, remove the nuggets from the air fryer. If you like, drizzle any leftover marinade on top. Serve hot with sweet chili sauce or your favorite dip.
Pro Tips
- Press Tofu Thoroughly: Ensure your tofu is well-pressed to remove excess moisture, which helps achieve a crispier texture when cooked.
- Customize the Marinade: Feel free to experiment with the marinade by adding different spices or herbs to suit your taste preferences.
- Don’t Overcrowd the Air Fryer: Cook the tofu nuggets in batches if necessary to allow for even cooking and crisping.
- Serve with Dipping Sauces: Pair your nuggets with a variety of dipping sauces, such as sweet chili sauce or a tangy soy sauce for added flavor.
Tips & Tricks
Best Tofu Types for Nuggets
For the best nuggets, use firm or extra-firm tofu. This type holds its shape well during cooking. Silken tofu can fall apart, so it’s not a good choice. Press the tofu to remove extra water. This step helps the nuggets absorb more flavor and stay crispy.
Enhancing Flavor with Additional Spices
To boost the taste, add spices like smoked paprika or onion powder. A dash of cayenne pepper can add heat. You can also mix in fresh herbs, like cilantro or basil, for a fresh kick. Don’t be afraid to get creative! Each spice adds a unique twist to the dish.
Achieving Perfect Crispiness
Coating the tofu with cornstarch is key to crispiness. It creates a crunchy shell when air-fried. Make sure each piece is evenly coated. Also, avoid overcrowding the air fryer basket. Air needs space to circulate for that perfect golden color. Flip the nuggets halfway through cooking for even crispiness.
Variations
Vegan Alternatives
You can make this recipe vegan by swapping honey with agave syrup. Agave gives a similar sweetness without using animal products. It blends well with the soy sauce and garlic. This choice keeps your dish tasty and plant-based. You can also use maple syrup if you want a different flavor. Both work great in this recipe.
Spicy Honey Garlic Tofu Nuggets
If you like heat, add red pepper flakes to the marinade. Start with half a teaspoon and adjust to your taste. You can also mix in some sriracha or chili sauce. This gives your nuggets a nice kick. The spicy flavor pairs well with the sweet honey. It makes for a delicious balance that will thrill your taste buds.
Adding Vegetables for Nutrition
You can boost the nutrition of your nuggets by adding veggies. Try mixing in finely chopped bell peppers or carrots in the marinade. You can also serve the nuggets with a side of steamed broccoli. This extra crunch and color make your meal more appealing. Plus, it adds vitamins and minerals to your dish.
Storage Info
Storing Leftovers
Tofu nuggets are best fresh, but you can store leftovers. Place the cooled nuggets in an airtight container. Keep them in the fridge for up to three days. Make sure they are completely cool before sealing to prevent sogginess.
Reheating Tips
Reheating is easy. For the best texture, use the air fryer again. Set it to 350°F (175°C) for about 5 minutes. This method keeps them crispy. You can also use a regular oven at the same temperature for a few minutes. If you’re in a hurry, the microwave works, but they may lose some crispiness.
Freezing Options
You can freeze cooked tofu nuggets for later use. First, let them cool completely. Then, place them in a single layer on a baking sheet. Freeze for about an hour until firm. After that, transfer them to a freezer bag. They can last up to three months in the freezer. When ready to eat, thaw in the fridge overnight and reheat as mentioned above.
FAQs
Can I use other sweeteners instead of honey?
Yes, you can! Agave syrup works well as a vegan swap. Maple syrup also adds a nice flavor. Both options will keep your nuggets sweet and tasty. Just use the same amount as honey.
How do I make these nuggets gluten-free?
To make these nuggets gluten-free, choose gluten-free soy sauce. Look for tamari, which is a great option. Ensure your cornstarch is also gluten-free, as most brands are. This way, you enjoy the same great taste without gluten.
What dipping sauces pair well with honey garlic tofu nuggets?
These nuggets taste amazing with various dipping sauces. Sweet chili sauce adds a nice kick. You can also try soy sauce mixed with a bit of vinegar. For a zing, use sriracha or a creamy vegan ranch. Each sauce complements the honey garlic flavor perfectly.
In this blog post, I covered how to make tasty tofu nuggets. We looked at main and optional ingredients, plus great sauces for dipping. I shared step-by-step instructions for preparing, marinating, and air frying the tofu. Importantly, I offered tips on the best tofu types and flavor boosters for crispiness. We explored fun variations like spicy nuggets and veggie adds. Finally, I shared smart storage and reheating tips. Now you can enjoy these delicious nuggets anytime!


