
Are you ready to make the crispiest, most flavorful Air Fryer Lemon Pepper Wings? This easy recipe will have your taste buds dancing with every bite. With just a few simple ingredients and a bit of time, you can create a dish that’s perfect for game day or a fun family dinner. Let’s dive into how to make these mouthwatering wings that everyone will love!
Why I Love This Recipe
- Easy Preparation: This recipe requires minimal ingredients and just a few simple steps, making it perfect for a weeknight dinner.
- Crispy Texture: The air fryer creates a delightful crispy exterior without the need for deep frying, keeping it healthier.
- Flavor Explosion: The lemon pepper seasoning combined with garlic and smoked paprika delivers a burst of flavor that’s hard to resist.
- Perfect for Any Occasion: These wings are great for game days, parties, or simply as a tasty snack to enjoy at home.
Ingredients
Main Ingredients
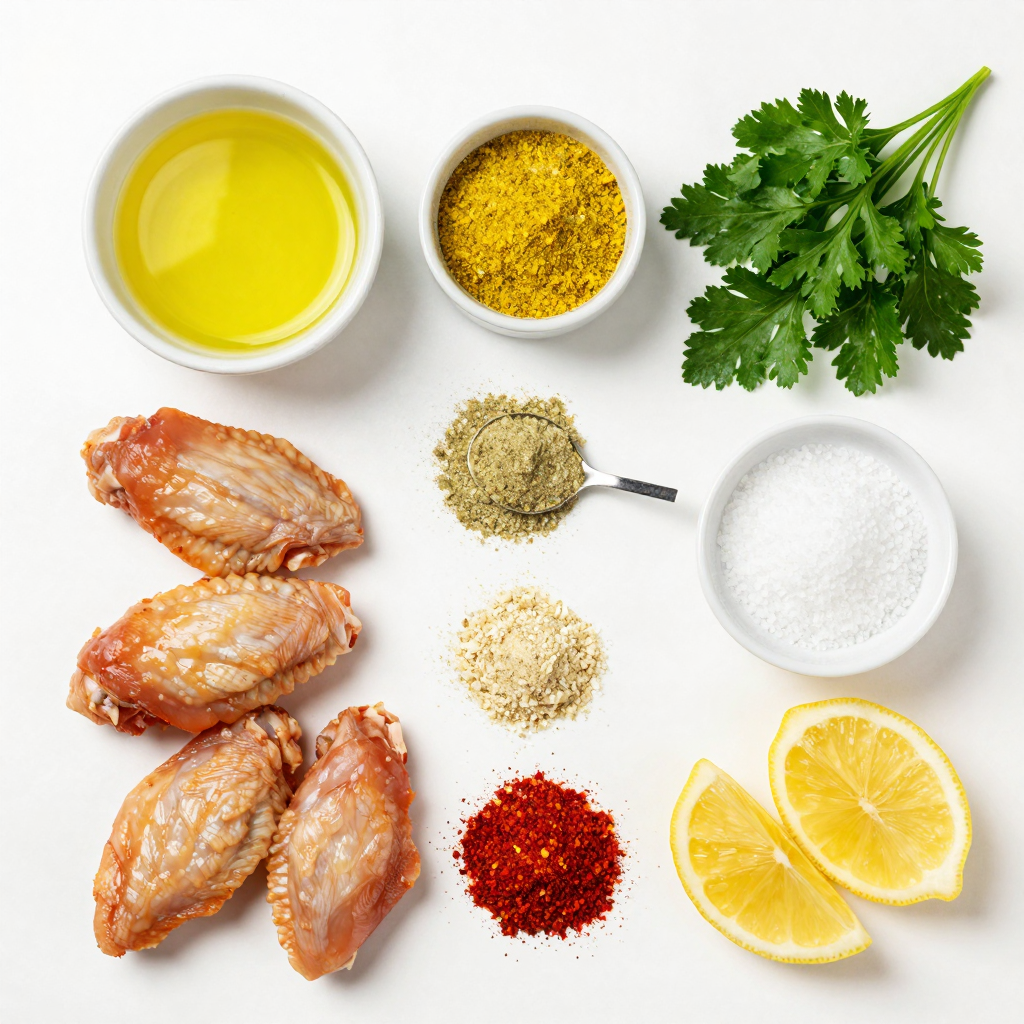
– 2 lbs chicken wings, cleaned and pat dry
– 2 tablespoons olive oil
– 2 tablespoons lemon pepper seasoning
The main stars of this dish are chicken wings, which I always choose for their flavor and texture. I rinse them well and pat them dry to get rid of extra moisture. This helps the wings become crispy in the air fryer. Next, I add olive oil. It keeps the wings moist and helps the seasonings stick well. Finally, lemon pepper seasoning gives the wings a zesty kick.
Additional Seasonings
– 1 teaspoon garlic powder
– 1 teaspoon onion powder
– 1 teaspoon smoked paprika
– Salt to taste
These seasonings add layers of flavor to the wings. Garlic and onion powders bring depth, while smoked paprika adds a subtle smokiness. I sprinkle salt to enhance all the flavors and make them pop. You can adjust these seasonings based on your taste.
Garnishes
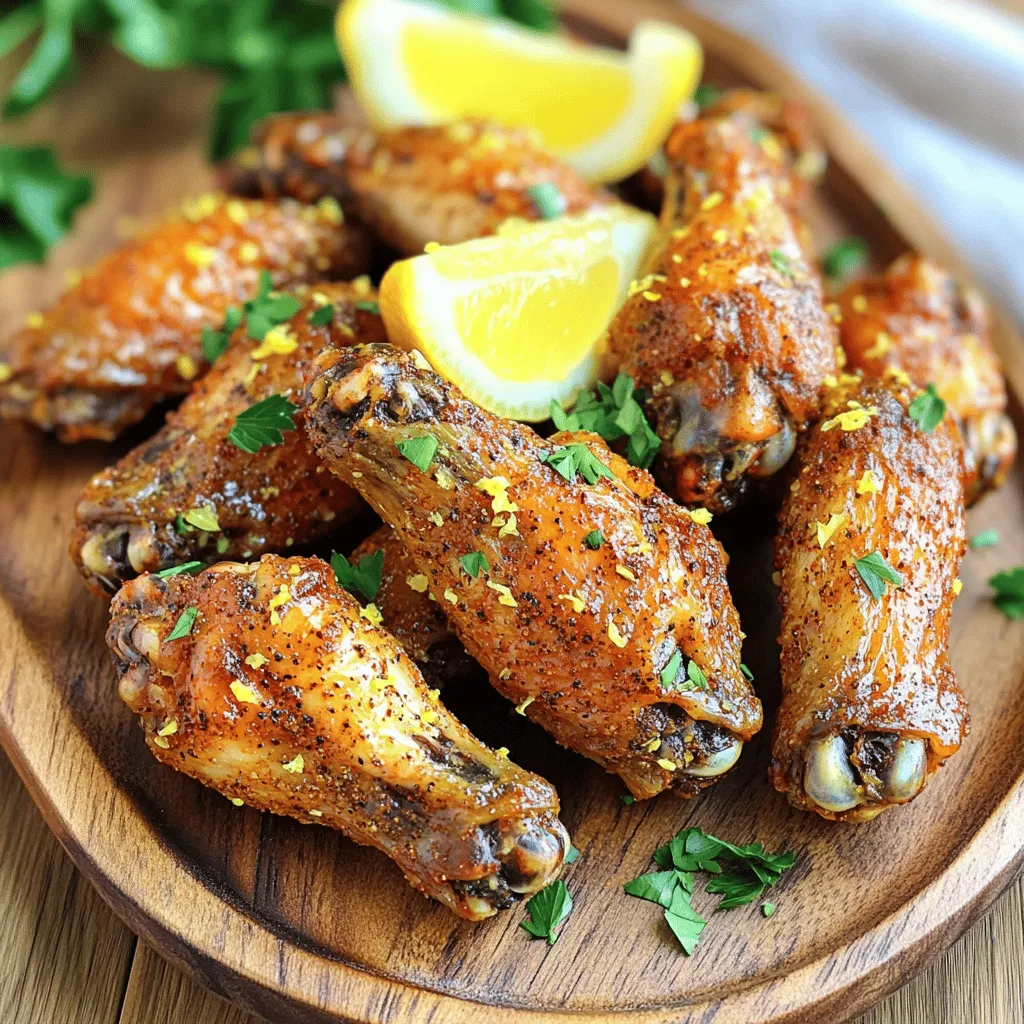
– Fresh lemon wedges
– Chopped parsley
To finish the dish, I use fresh lemon wedges. They add brightness and can be squeezed over the wings. Chopped parsley gives a nice pop of color and freshness. It makes the dish look appealing and inviting.
Step-by-Step Instructions
Preparation Steps
First, you need to clean and dry the chicken wings. Rinse them under cold water and pat them dry with paper towels. This step helps to remove any excess moisture. Dry wings will crisp up better in the air fryer.
Next, mix the ingredients in a bowl. In a large mixing bowl, add the chicken wings. Pour in the olive oil, lemon pepper seasoning, garlic powder, onion powder, smoked paprika, and salt. Toss everything together. Make sure the wings are evenly coated with the mix. This will give them a great flavor.
Air Frying Process
Now, preheat your air fryer. Set it to 400°F (200°C) and let it warm up for about 5 minutes. This step ensures the wings cook evenly.
After preheating, arrange the wings in the basket. Place the seasoned chicken wings in a single layer. Be careful not to overcrowd the basket. If needed, you can cook them in batches.
Cooking Time
For the air frying duration and temperature, cook the wings at 400°F (200°C) for 25 to 30 minutes. This will make them nice and crispy.
Make sure to flip the wings halfway through. This helps them cook evenly on both sides. Use tongs to turn them gently. Once they are golden brown, they are ready to enjoy!
Pro Tips
- Use Dry Wings: Make sure your chicken wings are thoroughly patted dry before seasoning to achieve maximum crispiness.
- Batch Cooking: If cooking a large amount, air fry in batches to avoid overcrowding, which can lead to uneven cooking.
- Marinate for Flavor: For deeper flavor, consider marinating the wings in the seasoning and olive oil for at least 30 minutes before air frying.
- Check for Doneness: Use a meat thermometer to ensure the internal temperature of the wings reaches 165°F (74°C) for safe consumption.
Tips & Tricks
Achieving Crispy Wings
To get crispy wings, do not overcrowd the basket. If you add too many wings, they will steam instead of fry. Cook in batches if needed. Each wing should have space to breathe. This helps them crisp up nicely. If you like them extra crispy, adjust the cook time. Try adding a few more minutes to the timer. Just keep an eye on them to avoid burning.
Flavor Enhancements
Want to boost the flavor? You can add other spices or marinades. Try cayenne pepper for heat or honey for sweetness. You can even mix in some soy sauce for a savory twist. Adjust the lemon pepper seasoning to suit your taste. If you want a zesty kick, add more lemon zest. Experiment with flavors until you find your perfect blend.
Serving Suggestions
For side dishes, think about fresh veggies or a light salad. Celery sticks and carrot sticks pair well. If you want something warm, serve with garlic bread or rice. For garnish, use fresh lemon wedges and chopped parsley. They add color and freshness to your plate. You can also try serving with a tangy dipping sauce for extra flavor. Enjoy your meal with friends or family!
Variations
Flavor Variations
You can add some fun to your lemon pepper wings. Here are two great ideas:
– Spicy lemon pepper wings: Add some heat with cayenne pepper or chili powder. Mix it into your seasoning blend. This gives a nice kick.
– Honey lemon pepper wings: Drizzle honey over the wings before cooking. This adds a sweet touch that pairs well with the lemon.
Cooking Method Alternatives
If you want to try new methods, here are two options:
– Oven-baked lemon pepper wings: Preheat your oven to 425°F (220°C). Spread the wings on a baking sheet. Bake for about 30-35 minutes. Flip them halfway for even crispiness.
– Grilled lemon pepper wings: Marinate your wings in lemon pepper seasoning. Grill them over medium heat for 20-25 minutes. This gives a smoky flavor that is hard to resist.
Dietary Adjustments
You can easily tweak the recipe to fit your needs:
– Gluten-free options: Ensure your lemon pepper seasoning is gluten-free. Most brands are, but check the label to be sure.
– Low-sodium alternatives: Use salt-free lemon pepper seasoning. This helps reduce sodium while keeping the flavor strong.
Storage Info
Refrigerating Leftovers
When you have leftover lemon pepper wings, store them in proper containers. Use airtight containers to keep them fresh. You can also wrap them in plastic wrap. Store the wings in the fridge for up to three days. This way, they stay tasty and safe to eat.
Freezing Instructions
To freeze lemon pepper wings, let them cool first. Place the wings in a single layer on a baking sheet. Freeze them for a couple of hours. Once frozen, transfer them to a freezer bag. Remove as much air as you can. They will last for up to three months. When ready to eat, thaw them overnight in the fridge.
Reheating Tips
For reheating, the best method is to use the air fryer again. Preheat it to 375°F (190°C). Place the wings in the basket in a single layer. Reheat for about 10 minutes. Flip them halfway for even crispiness. You can also use an oven if you prefer. Just remember, reheating in the air fryer keeps them crispy and delicious.
FAQs
Can I use frozen chicken wings for this recipe?
Yes, you can use frozen chicken wings. First, thaw them in the fridge overnight. If you’re short on time, place them in a sealed bag and submerge them in cold water for about an hour. Once thawed, dry them well with paper towels. This step is key to getting crispy wings. You may need to add a few extra minutes to the cooking time. Check the wings at 30 minutes to ensure they are fully cooked and crispy.
How do I store leftover air fryer lemon pepper wings?
To store leftover wings, place them in an airtight container. Make sure they are cool before sealing. Store them in the fridge for up to three days. If you want to keep them longer, freeze them. Use freezer bags or containers. They can last up to three months in the freezer. When you want to eat them, thaw in the fridge. Reheat them in the air fryer to keep them crispy.
What can I serve with lemon pepper wings?
Lemon pepper wings pair well with many sides. Here are some ideas:
– Celery sticks and carrot sticks
– Ranch or blue cheese dressing for dipping
– French fries or sweet potato fries
– A fresh salad with lemon vinaigrette
– Garlic bread or toasted rolls
These sides will add variety and balance to your meal. Enjoy experimenting with different combinations!
In this post, we explored how to make delicious air fryer lemon pepper wings. We covered the main ingredients like chicken wings and lemon pepper seasoning. I shared step-by-step instructions for preparation and cooking. Tips on achieving crispiness and flavor variations added extra value.
These wings are simple to make and delightfully tasty. Try out the recipe, test different flavors, and enjoy your meal! Cooking can be fun and rewarding when you know what to do.


