

Are you ready to enjoy a delicious, crispy snack? My Air Fryer Sesame Crusted Tofu Bites are not just tasty—they’re also easy to make! With just a few simple ingredients, you’ll create a crunchy delight that everyone loves. Let’s dive into this fun recipe that transforms plain tofu into a flavorful treat. Grab your air fryer, and let’s get cooking!
Why I Love This Recipe
- Flavor Explosion: The combination of tahini, soy sauce, and sesame oil creates a rich, nutty flavor that elevates the tofu to new heights.
- Crispy Texture: Air frying gives these tofu bites a delightful crunch without the need for deep frying, making them a healthier option.
- Quick and Easy: This recipe comes together in under an hour, making it a perfect choice for quick weeknight dinners or appetizers.
- Versatile Dish: These tofu bites can be served as a main dish, a snack, or an appetizer, and pair well with various dipping sauces.
Ingredients
Main Ingredients
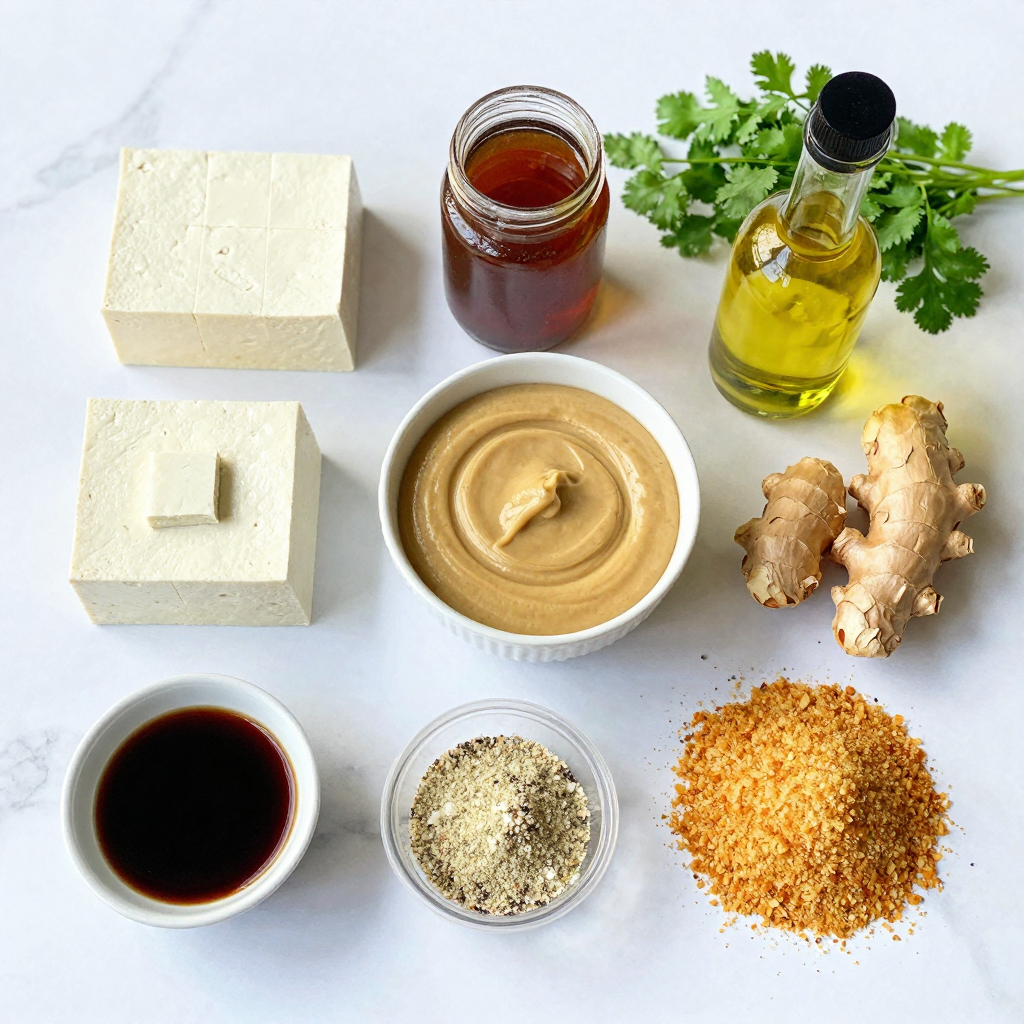
– 14 oz firm tofu
– 1/2 cup tahini
– 2 tablespoons soy sauce
– 1 tablespoon maple syrup
Additional Flavorings
– 1 tablespoon sesame oil
– 1 teaspoon garlic powder
– 1 teaspoon ground ginger
Coating and Garnish
– 1 cup panko breadcrumbs
– 1/4 cup sesame seeds
– Fresh cilantro (optional)
– Salt and pepper to taste
To make Air Fryer Sesame Crusted Tofu Bites, gather the ingredients listed above. Start with firm tofu. It’s the best choice for this recipe. The tofu needs to be pressed first. This step removes extra moisture and helps it become crispy.
Next, tahini gives a rich, creamy flavor. Soy sauce adds a salty kick. Maple syrup brings a hint of sweetness. The sesame oil enhances the nutty taste. Garlic powder and ground ginger add depth to the marinade.
For the coating, panko breadcrumbs create a great crunch. The sesame seeds add a lovely texture and flavor. You can garnish with fresh cilantro for color and taste.
Remember to season with salt and pepper to your liking. These ingredients come together to create a delicious snack or appetizer.
Step-by-Step Instructions
Preparing the Tofu
– Pressing the tofu: Start by pressing the tofu. Wrap the block in a clean towel. Place a weight on top for 15-20 minutes. This step removes excess moisture. It helps the tofu absorb flavors better.
– Cutting into bite-sized pieces: After pressing, cut the tofu into small cubes. Aim for 1-inch pieces. This size allows for even cooking and easy eating.
Making the Marinade
– Whisking the marinade ingredients: In a medium bowl, whisk together the tahini, soy sauce, maple syrup, sesame oil, garlic powder, and ground ginger. Add salt and pepper to taste. Mix until smooth. This marinade gives the tofu rich flavor.
Coating and Cooking
– Tossing the tofu in the marinade: Place the cubed tofu in the bowl with the marinade. Gently toss to coat each piece well. Let it sit for at least 15 minutes. This time allows the tofu to soak in all the flavors.
– Coating with panko and sesame seeds: In another bowl, mix the panko breadcrumbs and sesame seeds. Take each marinated tofu cube and dip it into this mixture. Press gently so the crumbs stick well. This will give a nice crunchy layer.
– Preheating the air fryer: Preheat your air fryer to 375°F (190°C). This step is key for even cooking.
– Air frying the tofu bites: Place the coated tofu bites in the air fryer basket. Ensure they are in a single layer, not crowded. Cook for 15-20 minutes. Flip them halfway for even crisping. They should turn golden brown and crispy. Enjoy the delightful crunch!
Pro Tips
- Press Tofu Properly: Ensure to press the tofu for at least 15-20 minutes to remove excess moisture, which helps in achieving a crispier texture when air-fried.
- Marinate Longer: For deeper flavor, allow the tofu to marinate for 30 minutes or longer if time permits. This enhances the taste significantly.
- Use Fresh Ingredients: Fresh garlic and ginger can elevate the flavor profile of your tofu bites. Consider using freshly minced garlic and grated ginger instead of powdered.
- Monitor Cooking Time: Keep an eye on the tofu bites as they cook, as air fryers can vary in efficiency. Adjust cooking time as necessary to achieve the perfect golden brown color.
Tips & Tricks
Achieving the Perfect Crispy Texture
To get that perfect crunch, follow these steps:
– Coating: Make sure to coat each tofu cube well with the marinade. Let it soak for at least 15 minutes. This step helps the flavors stick.
– Panko Mixture: When you dip the marinated tofu into the panko and sesame seeds, press down gently. This helps the coating stay on during cooking.
– Air Fryer Settings: Preheat your air fryer to 375°F (190°C). This ensures the tofu bites cook evenly and get crispy. Air fry for 15-20 minutes. Flip halfway for even browning.
Flavor Enhancements
To make these bites even better, try these ideas:
– Marinades: You can add different spices or herbs. Consider adding a little chili powder for some heat. Or use lime juice for a fresh twist.
– Sauces: Pair these bites with dipping sauces like sriracha or sweet chili sauce. The flavors mix well and add excitement.
Serving Suggestions
When serving, presentation matters:
– Plating: Arrange the tofu bites on a nice platter. Add fresh cilantro on top for color. This makes the dish look inviting.
– Side Dishes: Serve with a fresh salad or steamed veggies. This adds balance to the meal and makes it more filling.
Variations
Different Protein Options
You can switch up the protein in this recipe. Tempeh works well instead of tofu. It has a firmer texture and adds a nutty flavor. If you prefer meat, try chicken or fish. Both options can soak up the marinade nicely. Just adjust the cooking time based on the protein you choose. Chicken pieces may need a few more minutes to cook through.
Flavor Variants
Experiment with different flavors to keep it exciting. Add some Asian-inspired seasonings like five-spice powder or chili flakes for extra kick. You could also try a sweet twist by adding honey or more maple syrup. This gives the tofu a nice glaze. Don’t be afraid to mix and match spices to find your favorite flavor combo.
Dietary Adaptations
If you need gluten-free options, use gluten-free panko breadcrumbs. They provide the same crunch without the gluten. For nut-free needs, simply omit the tahini. Instead, use sunflower seed butter or yogurt as a marinade base. These swaps keep the dish delicious while meeting your dietary needs.
Storage Info
Storing Leftovers
To store your leftover Air Fryer Sesame Crusted Tofu Bites, place them in an airtight container. Keep the container in the refrigerator for up to three days. This helps maintain their flavor and texture. If you’d like to keep them longer, you can freeze them. To freeze, place the tofu bites in a single layer on a baking sheet. Freeze until solid, then transfer them to a freezer bag. They will last up to three months in the freezer.
Reheating Instructions
To reheat the tofu bites without losing their crispiness, use the air fryer or oven. Set your air fryer to 350°F (175°C). Place the tofu bites in the basket and heat for about 5 to 7 minutes. This method keeps them crispy. If using an oven, preheat it to 375°F (190°C) and bake for about 10 minutes. Flip them halfway to ensure even heating.
Serving After Storage
When serving leftover tofu bites, consider refreshing their flavor. You can add a sprinkle of fresh cilantro or a drizzle of sesame oil. Pair them with a spicy dipping sauce, like sriracha or sweet chili sauce, to enhance the taste. This makes your meal feel fresh and exciting, even the second time around!
FAQs
Can I use extra-firm tofu?
Yes, you can use extra-firm tofu. Extra-firm tofu has a lower moisture content. This makes it more resilient during cooking. It holds its shape well and gives a firmer bite. Firm tofu works too, but it may absorb more marinade. Both types are great for this recipe.
How long do I need to marinate the tofu?
I recommend marinating the tofu for at least 15 minutes. This time allows the tofu to soak up the flavors. For even better taste, you can marinate it longer, up to an hour. The longer it sits, the more intense the flavor will be.
What dipping sauces pair well with these bites?
I love serving these tofu bites with sriracha or sweet chili sauce. They add a nice kick and balance the sesame flavor. You can also try peanut sauce or soy sauce for a classic touch. Each sauce brings its own unique taste that pairs well with the bites.
You learned how to make crispy air-fried tofu bites using simple ingredients. From the crunchy panko coating to delicious marinades, each step adds flavor and texture. With tips for perfecting the dish and variations for every taste, your options are endless. Remember to store leftovers properly and reheat them to keep their crispy goodness. Enjoy experimenting with this recipe and make it your own!


