

Craving a crunchy, flavorful snack? Let’s dive into the wonderful world of Air Fryer Sesame Tofu Bites! Made with just a handful of simple ingredients, these bites are a perfect mix of crispy and tasty. Whether you’re a tofu lover or just curious, this recipe is easy and fun. Get ready to impress your friends and family with a healthy treat that’s as delightful to make as it is to eat!
Why I Love This Recipe
- Flavorful Marinade: The combination of soy sauce, sesame oil, and maple syrup creates a deliciously addictive flavor that perfectly complements the tofu.
- Crispy Texture: Air frying the tofu gives it a wonderfully crispy exterior while keeping the inside tender, making each bite satisfying.
- Quick and Easy: This recipe takes only 30 minutes from start to finish, making it a perfect choice for a quick weeknight meal or snack.
- Customizable: You can easily adjust the marinade ingredients or add your favorite spices to suit your taste preferences, making this recipe versatile.
Ingredients
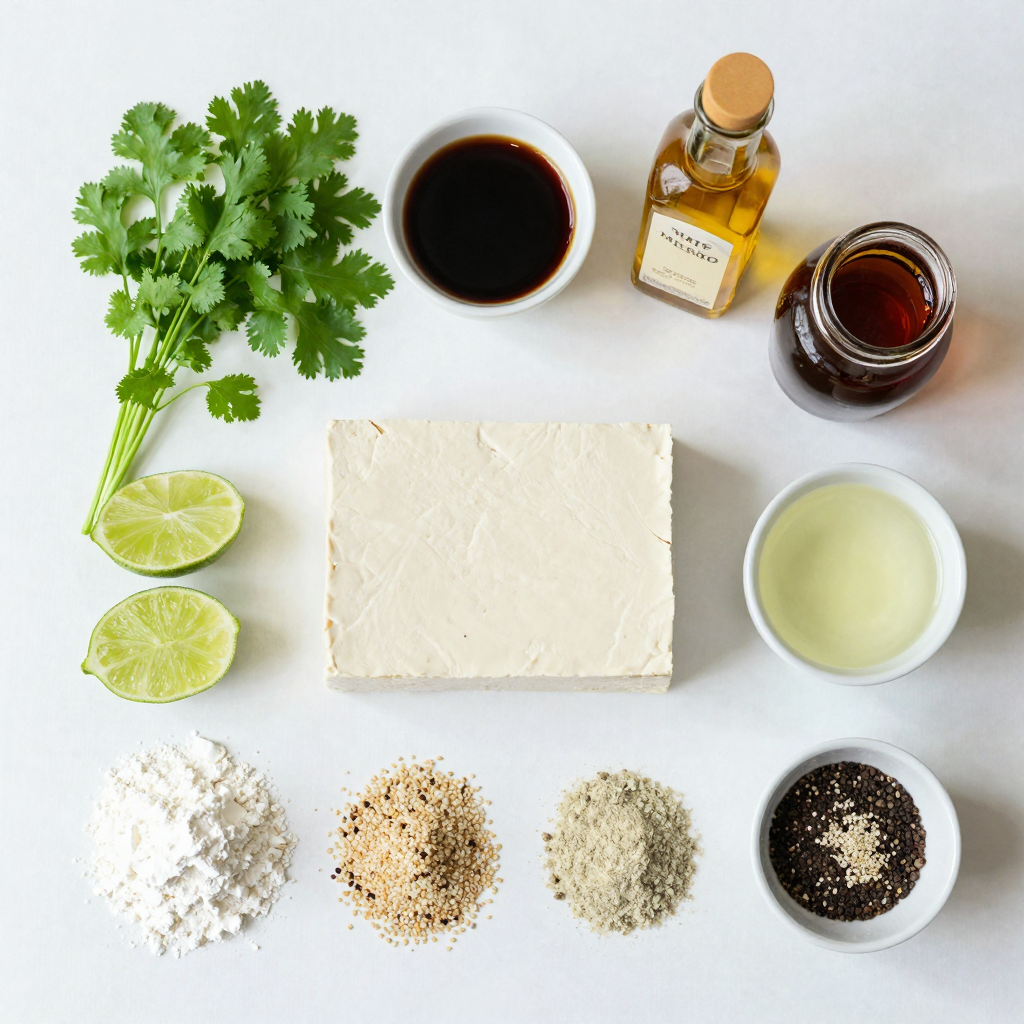
Main Ingredients
– Firm tofu (14 oz block)
– Soy sauce (or tamari for gluten-free)
– Sesame oil
– Maple syrup or honey
Coating Ingredients
– Cornstarch
– Sesame seeds (white or mixed)
– Garlic powder
– Onion powder
– Ground black pepper
Garnish and Serving
– Fresh cilantro, chopped
– Lime wedges
To make air fryer sesame tofu bites, you need some key ingredients. Start with a block of firm tofu. This helps keep its shape when cooking. Next, grab soy sauce or tamari if you want a gluten-free option. Sesame oil adds a tasty touch, while maple syrup or honey gives a hint of sweetness.
For coating, gather cornstarch, sesame seeds, garlic powder, onion powder, and ground black pepper. These will create a crispy outer layer that adds flavor and crunch. Finally, fresh cilantro and lime wedges make great garnishes. They add color and freshness to your dish.
With these ingredients, you can create a snack that is both crispy and full of flavor.
Step-by-Step Instructions
Preparing the Tofu
First, you need to press the tofu. Wrap the block in a clean towel. Place something heavy on top for about 15 minutes. This step helps to remove extra moisture. Once pressed, cut the tofu into bite-sized cubes. Aim for pieces that are about one inch each. This size helps them cook evenly.
Making the Marinade
Next, let’s make the marinade. In a bowl, whisk together the soy sauce, sesame oil, maple syrup, and rice vinegar. Mix until everything blends well. This mixture adds a nice flavor to your tofu.
Marinating the Tofu
Now, it’s time to marinate the tofu. Place the cubed tofu into the bowl with the marinade. Gently toss to coat each piece. Let the tofu marinate for at least 15 minutes. This allows the tofu to absorb all those tasty flavors.
Coating Process
In another bowl, mix the cornstarch, sesame seeds, garlic powder, onion powder, and black pepper. Combine these dry ingredients well. Take the marinated tofu and toss it in this mix. Make sure each piece is fully coated. This coating gives the tofu a crispy texture when cooked.
Air Frying Instructions
Preheat your air fryer to 375°F (190°C). Once it’s hot, place the coated tofu bites in a single layer. Ensure they are not overcrowded for even cooking. Air fry for 12-15 minutes. Shake the basket halfway through to help them cook evenly. They should turn golden brown and crispy.
Serving Suggestions
After cooking, transfer the tofu bites to a serving plate. Garnish with chopped cilantro for a fresh touch. Serve with lime wedges for a zesty kick. You can also add a small bowl of soy sauce or sweet chili sauce for dipping. Enjoy these tasty bites as a snack or appetizer!
Pro Tips
- Press Tofu Well: Make sure to press the tofu for at least 15 minutes to remove excess moisture, ensuring it absorbs the marinade better and results in crispier bites.
- Experiment with Marinades: Feel free to get creative with your marinade! Adding ingredients like ginger or chili paste can elevate the flavor profile.
- Don’t Overcrowd the Air Fryer: For the best texture, place the tofu bites in a single layer without overcrowding, allowing hot air to circulate evenly.
- Garnish for Presentation: Garnish with freshly chopped cilantro and serve with lime wedges to enhance the dish visually and add a zesty flavor.
Tips & Tricks
Achieving the Perfect Crisp
To get that crunchy texture, follow a few key air fryer techniques. First, make sure to preheat your air fryer to 375°F (190°C). This helps the tofu cook evenly. When you place the tofu in the basket, do it in a single layer. Avoid overcrowding the basket. If you put too many pieces together, they will steam instead of crisp up.
Flavor Enhancements
Want to boost the flavor? You can try different marinades. Swap soy sauce for teriyaki or add ginger for a zing. For dipping sauces, consider sweet chili sauce or a sesame soy blend. Both pair well with the tofu bites and add more taste.
Making Ahead
If you want to prep in advance, marination is key. You can marinate the tofu cubes the night before. Just store them in the fridge in a sealed container. This allows the flavors to soak in deeply and makes cooking even easier when you’re ready to fry.
Variations
Ingredient Substitutions
You can easily change some ingredients to fit your diet. For a gluten-free option, use tamari instead of soy sauce. It gives you the same salty flavor without the gluten. If you want a sweetener that is vegan, try agave syrup instead of honey. Both options keep the dish tasty.
Serving Styles
Air fryer sesame tofu bites are very versatile. You can serve them over rice for a filling meal. A salad is another great choice, adding fresh crunch to each bite. These tofu bites also work perfectly as appetizers. Guests love to snack on them during parties.
Spice Level Adjustment
If you like heat, add chili flakes to the coating. This simple change gives a nice kick to the bites. You can also swap in different seasonings, like smoked paprika or cumin, for new flavors. Experimenting is fun and can lead to great tasting snacks!
Storage Info
Leftovers
To store your leftover Air Fryer Sesame Tofu Bites, let them cool first. Place them in an airtight container. This keeps them fresh and prevents them from getting soggy. Store them in the fridge for up to three days. After that, the tofu may lose its crispiness and flavor.
Reheating Instructions
To keep the tofu crispy when reheating, the air fryer is your best friend. Preheat the air fryer to 375°F (190°C). Place the leftover tofu bites in a single layer and heat for about 5 to 7 minutes. This method revives their crunch and great taste.
If you use the microwave, the tofu may turn soft. It’s not the best option for crispy tofu. If you choose this method, heat it for 30 seconds at a time to avoid overcooking.
FAQs
How do I make air fryer tofu crispy?
To make air fryer tofu crispy, start with pressing the tofu. This removes extra moisture. Cut the tofu into bite-sized cubes. Marinate them in a mix of soy sauce, sesame oil, maple syrup, and rice vinegar. Let it soak for at least 15 minutes. This step adds flavor and helps with texture. Next, coat the tofu cubes in a mix of cornstarch and spices. The cornstarch creates a crunchy layer. Air fry them at 375°F for 12-15 minutes. Shake the basket halfway through for even cooking.
Can I use different types of tofu?
You can use different types of tofu, but firm or extra firm tofu works best. Firm tofu has enough structure to hold its shape. Extra firm tofu is even denser and offers a chewier bite. Soft or silken tofu may not work well, as they can break apart easily. Choose the right type to match the texture you want.
How do I know when the tofu is done cooking?
Tofu is done when it turns golden brown and crispy. You should see a nice crunch on the outside. If you gently press the tofu, it should feel firm but not hard. You can also check if the edges look slightly crispy. If it meets these signs, your tofu bites are ready to enjoy.
What to serve with air fryer sesame tofu bites?
Air fryer sesame tofu bites pair well with many side dishes. You can serve them over rice or quinoa for a complete meal. A fresh salad adds a nice crunch and balance. For dipping, consider soy sauce or sweet chili sauce. Fresh lime wedges bring a zesty kick. This combo enhances the flavors and makes your meal exciting.
This blog covered making delicious air fryer sesame tofu bites. You learned the main ingredients, coating techniques, and marinating steps. We discussed tips for crispiness and flavor options, plus how to store and reheat leftovers. My final thoughts? Enjoy experimenting with variations for your taste. This dish is versatile, healthy, and a fun way to enjoy tofu. With practice and creativity, you’ll impress yourself and others. Happy cooking!


