
If you love crispy snacks, you’ll adore these Air Fryer Veggie Spring Rolls! They’re easy to make and packed with flavor. I’ll guide you through prepping colorful veggies, creating a tasty filling, and mastering the wrapping technique. Plus, I’ll share tips to keep them crunchy and variations to suit your taste. Ready to impress your friends and family? Let’s get started on this delightful treat!
Why I Love This Recipe
- Healthy Ingredients: This recipe is packed with fresh vegetables, making it a nutritious choice for a snack or appetizer.
- Crispy Texture: The air fryer gives these spring rolls a delightful crunch without the need for deep frying.
- Quick & Easy: With a prep time of just 20 minutes, these spring rolls can be made quickly for a last-minute gathering.
- Customizable: You can easily swap in your favorite vegetables or proteins to make these spring rolls your own!
Ingredients
List of Vegetables
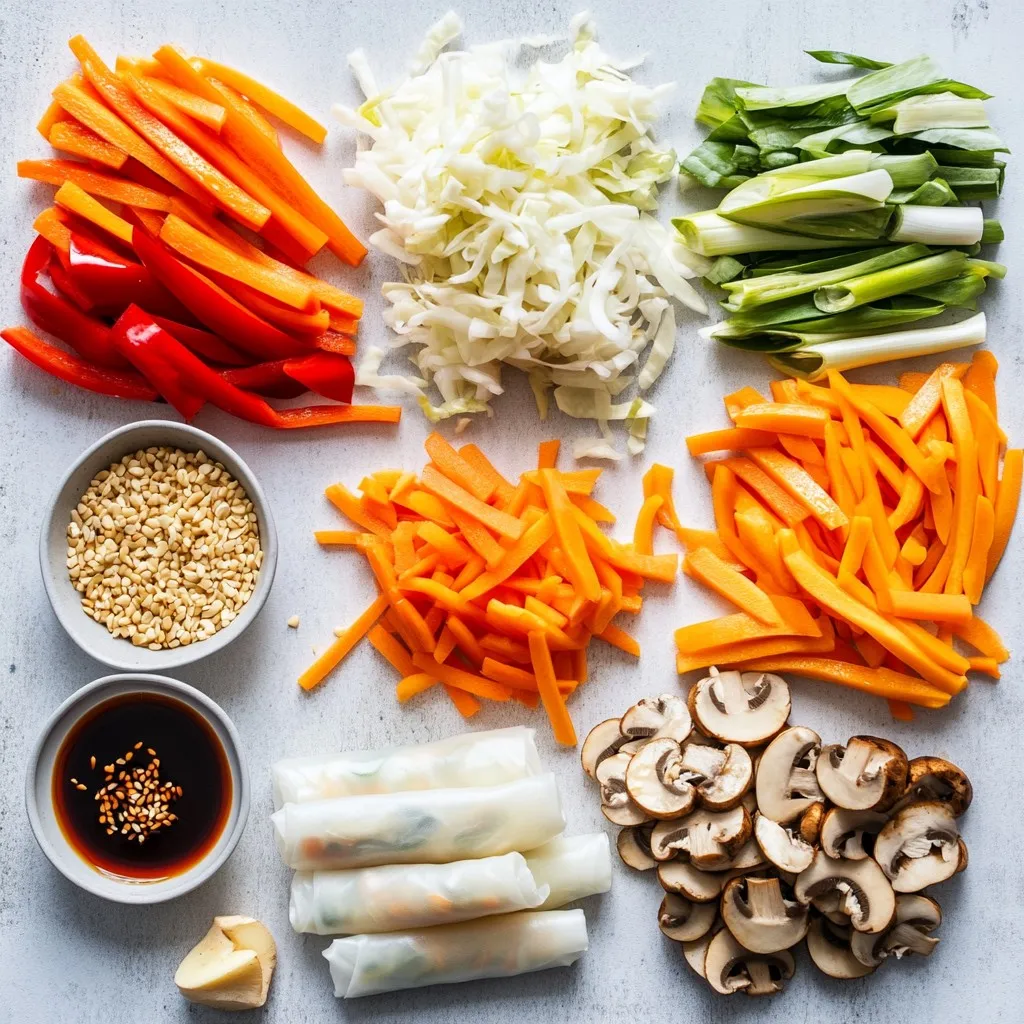
For the filling, choose fresh veggies. I use:
– 1 cup carrots, julienned
– 1 cup bell peppers, thinly sliced (red and yellow)
– 1 cup green cabbage, shredded
– 1/2 cup mushrooms, finely chopped
– 2 green onions, chopped
– 2 cloves garlic, minced
These veggies add crunch and flavor. Feel free to mix in your favorites.
Seasonings
Seasonings make the spring rolls pop. Here’s what I add:
– 1 tablespoon soy sauce
– 1 teaspoon ginger, grated
– Salt and pepper to taste
The soy sauce adds umami. Ginger gives a nice kick.
Spring Roll Wrappers
Spring roll wrappers are key to the dish. I use:
– 12 spring roll wrappers (found in the frozen section)
Make sure to thaw them before use. They wrap the filling perfectly.
Cooking Spray Alternatives
To get the rolls crisp, you can use:
– Cooking spray
– A few drops of sesame oil for brushing
Both options help achieve a golden finish. A light coat goes a long way.
Step-by-Step Instructions
Prep the Vegetables
First, gather all your veggies. You need 1 cup of julienned carrots, 1 cup of thinly sliced bell peppers, and 1 cup of shredded green cabbage. Don’t forget 1/2 cup of finely chopped mushrooms and 2 chopped green onions. Finally, grab 2 cloves of minced garlic. Place all these in a large bowl. This mix adds color and crunch to your spring rolls.
Making the Filling
Now, let’s make the filling. Add 1 tablespoon of soy sauce and 1 teaspoon of grated ginger to your bowl. Season the mix with salt and pepper to taste. Stir everything well. You want the flavors to blend nicely. This step makes your spring rolls tasty and exciting.
Wrapping the Spring Rolls
Next, take a spring roll wrapper. Place it on a flat surface with one corner pointing at you. Spoon about 2 tablespoons of the veggie mix onto the wrapper, about an inch from the bottom corner. Fold the bottom corner over the filling. Then fold the sides in and roll it up tightly. Dampen the top corner with a bit of water to seal it. Repeat this with the rest of the wrappers.
Air Frying Process
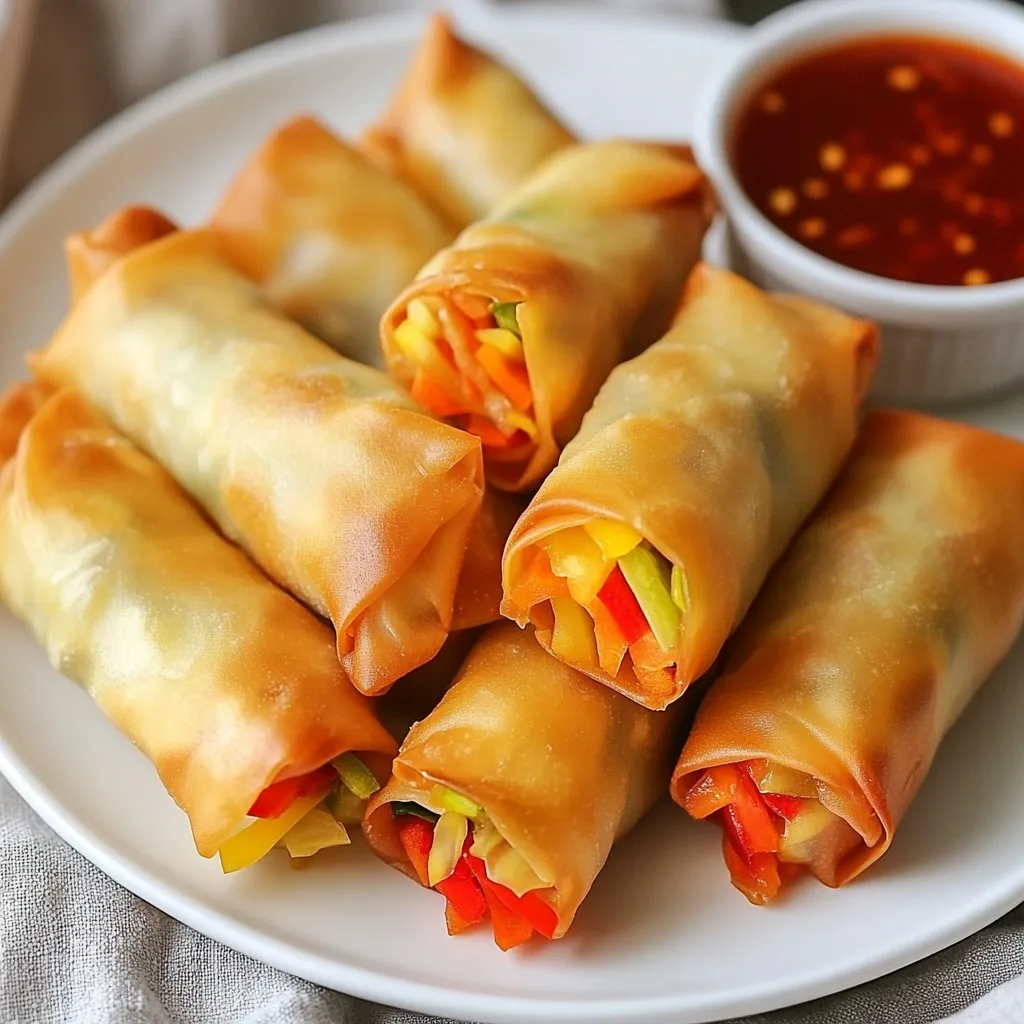
Preheat your air fryer to 380°F (190°C). Lightly spray the basket with cooking spray or brush it with sesame oil. Place the spring rolls in the basket, but don’t let them touch. This helps them cook evenly. Cook for 8 to 10 minutes. Flip them halfway through to get that golden brown color.
Serving Suggestions
Once done, take the spring rolls out and let them cool for a minute. Serve them hot with sweet chili sauce or soy sauce for dipping. For a nice touch, garnish with fresh cilantro or sesame seeds. Enjoy your crispy veggie spring rolls!
Tips & Tricks
Ensuring Crispy Texture
To get a crunchy spring roll, moisture is the enemy. Start by squeezing out excess water from veggies. Use a clean kitchen towel for this. When wrapping, keep the filling dry. This helps avoid soggy rolls. Spray or brush the outside of the rolls with cooking spray or sesame oil. This adds crispness when air frying.
Adjusting Flavor Profiles
You can adjust flavors to fit your taste. Like spicy? Add chili flakes or sriracha to the filling. Want a sweeter kick? Mix in some diced bell peppers or a splash of hoisin sauce. Fresh herbs like cilantro or basil also boost flavor. Experiment with what you enjoy most to make it your own.
Common Mistakes to Avoid
One common mistake is overcrowding the air fryer. Leave space between each roll. This allows hot air to circulate, making them even crispier. Another mistake is not sealing the rolls well. If they open up, the filling may spill out. Lastly, don’t skip the preheating step. It ensures even cooking from the start.
Pro Tips
- Fresh Ingredients: Always use fresh vegetables for the best flavor and texture in your spring rolls.
- Keep It Dry: Make sure your vegetable mixture is not too wet to prevent the wrappers from becoming soggy.
- Perfect Folding: Practice the folding technique to ensure that your spring rolls are tightly sealed and won’t open during cooking.
- Serve Immediately: For the best experience, serve the spring rolls immediately after cooking while they are still hot and crispy.
Variations
Adding Protein Options
You can boost your spring rolls with protein. Cooked chicken, shrimp, or tofu works great. For chicken, use shredded rotisserie meat. For shrimp, just chop them into small pieces. Tofu should be firm and diced. Mix the protein with your veggies for a tasty filling.
Gluten-Free Alternatives
If you need gluten-free options, use rice paper wraps. These wraps are light and crisp when cooked. You can also use gluten-free soy sauce. Check labels to ensure they are truly gluten-free. This way, everyone can enjoy these tasty treats.
Vegetarian and Vegan Substitutes
To keep your dish vegetarian or vegan, skip the meat and focus on veggies. You can add more mushrooms or chickpeas for protein. Use plant-based sauces like tamari instead of soy sauce. This keeps the flavor strong without any animal products. Enjoy these spring rolls, knowing they fit your diet!
Storage Info
How to Store Leftovers
To keep your veggie spring rolls fresh, place them in an airtight container. Make sure they cool down to room temperature first. You can store them in the fridge for up to three days. If you have extra spring rolls, separate layers with parchment paper. This step helps prevent sticking.
Reheating Instructions
When you want to enjoy your leftovers, the air fryer works best. Preheat your air fryer to 350°F (175°C). Place the spring rolls in a single layer. Heat them for about 5 minutes or until they are crispy again. You can also use a microwave, but that may make them soft.
Freezing Spring Rolls
Freezing is a great way to save spring rolls for later. To freeze, lay the rolled spring rolls on a baking sheet in a single layer. Place them in the freezer for about an hour. Once frozen, transfer them to a freezer bag. They can last up to two months. When ready to eat, cook them from frozen in the air fryer. Just add a few extra minutes to the cooking time.
FAQs
Can I use other vegetables in spring rolls?
Yes, you can use many other veggies. Try zucchini, spinach, or bean sprouts. Mix and match to find your favorite blend. Fresh herbs like cilantro, basil, or mint add flavor too. Just remember to cut all veggies thin. This helps them cook evenly and stay crisp.
How do I make spring rolls ahead of time?
You can prepare spring rolls in advance. Once you wrap them, place them on a tray. Keep them in the fridge for up to one day. If you plan to freeze them, wrap them tightly in plastic. When ready to cook, no need to thaw; just air fry them straight from the freezer.
What dipping sauces pair well with veggie spring rolls?
Sweet chili sauce is a favorite. It adds a nice kick and sweetness. Soy sauce is a classic option too. You can also try peanut sauce for a creamy twist. For a tangy flavor, mix soy sauce with lime juice and a touch of honey.
What is the best way to serve air fryer spring rolls?
Serve them hot right from the air fryer. Arrange them on a nice plate for a great look. Add a small bowl of dipping sauce on the side. Garnish with fresh herbs like cilantro or sesame seeds. This makes your dish pop and taste even better!
You learned how to make tasty spring rolls from scratch. We covered key ingredients, step-by-step instructions, and helpful tips for success. Remember to pre-cook veggies for a crispy bite and avoid common mistakes. You can also try different proteins or make these rolls gluten-free. Now, enjoy your delicious creation with your favorite dipping sauce. With practice, you’ll become a spring roll expert in no tim


