

Looking for a healthy, fresh meal that packs a flavor punch? I’ve got just the thing for you: Avocado Egg Salad Lettuce Wraps! This delicious dish combines creamy avocado with protein-rich eggs, all wrapped in crisp lettuce for a satisfying bite. Whether you’re aiming for a light lunch or a quick snack, these wraps are easy to make and customizable to fit your taste. Let’s dive into the recipe and tips to make this meal your go-to!
Why I Love This Recipe
- Healthy Ingredients: This recipe features wholesome ingredients like avocado and Greek yogurt, making it a nutritious choice for any meal.
- Quick and Easy: With just 10 minutes of prep time, this recipe is perfect for those busy days when you need a meal in a hurry.
- Versatile Serving: These lettuce wraps can be enjoyed as a light lunch, snack, or appetizer, making them suitable for various occasions.
- Flavorful and Satisfying: The combination of creamy avocado, tangy mustard, and fresh vegetables creates a deliciously satisfying dish that everyone will love.
Ingredients
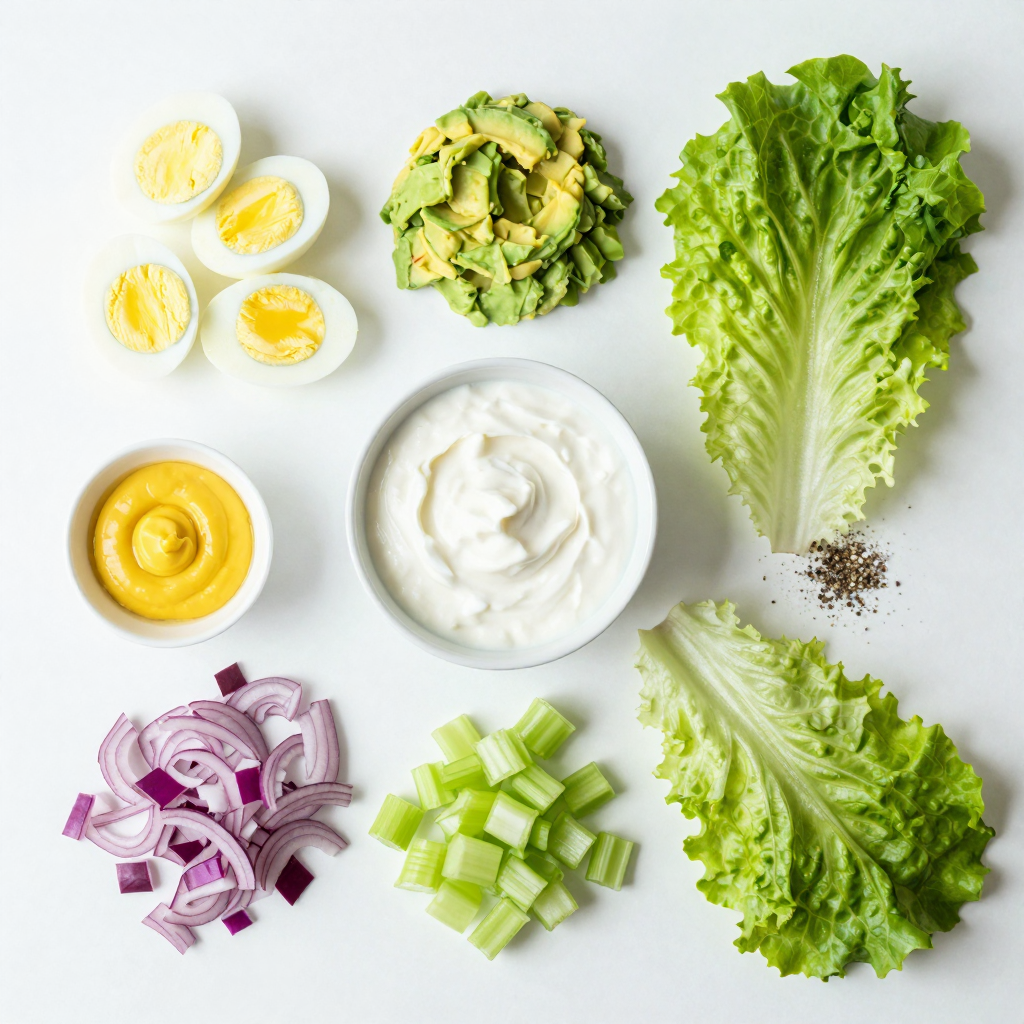
List of Ingredients
– 4 hard-boiled eggs, peeled and chopped
– 1 ripe avocado, mashed
– 2 tablespoons Greek yogurt
– 1 tablespoon Dijon mustard
– 1 tablespoon fresh lemon juice
– 1/4 cup red onion, finely chopped
– 1/4 cup celery, finely chopped
– Salt and pepper to taste
– 1 head of butter lettuce or Romaine, leaves separated
– Fresh dill or cilantro for garnish (optional)
Nutritional Information
Avocado egg salad lettuce wraps are tasty and healthy. Each serving packs protein from eggs and healthy fats from avocado. The Greek yogurt adds creaminess with fewer calories than mayo. This recipe is low in carbs, making it great for many diets. Each wrap is a good source of vitamins and minerals.
Tips for Choosing Fresh Ingredients
When selecting ingredients, look for ripe avocados. They should yield slightly to gentle pressure. For eggs, choose ones that feel heavy and have a clean shell. Fresh vegetables should be crisp and vibrant. Red onions should have a sharp smell, but not be soft or sprouted. Always check the date on your Greek yogurt to ensure freshness.
Step-by-Step Instructions
Preparing the Egg Salad Mixture
To start, gather your ingredients. You will need hard-boiled eggs, a ripe avocado, Greek yogurt, Dijon mustard, and lemon juice.
1. In a medium bowl, combine the chopped hard-boiled eggs and the mashed avocado.
2. Next, add Greek yogurt, Dijon mustard, and lemon juice. Mix until everything is smooth and creamy.
3. Stir in the finely chopped red onion and celery.
4. Finally, season with salt and pepper to taste.
This mixture is creamy and packed with flavor. The avocado adds a nice richness, while the yogurt keeps it light.
Assembling the Lettuce Wraps
Now that your egg salad mixture is ready, it’s time to assemble the wraps.
1. Pick a head of butter lettuce or Romaine. Carefully separate the leaves.
2. Lay the lettuce leaves on a serving platter.
3. Spoon a generous amount of the egg salad mixture onto each leaf.
The crisp lettuce wraps give a fresh crunch. They also make a great low-carb option for lunch or a snack.
Serving Suggestions
You can serve these wraps immediately. For an extra pop of flavor, consider garnishing them with fresh dill or cilantro.
Guests can enjoy these wraps as they are or fold them around the filling. This makes for easy eating.
These avocado egg salad lettuce wraps are not only healthy but also fun to make and share!
Pro Tips
- Use Fresh Ingredients: Always opt for ripe avocados and fresh vegetables to enhance the flavor and texture of your salad.
- Customize Your Seasoning: Feel free to adjust the salt, pepper, and lemon juice to your taste preferences for a more personalized flavor.
- Chill Before Serving: If you have time, refrigerate the egg salad mixture for 30 minutes before serving to allow the flavors to meld together.
- Experiment with Herbs: Try adding different herbs such as parsley or chives for an extra layer of flavor and freshness.
Tips & Tricks
How to Perfect the Avocado Egg Salad Texture
To get the best texture, mash the avocado well. You want it creamy but not runny. Next, mix in the chopped eggs. Keep some chunks for a nice bite. Blend in Greek yogurt to add richness. The Dijon mustard and lemon juice bring bright flavors, too. This mix should feel smooth yet chunky, making each bite delightful.
Substitutions for Dietary Preferences
If you want a lighter option, swap Greek yogurt for low-fat sour cream. For those who avoid dairy, use mashed tofu or a dairy-free yogurt. You can also replace the eggs with chickpeas for a vegan twist. The key is to keep the mix flavorful while meeting your needs.
Making Ahead and Quick Tips
You can prepare the egg salad a day in advance. Just store it in an airtight container in the fridge. This lets the flavors meld nicely. To keep the lettuce fresh, store it separately. When serving, spoon the salad into the lettuce just before eating. This keeps everything crisp and enjoyable.
Variations
Adding Flavor with Different Herbs and Spices
You can change up the taste of your avocado egg salad by using fresh herbs. Basil, chives, or parsley add a nice twist. Just chop them finely and mix them in. You can also add spices like paprika for a slight kick or garlic powder for depth. Each herb or spice gives a different flavor, so feel free to experiment!
Protein Boost Options
Want to make your meal even heartier? Consider adding extra protein. You could mix in shredded chicken or diced turkey. For a plant-based option, chickpeas work well too. They add protein and a nice texture. Any of these options help make your wraps more filling while keeping them delicious.
Vegan or Dairy-Free Adjustments
If you prefer a vegan version, swap out the eggs and Greek yogurt. You can use mashed chickpeas instead of eggs. For creaminess, use avocado and a little coconut yogurt. This gives a rich taste without dairy. You still get that satisfying, creamy feel while keeping it plant-based. Try adding diced bell peppers for crunch and flavor!
Storage Info
How to Store Leftover Avocado Egg Salad
To store leftover avocado egg salad, place it in an airtight container. Make sure the lid seals tightly. This keeps air out and helps maintain freshness. You can store it in the fridge for up to three days. If you notice browning from the avocado, stir it well. The lemon juice helps slow down browning, but it may still change color slightly.
Best Practices for Keeping Lettuce Fresh
To keep your lettuce fresh, store it in the fridge. Wrap the lettuce leaves in a damp paper towel. Place them inside a plastic bag, but don’t seal it completely. This allows some air to circulate. You can also use a salad spinner. Rinse and dry the leaves well before storing. This method helps maintain crispness for about a week.
Reheating Guidelines (if applicable)
You do not need to reheat avocado egg salad. It tastes best cold and fresh. If you want to warm it up, do so gently. Use a microwave on low power for short bursts. However, be careful not to overheat. The eggs can become rubbery, and the avocado might turn mushy. Enjoy your salad fresh for the best flavor!
FAQs
What can I use instead of Greek yogurt?
You can use sour cream or plain yogurt as a substitute. If you want a dairy-free option, try using mashed silken tofu. It will still give you a creamy texture. You can also use a bit of olive oil for a lighter option. Each choice adds a unique flavor.
Can I make avocado egg salad in advance?
Yes, you can make the avocado egg salad ahead of time. Just keep it in an airtight container in the fridge. However, the avocado may brown over time. To slow this down, add a bit more lemon juice. It helps keep the color fresh and bright.
How long do avocado egg salad lettuce wraps last?
Avocado egg salad lettuce wraps are best eaten fresh. If stored, they last about one day in the fridge. The lettuce may become soggy, so keep the salad and lettuce separate until serving. This way, you can enjoy the wraps at their best!
Avocado egg salad offers fresh, tasty options with many variations. We’ve covered key ingredients, nutrition, and tips for choosing top-notch items. I shared step-by-step instructions and ways to serve it right. You learned tricks to perfect the texture and create substitutes for any diet. I also explained proper storage and answered common questions. Enjoy this versatile dish in many forms. It’s healthy and easy, making meal prep fun and simple. Embrace creativity as you make it your own.


