Baked Apple Crisp Delightful and Easy Recipe Guide

Are you ready to create a sweet treat that’s simple and delicious? In this guide, I’ll show you how to make a Baked Apple Crisp that will impress your family and friends. With easy steps, handy tips, and exciting variations, this recipe is perfect for any occasion. Let’s dive into the warm, cozy flavors of apple crisp that will make your kitchen smell amazing!
Why I Love This Recipe
- Delicious Flavor Combination: The tartness of Granny Smith apples perfectly balances with the sweetness of brown sugar and warm spices, creating a comforting dessert.
- Easy to Make: This recipe requires minimal prep time and simple ingredients, making it a quick option for any occasion.
- Customizable: Add in your favorite nuts or substitute different fruits to make this recipe your own!
- Perfect for Sharing: This baked apple crisp serves 6-8, making it an ideal dessert for gatherings with family and friends.
Ingredients
Key Ingredients for Baked Apple Crisp
The main ingredients make this crisp a treat. Here’s what you’ll need:
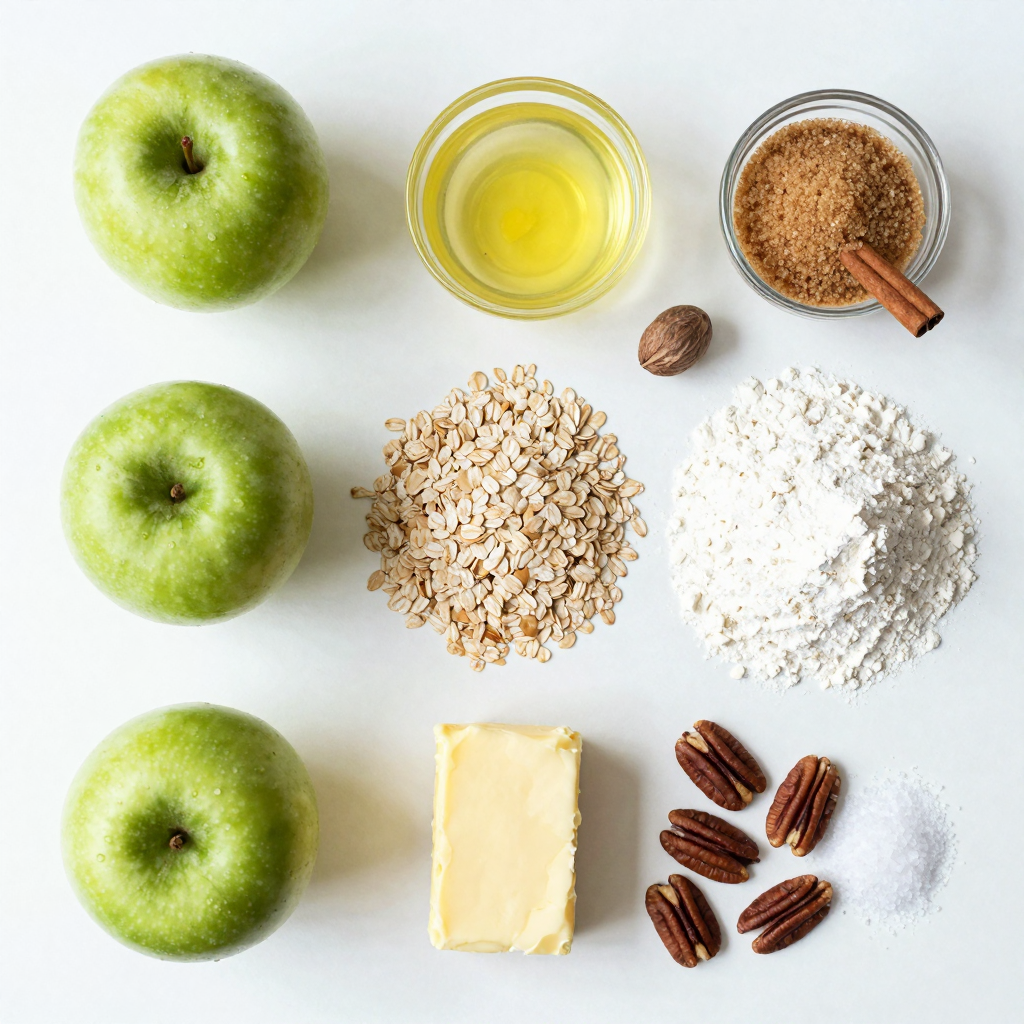
- 4 large Granny Smith apples, peeled and sliced
- 1 tablespoon lemon juice
- ½ cup brown sugar
- 1 teaspoon cinnamon
- ½ teaspoon nutmeg
- 1 cup rolled oats
- ½ cup all-purpose flour
- ½ cup unsalted butter, melted
- ¼ cup chopped pecans (optional)
- A pinch of salt
Each ingredient plays a role. The apples provide sweetness and tartness. The lemon juice keeps them fresh. Brown sugar adds depth. Cinnamon and nutmeg bring warmth and spice. Oats and flour create a crunchy topping.
Optional Add-ins
You can customize your apple crisp with fun add-ins. Here are some ideas:
- Raisins or dried cranberries for a chewy texture
- Chopped walnuts for more crunch
- A splash of vanilla extract for extra flavor
Feel free to mix and match. These add-ins can change the taste and make your dish unique.
Substitutions for Dietary Needs
If you have dietary needs, don’t worry! Here are some swaps you can try:
- Use gluten-free oats and flour for a gluten-free option.
- Swap butter for coconut oil if you want a dairy-free version.
- Use maple syrup instead of brown sugar for a natural sweetener.
These substitutions keep the flavor while fitting your diet. Enjoy baking this apple crisp with your own twist!

Step-by-Step Instructions
Preparation of Apples
Start by peeling and slicing 4 large Granny Smith apples. These apples are tart, which balances the sweetness well. Place the apple slices in a big bowl. Add 1 tablespoon of lemon juice to keep them fresh. Then, sprinkle in ½ cup of brown sugar, 1 teaspoon of cinnamon, ½ teaspoon of nutmeg, and a pinch of salt. Mix everything gently until the apples are well coated. This step boosts the flavor and makes the apples soft when baked.
Making the Crisp Topping
In another bowl, combine 1 cup of rolled oats, ½ cup of all-purpose flour, and ½ cup of melted unsalted butter. If you like, add ¼ cup of chopped pecans for crunch. Stir the mix until it looks crumbly. The oats and flour create a tasty topping that gets crispy as it bakes. This contrast makes each bite special.
Baking Time and Temperature
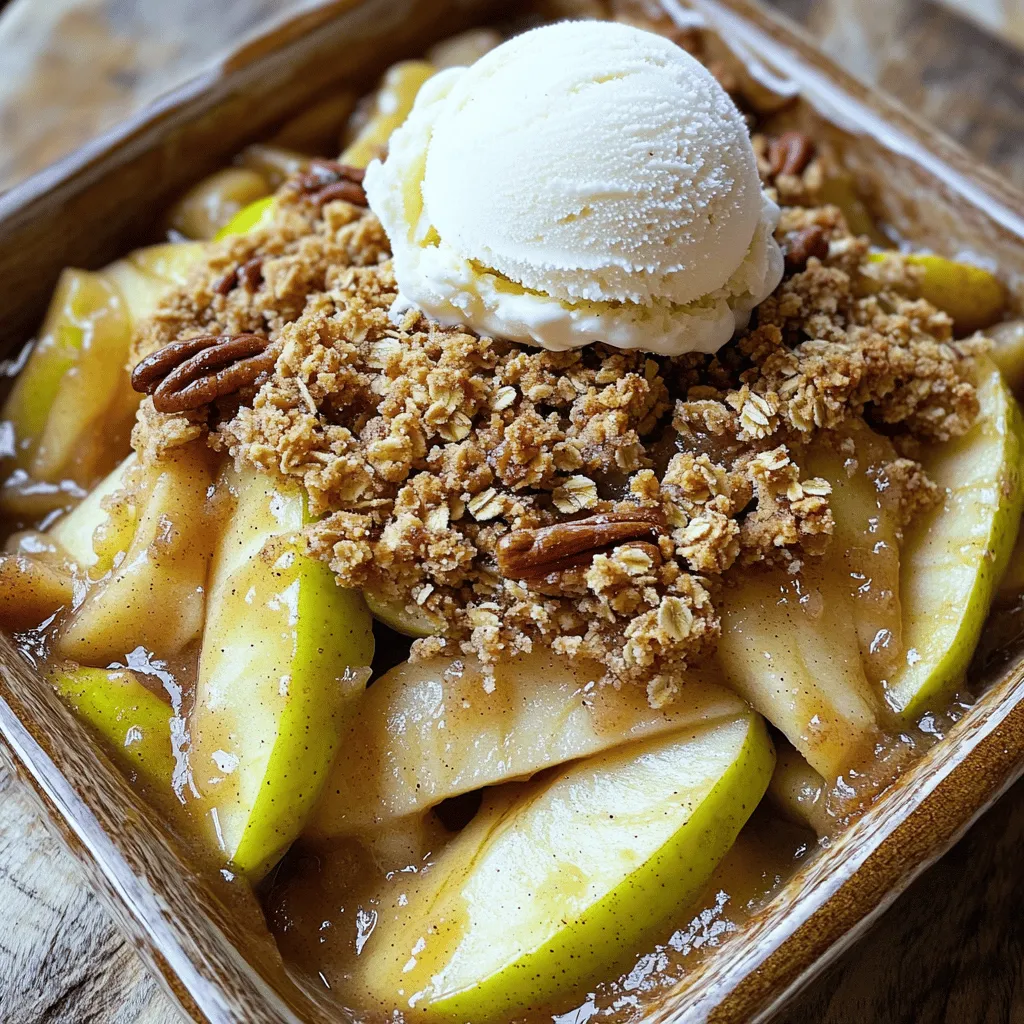
Preheat your oven to 350°F (175°C). Spread the apple mixture evenly in a greased 9×13 inch baking dish. Then, sprinkle the oat topping over the apples. Bake for about 35-40 minutes. Watch for the apples to bubble and the topping to turn golden brown. Let it cool for a few minutes before serving. Enjoy this delight warm, maybe with a scoop of vanilla ice cream on top!
Pro Tips
- Use firm apples: Choose apples that are firm and tart, like Granny Smith, to ensure they hold their shape during baking and provide a nice contrast to the sweet topping.
- Customize the topping: Add your favorite nuts or seeds to the oat mixture for extra crunch, or substitute some of the flour with whole wheat flour for a heartier texture.
- Check for doneness: Keep an eye on the crisp towards the end of baking. The apples should be bubbling and the topping golden brown; if it browns too quickly, cover it loosely with foil.
- Serve with flair: Enhance presentation by serving warm with a scoop of vanilla ice cream and a dusting of cinnamon, or drizzle with caramel sauce for an extra indulgent treat.
Tips & Tricks
Achieving the Perfect Crisp Texture
To get the best crisp, use a mix of oats and flour. The oats add chewiness, while the flour helps bind the topping. Always melt the butter before mixing it in. This makes the crisp golden and crunchy. Don’t overmix the topping. You want it crumbly, not a dough.
How to Enhance Flavor with Spices
Adding spices makes your baked apple crisp pop! Cinnamon is the star here. It brings warmth and sweetness. Nutmeg adds a hint of spice. You can also try ginger for a kick. A touch of vanilla extract blends well too. Remember, balance is key.
Serving Suggestions
Serve your baked apple crisp warm. A scoop of vanilla ice cream on top makes it special. You can also add a sprinkle of cinnamon for flair. If you like nuts, sprinkle more pecans on top. For a fun twist, drizzle caramel sauce over it. Enjoy with family and friends!

Variations
Fall Spice Variation
To spice up your baked apple crisp, try adding more warm flavors. Cinnamon gives great taste, but also consider adding ginger or allspice. These spices add a cozy fall vibe. You can mix in 1/4 teaspoon of ground ginger or allspice with the other spices. This twist makes each bite truly special.
Gluten-Free Option
If you want a gluten-free version, swap the all-purpose flour for almond flour or gluten-free flour. Use certified gluten-free oats too. This change keeps the dish tasty without the gluten. Just make sure to check labels while shopping. Your friends with gluten sensitivities will love this option!
Fruit Combination Ideas
Think beyond apples! You can mix in pears, berries, or peaches. For a fun twist, use one cup of your favorite fruit along with apples. This adds flavor and color. Combining different fruits creates a unique dish. Let your creativity shine in the kitchen!
Storage Info
How to Store Leftovers
To keep your baked apple crisp fresh, let it cool first. Once cool, cover it tightly with plastic wrap or aluminum foil. You can also transfer it to an airtight container. Store it in the fridge. It stays fresh for up to four days. If you want to enjoy it later, freezing is a great option.
Reheating Instructions
When you are ready to enjoy your apple crisp again, preheat your oven to 350°F (175°C). Place the leftover crisp in an oven-safe dish. Cover it with foil to prevent it from getting too dry. Heat for about 15 to 20 minutes until warm. You can also microwave individual portions. Heat for 30 seconds to 1 minute. Just check to avoid overheating.
Freezing for Future Enjoyment
Freezing apple crisp is easy. Slice it into portions before freezing. Wrap each portion in plastic wrap and then in foil. You can store it in a freezer-safe bag or container. It freezes well for up to three months. When you want to eat it, thaw it in the fridge overnight. Then, reheat as mentioned before. Enjoy your treat anytime!
FAQs
Can I use different types of apples?
Yes, you can use different apples. Granny Smith apples are tart and hold their shape well. You can also try Fuji, Honeycrisp, or Braeburn apples. Each type gives a unique flavor. Mixing sweet and tart apples can make your crisp even better. Experiment and find your favorite blend!
How do I know when the apple crisp is done baking?
You can tell it’s done when the apples bubble and the topping turns golden brown. After about 35-40 minutes at 350°F, check it closely. The apples should be soft but not mushy. Let it cool a bit before serving. This will help the juices set.
What can I serve with baked apple crisp?
Baked apple crisp is great on its own, but you can make it even better! Serve it warm with vanilla ice cream on top. Whipped cream also pairs well. Add a sprinkle of cinnamon or chopped nuts for extra crunch. You can even drizzle caramel sauce for a sweet touch. Enjoy the mix of warm and cold!
In this post, we explored how to make a delicious baked apple crisp. You learned about key ingredients, cooking steps, and helpful tips to achieve a perfect crisp. We shared ideas for variations and ways to store leftovers, ensuring you can enjoy this dessert anytime.
Baked apple crisp is simple and fun to make. With these guidelines, you’ll impress everyone with your dish. Enjoy every bite and share it with those you love.

Baked Apple Crisp
Ingredients
4 large Granny Smith apples, peeled and sliced
1 tablespoon lemon juice
½ cup brown sugar
1 teaspoon cinnamon
½ teaspoon nutmeg
1 cup rolled oats
½ cup all-purpose flour
½ cup unsalted butter, melted
¼ cup chopped pecans (optional)
A pinch of salt
Instructions
Preheat your oven to 350°F (175°C).
In a large mixing bowl, toss the sliced apples with lemon juice, brown sugar, cinnamon, nutmeg, and salt until well coated.
Spread the apple mixture evenly into a greased 9×13 inch baking dish.
In a separate bowl, combine the rolled oats, flour, melted butter, and chopped pecans (if using). Mix until crumbly.
Sprinkle the oat mixture evenly over the apples in the baking dish.
Bake in the preheated oven for 35-40 minutes, or until the apples are bubbling and the topping is golden brown.
Let it cool for a few minutes before serving.
Prep Time: 15 mins | Total Time: 55 mins | Servings: 6-8 servings
– Presentation Tips: Serve warm with a scoop of vanilla ice cream on top, garnished with a sprinkle of cinnamon and a few pecans for added texture.

Baked Apple Crisp
Ingredients
- 4 large Granny Smith apples, peeled and sliced
- 1 tablespoon lemon juice
- 0.5 cup brown sugar
- 1 teaspoon cinnamon
- 0.5 teaspoon nutmeg
- 1 cup rolled oats
- 0.5 cup all-purpose flour
- 0.5 cup unsalted butter, melted
- 0.25 cup chopped pecans (optional)
- 1 pinch salt
Instructions
- Preheat your oven to 350°F (175°C).
- In a large mixing bowl, toss the sliced apples with lemon juice, brown sugar, cinnamon, nutmeg, and salt until well coated.
- Spread the apple mixture evenly into a greased 9x13 inch baking dish.
- In a separate bowl, combine the rolled oats, flour, melted butter, and chopped pecans (if using). Mix until crumbly.
- Sprinkle the oat mixture evenly over the apples in the baking dish.
- Bake in the preheated oven for 35-40 minutes, or until the apples are bubbling and the topping is golden brown.
- Let it cool for a few minutes before serving.

![To make Peach Cream Cheese Danish, you need these key items: - 1 package (8 oz) cream cheese, softened - 1/4 cup granulated sugar - 1 teaspoon vanilla extract - 1 package (1 lb) refrigerated crescent roll dough - 2 ripe peaches, sliced thin - 1 tablespoon lemon juice - 1 teaspoon ground cinnamon - 1 egg, beaten (for egg wash) - Powdered sugar for drizzling These ingredients create a creamy filling and a flaky crust. The peaches add a sweet touch. You can add a few extra ingredients for more taste: - 1 tablespoon honey for sweetness - 1/2 teaspoon almond extract for a nutty note - Chopped nuts for crunch These extras can take your danish to the next level. Try them out for a twist! Gather these tools for easy cooking: - Mixing bowls - Whisk or electric mixer - Baking sheet - Parchment paper - Knife and cutting board Having the right tools makes the process smooth. You will feel like a pro in no time! For the complete recipe, check out the Full Recipe link. To start, gather your cream cheese, sugar, and vanilla extract. Beat the softened cream cheese in a bowl. Add the granulated sugar and vanilla extract next. Mix until you have a smooth and creamy filling. This step is simple but key. You want a rich flavor that pairs well with the peaches. Set this bowl aside as you move on. Now, let’s work with the crescent roll dough. Open the package and unroll it on a floured surface. Pinch the seams to form a rectangle. This helps keep the dough intact. Cut the dough into squares about 4 inches by 4 inches. Make a small indentation in the center of each square. This is where your filling will go. Next, take your sliced peaches. Toss them with lemon juice and ground cinnamon. This mix adds a bright taste. Place a tablespoon of the cream cheese filling in the center of each dough square. Top it with a few peach slices. You can fold the corners over the filling to create a pocket. This keeps the delicious filling inside. Before baking, brush the tops with a beaten egg. This gives the danishes a lovely golden color. Preheat your oven to 375°F (190°C). Line a baking sheet with parchment paper to prevent sticking. Bake the danishes for 15-18 minutes. Look for a golden brown color and puffed dough. Let them cool for a few minutes. Drizzle with powdered sugar for that sweet touch. Enjoy your Peach Cream Cheese Danish as a delightful treat! For the complete recipe, check the [Full Recipe]. To make your Peach Cream Cheese Danish shine, use ripe peaches. They add sweetness and flavor. You can also sprinkle a bit of extra sugar on the peaches before baking. It helps them caramelize and enhances their taste. For a rich creaminess, ensure your cream cheese is at room temperature. This makes it easy to blend with sugar and vanilla. Don’t rush this step. A smooth filling gives the best texture. If your danishes don't puff up, check your oven temperature. An oven that is too cool can lead to flat pastries. Also, ensure you seal the edges well. If they open during baking, the filling will spill out. If the dough is too sticky, add a bit of flour when rolling it out. This will help prevent sticking and make it easier to shape. These danishes are perfect warm. You can serve them with a scoop of vanilla ice cream or a dollop of whipped cream. For a fun twist, try pairing them with a cup of coffee or tea. They also make a great breakfast treat or a delightful dessert. You can find the full recipe to perfect your own Peach Cream Cheese Danish. Enjoy! {{image_2}} You can change up the fruit in your Danish. Try using apples, berries, or pears. Each fruit gives a new taste. Apples add crunch, while berries bring a sweet-tart flavor. For pears, use ripe ones for the best texture. You can mix fruits too! Combine peaches with blueberries for a fun twist. This way, you can create your favorite flavor each time. If you need gluten-free options, look for gluten-free crescent roll dough. Many brands have tasty choices that work well. For a vegan version, swap cream cheese for plant-based cream cheese. Use a vegan egg wash or skip it for a golden look. You can also replace sugar with maple syrup or agave for sweetening. These changes let everyone enjoy the Danish! Want to make your Danish even better? Add spices like nutmeg or ginger for warmth. You can mix in a splash of almond extract for a nutty taste. Try adding a dollop of jam on top of the cream cheese too. You can experiment with different flavors! The possibilities are endless, and you can find your perfect combo. Check the Full Recipe to see how to make your new favorite treat! To keep your Peach Cream Cheese Danish fresh, place it in an airtight container. This will help preserve its flavor and texture. You can store it in the fridge for up to three days. Just make sure it is completely cool before sealing it. If you prefer to keep it longer, freezing is a great option. When you want to enjoy your leftover Danish, reheating is simple. Preheat your oven to 350°F (175°C). Place the Danish on a baking sheet for about 10-15 minutes. This will warm it up nicely and keep the pastry crisp. You can also use a microwave if you're in a hurry, but the oven gives better results. If you want to freeze the Danish, wrap each piece tightly in plastic wrap. Then, place them in a freezer-safe bag. They can last up to three months in the freezer. When you're ready to eat, just thaw them in the fridge overnight. Reheat in the oven for the best taste. For the full recipe, check the earlier sections. Yes, you can use canned peaches. They save time and are easy to find. Just make sure to drain them well. Canned peaches can be softer than fresh ones. This may change the texture slightly. If you want a firmer bite, fresh peaches are best. You will know the danishes are done when they turn golden brown. The dough should be puffy and cooked through. You can also check the bottom. It should feel firm and have a slight crunch. If they look undercooked, give them a few more minutes. Yes, you can prepare the dough ahead of time. Just keep it covered in the fridge. Make sure to use it within a day or two. If you want to freeze it, roll it out and wrap it tightly. When ready, thaw it in the fridge overnight before using. For the complete recipe, check out the Full Recipe link. Enjoy your baking! You now know how to make a delicious Peach Cream Cheese Danish. We covered key ingredients, step-by-step instructions, and handy tips. You can adjust flavors and even swap out fruits. Remember, storing leftovers properly keeps them fresh. Don't shy away from experimenting with options like vegan swaps. Making this treat is fun and easy! Enjoy baking and sharing your tasty danish creations!](https://dailydishlab.com/wp-content/uploads/2025/07/e83a1769-6d69-4dce-85bf-b37ffbe7d076-768x768.webp)


