BBQ Ranch Chicken Salad Flavorful and Satisfying Meal

Looking for a tasty meal that’s full of flavor? Look no further! My BBQ Ranch Chicken Salad combines juicy chicken, crisp vegetables, and a tangy dressing to create a satisfying dish. Perfect for lunch or dinner, this salad is easy to make and sure to please everyone at your table. Ready to dive into this delicious recipe? Let’s get started!
Why I Love This Recipe
- Flavorful Combination: This salad combines smoky BBQ chicken with creamy ranch dressing, creating a deliciously satisfying meal.
- Quick Preparation: With a prep time of just 15 minutes, this salad is perfect for busy weeknights or last-minute gatherings.
- Healthy Ingredients: Packed with protein from chicken and fiber from beans and veggies, this salad is a nutritious choice.
- Customizable: You can easily adjust the ingredients to your taste, adding more veggies or using different dressings.
Ingredients
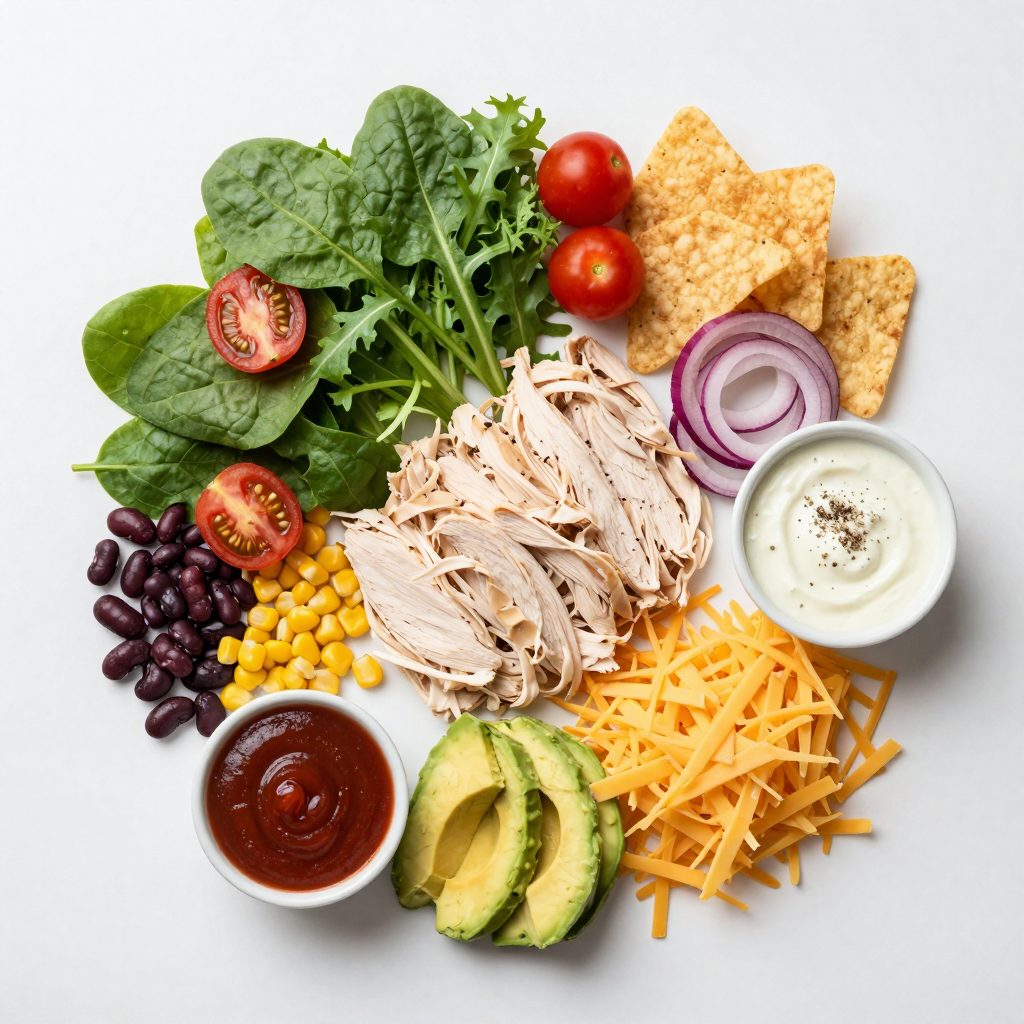
To make a BBQ Ranch Chicken Salad, you’ll need fresh and tasty ingredients. Each one adds flavor and texture. Here’s a list to get you started:
- Chicken
- 2 cups cooked chicken breast, shredded
- Vegetables
- 4 cups mixed greens (spinach, romaine, arugula)
- 1 cup cherry tomatoes, halved
- 1/2 cup corn (canned or grilled)
- 1/2 cup black beans, rinsed and drained
- 1/2 red onion, thinly sliced
- 1 avocado, diced
- Dressings
- 1/4 cup BBQ sauce (your favorite brand)
- 1/4 cup ranch dressing
- Seasonings
- Salt and pepper to taste
- Optional toppings
- 1/2 cup shredded cheddar cheese
- Tortilla chips for crunch
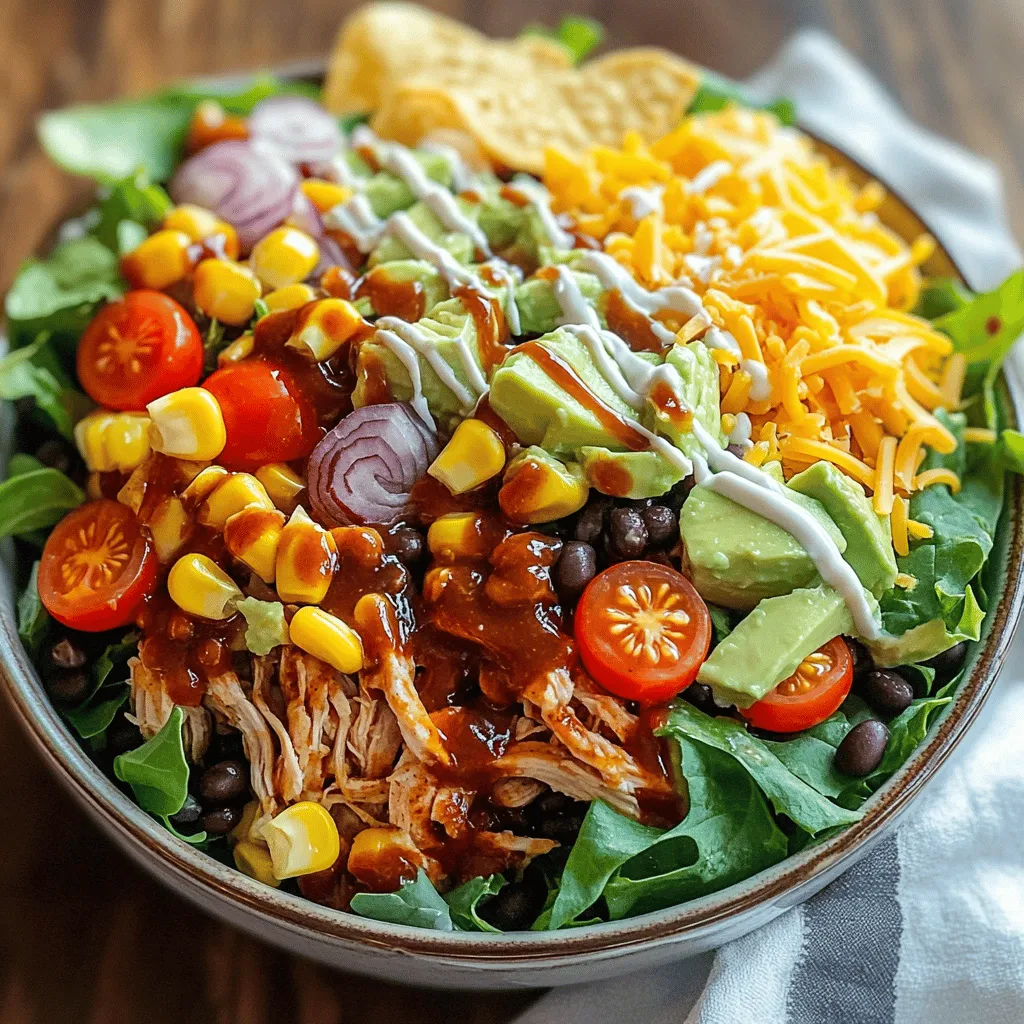
These ingredients create a colorful and satisfying meal. Each one plays an important role in the overall taste. I love how the BBQ sauce mixes with ranch dressing. It brings a sweet and tangy flavor that makes this salad stand out.Enjoy every bite!

Step-by-Step Instructions
Mixing the BBQ chicken
First, take your cooked chicken breast and shred it. I like to use a fork for this. In a bowl, mix the shredded chicken with your favorite BBQ sauce. Make sure every piece is coated well. This adds a nice flavor to the salad. Set the bowl aside while you prepare the rest.
Layering the salad
Grab a large salad bowl. Start by adding the mixed greens as your base. I love using a mix of spinach, romaine, and arugula. Next, add the halved cherry tomatoes, corn, black beans, and thinly sliced red onion on top. Finally, sprinkle the diced avocado over these layers.
Adding toppings and dressing
Now, it’s time to scatter the BBQ chicken evenly over your salad. Next, sprinkle shredded cheddar cheese all over the salad. This adds a delicious creaminess. Drizzle ranch dressing on top, adjusting the amount based on your taste.
Final touches
Gently toss the salad to mix everything well. Be careful not to bruise the greens. Season with salt and pepper to taste. For that extra crunch, you can add crushed tortilla chips on top or serve them on the side. Enjoy this colorful and tasty meal!
Pro Tips
- Use Fresh Ingredients: Always opt for fresh vegetables and high-quality chicken for the best flavor and texture in your salad.
- Customize Your Dressing: Feel free to mix the BBQ sauce and ranch dressing in a separate bowl to create a unique flavor profile.
- Layer for Presentation: Layering the ingredients not only makes for a beautiful presentation but also helps in evenly distributing flavors.
- Make It Ahead: You can prep the ingredients ahead of time and assemble the salad just before serving to keep the greens crisp.
Tips & Tricks
Enhancing Flavor
Choosing the right BBQ sauce makes a big difference. Look for a sauce that you love. Sweet, tangy, or smoky—all add unique flavors. Try different brands until you find your favorite.
For dressing, you can mix BBQ sauce with ranch. This adds depth and a nice kick. You can also try a honey mustard or a yogurt-based dressing. Each gives a fresh twist to the salad.
Seasoning is key. I like to sprinkle salt and pepper on each layer. You can also add garlic powder or smoked paprika for extra flavor. Just a pinch can elevate the taste.
Preparing Ahead of Time
Meal prep makes this salad easy. You can cook the chicken and chop the veggies ahead of time. Store them in separate containers. This keeps everything fresh.
When you store components separately, the salad stays crisp. Keep the greens away from sauces until you’re ready to eat. This helps avoid sogginess. You can mix everything just before serving. It’s that simple!

Variations
Alternative Protein Options
You can switch up the protein in your BBQ Ranch Chicken Salad for fun. Grilled shrimp offers a sweet and smoky taste. They pair well with the BBQ sauce and ranch dressing. Just grill the shrimp until they turn pink. Toss them in with the other salad ingredients.
Tofu or tempeh are great choices for a plant-based option. They soak up the flavors well. Press the tofu to remove excess water, then grill or sauté it for added texture. Cut the tempeh into slices or cubes for easy mixing.
Salad Add-ins
Adding veggies can make your salad more colorful and healthy. Try bell peppers, cucumber, or shredded carrots. They add crunch and freshness to the dish. You can also use roasted veggies for a warm contrast.
For cheese, consider using feta or pepper jack. Feta adds a salty kick, while pepper jack gives a spicy twist. Both will enhance the flavor profile of your salad.
For extra crunch, crushed tortilla chips are a fun option. You can also use nuts or seeds, like sunflower seeds or walnuts. They add texture and a satisfying bite. There are many ways to customize your BBQ Ranch Chicken Salad. Explore different flavors and textures to find your favorite mix!
Storage Info
How to Store Leftovers
To keep your BBQ Ranch Chicken Salad fresh, use airtight containers. This helps keep moisture in and air out. You can store it in the fridge for up to three days. Make sure to avoid adding the dressing until you are ready to eat. This keeps the greens crisp and tasty.
Reheating Tips
When you want to serve leftovers, you can enjoy them cold or warm. If you prefer warm, heat the chicken in a pan. Do not heat the whole salad; it will make the greens soggy. You can also add fresh toppings or extra dressing to keep it exciting. Enjoy your meal!
FAQs
Common Questions
What is the best dressing for BBQ Ranch Chicken Salad?
The best dressing for this salad is a mix of BBQ sauce and ranch dressing. This combination gives a sweet and tangy flavor. You can adjust the amounts to fit your taste. For a lighter option, use low-fat ranch or a yogurt-based dressing.
Can I make this salad ahead of time?
Yes, you can make this salad ahead of time. I recommend prepping the ingredients separately. Keep the dressing on the side until ready to serve. This keeps the greens fresh and crunchy. You can store the salad in the fridge for up to two days.
What can I substitute for chicken in this recipe?
You can use grilled shrimp, tofu, or tempeh as a substitute for chicken. These options give the salad a different twist. If you want a vegetarian meal, tofu or tempeh works well. They absorb flavors nicely and add protein.
Nutritional Information
Calories and macronutrients
One serving of BBQ Ranch Chicken Salad has about 400 calories. It contains protein from the chicken, healthy fats from the avocado, and fiber from the beans and veggies. This balance makes it a filling meal.
Health benefits of ingredients
The mixed greens add vitamins A and C. Cherry tomatoes boost antioxidants, while black beans provide protein and fiber. Avocado is full of healthy fats. Each ingredient contributes to a well-rounded meal.
Gluten-free/dairy-free options
This salad can be made gluten-free by checking your BBQ sauce and ranch dressing. For a dairy-free option, use dairy-free cheese or skip it altogether. You can also use a dairy-free ranch dressing for the same great taste.
In this blog post, we covered the best ingredients for a BBQ Ranch Chicken Salad. You learned how to mix flavors and layer fresh veggies. I shared tips for enhancing taste and options for meal prep. You can choose from different proteins and salad add-ins to fit your needs. Storing and reheating leftovers were also discussed to keep your dish fresh. With these insights, you can create a tasty and satisfying salad. Enjoy making this dish your own!

BBQ Ranch Chicken Salad
Ingredients
2 cups cooked chicken breast, shredded
4 cups mixed greens (spinach, romaine, arugula)
1 cup cherry tomatoes, halved
1/2 cup corn (canned or grilled)
1/2 cup black beans, rinsed and drained
1/2 red onion, thinly sliced
1 avocado, diced
1/2 cup shredded cheddar cheese
1/4 cup BBQ sauce (your favorite brand)
1/4 cup ranch dressing
Salt and pepper to taste
Optional: tortilla chips for crunch
Instructions
In a bowl, mix the shredded chicken with BBQ sauce until well-coated. Set aside.
In a large salad bowl, layer the mixed greens as a base.
Add the halved cherry tomatoes, corn, black beans, red onion slices, and diced avocado on top of the greens.
Scatter the BBQ chicken over the salad, ensuring it’s evenly distributed.
Sprinkle the shredded cheddar cheese over the entire salad.
Drizzle ranch dressing over the top, adjusting the amount according to your preference.
Toss the salad gently, ensuring all ingredients are combined without bruising the greens.
Season with salt and pepper to taste.
For added crunch, serve with crushed tortilla chips on top or on the side.
Prep Time: 15 minutes | Total Time: 15 minutes | Servings: 4

BBQ Ranch Chicken Salad
Ingredients
- 2 cups cooked chicken breast, shredded
- 4 cups mixed greens (spinach, romaine, arugula)
- 1 cup cherry tomatoes, halved
- 0.5 cup corn (canned or grilled)
- 0.5 cup black beans, rinsed and drained
- 0.5 medium red onion, thinly sliced
- 1 medium avocado, diced
- 0.5 cup shredded cheddar cheese
- 0.25 cup BBQ sauce (your favorite brand)
- 0.25 cup ranch dressing
- to taste salt and pepper
- optional tortilla chips for crunch
Instructions
- In a bowl, mix the shredded chicken with BBQ sauce until well-coated. Set aside.
- In a large salad bowl, layer the mixed greens as a base.
- Add the halved cherry tomatoes, corn, black beans, red onion slices, and diced avocado on top of the greens.
- Scatter the BBQ chicken over the salad, ensuring it's evenly distributed.
- Sprinkle the shredded cheddar cheese over the entire salad.
- Drizzle ranch dressing over the top, adjusting the amount according to your preference.
- Toss the salad gently, ensuring all ingredients are combined without bruising the greens.
- Season with salt and pepper to taste.
- For added crunch, serve with crushed tortilla chips on top or on the side.


![To make black bean stuffed peppers, you need fresh, wholesome items. Here is what you'll need: - 4 large bell peppers (any color) - 1 can (15 oz) black beans, rinsed and drained - 1 cup cooked quinoa - 1 cup corn kernels (fresh or frozen) - 1 cup diced tomatoes (canned or fresh) - ½ cup diced red onion - 1 teaspoon cumin - 1 teaspoon smoked paprika - ½ teaspoon garlic powder - ½ teaspoon chili powder - Salt and pepper to taste - 1 cup shredded cheese (cheddar or pepper jack) - Fresh cilantro, chopped (for garnish) These ingredients blend to create a tasty and filling meal. The black beans offer protein and fiber. The quinoa adds more nutrients, while the peppers provide color and crunch. This recipe serves four people. Each stuffed pepper is a complete meal. You can pair them with a salad or bread for a larger dinner. If you want leftovers, consider making extra peppers. They keep well in the fridge for a few days. I often choose fresh ingredients when I can. Fresh bell peppers taste better and add more nutrition. However, canned items make cooking easier. For example, canned black beans save time. Rinse them well to reduce sodium. Use fresh corn when it’s in season for the best flavor. For tomatoes, choose canned or fresh based on your preference. Both work well in this dish. Start by preheating your oven to 375°F (190°C). Take your bell peppers and cut off the tops. Be careful not to cut too much. Remove the seeds and membranes inside. Keep the peppers whole. They will hold the filling. You can use any color you like. Red, yellow, or green all work well. Set them aside while you prepare the filling. In a large bowl, mix together the following ingredients: - 1 can (15 oz) black beans, rinsed and drained - 1 cup cooked quinoa - 1 cup corn kernels (fresh or frozen) - 1 cup diced tomatoes (canned or fresh) - ½ cup diced red onion - 1 teaspoon cumin - 1 teaspoon smoked paprika - ½ teaspoon garlic powder - ½ teaspoon chili powder - Salt and pepper to taste Stir everything until well combined. The mixture should be colorful and fragrant. This filling is packed with flavor and nutrition. You can taste it to check the seasoning. Adjust with more salt or spices if needed. Spoon the filling into each bell pepper. Fill them generously, but don’t overfill. Place the stuffed peppers upright in a baking dish. If they seem wobbly, you can add a little water to the dish. This helps steam the peppers as they cook. Cover the dish with aluminum foil. Bake for 30 minutes. After that, remove the foil and sprinkle cheese on top. Use about 1 cup of shredded cheese, like cheddar or pepper jack. Bake for another 10-15 minutes. You want the cheese to melt and bubble. Once done, take them out and let cool for a few minutes. Garnish with fresh cilantro for a pop of color. Enjoy your tasty Black Bean Stuffed Peppers! For the full recipe, click [Full Recipe]. To keep your peppers firm, avoid overcooking them. Pre-baking the peppers for just 10 minutes helps. This gives them a head start without making them mushy. If you want extra crunch, skip the water in the baking dish. Instead, bake the peppers dry. The filling will steam them nicely. Taste your filling before you stuff the peppers. If it needs more flavor, add spices. You can increase the garlic powder or chili powder for a kick. For a fresh flavor, try adding lime juice. It brightens the dish and makes each bite pop. Don’t forget to adjust the salt to your liking! Cheese adds creaminess and flavor. I love using shredded cheddar or pepper jack. If you want a twist, try crumbled feta or goat cheese. For a crunchy topping, sprinkle crushed tortilla chips before serving. Fresh cilantro adds color and taste. You can also drizzle some avocado or sour cream on top for extra goodness. For the full recipe, check out the Black Bean Fiesta Stuffed Peppers. {{image_2}} You can easily add meat to your stuffed peppers. Ground beef or turkey works well. Just brown the meat in a pan before mixing it with the other filling ingredients. This adds more protein and flavor. If you like, you can also use shredded chicken or pulled pork. These options make the dish heartier. They can balance the beans and grains nicely. If you want to change the grain, quinoa is not the only option. You can use brown rice, farro, or even couscous. Each grain gives a different taste and texture. Brown rice is chewier, while couscous cooks faster and is fluffier. Farro has a nutty flavor that adds depth. Feel free to mix it up based on what you have at home. For those who enjoy heat, you can spice things up easily. Add fresh jalapeños or red pepper flakes to the filling. You can also use hotter chili powders. If you prefer a milder dish, reduce the chili powder and cumin. Adding a dollop of sour cream or yogurt on top also cools the heat. Adjust the spices to match your taste and enjoy a perfect meal. Check out the Full Recipe for details on making these tasty stuffed peppers! After you enjoy your Black Bean Stuffed Peppers, store leftovers in an airtight container. Make sure they cool down to room temperature first. Place a layer of plastic wrap or parchment paper between layers if stacking. This keeps them fresh and prevents sticking. Stored this way, they last for up to four days in the fridge. Want to save some for later? You can freeze these stuffed peppers! Let them cool completely. Wrap each pepper in plastic wrap, then in foil. This method prevents freezer burn. You can also place them in a freezer-safe bag. They will stay good for about three months. When you're ready to eat, thaw them in the fridge overnight. To reheat, remove the peppers from the fridge or freezer. If frozen, let them thaw first. Preheat your oven to 350°F (175°C). Place the peppers in a baking dish. Cover with foil to keep them moist. Bake for 20-25 minutes until heated through. You can also microwave them for 2-3 minutes, but the oven keeps them crispy. Enjoy your meal again! For the full recipe, check the [Full Recipe]. Yes, you can make these peppers ahead. Prepare the filling and stuff the peppers. Then, cover and refrigerate them. Bake them later when you are ready to eat. This saves time and makes dinner easy. You can use pinto beans or kidney beans instead. Chickpeas are also a great choice. If you prefer a meat option, ground turkey works well too. Each choice brings a different taste, but all can make your dish delightful. Yes, you can cook stuffed peppers on the stovetop. Use a large skillet with a lid. Add a little water or broth to the skillet. Place the stuffed peppers in the pan, cover, and cook on low heat. This method takes about 25 to 30 minutes. Check them often to avoid burning. In this blog post, we covered all about stuffed peppers. We reviewed ingredients, portions, and the choice between fresh and canned. Next, I shared step-by-step instructions for prepping and baking. I shared tips to avoid soggy peppers and enhance flavors. You learned variations like adding meat or grains and how to store leftovers. Stuffed peppers are not just tasty but also easy to prepare. Enjoy your cooking and make it your own!](https://dailydishlab.com/wp-content/uploads/2025/07/2ade4988-b5b7-4125-b2de-b7911ae6a9e2-768x768.webp)

![For a hearty bowl of Classic Chicken Tortilla Soup, gather the following: - 1 pound boneless, skinless chicken breasts - 1 tablespoon olive oil - 1 medium onion, chopped - 2 cloves garlic, minced - 1 red bell pepper, diced - 1 can (14.5 ounces) diced tomatoes - 4 cups chicken broth - 1 can (4 ounces) diced green chilies - 1 tablespoon ground cumin - 1 teaspoon smoked paprika - Salt and pepper to taste - 1 cup corn kernels (fresh, frozen, or canned) - 1 lime, juiced - Fresh cilantro, chopped for garnish - Tortilla strips (store-bought or homemade) - Avocado, sliced for serving (optional) - Shredded cheese (Mexican blend or cheddar, optional) Using fresh ingredients can really boost the flavor. I recommend choosing chicken breasts that are plump and firm. When picking your onion, look for one that feels heavy for its size. Opt for garlic with tight, dry skins for the best taste. For spices, always check the date on the label. Fresh spices make a big difference. When it comes to tomatoes, use diced ones in juice, not the ones in sauce. The broth should be low-sodium to control the salt level. If you prefer a richer flavor, use homemade chicken broth. You can elevate your soup with a few tasty garnishes. Fresh avocado adds creaminess. A sprinkle of shredded cheese gives a nice touch. Crispy tortilla strips add crunch and fun. Lastly, do not skip the cilantro; it brightens up the dish. You can also serve it with lime wedges for an extra zing! For a twist, consider adding sliced jalapeños for heat or black beans for more depth. Each addition creates a unique take on this classic dish. To see the full recipe, check out the complete instructions. To start, heat 1 tablespoon of olive oil in a large pot over medium heat. Once it warms, add 1 chopped onion. Sauté the onion for about 5 minutes until it softens. Then, stir in 2 minced garlic cloves and 1 diced red bell pepper. Cook for another 3 minutes until you smell the garlic. Next, add 1 pound of boneless, skinless chicken breasts to the pot. Season the chicken with salt, pepper, 1 tablespoon of ground cumin, and 1 teaspoon of smoked paprika. Cook the chicken for 2-3 minutes, stirring often. After that, pour in 1 can of diced tomatoes, 4 cups of chicken broth, and 1 can of diced green chilies. Stir well, and bring the mixture to a gentle boil. Once it boils, reduce the heat and let it simmer for 20 minutes. This cooks the chicken fully. Once done, take the chicken out of the pot. Let it cool for a bit. Use two forks to shred the chicken into bite-sized pieces. Return the shredded chicken back to the soup. Now, stir in 1 cup of corn kernels and the juice of 1 lime. Taste the soup and adjust the salt and pepper as needed. Let it simmer for 5 more minutes. Start by prepping ingredients first. Chop the onion and red bell pepper before cooking. This saves time and keeps you organized. While the chicken simmers, you can clean up your workspace. This makes cooking feel less chaotic. Also, use a timer for each step, so you stay on track. Lastly, make sure you have all your ingredients ready before you start. This way, you avoid last-minute searching. Shredding chicken can feel tricky, but I have a simple way. First, let the chicken cool after you take it out of the pot. This makes it easier to handle. Use two forks to pull the chicken apart. Hold one fork in each hand. Use the first fork to hold the chicken in place. With the second fork, pull the chicken apart into strips. If you have a stand mixer, you can use it too! Just place the cooked chicken in the bowl and use the paddle attachment. Turn it on low for a few seconds, and watch the chicken shred easily. This method saves time and gives you perfect shreds for your soup! To boost the taste of your soup, try these ideas: - Add a splash of lime juice. It brightens the flavors. - Use fresh herbs like cilantro or oregano. They add depth. - Consider roasted peppers for a smoky touch. They enhance the flavor. - Top your soup with crumbled queso fresco. It adds creaminess. - Spice it up with jalapeños or hot sauce. This adds heat. Many home cooks make a few common errors. Here’s how to avoid them: - Don’t skip the sauté step. It builds flavor in the base. - Be careful not to overcook the chicken. It should be juicy and tender. - Avoid using low-quality broth. Good broth makes a big difference. - Don’t forget to taste as you cook. Adjust seasonings early on. - Skip the tortilla strips at the end. They add a nice crunch. Having the right tools makes cooking easier. Here’s what you need: - A large pot or Dutch oven for cooking. - A sharp knife for chopping. - A cutting board for prep work. - Two forks for shredding chicken. - Ladles for serving soup. For more details, check the [Full Recipe]. {{image_2}} You can make a great vegetarian or vegan tortilla soup. Swap the chicken with hearty beans like black or pinto beans. Use vegetable broth instead of chicken broth for the base. Add more veggies, like zucchini or carrots, to boost flavor and texture. You can use tofu or tempeh for protein. Top your soup with avocado and tortilla strips for crunch. This version remains rich and satisfying. If you love heat, try my spicy version. Add sliced jalapeños or serrano peppers to the pot when you cook the onions. Use a spicier salsa instead of diced tomatoes. You can also add a few dashes of hot sauce right before serving. This will give a nice kick to your soup. Adjust the spice level to your liking, but remember to taste as you go! You can switch ingredients to create a regional twist. For a Southwest flair, add roasted corn or poblano peppers. If you want a Mexican touch, try using hominy instead of corn. Swap fresh cilantro for epazote for a unique flavor. Each change gives your soup a new taste. Let yourself explore and enjoy the cooking process. For the full recipe, check out the detailed instructions above! To keep your chicken tortilla soup fresh, store it in an airtight container. This helps lock in flavor and moisture. Allow the soup to cool to room temperature before sealing the container. It keeps well in the fridge for about 3 to 4 days. Make sure to label the container with the date. This way, you know when it was made. If you want to save your soup for later, freezing is a great option. First, allow the soup to cool completely. Pour the soup into freezer-safe bags or containers. Leave some space at the top, as liquids expand when frozen. The soup stays good for about 2 to 3 months in the freezer. When you’re ready to enjoy it again, simply thaw it overnight in the fridge. When reheating, do so gently to keep the soup tasty. Pour the soup into a pot over medium heat. Stir often to help it heat evenly. If it seems thick, add a bit of chicken broth or water to loosen it up. You can also reheat individual portions in the microwave. Just remember to stir halfway through for even heating. For more details on making this delicious dish, check out the Full Recipe. To make Classic Chicken Tortilla Soup gluten-free, you need to swap out the tortilla strips. Use gluten-free tortilla chips instead. You can also make homemade strips using gluten-free tortillas. Just cut them into strips and bake until crispy. Always check your canned ingredients, like broth and tomatoes, for gluten-free labels. For storing leftover soup, let it cool first. Then, place it in an airtight container. You can store it in the fridge for up to three days. If you want to keep it longer, freeze the soup. Use freezer-safe containers and leave some space for expansion. When you’re ready to eat, just thaw and reheat. Yes, using rotisserie chicken is a great shortcut! It saves time and adds flavor. Just shred the chicken and add it after the soup simmers. This method gives you a tasty dish without much effort. You can still follow the rest of the recipe as usual. For the full recipe, check the details above. This article covered all you need for making chicken tortilla soup. We talked about essential ingredients and their quality. You learned step-by-step instructions and helpful cooking tips. I shared tricks to avoid common mistakes and suggestions for equipment. We explored tasty variations and smart storage methods. Now, you can confidently create a flavorful soup. Enjoy your cooking journey and make it your own!](https://dailydishlab.com/wp-content/uploads/2025/07/be748eb7-43aa-4443-8b13-5155a2eb28e7-768x768.webp)
