Cajun Shrimp Rice Skillet Quick and Flavorful Meal

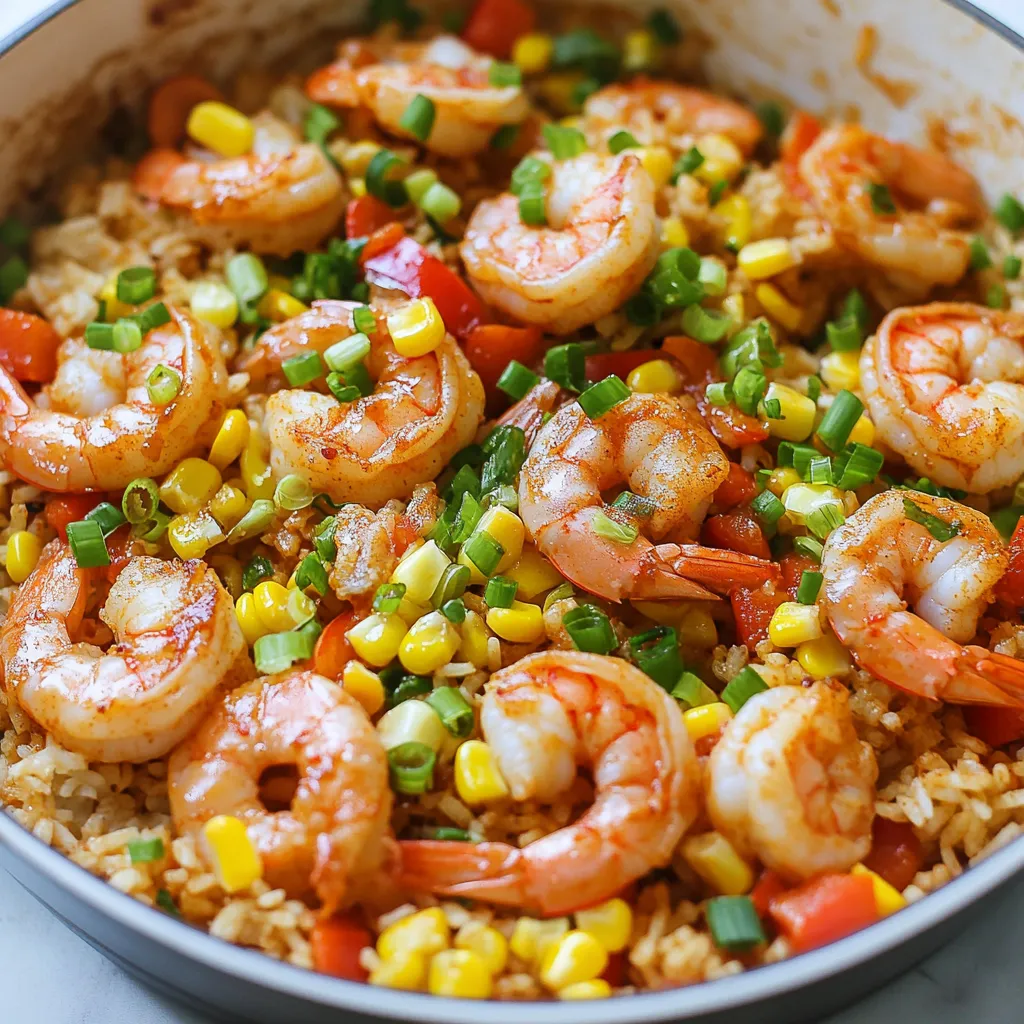
Craving a meal that’s quick and packed with flavor? Look no further than my Cajun Shrimp Rice Skillet! This dish is easy to whip up and bursting with spicy goodness. You’ll find step-by-step instructions to create a delightful dinner in under 30 minutes. Plus, I’ll share tips, tricks, and variations that will make this your go-to meal. Let’s dive in and spice up your kitchen!
Why I Love This Recipe
- Bold Flavors: The combination of Cajun seasoning and smoked paprika brings a vibrant and spicy kick to the dish, making every bite exciting.
- One-Pan Wonder: This recipe is cooked all in one skillet, which means fewer dishes to clean and more time to enjoy your meal.
- Quick and Easy: With a total time of just 30 minutes, this dish is perfect for busy weeknights when you want something delicious without a lot of fuss.
- Customizable: You can easily swap out the vegetables or add your favorite proteins, making it a versatile dish that fits your taste.
Ingredients
Detailed List of Ingredients
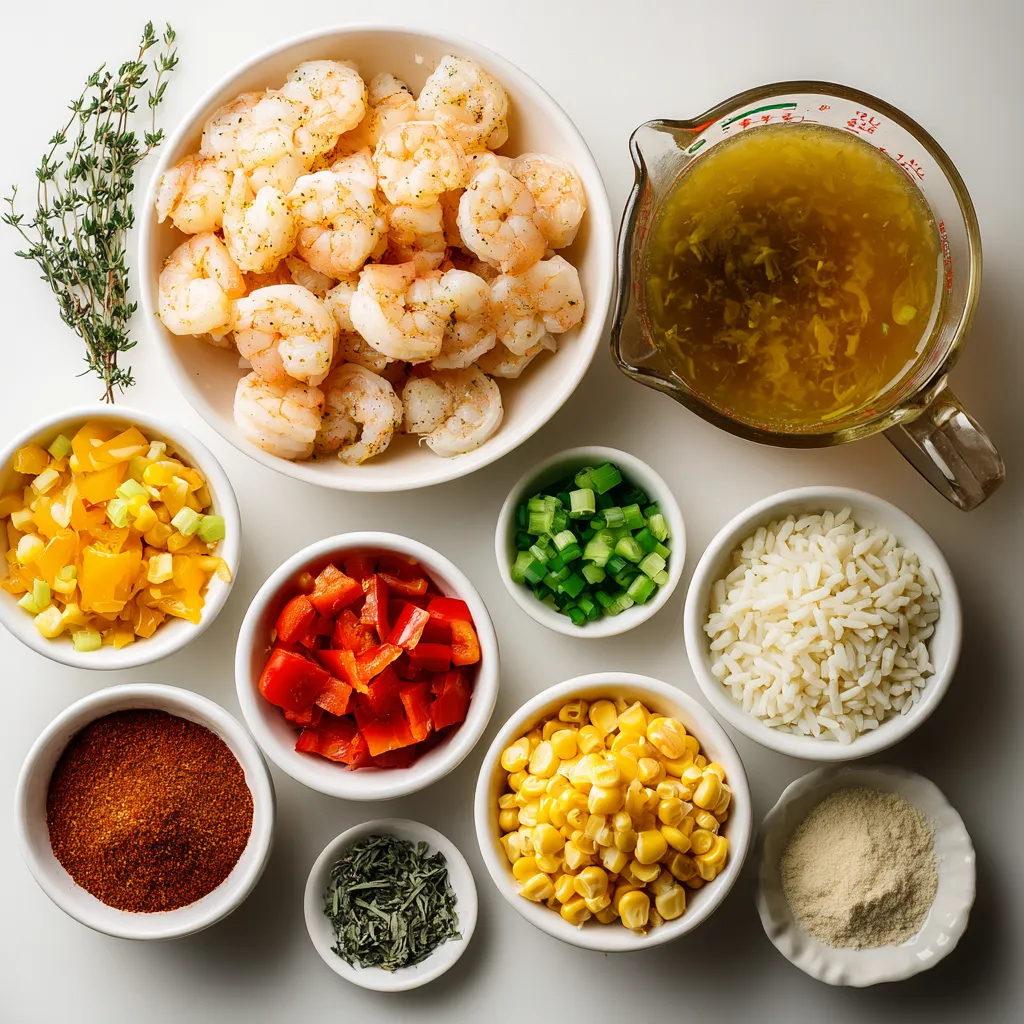
For a tasty Cajun Shrimp Rice Skillet, gather these items:
- 1 lb shrimp, peeled and deveined
- 1 cup long-grain rice
- 2 cups chicken broth
- 1 green bell pepper, diced
- 1 red bell pepper, diced
- 1 medium onion, chopped
- 3 cloves garlic, minced
- 2 tablespoons Cajun seasoning
- 1 teaspoon smoked paprika
- 1 teaspoon dried thyme
- 1 tablespoon olive oil
- 1 cup corn kernels (fresh or frozen)
- 2 green onions, sliced (for garnish)
- Salt and pepper to taste
Substitutions for Key Ingredients
You can easily swap out some ingredients if needed.
- For shrimp, use chicken or sausage for a different flavor.
- Swap long-grain rice with jasmine or basmati rice for a unique taste.
- Vegetable broth can replace chicken broth for a vegetarian option.
- Use sweet bell peppers if you prefer them over green.
- If you have no Cajun seasoning, blend equal parts of paprika, garlic powder, and cayenne.
Suggested Garnishes
To make your dish more appealing, add garnishes.
- Freshly chopped parsley brings a bright touch.
- Lime wedges add a zesty kick when squeezed on top.
- Sliced jalapeños give a spicy crunch.
- A dollop of sour cream can cool down the heat.

Step-by-Step Instructions
Preparing the Vegetables
First, gather all your vegetables. You need a medium onion, a green bell pepper, and a red bell pepper. Chop the onion into small pieces. Dice both bell peppers into similar-sized chunks. This helps them cook evenly. Heat a large skillet over medium heat and add one tablespoon of olive oil. Once hot, toss in the chopped onion and bell peppers. Cook them for about five minutes. You want them to soften and sweeten. Add three minced garlic cloves and stir for one more minute.
Cooking the Rice and Seasoning
Next, it’s time for the rice. Add one cup of long-grain rice to the skillet. Stir it often for about two minutes. This toasts the rice and brings out its flavor. Now, pour in two cups of chicken broth. Stir in two tablespoons of Cajun seasoning, one teaspoon of smoked paprika, and one teaspoon of dried thyme. Bring this mixture to a boil. Once it bubbles, lower the heat to low. Cover the skillet and let it simmer for 15 minutes. The rice will absorb most of the liquid and cook perfectly.
Sautéing the Shrimp
While the rice cooks, prepare the shrimp. Take one pound of peeled and deveined shrimp. Season them with salt, pepper, and a pinch of Cajun seasoning. Heat a separate pan over medium-high heat. Add a bit of olive oil, just enough to coat the bottom. Once hot, add the shrimp. Cook them for about 2-3 minutes. They should turn pink and opaque. After this, gently fold the sautéed shrimp and one cup of corn into the rice mixture. Cook for another 2-3 minutes to heat everything through. Taste and adjust the seasoning if needed.
Tips & Tricks
How to Perfectly Cook the Shrimp
To cook shrimp just right, you need to watch them closely. Start by heating olive oil in a separate pan over medium-high heat. Add the shrimp and cook them for about 2-3 minutes. They should turn pink and opaque when done. If you cook them too long, they can become rubbery. Season them with salt, pepper, and a pinch of Cajun seasoning for extra flavor.
Common Mistakes to Avoid
One common mistake is overcooking the shrimp. Remember, they cook fast. If you add them too early with the rice, they may turn tough. Another mistake is not to season properly. The spices in Cajun cooking are key. Don’t be shy; taste as you go. Lastly, don’t forget to stir the rice. This helps it cook evenly and prevents sticking.
Enhancing Flavor with Additional Spices
To make your Cajun Shrimp Rice Skillet even more flavorful, consider adding more spices. Some great options are cayenne pepper for heat or oregano for depth. You could also try some fresh herbs like parsley or cilantro. Adding a splash of lemon juice at the end brightens the dish nicely. Experiment and find what flavors you love most!
Pro Tips
- Fresh Shrimp: For the best flavor, use fresh shrimp instead of frozen. If using frozen, make sure to thaw completely and pat dry before cooking.
- Rice Toasting: Toasting the rice before adding the liquid enhances its nutty flavor, so don’t skip this step for a more delicious dish.
- Cajun Seasoning: Adjust the amount of Cajun seasoning based on your spice preference. Start with less and add more if you like it spicier!
- One-Pan Wonder: For easy cleanup, consider serving directly from the skillet. It makes for a beautiful presentation and keeps the dish warm.

Variations
Spicy Cajun Shrimp Rice Skillet
You can easily turn up the heat in this dish. To make a spicy Cajun shrimp rice skillet, add extra Cajun seasoning. You can also mix in some chopped jalapeños or cayenne pepper. Start with a small amount, then taste and adjust. This way, you control the spice level. The extra heat pairs well with the sweet corn and shrimp.
Adding Different Vegetables
Feel free to get creative with veggies. You can mix in zucchini, mushrooms, or even spinach. These add color and nutrients to the dish. Just make sure to cook them until they are tender before adding the rice. This keeps everything balanced and flavorful. You can also use frozen veggies if you’re short on time.
Vegetarian or Vegan Alternatives
To make this dish vegetarian, swap shrimp for chickpeas or tofu. These options add protein and soak up flavors well. Use vegetable broth instead of chicken broth for a vegan version. You can also add additional spices to keep the flavor rich. This way, everyone can enjoy a delicious meal!
Storage Info
How to Store Leftovers
To store leftovers, let the dish cool first. Then, place it in an airtight container. Make sure to seal it well. You can also use plastic wrap. Store it in the fridge for easy access. This keeps the flavors fresh and tasty.
Reheating Tips
When you’re ready to eat, reheat the Cajun Shrimp Rice Skillet on the stove. Add a small splash of chicken broth or water. This helps prevent it from drying out. Heat it over medium-low heat until it’s warm. Stir occasionally for even heating. You can also use the microwave. Just cover it with a lid to keep moisture in.
Shelf Life of the Dish
If stored properly, your Cajun Shrimp Rice Skillet lasts about 3 to 4 days in the fridge. After that, the flavors start to fade. For longer storage, you can freeze it. In the freezer, it can last up to 2 months. Just make sure to use a freezer-safe container.
FAQs
Can I use frozen shrimp for this recipe?
Yes, you can use frozen shrimp. Just make sure to thaw them first. Place them in cold water for about 15 minutes. This will help them cook evenly. Frozen shrimp are a great time-saver. They still taste amazing in this dish.
How can I make this dish spicier?
To amp up the heat, add more Cajun seasoning. You can also include diced jalapeños or cayenne pepper. A splash of hot sauce will give it a nice kick too. Adjust the spice to match your taste. Remember, you can always add more, but it’s hard to take away.
What can I serve with Cajun Shrimp Rice Skillet?
This dish pairs well with a simple green salad. A side of crusty bread also works great. You could serve it with roasted veggies for extra nutrients. If you like, add some cornbread for a Southern touch. Enjoy your meal with friends or family for a fun dining experience!
This post covered all you need to make a great Cajun Shrimp Rice Skillet. We looked at key ingredients, cooking steps, and room for fun variations. I shared tips to avoid common mistakes and improve taste. You can also learn how to store leftovers and heat them right. Remember, you can customize this dish to your liking! Enjoy making it your own and share it with friends. Happy cookin

Cajun Shrimp Rice Skillet
Ingredients
- 1 lb shrimp, peeled and deveined
- 1 cup long-grain rice
- 2 cups chicken broth
- 1 unit green bell pepper, diced
- 1 unit red bell pepper, diced
- 1 medium onion, chopped
- 3 cloves garlic, minced
- 2 tablespoons Cajun seasoning
- 1 teaspoon smoked paprika
- 1 teaspoon dried thyme
- 1 tablespoon olive oil
- 1 cup corn kernels (fresh or frozen)
- 2 unit green onions, sliced (for garnish)
- to taste salt and pepper
Instructions
- In a large skillet, heat the olive oil over medium heat. Add the chopped onion, diced green and red bell peppers, and cook until softened, about 5 minutes.
- Stir in the minced garlic and cook for another minute, until fragrant.
- Add the rice to the skillet, stirring frequently for about 2 minutes to toast the rice lightly.
- Pour in the chicken broth, then stir in the Cajun seasoning, smoked paprika, and dried thyme. Bring the mixture to a boil.
- Once boiling, reduce the heat to low, cover the skillet, and let it simmer for 15 minutes or until the rice is cooked and has absorbed most of the liquid.
- While the rice is cooking, season the shrimp with salt, pepper, and a pinch of Cajun seasoning.
- In a separate pan, quickly sauté the shrimp in a bit of olive oil over medium-high heat until they turn pink and opaque, about 2-3 minutes.
- Once the rice is done, gently fold in the sautéed shrimp and corn until well combined. Cook for another 2-3 minutes to heat everything through.
- Taste and adjust seasonings if necessary.


![To make a tasty Easy Broccoli Cheese Casserole, you need a few simple ingredients. Each one plays a key role in creating a rich flavor and creamy texture. Here’s what you will need: - 4 cups fresh broccoli florets - 1 cup cooked quinoa - 2 cups shredded cheddar cheese - 1 cup cream of mushroom soup - 1/2 cup milk - 1/4 cup sour cream - 1 teaspoon garlic powder - 1/2 teaspoon onion powder - Salt and pepper to taste - 1/2 cup breadcrumbs - 2 tablespoons olive oil Fresh broccoli florets give this dish its bright color and crunch. I like using cooked quinoa for a boost of protein. It makes the casserole more filling. The shredded cheddar cheese melts beautifully, adding a rich, creamy layer. Cream of mushroom soup is the secret to a dreamy texture. Milk and sour cream make everything extra smooth. Don’t forget the spices! Garlic powder and onion powder add depth to the flavor. You can adjust the salt and pepper to match your taste. The breadcrumbs on top add a nice crispiness, thanks to the olive oil. For the Full Recipe, check the detailed instructions. Enjoy making this dish with your family! First, preheat your oven to 350°F (175°C). This helps the casserole cook evenly. Next, grab a 9x13 inch baking dish and lightly grease it. This prevents sticking. Now, let’s steam the broccoli florets. Place them in a steamer for about 4-5 minutes. You want them tender but not mushy. Once done, set them aside to cool. In a large mixing bowl, combine the cooked quinoa, 1 1/2 cups of shredded cheddar cheese, cream of mushroom soup, milk, sour cream, garlic powder, onion powder, salt, and pepper. Mix everything well. You want a smooth, cheesy blend. This mix is the heart of your casserole, so make sure it's well combined. Now it’s time to fold in the steamed broccoli. Gently stir it into the cheesy mixture until coated. This adds a nice green color and texture. Pour this mixture into your prepared baking dish, spreading it out evenly. For the topping, mix breadcrumbs with olive oil in a small bowl. Sprinkle this mixture over the casserole. Finally, add the remaining 1/2 cup of shredded cheddar cheese on top. Place the casserole in the preheated oven. Bake it for 25-30 minutes. You will know it’s done when the top is golden brown and the cheese is bubbly. This creates a nice crust. After baking, let it cool for a few minutes before serving. This helps the flavors settle and makes it easier to serve. Enjoy your Easy Broccoli Cheese Casserole! For the full recipe, check the earlier section. To cook broccoli for the best texture, steam it lightly. This method keeps it bright green and crisp. Steam the florets for about 4-5 minutes. They should be tender but not mushy. This step helps them hold their shape and adds a nice bite to your casserole. Choosing the right cheese is key for flavor. I recommend using sharp cheddar. It melts well and gives a rich taste. If you want a creamier texture, try adding mozzarella. Mixing different cheeses can also add depth to your dish. You can easily make ingredient substitutions. If you don’t have quinoa, use rice or even pasta. For a lighter option, swap cream of mushroom soup with plain yogurt. This change keeps the dish creamy while cutting calories. Add-ins can boost flavor and nutrition. Consider mixing in cooked chicken or turkey for protein. Diced bell peppers or carrots can add color and crunch. You can also throw in some nuts for a nice crunch. These options make it fun and unique every time you make it. For the full recipe, check out the [Full Recipe]. {{image_2}} For a lighter version of this casserole, swap out some ingredients. Use low-fat cheese to cut calories. You can also replace cream of mushroom soup with a homemade version or low-sodium broth. This gives you control over the fat and salt levels. If you want a gluten-free option, use gluten-free breadcrumbs. You can also make your own with gluten-free bread if you prefer. These small changes keep the dish tasty while making it healthier. To add more flavor, you can include other vegetables. Bell peppers, carrots, or even spinach work well. These not only boost nutrition but also add great color. Mixing in proteins like cooked chicken or turkey makes the dish heartier. It turns a side dish into a full meal. For the best flavor, try adding fresh herbs like thyme or rosemary. These herbs brighten up the taste and add a nice aroma. You can also use a mix of cheeses for a more complex flavor profile. Just remember to keep it balanced so the broccoli shines through. For the complete recipe, check out the Full Recipe section. To keep your Easy Broccoli Cheese Casserole fresh, let it cool first. Once cool, cover it tightly with plastic wrap or aluminum foil. Store it in the fridge for up to three days. Use a clean spoon when serving, so you avoid cross-contamination. This way, you can enjoy your leftovers without worry. If you want to freeze your casserole, here’s what to do. First, let it cool completely. Then, cut it into portions. Wrap each piece in plastic wrap, then place them in a freezer bag. This helps keep the flavor and texture intact. When you are ready to eat, thaw it overnight in the fridge. Reheat in the oven at 350°F (175°C) until hot. This method works well to enjoy your Easy Broccoli Cheese Casserole later. For the complete recipe, check out the Full Recipe. How can I make this broccoli cheese casserole in advance? You can prepare this casserole a day ahead. Simply follow the recipe until you layer the casserole in the dish. Cover it tightly with plastic wrap and store it in the fridge. When ready to bake, remove the wrap and add a few extra minutes to the baking time. This method saves time and lets the flavors mix well. Can I use frozen broccoli instead of fresh? Yes, frozen broccoli works well in this casserole. Just thaw and drain it before mixing. This saves prep time and still gives you that great broccoli flavor. Make sure to squeeze out extra water to avoid a soggy casserole. What is the calorie count per serving? Each serving of this broccoli cheese casserole has about 300 calories. This count can vary based on your specific ingredients. If you use low-fat cheese or a lighter soup, the calories may drop. Does this casserole freeze well? Yes, this casserole freezes nicely. After baking, let it cool completely. Then, cover it tightly with foil or plastic wrap. Store it in the freezer for up to three months. When you want to eat it, thaw it overnight in the fridge and reheat in the oven. This helps keep the flavors fresh and delicious. For the full recipe, check out the Cheesy Broccoli Bliss Casserole! This blog covered a simple and tasty broccoli cheese casserole. You learned about the key ingredients, from fresh broccoli to spices. I shared step-by-step instructions for mixing and baking. Also, you discovered tips for perfecting the dish and ways to customize it. Finally, we discussed storage methods for leftovers. I hope you feel ready to make this dish! Enjoy your cooking and create a meal that everyone will love.](https://dailydishlab.com/wp-content/uploads/2025/07/a9a80e4c-75b2-4ae9-8984-ae1ea083217d-768x768.webp)

![- 1 lb boneless, skinless chicken breasts, sliced into thin strips - 2 tablespoons olive oil - 1 tablespoon lime juice - 1 teaspoon ground cumin - 1 teaspoon chili powder - 1 teaspoon garlic powder - 1 teaspoon onion powder - Salt and pepper to taste - 1 red bell pepper, sliced - 1 green bell pepper, sliced - 1 medium onion, sliced - 4 small flour tortillas For a great chicken fajita, the main ingredients matter. Start with fresh chicken. You want boneless, skinless breasts. Slice them thin for quick cooking. The next star is the bell peppers. I love a mix of red and green. They add color and crunch. Don't forget the onion. It adds sweetness when cooked. Seasonings make the fajitas pop. Ground cumin gives warmth. Chili powder adds a nice kick. Garlic and onion powders boost the flavor. A splash of lime juice brightens everything up. Always use salt and pepper to taste. - Fresh cilantro - Sour cream - Guacamole Garnishes can elevate your meal. Fresh cilantro adds a burst of freshness. Sour cream brings creaminess and coolness. Guacamole adds richness. You can mix and match these sides for a fun twist. - Skillet or cast-iron pan - Mixing bowl - Tongs You don't need fancy tools to make fajitas. A good skillet or cast-iron pan heats evenly. A mixing bowl works well for marinating chicken. Tongs help flip the chicken and veggies easily. With these basics, you're ready for a tasty night! For the full recipe, check out the link provided. Marinating the chicken Start by slicing 1 pound of boneless, skinless chicken breasts into thin strips. In a large bowl, mix the chicken with 2 tablespoons of olive oil, 1 tablespoon of lime juice, 1 teaspoon of ground cumin, 1 teaspoon of chili powder, 1 teaspoon of garlic powder, 1 teaspoon of onion powder, and salt and pepper. Stir until the chicken is well coated. Let it marinate for at least 15 minutes. This step adds flavor and keeps the chicken juicy. Cooking the chicken Preheat a large skillet or cast-iron pan over medium-high heat. Once hot, add the marinated chicken to the skillet. Cook the chicken for about 5 to 7 minutes. Stir it occasionally until the chicken is cooked through and lightly browned. Remove the chicken from the skillet and set it aside on a plate. Preparing bell peppers and onions While the chicken cools, slice 1 red bell pepper, 1 green bell pepper, and 1 medium onion. These veggies will add color and crunch to your fajitas. Cooking the vegetables In the same skillet, add the sliced bell peppers and onion. Sauté them for about 3 to 4 minutes. You want them tender but still crisp. The leftover flavor from the chicken will enhance the veggies. Tossing chicken and vegetables together After the vegetables are cooked, add the chicken back into the skillet. Toss everything together for another 2 minutes to heat it all through. This step mixes the flavors perfectly. Heating the tortillas Warm 4 small flour tortillas in a separate dry skillet or microwave for a few seconds. This makes them soft and easy to fold. Now you are ready to serve your chicken fajitas! Enjoy this simple yet tasty dish with fresh cilantro, sour cream, and guacamole. For the full recipe, check the details above. Marinating the chicken is key for great taste. It allows flavors to soak in well. I recommend marinating for at least 30 minutes. If you have time, longer is better. Use these seasonings for a tasty mix: - 1 teaspoon ground cumin - 1 teaspoon chili powder - 1 teaspoon garlic powder - 1 teaspoon onion powder - Salt and pepper to taste These spices add warmth and depth. They make the chicken truly delicious. To get the best results, heat your skillet to medium-high. A hot skillet helps brown the chicken. Stir the chicken often while cooking. This keeps it from sticking and helps it cook evenly. Cook for 5-7 minutes until the chicken is done. The edges should look golden brown. When cooking the veggies, sauté them for about 3-4 minutes. You want them tender but still crisp. This gives a nice texture to your fajitas. Serving fajitas is fun and easy! Start by placing a warm tortilla on a plate. Add a generous scoop of the chicken and veggie mix in the center. Top it off with fresh cilantro for color and flavor. You can also serve sour cream and guacamole on the side. This adds creaminess and richness to each bite. For a colorful plate, think about adding lime wedges too. They add a bright touch and a zesty kick. Enjoy your meal! {{image_2}} If you want to switch up the protein in your chicken fajitas, you have great options. You can use beef or shrimp for a different taste. Beef fajitas are juicy and rich. Shrimp cooks fast and adds a seafood twist. For those who prefer no meat, try using firm tofu or portobello mushrooms. These vegetarian options soak up spices well and taste great. The spice level is key to making fajitas your own. You can keep them mild, go for medium, or make them hot. To add heat, use jalapeños or serrano peppers. You can also add hot sauce or chili flakes. Start with small amounts and taste as you go. This way, you can find that perfect balance you love. Choosing the right tortilla can change your fajitas. Flour tortillas are soft and chewy, while corn tortillas are more traditional with a nice crunch. If you need gluten-free options, there are great corn tortillas available. You can also find gluten-free flour tortillas. Each choice will give your dish a different feel and flavor. For the full recipe, click [Full Recipe]. To keep your chicken fajitas fresh, store them in the fridge. Use an airtight container. Make sure to cool them first. They stay good for about 3 to 4 days. If you want to keep them longer, freeze your fajitas. Place them in a freezer-safe bag. They can last up to 3 months in the freezer. Reheating your fajitas can be easy. Use a skillet over medium heat for the best results. This method keeps the chicken and veggies nice and warm. You can also use a microwave. Just heat in short bursts. Stir in between to avoid hot spots. To keep your fajitas from getting soggy, don't cover them tightly while reheating. Chicken fajitas are safe to eat for 3 to 4 days in the fridge. If you freeze them, they last up to 3 months. Check for signs of spoilage before eating. Look for any off smells or changes in color. If they seem odd, it’s best to toss them. Enjoy your meal safely! For the full recipe, check out [Full Recipe]. To make chicken fajitas from scratch, follow these steps: 1. Marinate the Chicken: In a bowl, mix sliced chicken with olive oil, lime juice, cumin, chili powder, garlic powder, onion powder, salt, and pepper. Ensure each piece is well coated. 2. Cook the Chicken: Heat a skillet over medium-high heat. Add the marinated chicken and cook for 5-7 minutes. Stir until it turns golden brown and is cooked through. 3. Sauté the Veggies: Remove the chicken and set it aside. In the same skillet, add sliced bell peppers and onion. Cook for about 3-4 minutes until they are tender yet crisp. 4. Combine: Return the chicken to the skillet. Toss everything together for 2 more minutes to blend flavors. 5. Warm Tortillas: Heat flour tortillas in a dry skillet or microwave for a few seconds. 6. Serve: Place the chicken and veggies in the center of each tortilla. Add fresh cilantro, and serve with sour cream and guacamole. For the full recipe, check out the complete guide. Yes, you can use frozen chicken for fajitas. However, there are a few things to consider: - Thawing: Thaw the chicken in the fridge overnight or use the defrost setting on your microwave. - Cooking Time: Frozen chicken may take longer to cook. Ensure it reaches an internal temperature of 165°F. - Flavor: Fresh chicken may absorb marinades better than frozen. If using frozen, marinate it after thawing for better flavor. Toppings can enhance your chicken fajitas. Here are popular choices: - Fresh Cilantro: Adds brightness to each bite. - Sour Cream: Provides a creamy texture and coolness. - Guacamole: Offers rich flavor and creaminess. - Shredded Cheese: Adds a savory touch. - Salsa: Brings extra zest and freshness. - Lime Wedges: A squeeze of lime can brighten the dish. Feel free to mix and match to find your perfect topping combination! In this article, we explored classic chicken fajitas, from ingredients to cooking steps. You learned about marinating chicken, sautéing veggies, and the best serving tips. I also shared ways to customize flavors and storage info. Remember, a good fajita needs quality ingredients and care. Enjoy experimenting with different proteins and spice levels! Fajitas are fun and easy, so get cooking and share your delicious results.](https://dailydishlab.com/wp-content/uploads/2025/06/66375333-28c8-40a4-a8c4-3c36aa5b429f-768x768.webp)
![- 6 boneless, skinless chicken thighs - 1/4 cup honey - 1/4 cup soy sauce - 1 tablespoon rice vinegar - 4 cloves garlic, minced - 1 tablespoon fresh ginger, grated For this dish, the main star is the chicken thighs. They are juicy and tender. The honey adds sweetness, while soy sauce brings depth. Rice vinegar gives a nice tang. Garlic and ginger add a burst of flavor. - 2 green onions, thinly sliced - Sesame seeds Garnishes make the dish pop. Green onions add a fresh crunch. Sesame seeds add a nutty touch. These small details can elevate your meal. - 2 tablespoons olive oil - Salt and pepper to taste - 1 teaspoon sesame oil Seasoning is key for great taste. Olive oil helps with cooking and flavor. Salt and pepper enhance the natural flavors. Sesame oil adds a rich aroma. You can adjust these to fit your taste. For the complete recipe, check out the [Full Recipe]. To start, gather your ingredients. In a medium bowl, whisk together: - 1/4 cup honey - 1/4 cup soy sauce - 1 tablespoon rice vinegar - 4 cloves garlic, minced - 1 tablespoon fresh ginger, grated - 2 tablespoons olive oil - 1 teaspoon sesame oil Mix until smooth. This honey garlic blend will give your chicken a sweet and tangy taste. Next, place the 6 boneless, skinless chicken thighs into a large resealable plastic bag or bowl. Pour the marinade over the chicken. Make sure each piece gets coated well. Seal the bag or cover the bowl. Refrigerate the chicken for at least 30 minutes. For even better flavor, marinate for up to 4 hours. You can choose to grill or pan-sear your chicken. - Grilling: Preheat your grill to medium-high heat. - Pan-searing: Heat a large skillet over medium heat. Once ready, take the chicken out of the marinade. Let the excess marinade drip off. Season your chicken with salt and pepper. Cook the chicken thighs for about 6-7 minutes on each side. Make sure they reach an internal temperature of 165°F (75°C) and get a nice caramelized look. In the last few minutes, you can brush some reserved marinade over the chicken. Just remember, only use marinade that has not touched raw chicken. Enjoy your meal! The full recipe is easy to follow, making a delicious dish. For the best flavor, marinate your chicken thighs for at least 30 minutes. You can let them sit for up to 4 hours for a bolder taste. Use a large resealable bag or a bowl to coat the chicken fully. Make sure you flip the bag or stir the bowl occasionally. This helps the marinade reach every spot. To check if your chicken is done, use a meat thermometer. The safe internal temperature is 165°F (75°C). This ensures the chicken is juicy and safe to eat. Always wash your hands and surfaces after touching raw chicken. It’s key to avoid cross-contamination. For serving, place the chicken thighs on a big platter. Drizzle some honey or leftover marinade over them for extra shine. Serve with steamed rice or colorful stir-fried vegetables for a complete meal. Garnish with green onions and sesame seeds for a beautiful look. Enjoy your dish! {{image_2}} You can add a bright flavor to your honey garlic chicken thighs. Just include some orange or lemon zest. This little move gives your dish a fresh taste. The citrus adds a nice zing that works well with the sweet honey. Simply mix the zest into your marinade for a tasty twist! Want to kick it up a notch? Try adding chili flakes or sriracha. This gives your chicken a spicy kick that balances the sweetness of the honey. Start with a little, then taste as you go. You can adjust the heat to match your preference. It’s a fun way to switch up the flavor! If you're looking for a lighter meal, use skinless chicken thighs. This keeps your dish flavorful without the extra fat. You can also swap regular soy sauce for low-sodium soy sauce. This small change makes your honey garlic chicken healthier while still tasting great. Small tweaks can lead to big benefits! For the full recipe, check out the detailed instructions to create your flavorful dish. Store your leftover honey garlic chicken thighs in an airtight container. This keeps them fresh. Ensure they cool down before sealing. They will stay good for up to four days in the fridge. If you want to eat them later, avoid leaving them out for more than two hours. This helps prevent bacteria growth. You can freeze cooked chicken thighs too. First, let them cool completely. Then, wrap each thigh in plastic wrap. Place them in a freezer-safe bag or container. They will last up to three months in the freezer. When you're ready to eat, move them to the fridge for overnight thawing. To reheat, use the oven for best results. Preheat the oven to 350°F (175°C). Place the chicken on a baking sheet and cover with foil. Heat for about 15-20 minutes, or until warmed through. You can also use a microwave. Just place the chicken on a plate, cover it, and heat for about 1-2 minutes. Check every 30 seconds to avoid overcooking. Reheating this way keeps the chicken juicy and tasty. For more detailed steps, check the Full Recipe. To make Honey Garlic Chicken Thighs, follow these simple steps: 1. Prepare the marinade by mixing honey, soy sauce, rice vinegar, minced garlic, grated ginger, olive oil, and sesame oil in a bowl. 2. Marinate the chicken in a bag or bowl for at least 30 minutes. 3. Cook the chicken on a grill or in a pan for about 6-7 minutes per side. 4. Glaze the chicken with some reserved marinade in the last minutes of cooking. 5. Rest and serve the chicken after cooking, garnished with green onions and sesame seeds. This process creates juicy, flavorful chicken with a sticky glaze that you will love. You have many options for side dishes that pair well with Honey Garlic Chicken Thighs: - Steamed rice - Stir-fried vegetables - Quinoa salad - Garlic mashed potatoes - Roasted broccoli Each of these sides complements the sweet and savory notes of the chicken. Yes, you can use chicken breasts, but there are pros and cons: - Pros: Chicken breasts are leaner and cook faster. - Cons: They can dry out more easily than thighs if overcooked. Chicken thighs offer more flavor and tenderness, making them a great choice for this recipe. Yes, this recipe is perfect for meal prep. Here are some tips: - Cook a larger batch and store in airtight containers. - Divide into single servings for easy lunches or dinners. - Keep the chicken in the fridge for up to four days or freeze for longer storage. Meal prepping makes it easy to enjoy delicious Honey Garlic Chicken Thighs all week! For the complete cooking process, check out the [Full Recipe]. This blog post covered a simple recipe for Honey Garlic Chicken Thighs. We explored the main ingredients, the marinade process, and cooking methods. I shared tips on marinating, cooking, and presenting your dish. You also learned about variations and how to store leftovers. In closing, enjoy the rich flavor of this dish. It’s easy to make, healthy, and perfect for sharing. Experiment with the variations to keep your meals exciting. Whether you grill or pan-sear, this recipe is sure to impress. Happy cooking!](https://dailydishlab.com/wp-content/uploads/2025/07/290d04f4-f0f3-4f16-8110-9751a8193952-768x768.webp)