Caramel Banana Cream Trifle Delightfully Fresh Treat

If you’re looking for a sweet treat that dazzles with flavor and texture, you need to try this Caramel Banana Cream Trifle. This recipe combines creamy bananas, rich caramel, and fluffy whipped cream, layered perfectly for a delightfully fresh dessert. It’s easy to make and perfect for any occasion. Get ready to impress your family and friends with this show-stopping dessert that’s as delicious as it is beautiful!
Ingredients
List of Ingredients
- 3 ripe bananas, thinly sliced
- 1 cup heavy cream
- ½ cup caramel sauce (can be store-bought or homemade)
- 1 cup vanilla pudding (prepared and chilled)
- 1 cup ladyfinger cookies or crumbled sponge cake
- 1 teaspoon pure vanilla extract
- ¼ cup toasted walnuts or pecans, coarsely chopped
- A pinch of sea salt
Measurement Tips
Accurate measurements make a big difference. Use a kitchen scale for exact amounts. If you don’t have ladyfingers, crumbled sponge cake works well. You can also swap the nuts for your favorite type.
Quality Ingredients
Fresh bananas and high-quality cream are key. They enhance the flavor of the trifle. For caramel sauce, homemade gives the best taste. But if you’re short on time, store-bought works just fine. Always choose the best ingredients to make your trifle shine.
Step-by-Step Instructions
Preparing the Whipped Cream
To make the whipped cream, start with a large mixing bowl. Pour in 1 cup of heavy cream. Use an electric mixer on medium speed. Beat the cream until soft peaks form. Then, add 1 teaspoon of pure vanilla extract. Increase the speed and keep whipping. Stop when stiff peaks form. This means the cream holds its shape well.
Layering the Trifle
Now, let’s create the base layer. Take either a big trifle dish or small cups. Begin with crumbled ladyfinger cookies or sponge cake. Spread these evenly at the bottom. This forms a solid base for the trifle. Next, spoon a thick layer of vanilla pudding over the cookies. Smooth it out with a spatula, covering the cookies completely.
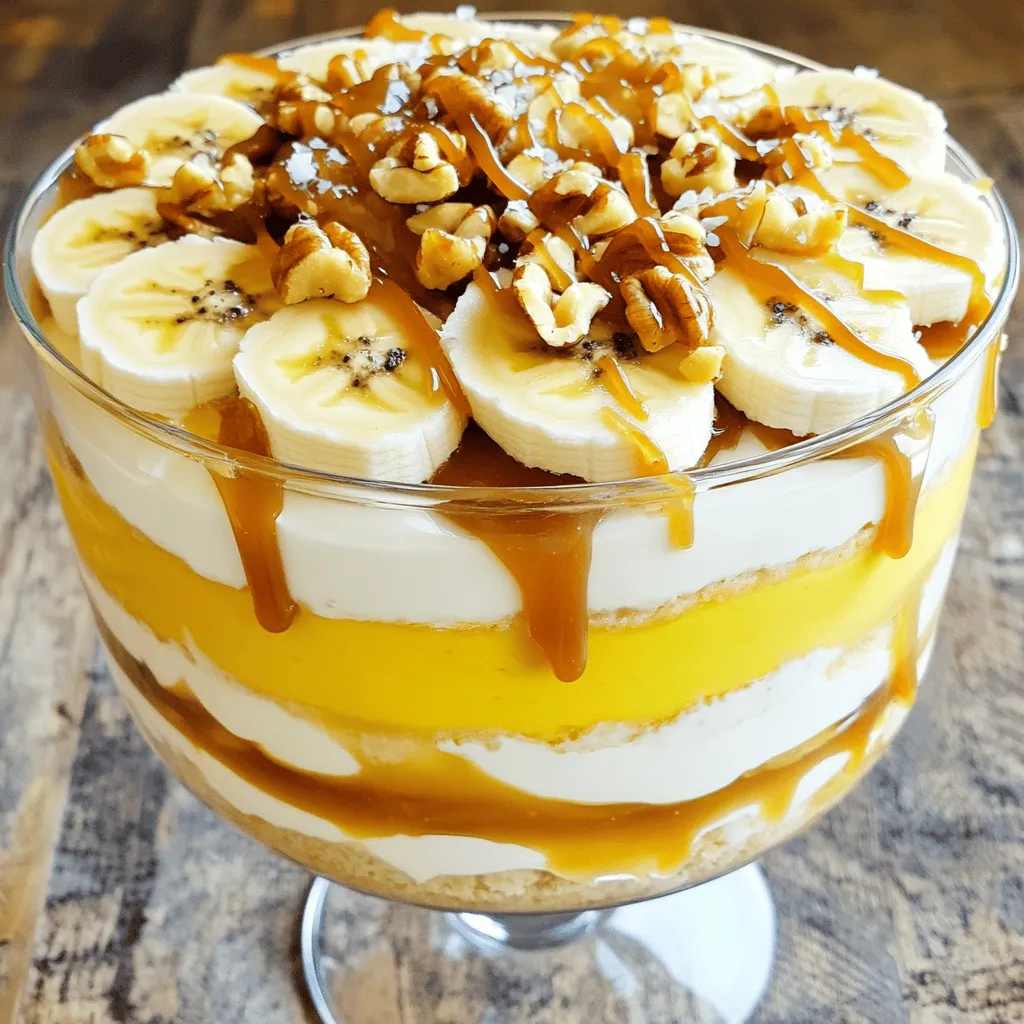
Now, it’s time for the banana layer. Arrange the thinly sliced bananas on top of the pudding. Then, drizzle some caramel sauce over the bananas. This adds a sweet touch. Follow with a layer of the whipped cream. Spread it carefully over the bananas, making a fluffy cap.
Repeat the layers. Start again with the cookies, then pudding, bananas, and whipped cream. Keep going until the dish is full. Make sure the last layer is whipped cream.
Final Steps
For a finishing touch, drizzle extra caramel sauce over the top. Sprinkle chopped toasted walnuts or pecans on the whipped cream. Add a pinch of sea salt to balance the sweetness.
Now, cover the trifle with plastic wrap or a lid. Chill it in the fridge for at least 2 hours. This waiting time helps the flavors mix well.
For serving, use clear glass bowls or cups. This way, you can show off the nice layers. Top each with a small sprig of fresh mint for color. Enjoy this tasty dessert!
Tips & Tricks
Perfecting the Texture
To get the right whipped cream, start with cold heavy cream. Use a large bowl and beat the cream on medium speed. Stop when soft peaks form. Then, add pure vanilla extract. Increase the speed until you see stiff peaks. This keeps the cream fluffy and light.
To avoid soggy layers, layer the ingredients in the right order. Start with cookies at the bottom. Add pudding next, then bananas. Finish with whipped cream. Repeat this until the dish is full. Each layer should be even. This keeps the trifle from collapsing.
Flavor Enhancements
For extra flavor, try adding a sprinkle of cinnamon or nutmeg. These spices add warmth and depth to the dessert. You can also experiment with toppings. Consider adding chocolate shavings or fresh berries. These can brighten the dessert and add different flavors.
Common Mistakes to Avoid
One common mistake is overwhipping the cream. If you whip too long, it can turn grainy. Stop whipping as soon as you see stiff peaks. This keeps the cream smooth and creamy.
Another mistake is incorrect layering. If you do not layer properly, the trifle can look messy. Be sure to spread each layer evenly. This makes the trifle look beautiful and keeps it together.Enjoy making this delightful dessert!

Variations
Alternative Ingredients
You can switch things up with different fruits, like strawberries or apples. These fruits add a fresh twist and new flavors. If you want a gluten-free version, try using gluten-free cookies. They work just as well and keep the treat delicious.
Flavor Combinations
Love chocolate? You can mix in chocolate or mocha flavors. Just add cocoa powder to the pudding or use chocolate pudding. You can also try flavored puddings, like banana or butterscotch, for an extra fun taste.
Serving Styles
You can serve this trifle in cups or a big trifle dish. Individual cups make it easy for guests to enjoy without sharing. A large dish looks great for family-style serving. Either way, it’s sure to impress!
Storage Info
How to Store Leftovers
To keep your trifle fresh, cover it tightly with plastic wrap or a lid. Store it in the fridge. This helps keep it cool and tasty. Use a glass or ceramic dish for best results. Avoid using metal containers, as they can change the flavor. To prevent soggy layers, try not to mix the layers too much when you serve.
Freezing Options
Can you freeze a trifle? Yes, but there are pros and cons. Freezing can change the texture of the whipped cream and bananas. If you want to freeze your trifle, layer it in a freezer-safe container. Leave some space at the top, as it may expand. Thaw it in the fridge overnight before serving. Remember, it may not taste as fresh as when made.
Shelf Life
How long does the trifle last in the fridge? Typically, it lasts about three days. After that, the layers may start to break down. Look for signs of spoilage, like a sour smell or watery layers. If you see any mold or strange colors, it’s best to discard it. Enjoy your trifle while it’s at its best!
FAQs
What is a trifle?
A trifle is a layered dessert. It often includes cake, cream, and fruit. In this recipe, I use ladyfinger cookies, vanilla pudding, bananas, and whipped cream. Each layer adds flavor and texture. The dessert looks beautiful in a clear dish. It invites you to dig in and enjoy.
Can I make the trifle ahead of time?
Yes, you can make this trifle ahead of time. It actually tastes better when it sits. I recommend preparing it a few hours before serving. Cover it well and chill it in the fridge. This allows the flavors to blend. Just remember to add the nuts on top just before serving. This keeps them crunchy.
Is this recipe suitable for special diets?
This recipe can be made gluten-free. Use gluten-free ladyfinger cookies or sponge cake. For nut-free needs, skip the walnuts or pecans. The trifle will still taste great without them. Always check labels to ensure safety. You can enjoy this dessert in many ways!
In this blog post, we explored how to make a delicious trifle. We discussed key ingredients like bananas, heavy cream, and caramel sauce. You learned measurement tips and the value of quality ingredients. We provided step-by-step instructions for whipping cream and layering your dessert. I shared helpful tips to perfect texture and avoid common mistakes. Plus, I offered variations and storage advice.
Now, it’s time to get creative and enjoy your trifle! Experiment with flavors and toppings, and make it your own. Enjoy your sweet creations!


![To make these delicious pancakes, gather the following ingredients: - 1 cup all-purpose flour - 1 tablespoon baking powder - 1 teaspoon ground cinnamon - 1/2 teaspoon ground nutmeg - 1/4 teaspoon salt - 1 cup pumpkin puree (canned or fresh) - 1 cup milk (or non-dairy alternative) - 1 large egg - 2 tablespoons brown sugar - 1 teaspoon vanilla extract - 2 tablespoons melted butter (or coconut oil) - For the cinnamon swirl: - 2 tablespoons brown sugar - 1 teaspoon ground cinnamon - 1 tablespoon melted butter You can swap some ingredients for different options. Here are a few ideas: - For all-purpose flour, try whole wheat flour for a heartier pancake. - If you want a dairy-free option, use almond milk or oat milk instead of regular milk. - Replace the large egg with a flax egg (1 tablespoon ground flaxseed mixed with 2.5 tablespoons water). - Coconut oil can replace butter for a dairy-free pancake. Using fresh pumpkin can give your pancakes a vibrant taste. Fresh pumpkin has a rich texture and a sweet flavor. However, canned pumpkin works well too. It is convenient and saves time. Canned pumpkin is often cooked and pureed, making it ready to use. Both options can provide the delicious taste you want. So, choose based on your time and preference. To make Cinnamon Swirl Pumpkin Pancakes, start by gathering your ingredients. In a large bowl, whisk together the flour, baking powder, ground cinnamon, nutmeg, and salt. This helps the dry ingredients mix well. In another bowl, blend the pumpkin puree, milk, egg, brown sugar, vanilla extract, and melted butter until smooth. Pour this mixture into the dry ingredients and stir gently. Remember, a few lumps are okay; overmixing can make pancakes tough. Next, prepare the cinnamon swirl. In a small bowl, mix brown sugar, ground cinnamon, and melted butter until it forms a paste. Preheat your skillet over medium heat. Lightly grease it with cooking spray or butter. For each pancake, pour about 1/4 cup of batter onto the skillet. Use the back of a spoon to create a swirl with the cinnamon mix on top of the batter. Cook the pancakes until bubbles form on the surface, about 2-3 minutes. Then, carefully flip them and cook for another 1-2 minutes until golden brown. Repeat this process until you finish all the batter and swirl. These steps will give you fluffy and flavorful pancakes. To achieve the right pancake texture, keep these tips in mind: - Use fresh ingredients. Fresh baking powder gives better rise. - Avoid overmixing the batter. This keeps pancakes light and fluffy. - Let the batter rest for a few minutes. This helps the gluten relax. - Adjust your heat. If pancakes brown too quickly, reduce the heat. These small adjustments can make a big difference in your pancake outcome. The cinnamon swirl is what makes these pancakes special. Here’s how to incorporate it perfectly: - When you pour the batter, do it in a circular motion. This helps the swirl blend nicely. - Use a spoon to create a gentle spiral. Don’t press too hard; you want a light touch. - If you have leftover swirl, drizzle it on top when serving. This will enhance the flavor and visual appeal of your pancakes. If you want more tips or the full recipe, check out the details I provided earlier. Enjoy your cooking! To make your pancakes fluffy, use a light hand when mixing. Overmixing can lead to tough pancakes. Mix until just combined, leaving some lumps in the batter. Also, let the batter rest for a few minutes before cooking. This helps the baking powder to activate and creates a lighter texture. Use a non-stick skillet or griddle for even cooking, and keep the heat at medium. This way, you avoid burning the outside while the inside remains raw. If you want thicker pancakes, add a bit more flour. For thinner pancakes, add a little milk. You can also change the spices to match your taste. Love nutmeg? Add a bit more! Prefer a sweeter pancake? Increase the brown sugar slightly. Always taste your batter before cooking to get it just right. You can even mix in chocolate chips or nuts for extra flavor. Serve your pancakes warm with maple syrup or honey. A dollop of whipped cream adds a nice touch, too. For a fun twist, sprinkle some chopped pecans or walnuts on top. You can also add a sprinkle of cinnamon for added warmth. If you want to make it a full breakfast, serve alongside crispy bacon or fresh fruit. These pancakes also pair well with a cup of hot coffee or chai tea. For the full recipe, check out the complete instructions above. {{image_2}} You can make these pancakes gluten-free. Swap the all-purpose flour for a gluten-free blend. Look for one that works well in baking. You can also use almond flour or oat flour. Just keep in mind that the texture may change slightly. Adding a little xanthan gum helps to bind the batter. This keeps your pancakes light and fluffy. To make this recipe vegan, use a non-dairy milk like almond or oat milk. Replace the egg with a flax egg. Just mix one tablespoon of ground flaxseed with three tablespoons of water. Let it sit for five minutes to thicken. You can also use vegan butter or coconut oil in place of regular butter. These swaps keep the pancakes rich and tasty without any dairy or eggs. Spice it up! You can add different flavors to your pancakes. Try adding a dash of ginger or allspice for a warm kick. Chopped nuts, like walnuts or pecans, add a nice crunch. You can also fold in chocolate chips for a sweet treat. For a fruity twist, add blueberries or cranberries. Each variation gives a new taste to your pancakes. These ideas let you customize your breakfast to fit your mood. For the full recipe, check out the *Full Recipe* section. After you enjoy your cinnamon swirl pumpkin pancakes, store leftovers properly. Let the pancakes cool to room temperature. Then, stack them with parchment paper in between each. This helps prevent them from sticking. Place the stack in an airtight container or wrap them tightly in plastic wrap. Keep them in the fridge for up to three days. If you want to save pancakes for later, freezing is a great option. Place cooled pancakes in a single layer on a baking sheet. Freeze them for about an hour. Once frozen, transfer them to a freezer-safe bag. This prevents them from sticking together. They can last up to two months in the freezer. To reheat, you can use a microwave or a toaster oven. For the microwave, heat them for about 30 seconds. Check if they are warm enough. For the toaster oven, set it to a low temperature and heat until warmed through. Pancakes in the fridge should be eaten within three days. If they start to smell sour or look dry, it’s time to toss them. Frozen pancakes can last up to two months. Be sure to check for freezer burn or ice crystals before eating. If they seem off, it’s best to err on the side of caution. Enjoy your delicious cinnamon swirl pumpkin pancakes at their best! For the full recipe, check out the [Full Recipe]. Yes, you can make the batter ahead of time. Mix your dry and wet ingredients separately, then store them in the fridge. Just remember to combine them when you're ready to cook. This makes your mornings easier and faster! You can use several alternatives to milk. Almond milk, soy milk, or oat milk work well. If you want a creamier taste, try coconut milk. Each option adds a unique flavor to your pancakes. Look for bubbles on the surface of the pancakes. When bubbles form, it’s time to flip them. Cook until they turn golden brown on both sides. A good pancake should feel firm but springy to the touch. Enjoy your cooking! For the full recipe, check out the details above. In this blog post, we explored how to make delicious cinnamon swirl pumpkin pancakes. We covered the essential ingredients and suggested alternatives, like fresh versus canned pumpkin. You learned step-by-step instructions for perfect pancakes and tips for cooking and serving. We also shared variations, including gluten-free and vegan options. Finally, we went over storage tips to keep leftovers fresh. Enjoy making these pancakes! They’re easy, tasty, and perfect for any meal.](https://dailydishlab.com/wp-content/uploads/2025/07/40c25aa9-222c-4f53-9c69-0bb881f505c1-768x768.webp)