
If you’re ready to elevate your breakfast game, this Caramelized Banana Pancakes recipe is your answer! Soft, fluffy pancakes topped with sweet, caramelized bananas make for a delightful morning treat. With simple ingredients and easy steps, you can whip up this dish in no time. Let’s dive into how to create these delicious pancakes that will impress your taste buds and make you the star of breakfast!
Why I Love This Recipe
- Deliciously Sweet: The caramelized bananas add a rich, sweet flavor that elevates classic pancakes to a whole new level.
- Easy to Make: This recipe comes together quickly, making it perfect for busy mornings or leisurely brunches.
- Customizable: You can easily adjust the ingredients, adding nuts or chocolate chips for extra texture and flavor.
- Family-Friendly: Kids and adults alike will love these pancakes, making them a hit for family breakfasts or gatherings.
Ingredients
Main Ingredients
– 1 cup all-purpose flour
– 2 tablespoons sugar
– 1 cup milk
– 1 large egg
– 2 tablespoons melted butter
– 2 ripe bananas, sliced
These main ingredients are key to making your pancakes fluffy and delicious. All-purpose flour gives the right texture, while sugar adds sweetness. Milk and an egg bind the mixture. The butter brings richness, and ripe bananas provide natural sweetness and flavor.
Additional Components
– 1 tablespoon baking powder
– 1/2 teaspoon salt
– 2 tablespoons brown sugar
– 1 teaspoon cinnamon
– Maple syrup for serving
The baking powder helps the pancakes rise, making them fluffy. Salt balances the sweetness. Brown sugar adds a caramel flavor when cooking the bananas. Cinnamon gives warmth and depth. Finally, maple syrup is perfect for drizzling on top. Each ingredient plays a role in creating a delightful pancake experience.

Step-by-Step Instructions
Preparing the Batter
1. Whisking dry ingredients: Start with a large bowl. Add 1 cup of all-purpose flour, 2 tablespoons of sugar, 1 tablespoon of baking powder, and 1/2 teaspoon of salt. Whisk them together until they blend well. This mix creates the base for your pancakes.
2. Mixing wet ingredients: In another bowl, whisk together 1 cup of milk, 1 large egg, and 2 tablespoons of melted butter. Slowly pour this mix into the dry ingredients. Stir gently until just combined. Some lumps are okay. Avoid overmixing, as that can make your pancakes tough.
Cooking the Caramelized Bananas
1. Melting butter and adding bananas: Heat a skillet over medium heat. Add a small pat of butter and let it melt. Once the butter is hot, add 2 sliced ripe bananas.
2. Caramelizing with brown sugar and cinnamon: Sprinkle the bananas with 2 tablespoons of brown sugar and 1 teaspoon of cinnamon. Cook for about 2-3 minutes, stirring gently. You want the bananas to soften and turn golden. Remove the skillet from heat and set the bananas aside.
Cooking the Pancakes
1. Pouring batter into skillet: In the same skillet, pour about 1/4 cup of pancake batter for each pancake. Watch for bubbles to form on the surface. This usually takes around 2 minutes.
2. Flipping pancakes for even cooking: When you see bubbles, it’s time to flip. Carefully turn the pancakes over and cook for another 1-2 minutes until they turn golden brown.
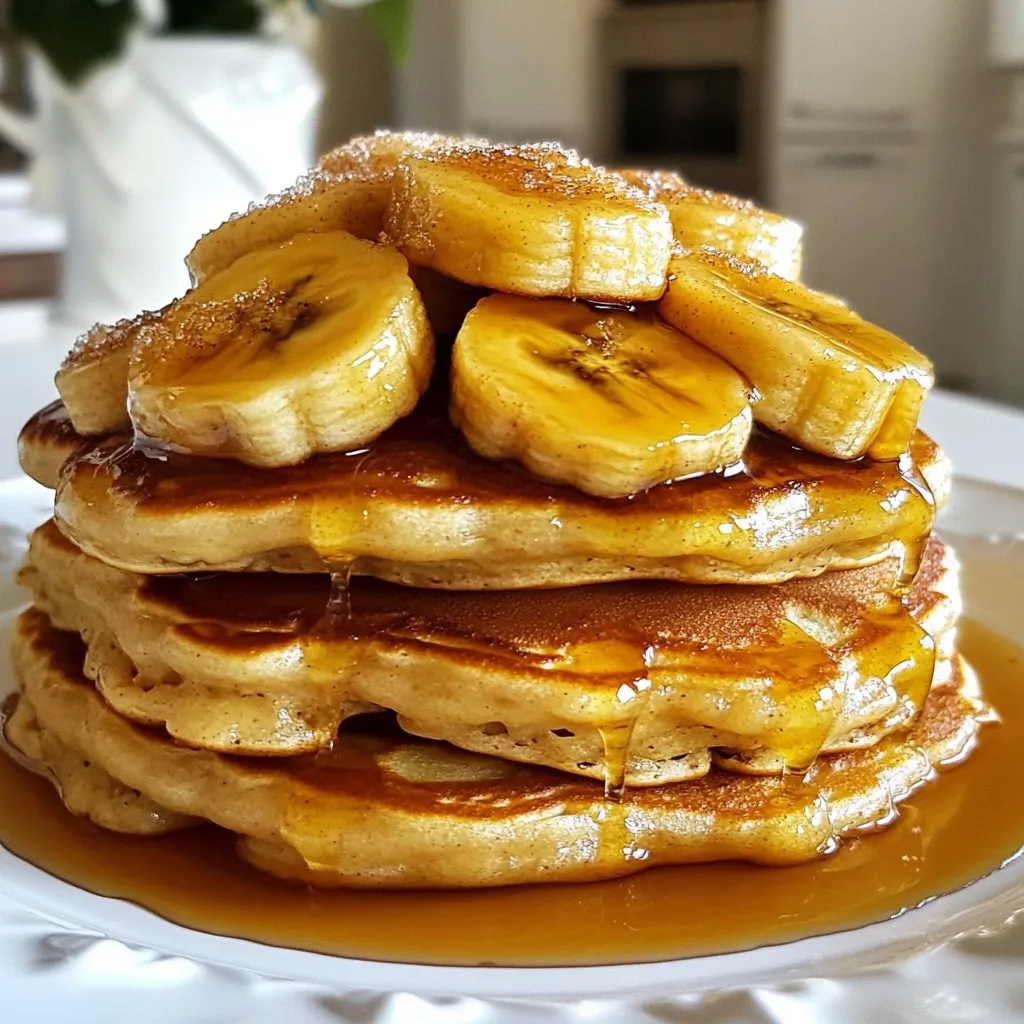
Once the pancakes are cooked, stack them on a plate. Top each pancake with the warm caramelized bananas. Drizzle with maple syrup for a sweet finish. Enjoy your delicious creation!
Tips & Tricks
Perfecting Pancake Batter
To make great pancakes, you must not overmix the batter. Overmixing makes pancakes tough. You want a light and fluffy texture, so mix until just combined. A few lumps are okay. The batter should be thick but pourable. If it’s too thick, add a splash of milk. If it’s too thin, add a little flour.
Achieving Caramelized Bananas
To caramelize bananas perfectly, slice them evenly. Use ripe bananas for the best flavor. Heat a skillet to medium and melt butter. Add bananas, then sprinkle with brown sugar. The sugar helps them brown and adds sweetness. Cook for about 2-3 minutes. If you don’t have brown sugar, try honey or maple syrup. Both work well and give a unique flavor.
Serving Suggestions
Maple syrup is a classic choice for pancakes. Try warm syrup for the best taste. You can also use flavored syrups like vanilla or caramel. For extra flair, add toppings like whipped cream or chopped nuts. Fresh fruit, like strawberries or blueberries, can brighten the dish. A sprinkle of cinnamon on top makes it look and taste great.
Pro Tips
- Use Ripe Bananas: The riper the bananas, the sweeter and more flavorful your pancakes will be. Look for bananas with a few brown spots for optimal sweetness.
- Don’t Overmix: When combining wet and dry ingredients, mix until just combined. Overmixing can lead to dense pancakes, so it’s okay if there are some lumps.
- Keep Pancakes Warm: As you cook the pancakes, keep them warm in a low oven (around 200°F or 93°C) to ensure they stay fluffy and warm until serving.
- Add a Pinch of Salt: A small pinch of salt enhances the flavors of the pancakes and balances the sweetness, giving you a well-rounded taste.
Variations
Different Banana Pancake Flavors
You can easily change the flavor of your pancakes. Here are some fun ideas:
– Adding chocolate chips or nuts: Just mix in a handful of chocolate chips or chopped nuts into the batter. This adds a nice crunch and sweetness.
– Incorporating other fruits: Try using berries like blueberries or strawberries. They add a fresh taste and color to your dish.
Healthy Ingredient Alternatives
You can make these pancakes healthier with a few simple swaps:
– Using whole wheat or gluten-free flour: Whole wheat flour adds fiber and nutrients. Gluten-free flour works well if you have a gluten allergy.
– Dairy-free milk options: You can use almond milk or oat milk instead of regular milk. They keep the pancakes creamy without dairy.
Cooking Methods
Change up how you cook your pancakes for fun variations:
– Making pancake bites or mini pancakes: Use less batter for smaller, bite-sized pancakes. Kids love them, and they are great for snacks!
– Using non-stick vs. cast-iron skillets: A non-stick skillet makes flipping easy. A cast-iron skillet gives a nice, even heat for perfect browning. Choose what works best for you!
Storage Info
Storing Leftover Pancakes
To keep your pancakes fresh, store them in the fridge. Place the pancakes on a plate and cover them with plastic wrap. This helps keep moisture in. You can also use an airtight container. Leftover pancakes stay good for about three days in the fridge.
If you want to save pancakes for later, freezing is the way to go. First, let the pancakes cool completely. Then, stack them with a piece of parchment paper in between each one. This prevents them from sticking together. Wrap the stack tightly in foil or place it in a freezer bag. Pancakes can last for up to two months in the freezer.
Reheating Methods
When it’s time to eat your pancakes, you have options for reheating. The microwave is quick. Place the pancakes on a microwave-safe plate and cover them with a damp paper towel. Heat for about 20-30 seconds, or until warm. This method is good for keeping moisture.
If you want crispy edges, use the stovetop. Heat a skillet over low heat. Add a tiny bit of butter. Place the pancakes in the skillet and heat for a couple of minutes on each side. This method gives you warm, crispy pancakes. Enjoy every bite!
FAQs
How do I make the pancakes fluffier?
To make your pancakes fluffier, follow these tips:
– Use fresh baking powder. Old powder may not rise well.
– Avoid overmixing the batter. Stir just until combined for air pockets.
– Let the batter rest for a few minutes. This helps the gluten relax.
– Use buttermilk instead of regular milk. The acidity adds a light texture.
Can I use frozen bananas for this recipe?
Yes, you can use frozen bananas. Here are the pros and cons:
Pros:
– Frozen bananas are often riper and sweeter.
– They are easy to store and use later.
Cons:
– Frozen bananas can be mushy once thawed.
– They may not caramelize as well as fresh ones.
What can I serve with caramelized banana pancakes?
You can serve these pancakes with:
– Maple syrup for sweetness.
– Fresh fruit like berries or extra banana slices.
– Yogurt for creaminess and added protein.
– A side of crispy bacon for salty contrast.
– Coffee or hot chocolate for a warm drink option.
You now have a simple way to make caramelized banana pancakes. We covered the main ingredients, such as flour and ripe bananas. You learned how to prepare the batter and caramelize bananas for flavor. I shared tips to help perfect your pancakes and several fun variations to try.
With these steps, you can impress friends and family. Enjoying pancakes is all about having fun in the kitche


