Cheesy Baked Macaroni and Cheese Comfort Food Delight

Get ready for pure comfort with my cheesy baked macaroni and cheese! This dish is rich, creamy, and so satisfying. With simple steps and everyday ingredients, you can create a meal that warms the heart. Whether you’re cooking for family or enjoying a solo night in, this recipe will impress everyone. Join me as we dive into the delicious details, from quality ingredients to expert tips that elevate your mac and cheese game!
Why I Love This Recipe
- Comforting Flavor: This cheesy baked macaroni and cheese offers a rich, creamy taste that is perfect for cozy nights in.
- Simple Ingredients: Using pantry staples like pasta, cheese, and milk makes this recipe easy to prepare anytime.
- Customizable: You can easily add vegetables or proteins to the dish, making it versatile for different tastes.
- Crispy Topping: The breadcrumb topping adds a delightful crunch that perfectly complements the creamy pasta.
Ingredients
Complete Ingredient List
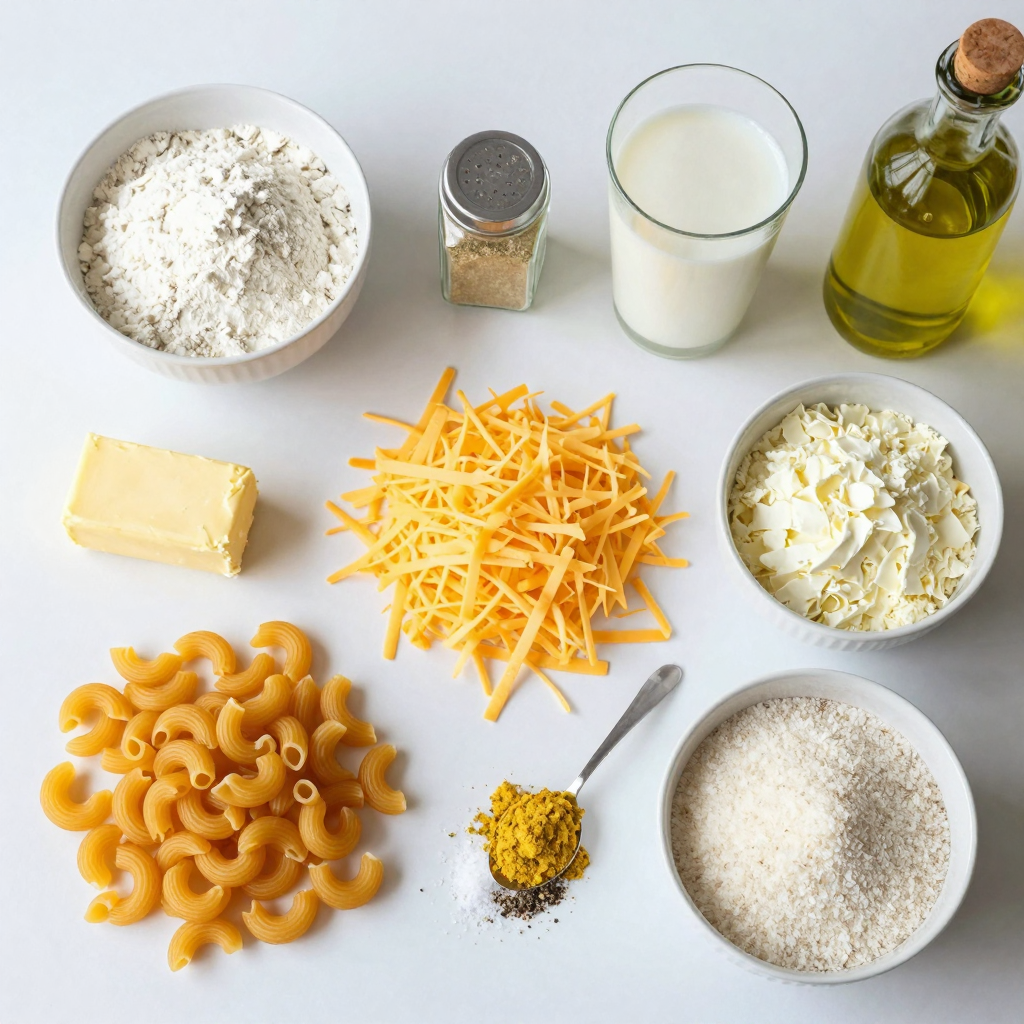
To make cheesy baked macaroni and cheese, you will need:
- 8 oz elbow macaroni
- 2 cups shredded sharp cheddar cheese
- 1 cup shredded mozzarella cheese
- 4 tablespoons unsalted butter
- 1/4 cup all-purpose flour
- 2 cups milk (whole or 2%)
- 1 teaspoon garlic powder
- 1 teaspoon mustard powder
- Salt and pepper to taste
- 1/2 cup breadcrumbs
- 2 tablespoons olive oil
- 1/4 teaspoon paprika (optional for garnish)
Quality of Ingredients
Choosing the right ingredients makes a big difference. I love using sharp cheddar cheese. It adds a deep flavor that really stands out. Mozzarella brings a nice gooey texture that everyone loves. For pasta, I recommend classic elbow macaroni. Its shape holds the cheese sauce well.
Using fresh ingredients always enhances taste. Fresh butter and whole milk create a richer sauce. If you can, find high-quality cheese from a local shop. The flavor will shine through in every bite.
Ingredient Substitutions
You can easily swap some ingredients if needed. For cheese, feel free to use gouda for a smoky taste or pepper jack for a bit of spice. If you want a lighter option, try low-fat cheese.
For gluten-free needs, use gluten-free pasta and flour in the recipe. This way, you can enjoy the same creamy goodness without worry. Don’t hesitate to get creative with your ingredients!

Step-by-Step Instructions
Preparation Steps
First, preheat your oven to 350°F (175°C). While the oven warms up, cook the elbow macaroni. Follow the package instructions and boil it until it’s al dente. This usually takes about 7-8 minutes. Drain the pasta and set it aside.
Next, you need to make the roux. In a large saucepan, melt 4 tablespoons of unsalted butter over medium heat. Stir in 1/4 cup of all-purpose flour. Cook this mixture for 1-2 minutes, stirring constantly. This step helps to create a thick base for your cheese sauce.
Combining Ingredients
Now, gradually whisk in 2 cups of milk. I like to use whole or 2% milk for a creamier texture. Ensure there are no lumps as you whisk. Continue to cook the sauce, stirring often for about 5-7 minutes until it thickens. Once thickened, take it off the heat.
Stir in 1 teaspoon of garlic powder, 1 teaspoon of mustard powder, salt, and pepper to taste. Now, add the 2 cups of shredded sharp cheddar cheese and 1 cup of shredded mozzarella cheese. Mix until the cheese melts and combines well with the sauce.
Fold the cooked macaroni into the cheese sauce. Make sure every piece of pasta gets a nice coat of that creamy goodness.
Baking Instructions
Pour your macaroni and cheese mixture into a greased 9×13 inch baking dish. In a small bowl, mix 1/2 cup of breadcrumbs with 2 tablespoons of olive oil. Mix until the breadcrumbs are well coated. Sprinkle this mixture evenly on top of the macaroni.
Now, bake in your preheated oven for 25-30 minutes. You want the top to turn golden brown and crispy. If you like, sprinkle a little paprika on top for extra color before serving. Enjoy your delicious creation!
Pro Tips
- Use Sharp Cheddar: For a more robust flavor, opt for sharp cheddar cheese. It adds a deeper taste to your macaroni and cheese.
- Make it Creamy: For an extra creamy texture, add a splash of cream or sour cream to the cheese sauce before mixing in the macaroni.
- Breadcrumb Variations: Experiment with different types of breadcrumbs, such as panko or seasoned breadcrumbs, for added crunch and flavor on top.
- Boost the Flavor: Incorporate your favorite spices or herbs, such as cayenne pepper or thyme, to elevate the dish with unique flavors.
Tips & Tricks
How to Achieve Creamy and Cheesy Texture
To make your macaroni and cheese creamy, focus on your cheese choices. Sharp cheddar and mozzarella work best. They melt well and give that gooey texture we all love. Use whole milk or 2% milk for a rich base. The thicker the milk, the creamier your sauce. Make sure to whisk the sauce well. This helps prevent lumps. Adding a bit of cream cheese or sour cream can boost creaminess too.
Common Mistakes to Avoid
One common mistake is overcooking the pasta. Cook it just until al dente; it should have a slight bite. If you cook it too long, the pasta becomes mushy after baking. Another mistake is not seasoning the cheese sauce enough. Taste as you go! Salt and pepper can enhance the flavor greatly. Lastly, don’t skip the breadcrumb topping. It adds a lovely crunch that balances the creamy sauce.
Enhancing Flavor Profiles
To spice things up, try adding garlic powder or mustard powder, as stated in the recipe. These ingredients elevate the flavor without overpowering it. You can also mix in some herbs like thyme or rosemary for a fresh taste. For a kick, add a pinch of cayenne pepper or some diced jalapeños. Incorporating cooked bacon or ham can also give you a savory twist. Experiment with different cheeses, like gouda or pepper jack, for unique flavors.

Variations
Adding Protein
You can easily boost your macaroni and cheese by adding protein. Bacon adds a nice crunch and smoky flavor. Cook it until crispy, crumble it, and mix it in. You can also add cooked chicken for a heartier meal. Shredded rotisserie chicken works well. For a fun twist, try adding diced ham. These proteins make your dish filling and tasty.
Vegetable Add-ins
Adding vegetables is a smart way to make your mac and cheese healthier. Spinach is a great choice. It wilts down nicely and adds color. Broccoli florets also work well. Steam them until tender and mix them in before baking. Cauliflower is another option. It adds creaminess without the extra calories. These veggies will make your dish vibrant and nutritious.
Different Cheese Blends
Using different cheeses can elevate your macaroni and cheese. Gouda gives a rich, smoky flavor that pairs perfectly with the pasta. Pepper jack adds a spicy kick. Mixing sharp cheddar with cream cheese can create a creamy texture. You can also experiment with fontina or Monterey Jack for a unique taste. Blending different cheeses adds depth and makes each bite exciting.
Storage Info
Refrigeration Tips
Once you enjoy your cheesy baked macaroni and cheese, store the leftovers in the fridge. Use an airtight container to keep it fresh. It lasts about 3 to 5 days. If you notice any changes in smell or texture, it’s best to toss it out.
Freezing Instructions
You can freeze this dish if you want to save some for later. Let it cool completely before freezing. Place it in a freezer-safe container or wrap it tightly in plastic wrap. It will stay good for about 2 to 3 months. To reheat, thaw it in the fridge overnight.
Reheating Tips
To reheat your macaroni and cheese, use the oven for the best texture. Preheat the oven to 350°F (175°C). Place it in a baking dish and cover with foil. Heat it for about 20 minutes, or until warm. If you want a crispy top, remove the foil for the last 5 minutes. You can also use the microwave, but this may make it less creamy.
FAQs
How to make cheesy baked macaroni and cheese without baking?
You can skip baking by making a stovetop version. Cook the macaroni as usual and make the cheese sauce. Mix them together in a pot. Stir until the cheese melts and coats the pasta. This gives you creamy, cheesy mac without an oven.
Can I use whole wheat macaroni?
Yes, whole wheat macaroni works well. It adds more fiber and a nutty taste. Just cook it a bit longer than regular macaroni. Keep an eye on it to get the right texture.
What type of cheese is best for macaroni and cheese?
Sharp cheddar is a favorite for its strong flavor. I also love mixing in mozzarella for creaminess. You can try gouda or fontina for something different. Feel free to mix and match to find your favorite combo!
Tips for making macaroni and cheese ahead of time?
Prepare the macaroni and cheese as usual, then cool it down. Store it in the fridge for up to two days. When ready to eat, reheat it on the stove or in the oven. Add a splash of milk to keep it creamy.
In this post, we covered how to make delicious baked macaroni and cheese. I shared a complete ingredient list, tips for quality, and substitutions. You learned step-by-step instructions, important tips, and variations to try. I also included storage tips for leftover mac and cheese.
Remember, cooking is about experiments and having fun. Enjoy making your dish unique. अब, it’s time to get cooking and enjoy every cheesy bite!

Cheesy Baked Macaroni and Cheese
Ingredients
8 oz elbow macaroni
2 cups shredded sharp cheddar cheese
1 cup shredded mozzarella cheese
4 tablespoons unsalted butter
1/4 cup all-purpose flour
2 cups milk (whole or 2%)
1 teaspoon garlic powder
1 teaspoon mustard powder
Salt and pepper to taste
1/2 cup breadcrumbs
2 tablespoons olive oil
1/4 teaspoon paprika (optional for garnish)
Instructions
Preheat your oven to 350°F (175°C).
Cook the elbow macaroni according to package instructions until al dente. Drain and set aside.
In a large saucepan, melt the butter over medium heat. Stir in the flour and cook for 1-2 minutes to create a roux.
Gradually whisk in the milk, ensuring there are no lumps. Continue to cook, stirring frequently, until the sauce thickens (around 5-7 minutes).
Once thickened, remove from heat, and stir in the garlic powder, mustard powder, salt, and pepper. Add the cheddar and mozzarella cheeses, stirring until fully melted and combined.
Fold the cooked macaroni into the cheese sauce until all pasta is coated.
Pour the macaroni and cheese mixture into a greased 9×13 inch baking dish.
In a small bowl, combine the breadcrumbs with olive oil and mix until well coated. Sprinkle the breadcrumb mixture evenly over the macaroni and cheese.
Bake in the preheated oven for 25-30 minutes, or until the top is golden brown and crispy.
If desired, sprinkle a little paprika on top for added color before serving.
Prep Time, Total Time, Servings: 10 minutes | 45 minutes | Serves 4-6
– Presentation Tips: Serve the mac and cheese in bowls or spread it on a platter. Garnish with a sprinkle of fresh parsley or chives for a pop of color!

Cheesy Baked Macaroni and Cheese
Ingredients
- 8 oz elbow macaroni
- 2 cups shredded sharp cheddar cheese
- 1 cup shredded mozzarella cheese
- 4 tablespoons unsalted butter
- 1 4 cup all-purpose flour
- 2 cups milk (whole or 2%)
- 1 teaspoon garlic powder
- 1 teaspoon mustard powder
- to taste salt and pepper
- 1 2 cup breadcrumbs
- 2 tablespoons olive oil
- 1 4 teaspoon paprika (optional for garnish)
Instructions
- Preheat your oven to 350°F (175°C).
- Cook the elbow macaroni according to package instructions until al dente. Drain and set aside.
- In a large saucepan, melt the butter over medium heat. Stir in the flour and cook for 1-2 minutes to create a roux.
- Gradually whisk in the milk, ensuring there are no lumps. Continue to cook, stirring frequently, until the sauce thickens (around 5-7 minutes).
- Once thickened, remove from heat, and stir in the garlic powder, mustard powder, salt, and pepper. Add the cheddar and mozzarella cheeses, stirring until fully melted and combined.
- Fold the cooked macaroni into the cheese sauce until all pasta is coated.
- Pour the macaroni and cheese mixture into a greased 9x13 inch baking dish.
- In a small bowl, combine the breadcrumbs with olive oil and mix until well coated. Sprinkle the breadcrumb mixture evenly over the macaroni and cheese.
- Bake in the preheated oven for 25-30 minutes, or until the top is golden brown and crispy.
- If desired, sprinkle a little paprika on top for added color before serving.


![Let’s dive into the simple ingredients that make this dish shine. Each element plays a role in creating a tasty and healthy meal. Here’s what you need: - 4 cod fillets (about 6 oz each) - 2 tablespoons olive oil - 2 lemons (one for zest and juice, one for slices) - 3 cloves garlic, minced - 1 teaspoon dried oregano - 1 teaspoon dried thyme - 1 teaspoon paprika - Salt and pepper to taste - Fresh parsley, chopped (for garnish) Cod fillets are the star here. They have a mild taste that works well with the bright lemon and herbs. Olive oil adds richness and helps the fish stay moist. Garlic brings a punch of flavor, and the herbs add freshness. Using fresh lemons is key. You’ll use one for zest and juice, which brightens up the dish. The other lemon gets sliced and placed on top of the cod for extra flavor and a nice look. Dried oregano and thyme give depth to the dish. Paprika adds a hint of warmth. Finally, a sprinkle of salt and pepper rounds it all out. These ingredients come together to create a dish that is both light and satisfying. If you want to see how these ingredients blend, check out the Full Recipe for step-by-step instructions. 1. Preheat the oven: Start by setting your oven to 400°F (200°C). This ensures even cooking for our cod. 2. Prepare the marinade: In a small bowl, mix 2 tablespoons of olive oil, 3 minced garlic cloves, the zest of one lemon, and the juice from that same lemon. Add 1 teaspoon each of dried oregano, thyme, and paprika. Finally, season with salt and pepper to taste. Stir it well. 3. Coat the cod fillets: Place your 4 cod fillets in a baking dish. Pour the lemon herb marinade over each fillet. Make sure they are all well coated in that tasty mix. 1. Arrange lemon slices: Take the other lemon and slice it. Place the lemon slices on top of each cod fillet. This adds a fresh, zesty kick while baking. 2. Baking time and temperatures: Slide the baking dish into your preheated oven. Bake for 15-20 minutes. The cod is ready when it turns opaque and flakes easily with a fork. 1. Rest and garnish before serving: Once the cod is done, take it out and let it rest for a couple of minutes. This helps the juices settle. Before serving, sprinkle freshly chopped parsley on top. It adds color and a fresh taste. Feel free to check the [Full Recipe] for more details! Choosing the best cod is key to a tasty dish. Look for cod fillets that are firm and moist. They should have a clean, ocean-like smell. Freshness matters. If you can, buy wild-caught cod for the best flavor. Fresh herbs and citrus add bright notes. Use fresh parsley, thyme, and oregano when possible. They bring out the lemon's zest. Always choose lemons that feel heavy for their size. Juicy lemons will boost your dish. To ensure moist fillets, don’t overcook the cod. Bake just until it is opaque and flakes easily. Set a timer for 15 minutes, then check. If it needs more time, add a few minutes. Adjusting seasoning levels is easy. Taste the marinade before adding it to the cod. If it feels bland, add a pinch more salt or pepper. You can always adjust to match your palate. Pair this dish with sides that complement its light flavors. Roasted vegetables work nicely. Try asparagus or green beans for a fresh touch. A light sauce can elevate the meal. Consider a yogurt dill sauce for creaminess. It adds a nice contrast to the cod. For a bit of crunch, add a side salad. For the full recipe, see the details above. {{image_2}} You can try other white fish instead of cod. Fish like tilapia or haddock work well. They will soak up the lemon and herb flavors nicely. If you want a richer taste, you can substitute cod with salmon. Salmon has more fat, so it stays moist when cooked. The lemon still brightens the dish, making it fresh and tasty. Adding spices can take your baked lemon herb cod to the next level. You might want to try adding cumin or dill to the mix. These spices pair well with lemon, enhancing the dish's flavor. If you love heat, consider making a spicy version. Add chili flakes or fresh jalapeños to the marinade. This twist creates a fun kick that many will enjoy. While baking is easy, you can also grill or pan-sear your cod. Grilling adds a smoky flavor that many people love. Just be sure to keep an eye on it so it doesn't dry out. Air-frying is another great option. It cooks the fish quickly and gives it a nice crust. Each method offers a unique taste and texture, so feel free to experiment. To store leftover cod, let it cool first. Place the cod in an airtight container. Cover it tightly to keep it fresh. You can store it in the fridge for up to three days. Make sure to check for any off smells or changes in texture before eating. If you want to keep cod longer, freezing is a great option. Wrap the cod tightly in plastic wrap or foil. You can also use a freezer-safe bag. This helps prevent freezer burn. Cod can last up to three months in the freezer. When you are ready to use it, remember to thaw it slowly. Place it in the fridge overnight for the best results. To reheat your baked cod, use the oven or a skillet. If you use the oven, preheat it to 350°F (175°C). Place the cod on a baking sheet for about 10 minutes. This keeps it moist and tasty. If you choose a skillet, heat it over medium heat. Add a splash of olive oil and gently warm the cod for about 5 minutes. Avoid high heat to keep the texture nice. Enjoy your flavorful meal again! What can I substitute for cod in this recipe? You can use halibut, haddock, or tilapia as substitutes for cod. Each fish has a mild flavor and similar texture. This ensures your dish remains light and flaky. How do I know when cod is fully cooked? Cod is fully cooked when it turns opaque and flakes easily with a fork. This usually takes 15 to 20 minutes at 400°F. A food thermometer can help; the internal temperature should reach 145°F. Can I prepare the marinade in advance? Yes, you can prepare the marinade a day ahead. Store it in the fridge until you are ready to use it. This allows the flavors to blend nicely. Caloric values per serving Each serving of Baked Lemon Herb Cod contains about 250 calories. This is a healthy option for a balanced meal. Key vitamins and minerals in the dish This dish is rich in protein, vitamin C, and omega-3 fatty acids. Cod provides important nutrients for heart health and overall well-being. Making it gluten-free This recipe is naturally gluten-free. Use gluten-free seasoning blends if you want to add extra flavors without worry. Adjusting for low-sodium diets For a low-sodium version, skip the added salt. Use fresh herbs and lemon juice for flavor without extra salt. This keeps your meal healthy and tasty. This article covered how to make delicious baked cod. You learned about the right ingredients, like fresh cod and herbs. I shared step-by-step instructions for preparing, baking, and serving. We also explored tips for ingredient selection and cooking methods. Remember, cooking should be fun and simple. Experiment with flavors and cooking styles. Whether you stick to cod or try other fish, enjoy the process. Keep these tips in mind for tasty meals every time. Happy cooking!](https://dailydishlab.com/wp-content/uploads/2025/07/2716cd61-27b0-42e4-83ae-f5907d1cee06-768x768.webp)


