

Looking for a quick, tasty treat for your next gathering? Look no further! This Cherry Cheesecake Dip is a crowd favorite and super easy to make. With just three main ingredients, you can whip up a creamy delight that pairs perfectly with graham crackers or fresh fruit. Get ready to impress your friends and family with a dish that’s not only delicious but also loaded with fun flavors. Let’s get started!
Why I Love This Recipe
- Quick and Easy: This dip takes only 10 minutes to prepare, making it a fantastic option for last-minute gatherings.
- Creamy and Delicious: The combination of cream cheese and whipped topping creates a light, fluffy texture that is irresistible.
- Perfect for Sharing: Serve it with graham crackers or fruit slices, making it a fun and interactive dessert for everyone to enjoy.
- Customizable: You can easily swap the cherry pie filling for other fruit flavors, catering to different tastes and preferences.
Ingredients
Main Ingredients Needed
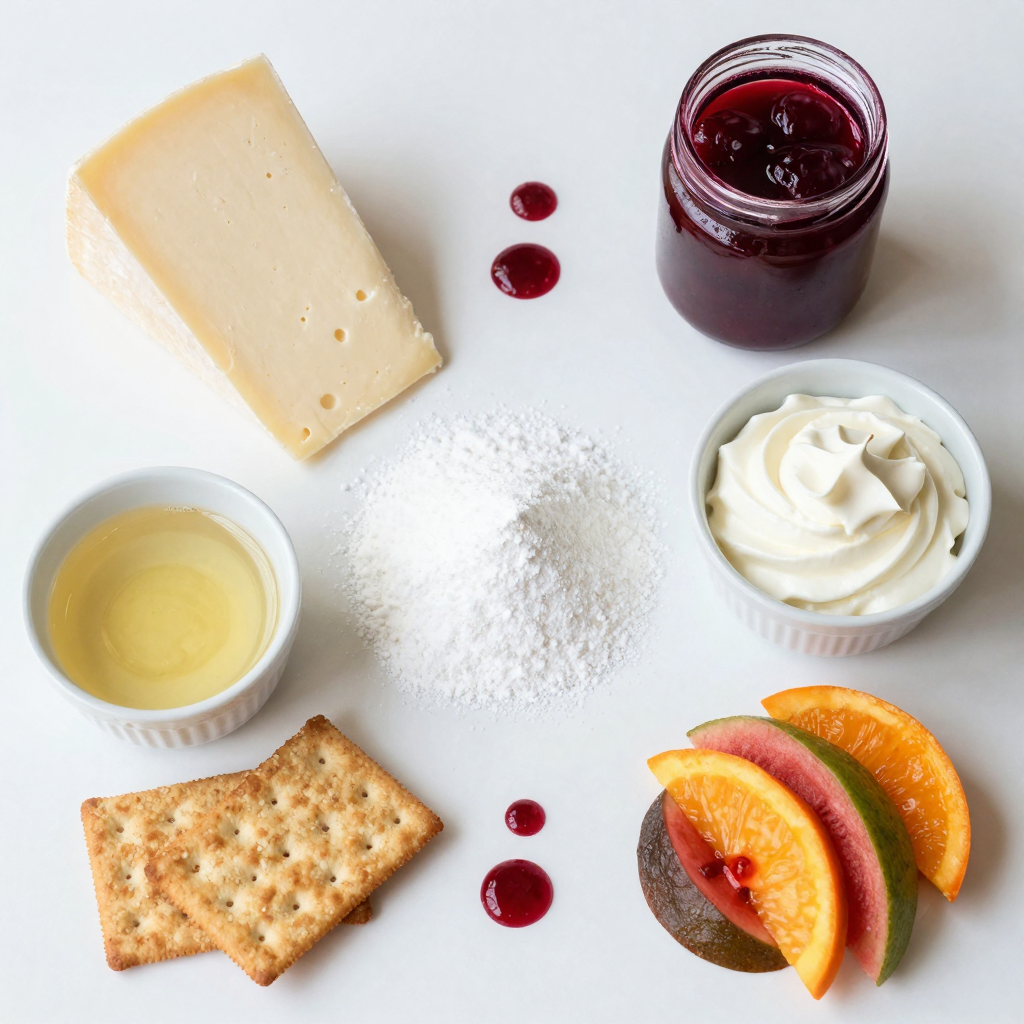
– 8 oz cream cheese
– 1/2 cup powdered sugar
– 1 cup whipped topping
To make this dip, you need three key ingredients. First, use 8 ounces of softened cream cheese. This makes the base rich and creamy. Next, add 1/2 cup of powdered sugar to sweeten the mix. It helps balance the tang from the cream cheese. Finally, fold in 1 cup of whipped topping. This lightens the dip and gives it a fluffy texture.
Optional Ingredients
– 1/2 cup cherry pie filling
– 1/4 teaspoon almond extract
For that classic cheesecake flavor, you can stir in 1/2 cup of cherry pie filling. This adds sweetness and a lovely color. You might also want to add 1/4 teaspoon of almond extract. It gives a nice depth of flavor and pairs well with cherries.
Serving Suggestions
– Graham crackers or fruit slices for dipping
– Additional toppings for garnishing
When it’s time to serve, think about what to use for dipping. Graham crackers work great. Their crunch complements the creamy dip. You can also use fresh fruit slices for a healthier option. To make it look even better, consider garnishing with whole cherries on top. This adds a pop of color and makes your dip even more inviting.
Step-by-Step Instructions
Preparation Steps
To start, you need to mix the cream cheese. Take 8 oz of softened cream cheese and put it in a mixing bowl. Use a hand mixer or stand mixer. Beat it until it is smooth and creamy. This step is key for a great texture.
Next, you will incorporate sugar and vanilla extract. Gradually add in 1/2 cup of powdered sugar and 1/2 teaspoon of vanilla extract. Mix until everything is well blended and there are no lumps. This sweetness is what makes the dip so good!
Assembling the Dip
Now it’s time to fold in the whipped topping. Take 1 cup of whipped topping, like Cool Whip, and gently fold it into the cream cheese mixture. Make sure it stays light and fluffy. This adds a great texture to your dip.
Then, stir in the cherry pie filling. Carefully add in 1/2 cup of cherry pie filling along with 1/4 teaspoon of almond extract. Stir gently to make sure the cherries are spread throughout the dip. This gives it a lovely cherry flavor.
Chilling and Serving
After mixing, transfer the dip to a serving bowl. Smooth the top with a spatula. If you like, you can swirl some extra cherry pie filling on top for a pop of color.
Now, refrigerate the dip for about 30 minutes. This helps the flavors set and chill. When you are ready to serve, pair it with graham crackers or fruit slices for dipping. Enjoy this easy, tasty treat!
Pro Tips
- Use Room Temperature Cream Cheese: Make sure your cream cheese is softened to room temperature for a smooth and creamy dip without lumps.
- Experiment with Flavors: Feel free to add different extracts like vanilla or coconut for a unique twist on the classic cherry cheesecake flavor.
- Chill Before Serving: Allowing the dip to chill for at least 30 minutes enhances the flavors and makes it easier to scoop.
- Garnish for Presentation: Top the dip with extra cherry pie filling and whole cherries for an attractive presentation that invites guests to dig in.
Tips & Tricks
Ensuring a Smooth Consistency
To avoid lumps in the cream cheese, make sure it is softened well. Cold cream cheese is hard to mix. I leave it out for about 30 minutes before starting. If it’s soft, it blends easily. Use a hand mixer or stand mixer for the best results. Mix until it is smooth and creamy.
When you add the whipped topping, fold it in gently. This keeps the mixture light and fluffy. Use a spatula to lift and turn the dip. Don’t stir too hard, or you’ll lose air. You want a nice, creamy dip that is easy to scoop.
Flavor Enhancements
You can add different extracts or spices for a fun twist. Try adding extra vanilla or a dash of cinnamon. Almond extract adds a nice depth of flavor. Just remember to keep the amounts small. You don’t want one flavor to overpower the dip.
For toppings, think beyond cherry pie filling. Fresh fruit like strawberries or blueberries adds a fresh taste. You could also sprinkle crushed graham crackers on top for a nice crunch. These small changes can make a big difference.
Party Preparation Tips
To make your party stress-free, consider making this dip ahead of time. You can prepare it a day before. Just keep it in the fridge until you’re ready to serve. This gives the flavors time to blend together.
When serving, use a colorful bowl to catch the eye. Surround it with graham crackers and fresh fruit slices. This not only looks good but also offers variety. You can even add whole cherries on top for a pop of color. This dip always draws a crowd!
Variations
Alternative Fruit Options
You can easily switch up the fruit in this dip. Try using strawberry or blueberry pie filling instead of cherry. Each fruit brings its own flavor and makes the dip unique. Fresh fruit is another fun choice. Slices of bananas or strawberries add color and taste. You can even mix different fruits for a fun twist.
Dietary Adaptations
If you need gluten-free options for dipping, use rice cakes or gluten-free crackers. These work well and keep the dip tasty. For a vegan option, substitute cream cheese with a vegan cream cheese. Use a coconut-based whipped topping instead of regular whipped cream. These changes keep the dip delicious and suitable for everyone.
Flavor Combinations
Want to add some exciting flavors? Mix in a dash of cinnamon or a hint of cocoa powder. These little twists can make the dip even more special. You could also try adding crushed nuts for a crunchy texture. Think about folding in some crushed cookies for a fun surprise. Each idea can take your dip to a new level!
Storage Info
Proper Storage Techniques
To keep your cherry cheesecake dip fresh, use an airtight container. Glass or plastic containers work well. Make sure to seal it tightly. This step keeps out air and prevents drying. If you have leftovers, scoop them into the container right after serving. Don’t let it sit out too long.
Shelf Life
This dip lasts about 3 to 5 days in the fridge. If you want to enjoy it longer, consider freezing it. However, freezing may change its texture. Check for signs of spoilage before eating. If you see mold or smell something sour, it’s best to throw it away. Trust your senses—they won’t steer you wrong!
Reheating and Refreshing
You don’t need to heat this dip, but you can refresh it. If it thickens in the fridge, add a splash of milk or extra whipped topping. Mix it well until smooth. This tip brings back the creamy texture. Serve it chilled for the best taste.
FAQs
Can I use low-fat cream cheese?
Yes, you can use low-fat cream cheese. It reduces calories and fat. However, it may alter the dip’s taste and texture. Low-fat options can be less creamy. If you prefer a light dip, it’s a good choice. Just mix it well to avoid lumps.
How long can I make this dip in advance?
You can make this dip a day ahead. It tastes even better after chilling. Store it in the fridge until you’re ready to serve. This helps all the flavors mix well. Don’t forget to cover it tightly.
Is there a gluten-free option for dipping?
Yes! Use gluten-free graham crackers or rice cakes. Fresh fruit slices work great too. Strawberries, apples, or bananas are tasty choices. They add color and nutrition. Choose what you enjoy most for a fun dip experience.
This dip is easy to make and tasty for events. You only need a few ingredients, like cream cheese and whipped topping. It’s fun to add your favorite fruits or flavors for a twist. Remember to chill it well for the best taste. Store any leftovers in a good container. Try different fruits to keep it fresh and exciting. You have many ways to enjoy this dip, so explore your options! Enjoy making and sharing this creamy delight with friends and family.


