
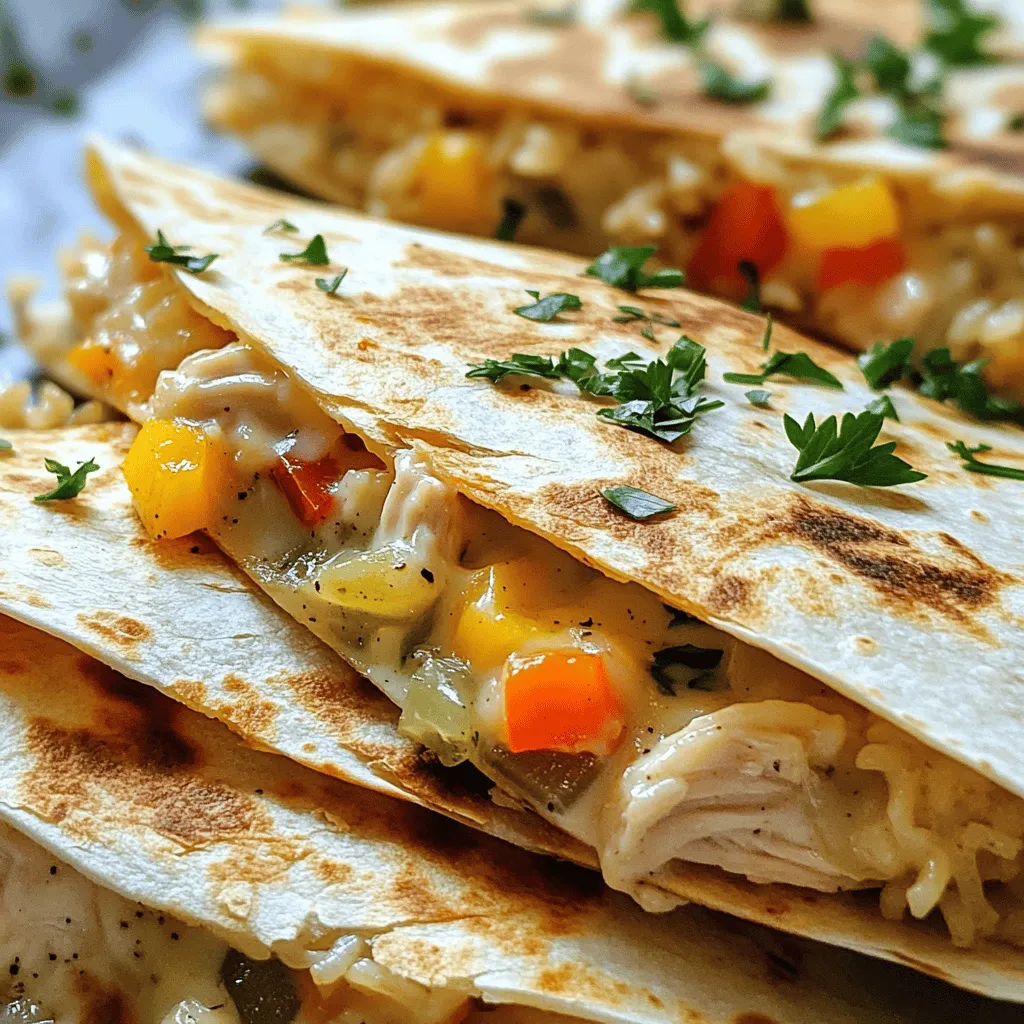
If you’re craving a warm, cheesy treat, you’re in for a real delight! The Chicken and Rice Skillet Alfredo Quesadilla brings together juicy chicken, fluffy rice, and a creamy Alfredo sauce, all packed in a crisp tortilla. This dish is simple to make and perfect for any meal. Let’s dive into the ingredients and steps to whip up this tasty quesadilla that will impress your family and friends!
Why I Love This Recipe
- Quick and Easy: This dish comes together in just 30 minutes, making it perfect for busy weeknights.
- All-in-One Meal: It combines protein, grains, and cheese in a delicious quesadilla, making it a complete meal.
- Customizable: You can easily modify the ingredients based on what you have on hand or your dietary preferences.
- Kid-Friendly: With its cheesy goodness and familiar flavors, this recipe is sure to please even the pickiest eaters.
Ingredients
Main Ingredients
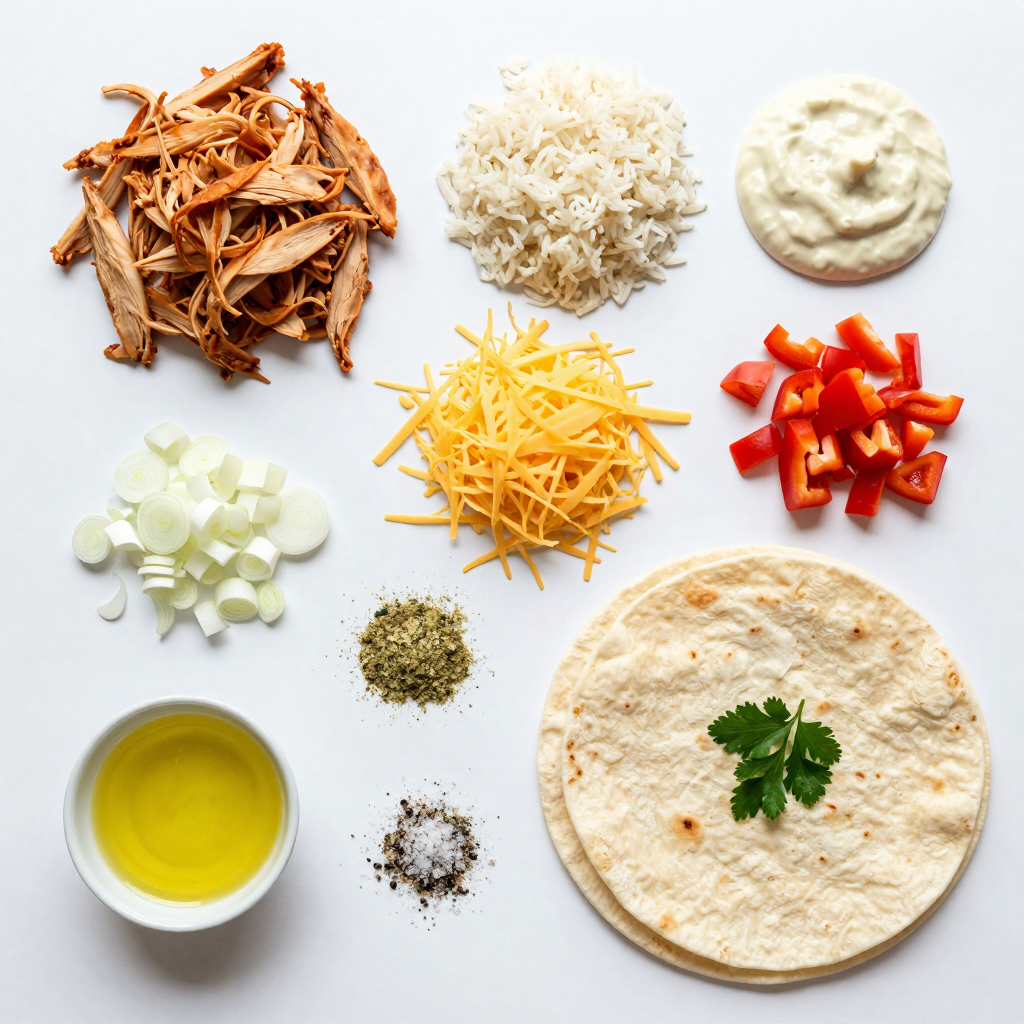
– 2 cups cooked chicken, shredded
– 1 cup cooked rice (white or brown)
– 1 cup Alfredo sauce (store-bought or homemade)
– 4 large flour tortillas
Cheese and Seasonings
– 1 cup shredded mozzarella cheese
– 1/2 cup shredded cheddar cheese
– 1 teaspoon garlic powder
– 1 teaspoon Italian seasoning
– Salt and pepper to taste
Vegetables
– 1 small onion, finely chopped
– 1 bell pepper, diced (any color)
– Fresh parsley, chopped (for garnish)
For this Chicken and Rice Skillet Alfredo Quesadilla, you start with simple and delicious ingredients. First, you need cooked chicken. Shred it into small pieces. You can use leftover chicken or roast some fresh. Next, you want rice. White or brown rice works well. It adds a nice base to your quesadilla.
The Alfredo sauce gives a creamy texture. You can grab a jar from the store or make your own. This sauce is key for flavor. Now, choose your tortillas. Large flour tortillas hold everything together nicely.
Next, cheese! Mozzarella cheese melts beautifully. Cheddar cheese adds a sharp taste. Combine these for a cheesy delight. Garlic powder and Italian seasoning give it a flavorful kick. Don’t forget salt and pepper to taste.
Now let’s add some crunch! Chop a small onion and a bell pepper. They bring freshness and color. Finally, sprinkle fresh parsley on top for a pop of green. This adds flavor and looks great on your plate.
With these ingredients, you will create a tasty and satisfying meal.
Step-by-Step Instructions
Preparing the Vegetables
– Heat olive oil in a skillet.
– Sauté onion and bell pepper until softened.
In a large skillet, I start by heating the olive oil over medium heat. The oil helps to create a nice base for the vegetables. I add in the chopped onion and diced bell pepper. As they cook, they become soft and a bit sweet. This usually takes about 5 to 7 minutes. The smell is wonderful and sets the stage for the rest of the dish.
Mixing the Filling
– Combine chicken, rice, Alfredo sauce, cheeses, and seasonings.
– Season with salt and pepper.
Next, I grab a large bowl. I mix the cooked chicken, rice, Alfredo sauce, mozzarella cheese, and cheddar cheese. I also add in the sautéed onion and bell pepper from earlier. To enhance the flavor, I sprinkle in garlic powder and Italian seasoning. A quick taste test helps me decide how much salt and pepper to add. The mixture should be creamy and packed with flavor.
Cooking the Quesadillas
– Assemble quesadillas in the skillet.
– Cook until golden and crispy on each side.
Now comes the fun part! I wipe out the skillet and return it to medium heat. I take one flour tortilla and place it in the skillet. On one half, I spread a generous scoop of the chicken and rice mixture. Then, I fold the tortilla over. I let it cook for about 3 to 4 minutes until the bottom is golden and crispy. A careful flip is next, cooking the other side for another 3 to 4 minutes. When both sides are golden and the cheese is melted, I remove the quesadilla from the skillet. I repeat this for the rest of the tortillas and filling. Finally, I cut the quesadillas into wedges and garnish them with fresh parsley for a nice touch.Enjoy your cooking adventure!
Pro Tips
- Use Leftover Chicken: If you have leftover rotisserie chicken, it works perfectly for this recipe, saving you time and enhancing the flavor.
- Customize Your Vegetables: Feel free to add other vegetables like spinach, mushrooms, or zucchini for extra nutrition and flavor.
- Perfectly Crispy Quesadilla: For an extra crispy quesadilla, try adding a little butter to the skillet before cooking each one.
- Make It Spicy: Add some diced jalapeños or a sprinkle of red pepper flakes to the filling for a spicy kick.
Tips & Tricks
Perfect Cooking Techniques
To get crispy quesadillas, use medium heat. This helps the tortillas brown nicely. Cook each side for about 3-4 minutes. Press down gently with a spatula to ensure even cooking. Flip carefully to avoid spills. You want the cheese to melt perfectly while the outer layer crisps up.
Customizing Flavor
Add extra spices for a flavor boost. Try chili powder for heat or cumin for warmth. You can also toss in some corn or black beans for added texture. If you like a creamy twist, swap the Alfredo sauce with a spicy ranch or a smoky chipotle sauce. Both give a unique flair to your quesadilla.
Serving Suggestions
Pair your quesadilla with fresh salsa or guacamole on the side. These dips add freshness and flavor. For a fun presentation, cut the quesadillas into wedges and arrange them on a colorful plate. Top with chopped parsley for a pop of color. Your guests will love the look and taste of this dish.
Variations
Protein Options
You can switch up the protein in your quesadilla. Instead of chicken, try turkey or beef. These meats add a different flavor and texture. If you want a vegetarian twist, use black beans or lentils. For seafood lovers, shrimp or crab can make a tasty filling. Just cook the seafood well before adding it to the mix.
Rice Alternatives
Rice is great, but you can use other grains too. Quinoa adds a nutty taste and is full of protein. Cauliflower rice is a low-carb choice that works well in this dish. Each rice type changes the taste, so experiment with jasmine, basmati, or brown rice for new flavors.
Cheese Mixes
Cheese is key to a good quesadilla. While mozzarella and cheddar are classic, don’t be afraid to try others. Pepper jack adds a spicy kick, while gouda brings a nice creaminess. If you’re vegan, use cashew cheese, almond cheese, or nutritional yeast for a cheesy flavor without dairy. The options are endless!
Storage Info
Storing Leftovers
To store leftover quesadillas, let them cool first. Then, wrap each quesadilla in plastic wrap or aluminum foil. Place them in an airtight container in the fridge. This keeps them fresh and tasty. You can store them for up to three days.
Reheating Techniques
When you want to eat the leftovers, the best way to reheat them is in a skillet. Heat the skillet on medium. Add a little oil to keep them crispy. Cook each side for about three minutes. This method keeps them crunchy and warm. If you want to freeze them, place the wrapped quesadillas in a freezer-safe bag. They can last for up to three months.
Preventing Sogginess
To keep your quesadillas crispy during storage, use parchment paper between each one. This helps absorb moisture. You can also layer them with paper towels. Avoid stacking them directly on top of each other. This way, they will stay nice and crispy.
FAQs
How do I make homemade Alfredo sauce?
To make a simple homemade Alfredo sauce, you need just a few ingredients. Here’s a quick recipe:
– 1 cup heavy cream
– 1/2 cup unsalted butter
– 1 cup grated Parmesan cheese
– Salt and pepper to taste
– 1 teaspoon garlic powder (optional)
1. In a saucepan, melt the butter over medium heat.
2. Add the heavy cream and stir until combined.
3. Gradually whisk in the Parmesan cheese until smooth.
4. Season with salt, pepper, and garlic powder if using.
5. Cook for a few minutes until thickened.
This sauce is creamy and rich, perfect for your Chicken and Rice Skillet Alfredo Quesadilla!
Can I prepare the filling ahead of time?
Yes, you can prepare the filling ahead of time. This makes cooking easier on busy days. Here’s how:
– Cook the chicken and rice as directed.
– Mix them with Alfredo sauce, cheeses, and veggies.
– Store the mixture in an airtight container in the fridge for up to 2 days.
When you are ready to cook, just take it out and fill your tortillas. This saves time and makes your meal prep simple!
What can I substitute for tortillas?
If you need alternatives to tortillas, there are great options available. Here are some ideas:
– Use lettuce leaves for a low-carb option.
– Try corn tortillas if you want a gluten-free choice.
– Consider using whole grain wraps for more fiber.
These substitutes work well and can give your Chicken and Rice Skillet Alfredo Quesadilla a new twist!
In this post, we explored how to make delicious chicken quesadillas. We covered key ingredients, like chicken, cheese, and rice, and shared simple steps for cooking. You also learned tips for a perfect crust and ways to customize flavors. Remember, feel free to swap proteins and cheeses to match your taste. These quesadillas are not only tasty but easy to store and reheat. Enjoy making your own version, and share these tips with friends. Happy cooking!


